How CloudFormation works
This topic describes how CloudFormation works and introduces you to the key concepts you'll need to know about as you use it.
Key concepts
When you use CloudFormation, you work with templates and stacks. You create templates to describe your AWS resources and their properties. Whenever you create a stack, CloudFormation provisions the resources that are described in your template.
Templates
A CloudFormation template is a YAML or JSON formatted text file. You can save these files with
any extension, such as .yaml, .json,
.template, or .txt. CloudFormation uses these
templates as blueprints for building your AWS resources. For example, in a template, you can
describe an Amazon EC2 instance, such as the instance type, the AMI ID, block device mappings, and
its Amazon EC2 key pair name. Whenever you create a stack, you also specify a template that
CloudFormation uses to create whatever you described in the template.
For example, if you created a stack with the following template, CloudFormation provisions an
instance with an ami-0ff8a91507f77f867 AMI ID, t2.micro instance
type, testkey key pair name, and an Amazon EBS volume.
YAML
AWSTemplateFormatVersion: 2010-09-09
Description: A sample template
Resources:
  MyEC2Instance:
    Type: AWS::EC2::Instance
    Properties:
      ImageId: ami-0ff8a91507f77f867
      InstanceType: t2.micro
      KeyName: testkey
      BlockDeviceMappings:
        - DeviceName: /dev/sdm
          Ebs:
            VolumeType: io1
            Iops: 200
            DeleteOnTermination: false
            VolumeSize: 20
JSON
{
    "AWSTemplateFormatVersion": "2010-09-09",
    "Description": "A sample template",
    "Resources": {
        "MyEC2Instance": {
            "Type": "AWS::EC2::Instance",
            "Properties": {
                "ImageId": "ami-0ff8a91507f77f867",
                "InstanceType": "t2.micro",
                "KeyName": "testkey",
                "BlockDeviceMappings": [
                    {
                        "DeviceName": "/dev/sdm",
                        "Ebs": {
                            "VolumeType": "io1",
                            "Iops": 200,
                            "DeleteOnTermination": false,
                            "VolumeSize": 20
                        }
                    }
                ]
            }
        }
    }
}
You can also specify multiple resources in a single template and configure these resources to work together. For example, you can modify the previous template to include an Elastic IP address (EIP) and associate it with the Amazon EC2 instance, as shown in the following example:
YAML
AWSTemplateFormatVersion: 2010-09-09
Description: A sample template
Resources:
  MyEC2Instance:
    Type: AWS::EC2::Instance
    Properties:
      ImageId: ami-0ff8a91507f77f867
      InstanceType: t2.micro
      KeyName: testkey
      BlockDeviceMappings:
        - DeviceName: /dev/sdm
          Ebs:
            VolumeType: io1
            Iops: 200
            DeleteOnTermination: false
            VolumeSize: 20
  MyEIP:
    Type: AWS::EC2::EIP
    Properties:
      InstanceId: !Ref MyEC2Instance
JSON
{
    "AWSTemplateFormatVersion": "2010-09-09",
    "Description": "A sample template",
    "Resources": {
        "MyEC2Instance": {
            "Type": "AWS::EC2::Instance",
            "Properties": {
                "ImageId": "ami-0ff8a91507f77f867",
                "InstanceType": "t2.micro",
                "KeyName": "testkey",
                "BlockDeviceMappings": [
                    {
                        "DeviceName": "/dev/sdm",
                        "Ebs": {
                            "VolumeType": "io1",
                            "Iops": 200,
                            "DeleteOnTermination": false,
                            "VolumeSize": 20
                        }
                    }
                ]
            }
        },
        "MyEIP": {
            "Type": "AWS::EC2::EIP",
            "Properties": {
                "InstanceId": {
                    "Ref": "MyEC2Instance"
                }
            }
        }
    }
}
The previous templates are centered around a single Amazon EC2 instance; however, CloudFormation templates have additional capabilities that you can use to build complex sets of resources and reuse those templates in multiple contexts. For example, you can add input parameters whose values are specified when you create a CloudFormation stack. In other words, you can specify a value like the instance type when you create a stack instead of when you create the template, making the template easier to reuse in different situations.
Stacks
When you use CloudFormation, you manage related resources as a single unit called a stack. You create, update, and delete a collection of resources by creating, updating, and deleting stacks. All the resources in a stack are defined by the stack's CloudFormation template. Suppose you created a template that includes an Auto Scaling group, Elastic Load Balancing load balancer, and an Amazon Relational Database Service (Amazon RDS) database instance. To create those resources, you create a stack by submitting the template that you created, and CloudFormation provisions all those resources for you.
Change sets
If you need to make changes to the running resources in a stack, you update the stack. Before making changes to your resources, you can generate a change set, which is a summary of your proposed changes. Change sets allow you to see how your changes might impact your running resources, especially for critical resources, before implementing them.
For example, if you change the name of an Amazon RDS database instance, CloudFormation will create a new database and delete the old one. You will lose the data in the old database unless you've already backed it up. If you generate a change set, you will see that your change will cause your database to be replaced, and you will be able to plan accordingly before you update your stack.
How CloudFormation works
When you use CloudFormation to create your stack, CloudFormation makes underlying service calls to AWS to provision and configure the resources described in your template. You need permission to create these resources. For example, to create EC2 instances by using CloudFormation, you need permissions to create instances. You manage these permissions with AWS Identity and Access Management (IAM).
The calls that CloudFormation makes are all declared by your template. For example, suppose you
have a template that describes an EC2 instance with a t2.micro instance type. When
you use that template to create a stack, CloudFormation calls the Amazon EC2 create instance API and
specifies the instance type as t2.micro. The following diagram summarizes the
CloudFormation workflow for creating stacks.

To create a stack
-
Use a text editor to create a CloudFormation template in YAML or JSON format. The CloudFormation template describes the resources you want and their settings. Use Infrastructure Composer to visualize and validate your template. This helps you make sure that your template is properly structured and free of syntax errors. For more information, see Working with CloudFormation templates.
-
Save the template locally or in an Amazon S3 bucket.
-
Create a CloudFormation stack by specifying the location of your template file, such as a path on your local computer or an Amazon S3 URL. If the template contains parameters, you can specify input values when you create the stack. Parameters allow you to pass in values to your template so that you can customize your resources each time you create a stack.
Note
If you specify a template file stored locally, CloudFormation uploads it to an S3 bucket in your AWS account. CloudFormation creates a bucket for each region in which you upload a template file. The buckets are accessible to anyone with Amazon Simple Storage Service (Amazon S3) permissions in your AWS account. If a bucket created by CloudFormation is already present, the template is added to that bucket.
You can use your own bucket and manage its permissions by manually uploading templates to Amazon S3. Then whenever you create or update a stack, specify the Amazon S3 URL of a template file.
Before provisioning resources, CloudFormation runs pre-deployment validation on your template.
This checks for common errors such as invalid property syntax and resource name conflicts. If
validation fails, the operation stops before any resources are created. Validation runs
automatically on all Create Stack, Update Stack, and Create Change Set operations. To skip
validation, use the DisableValidation parameter. For more information, see Validate stack deployments.
After all the resources have been created, CloudFormation reports that your stack has been created. You can then start using the resources in your stack. If stack creation fails, CloudFormation rolls back your changes by deleting the resources that it created.
Express mode
For faster stack operations during development, use express mode. Express mode completes stack operations as soon as CloudFormation applies the resource configuration, without waiting for resources to fully stabilize. For more information, see Express mode.
Updating a stack with a change set
When you need to update your stack's resources, you can modify the stack's template. You don't need to create a new stack and delete the old one. To update a stack, create a change set by submitting a modified version of the original stack template, different input parameter values, or both. CloudFormation compares the modified template with the original template and generates a change set. The change set lists the proposed changes. After reviewing the changes, you can start the change set to update your stack or you can create a new change set. The following diagram summarizes the workflow for updating a stack.
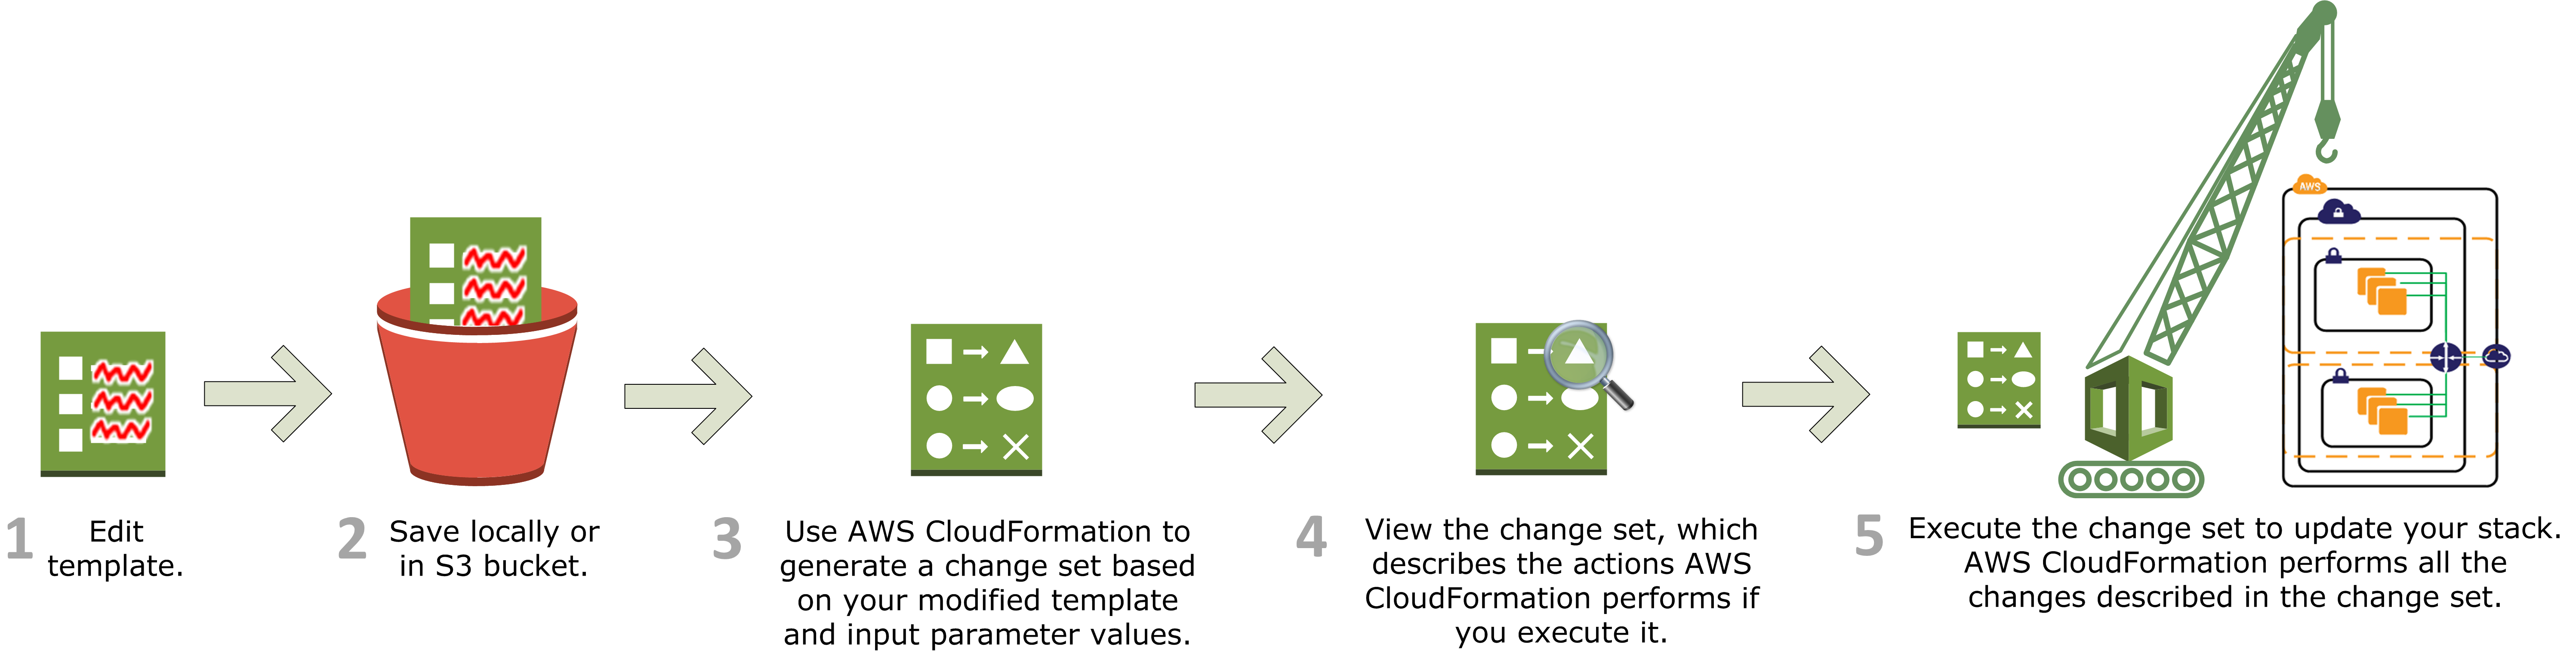
To update a stack with a change set
-
You can modify a CloudFormation stack template by using Infrastructure Composer or a text editor. For more information, see Update your stack template.
As you update your template, keep in mind that updates can cause interruptions. Depending on the resource and properties that you are updating, an update might interrupt or even replace an existing resource. For more information, see Understand update behaviors of stack resources.
-
Save the CloudFormation template locally or in an S3 bucket.
-
Create a change set by specifying the stack that you want to update and the location of the modified template, such as a path on your local computer or an Amazon S3 URL. For more information about creating change sets, see Update CloudFormation stacks using change sets.
Note
If you specify a template that's stored on your local computer, CloudFormation automatically uploads your template to an S3 bucket in your AWS account.
-
View the change set to check that CloudFormation will perform the changes that you expect. For example, check whether CloudFormation will replace any critical stack resources. You can create as many change sets as you need until you have included the changes that you want.
Important
Change sets don't indicate whether your stack update will be successful. For example, a change set doesn't check if you will surpass an account quota, if you're updating a resource that doesn't support updates, or if you have insufficient permissions to modify a resource, which can cause a stack update to fail.
-
Initiate the change set that you want to apply to your stack. CloudFormation updates your stack by updating only the resources that you modified and signals that your stack has been successfully updated. If the stack updates fails, CloudFormation rolls back changes to restore the stack to the last known working state.
Ways to get started with CloudFormation
To create a hello world CloudFormation stack with the console, see Creating your first stack.
For guided learning, try the Getting Started with CloudFormation
