Tutorial: Restoring a DB cluster from a DB cluster snapshot using the Amazon RDS console
In this tutorial, you restore a DB cluster from a DB cluster snapshot using the Amazon RDS console. When you restore a DB cluster from a snapshot using the AWS Management Console, the primary (writer) DB instance is also created.
Note
While the primary DB instance is being created, it appears as a reader instance, but after creation it's a writer instance.
To restore a DB cluster from a DB cluster snapshot
Sign in to the AWS Management Console and open the Amazon RDS console at https://console.aws.amazon.com/rds/
. -
In the navigation pane, choose Snapshots.
-
Choose the DB cluster snapshot that you want to restore from.
-
For Actions, choose Restore snapshot.

The Restore snapshot page appears.
-
Under DB instance settings, do the following:
-
Use the default setting for DB engine.
-
For Available versions, choose a MySQL–8.0 compatible version, such as Aurora MySQL 3.04.0 (compatible with MySQL 8.0.28).

-
-
Under Settings, for DB instance identifier enter the unique name that you want to use for the restored DB instance, for example
my-80.Note
To create the DB cluster identifier, Amazon RDS appends
-clusterto the DB instance identifier you specify. -
Under Connectivity, use the default settings for the following:
-
Virtual private cloud (VPC)
-
DB subnet group
-
Public access
-
VPC security group (firewall)
-
-
Choose the DB instance class.
For this tutorial, choose Burstable classes (includes t classes), and then choose db.t3.medium.
Note
We recommend using the T DB instance classes only for development and test servers, or other non-production servers. For more details on the T instance classes, see DB instance class types.

-
For Database authentication, use the default setting.
-
For Encryption, use the default settings.
If the source DB cluster for the snapshot was encrypted, the restored DB cluster is also encrypted. You can't make it unencrypted.
-
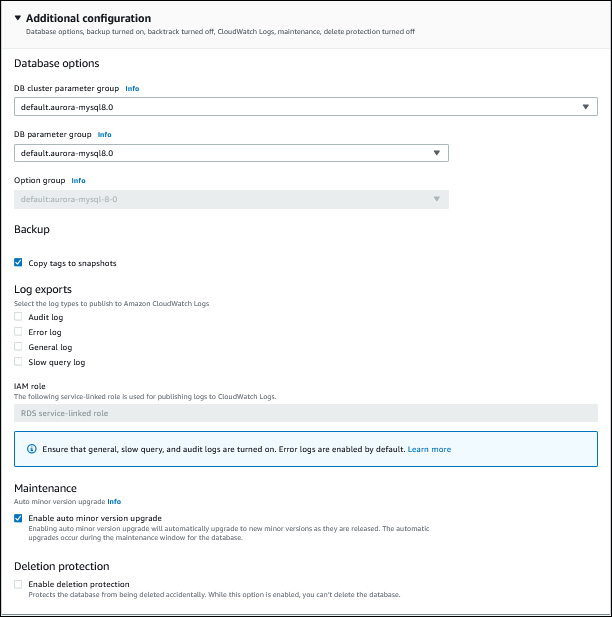
Expand Additional configuration at the bottom of the page.

-
Make the following choices:
-
For this tutorial, use the default value for DB cluster parameter group.
-
For this tutorial, use the default value for DB parameter group.
-
For Log exports, select all of the check boxes.
-
For Deletion protection, select the Enable deletion protection check box.
-
-
Choose Restore DB instance.
The Databases page displays the restored DB cluster, with a status of Creating.

While the primary DB instance is being created, it appears as a reader instance, but after creation it's a writer instance.