Mit dem IVS iOS Broadcast SDK veröffentlichen und abonnieren
Dieser Abschnitt führt Sie durch die Schritte zur Veröffentlichung und zum Abonnieren einer Stufe mithilfe Ihrer iOS-App.
Ansichten erstellen
Wir beginnen mit der automatisch erstellten ViewController.swift-Datei, um AmazonIVSBroadcast zu importieren und dann fügen wir etwas @IBOutlets hinzu zum Verlinken:
import AmazonIVSBroadcast

class ViewController: UIViewController {

    @IBOutlet private var textFieldToken: UITextField!
    @IBOutlet private var buttonJoin: UIButton!
    @IBOutlet private var labelState: UILabel!
    @IBOutlet private var switchPublish: UISwitch!
    @IBOutlet private var collectionViewParticipants: UICollectionView!
Jetzt erstellen wir diese Ansichten und verknüpfen sie in Main.storyboard. Hier ist die Ansichtsstruktur, die wir verwenden werden:
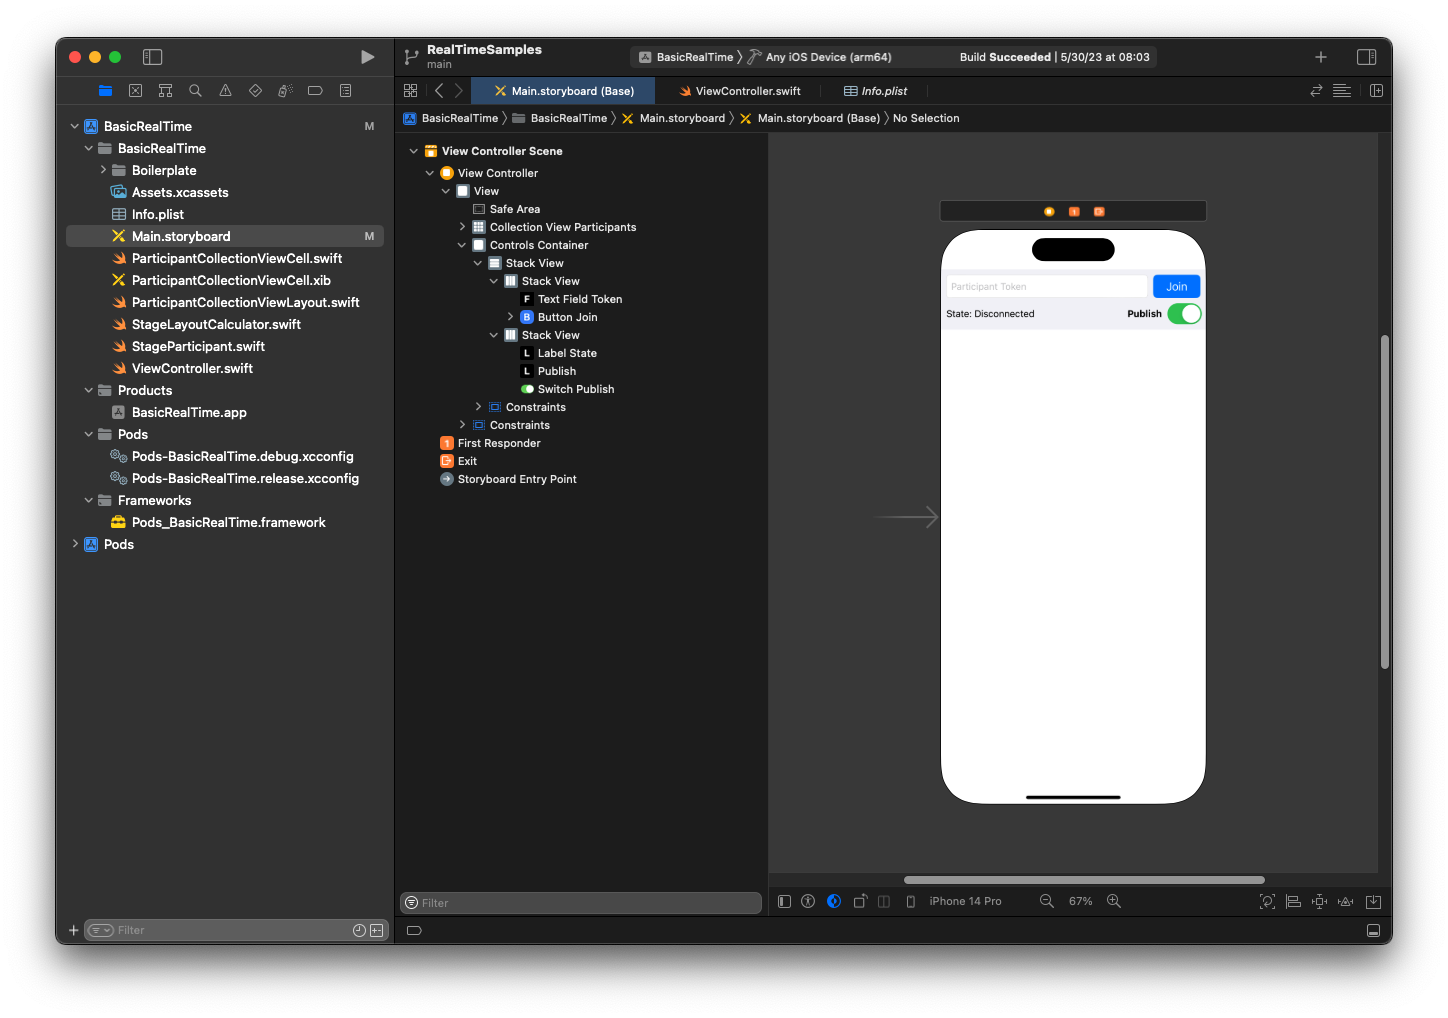
Für die AutoLayout-Konfiguration müssen wir drei Ansichten anpassen. Die erste Ansicht ist Sammlungsansicht der Teilnehmer (ein UICollectionView). Binden Sie Führend, Verfolgend, und Unterseite zu Sicherer Bereich. Binden Sie auch Oben zu Steuert Container.
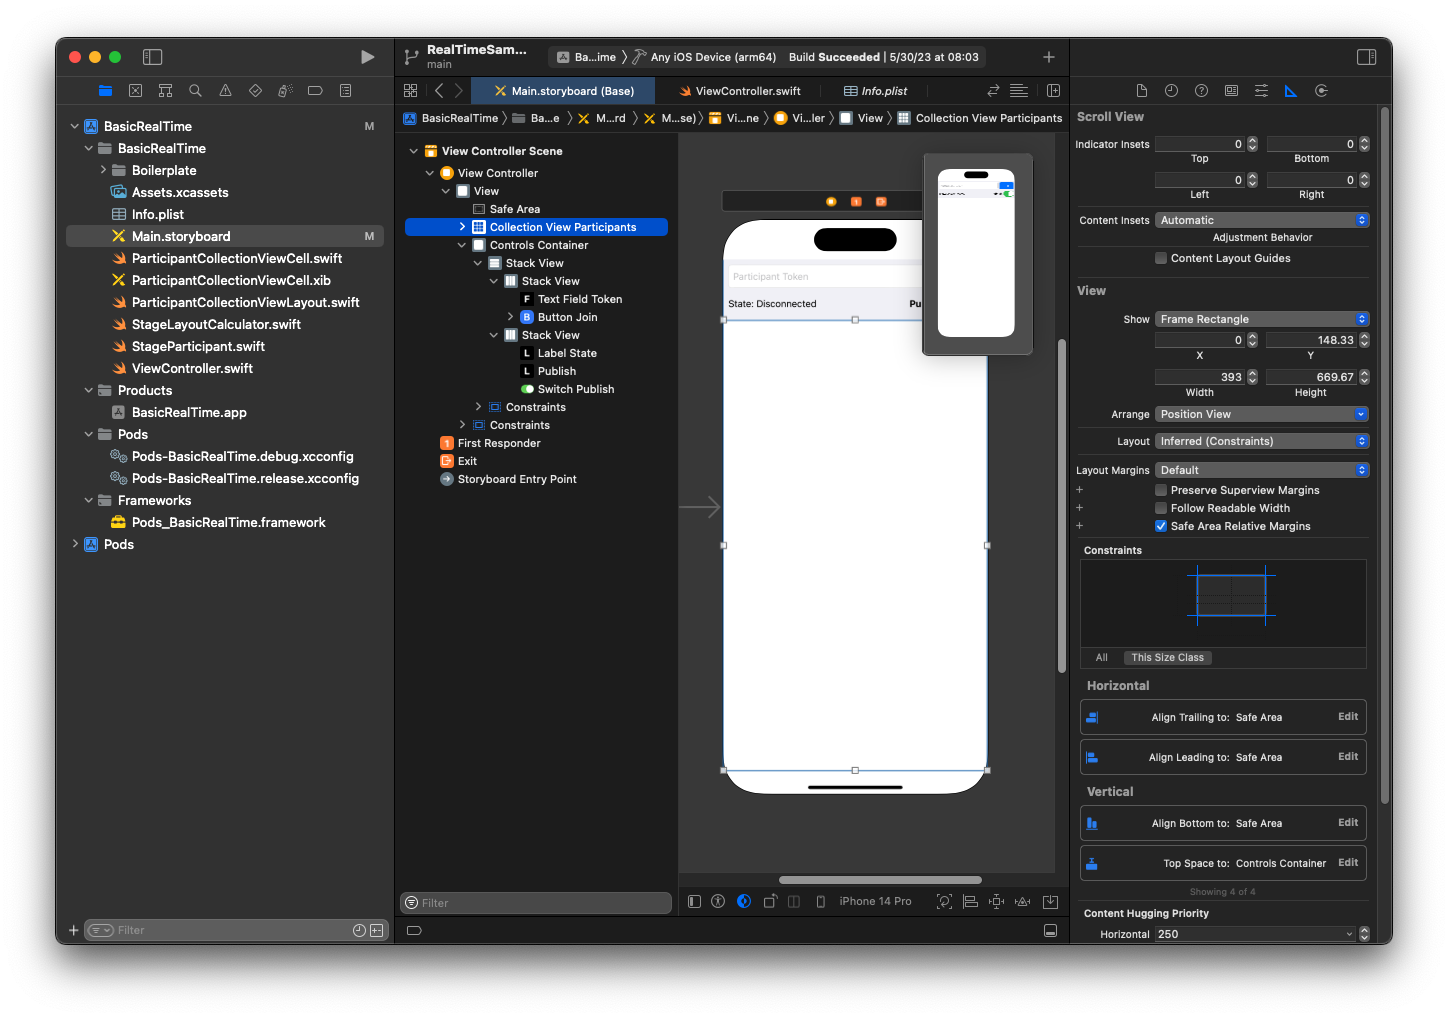
Die zweite Ansicht ist Steuert Container. Binden Sie Führend, Verfolgend, und Unterseite zu Sicherer Bereich:
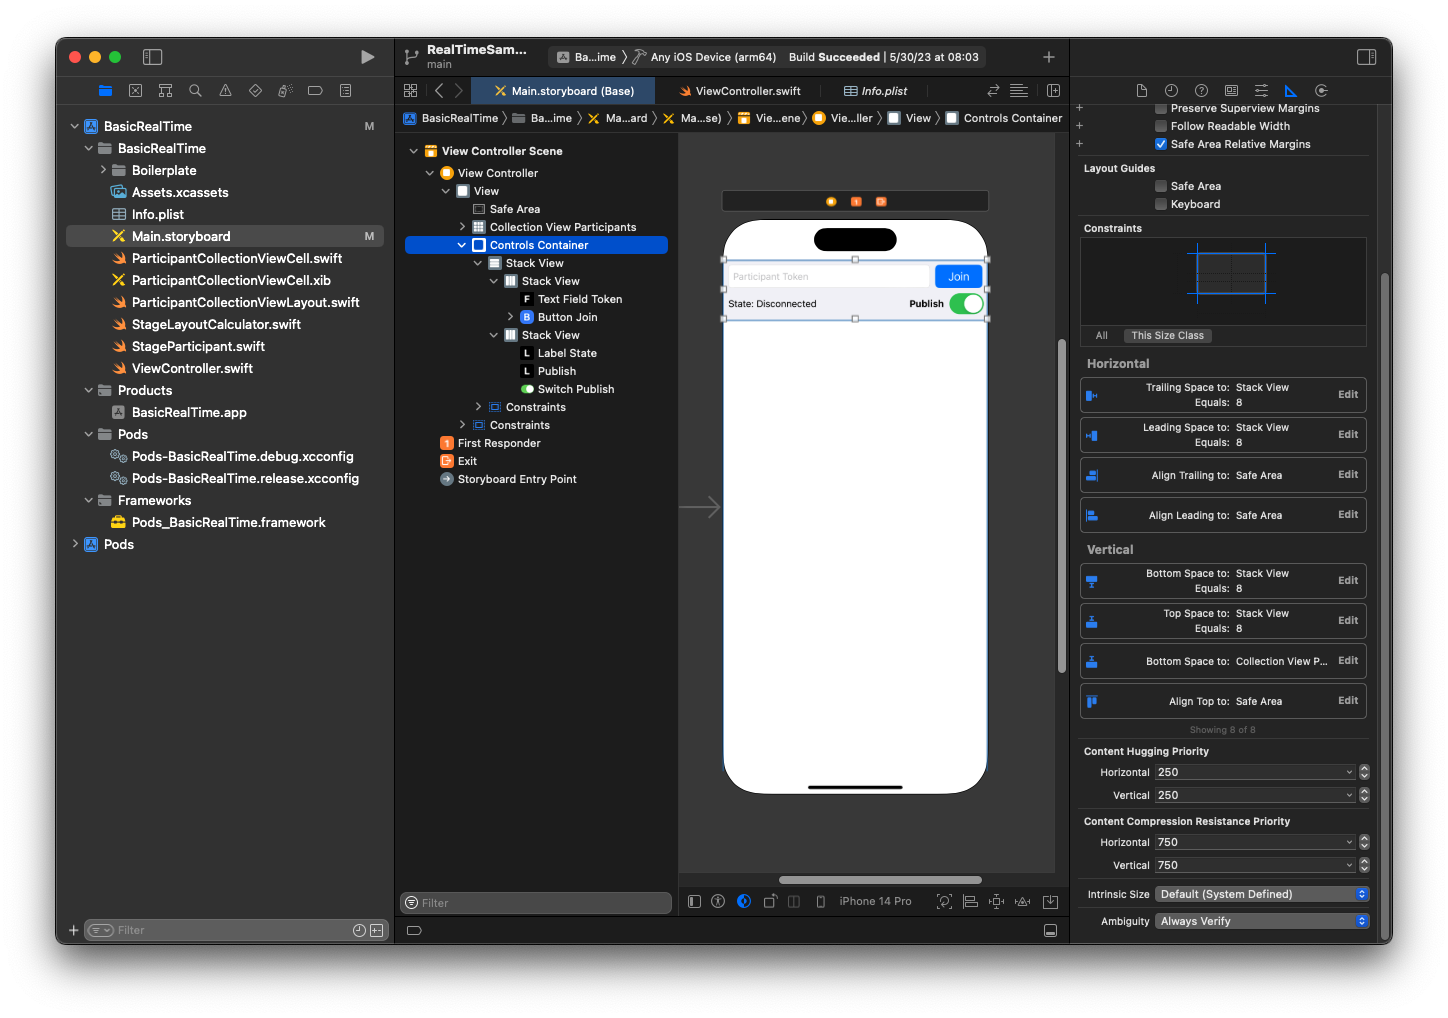
Die dritte und letzte Ansicht ist Vertikale Stapelansicht. Binden Sie Oben,Führend,Verfolgend, und Unterseite zu Superansicht. Stellen Sie für das Styling den Abstand auf 8 statt auf 0 ein.
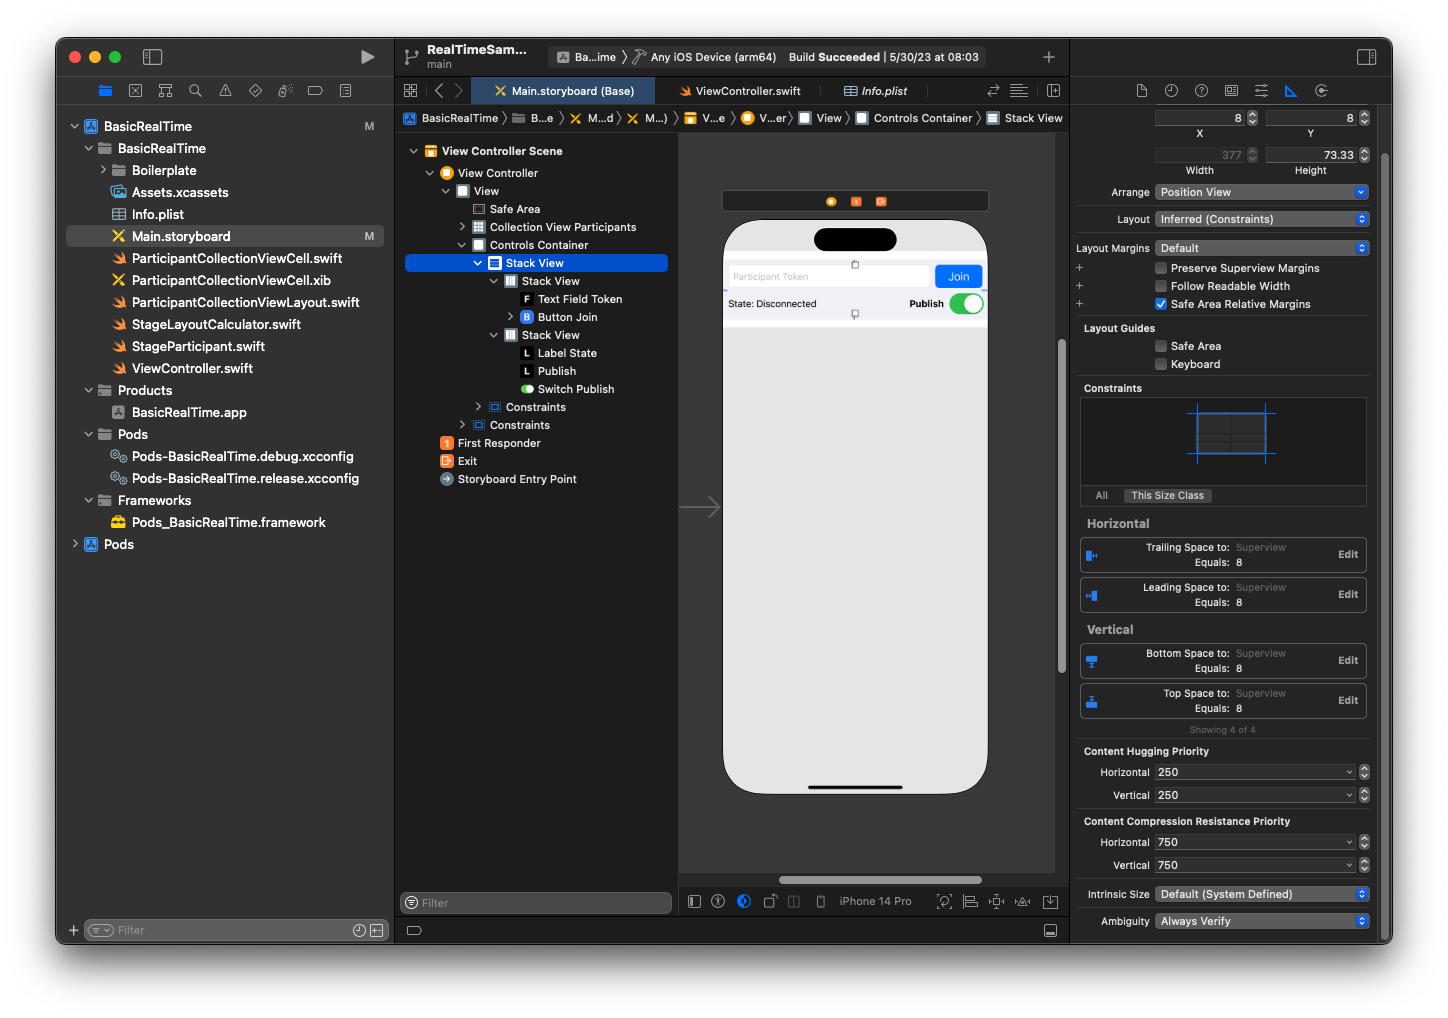
UIStack-Ansichten kümmert sich um das Layout der verbleibenden Ansichten. Für alle drei UIStack-Ansichten, verwenden Sie Füllen, sowie Ausrichtung und Verteilung.
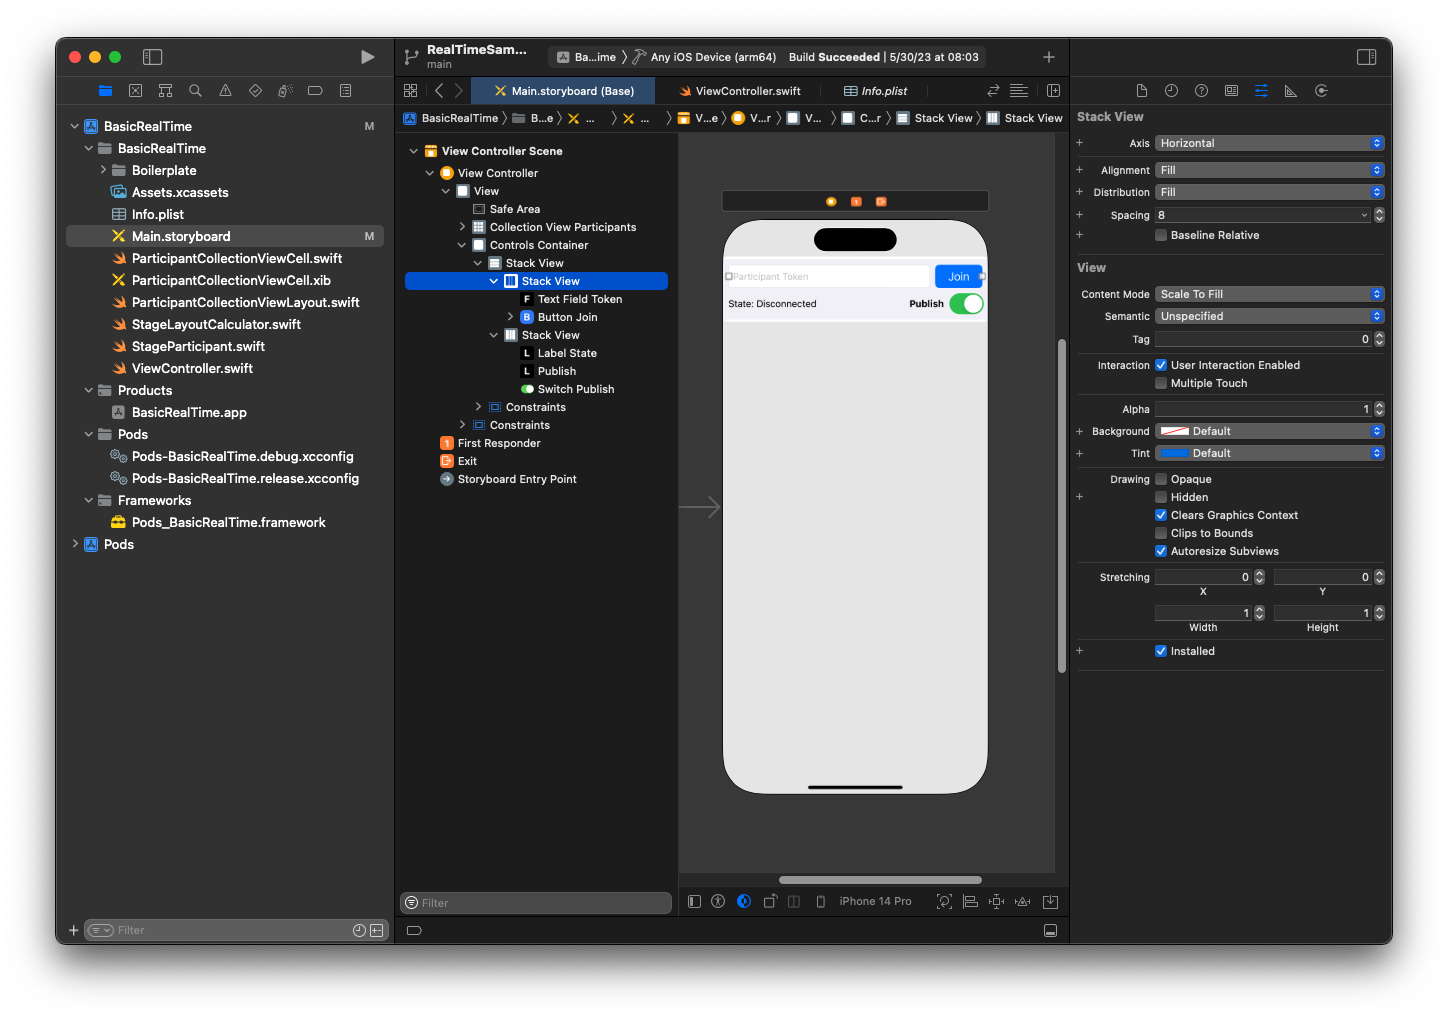
Lassen Sie uns abschließend diese Ansichten mit unserem ViewController verknüpfen. Kartieren Sie von oben die folgenden Ansichten:
-
Textfeld-Verknüpfung bindet an
textFieldToken. -
Schaltfläche Beitreten bindet an
buttonJoin. -
Status beschriften bindet an
labelState. -
Veröffentlichen wechseln bindet an
switchPublish. -
Sammlungsansicht der Teilnehmer bindet an
collectionViewParticipants.
Nutzen Sie diese Zeit auch, um das dataSource des Elements Sammlungsansicht der Teilnehmer auf den Besitz von ViewController einzustellen:
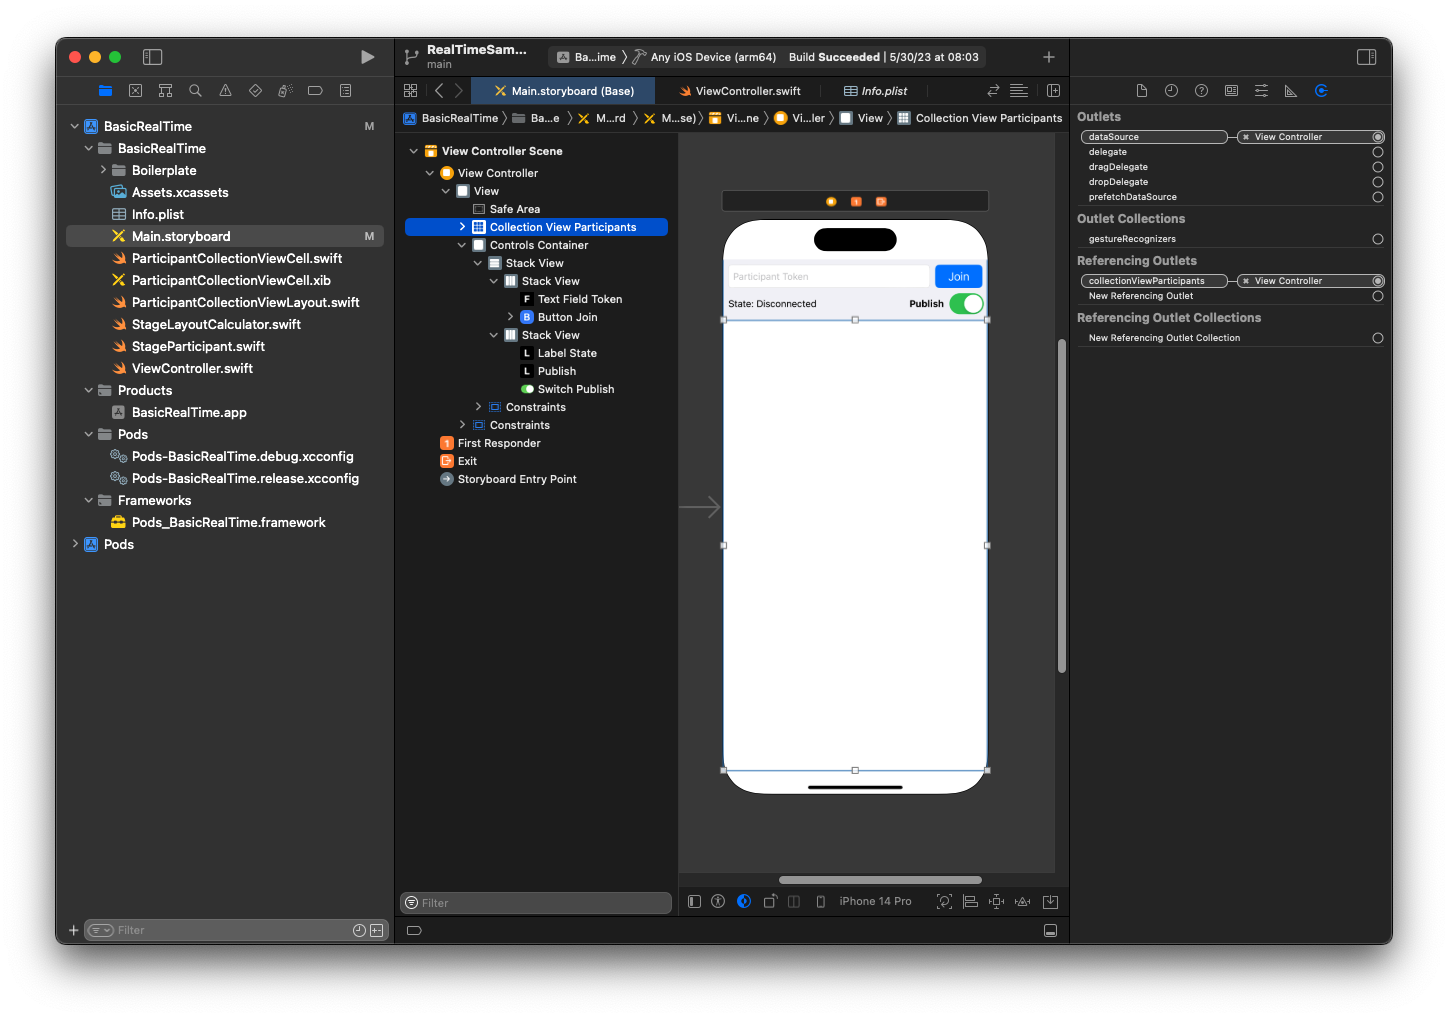
Jetzt erstellen wir die UICollectionViewCell-Unterklasse, in welcher die Teilnehmer gerendert werden sollen. Erstellen Sie zunächst eine neue Cocoa-Touch-Class-Datei:
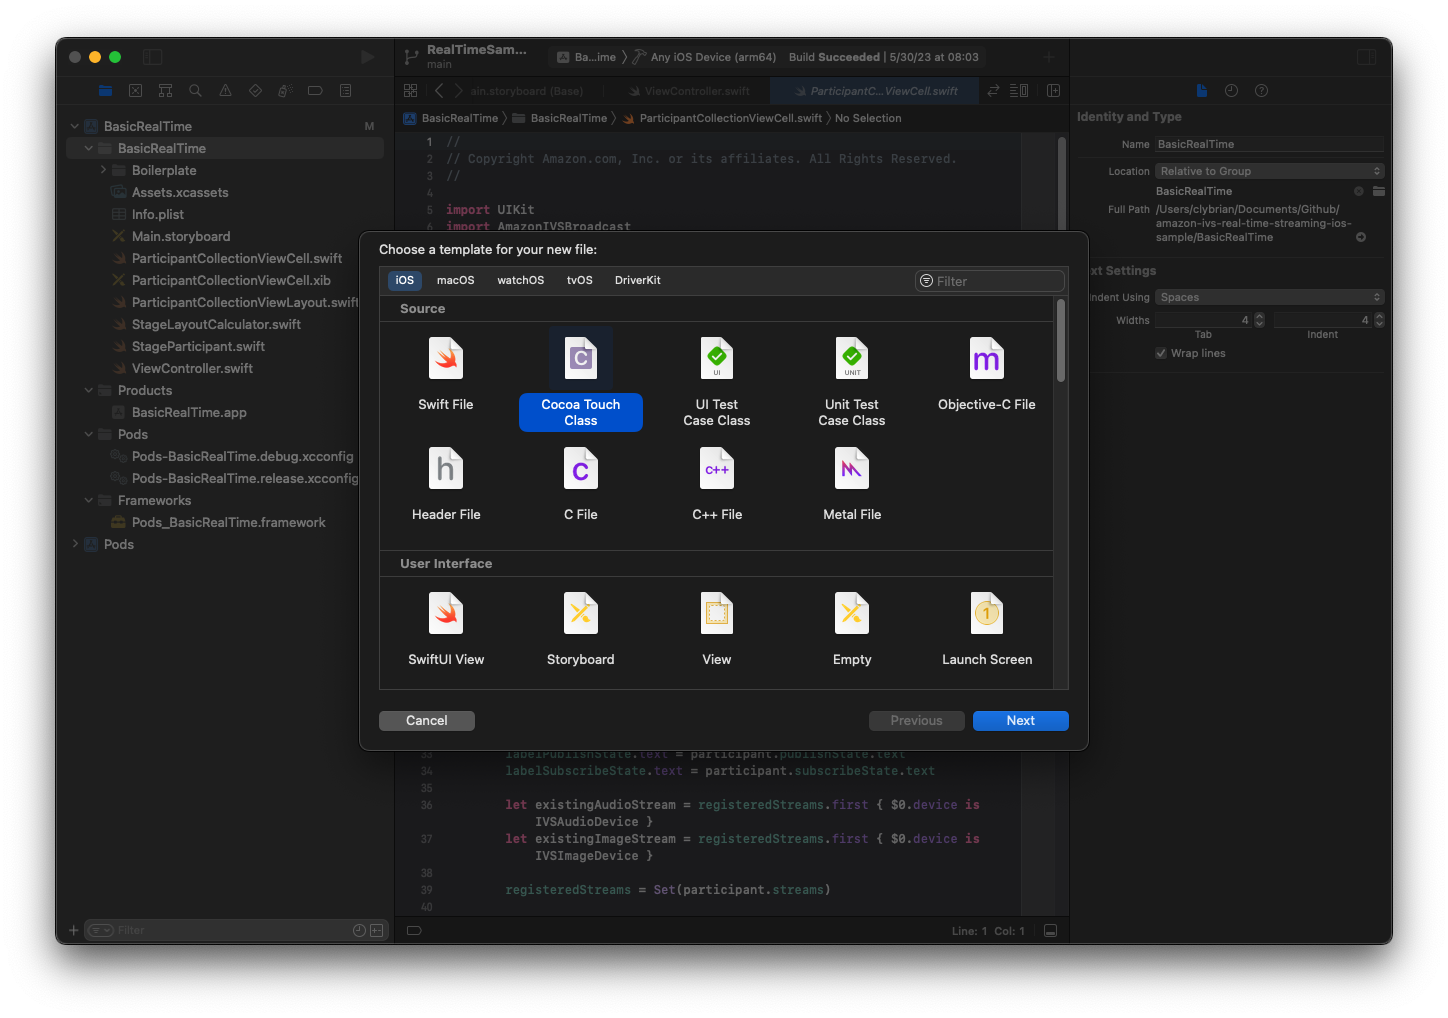
Nennen Sie sie ParticipantUICollectionViewCell und machen Sie es zu einer Unterklasse von UICollectionViewCell in Swift. Wir beginnen erneut in der Swift-Datei und erstellen unsere @IBOutlets zum Verlinken:
import AmazonIVSBroadcast

class ParticipantCollectionViewCell: UICollectionViewCell {

    @IBOutlet private var viewPreviewContainer: UIView!
    @IBOutlet private var labelParticipantId: UILabel!
    @IBOutlet private var labelSubscribeState: UILabel!
    @IBOutlet private var labelPublishState: UILabel!
    @IBOutlet private var labelVideoMuted: UILabel!
    @IBOutlet private var labelAudioMuted: UILabel!
    @IBOutlet private var labelAudioVolume: UILabel!
Erstellen Sie in der zugehörigen XIB-Datei diese Ansichtshierarchie:
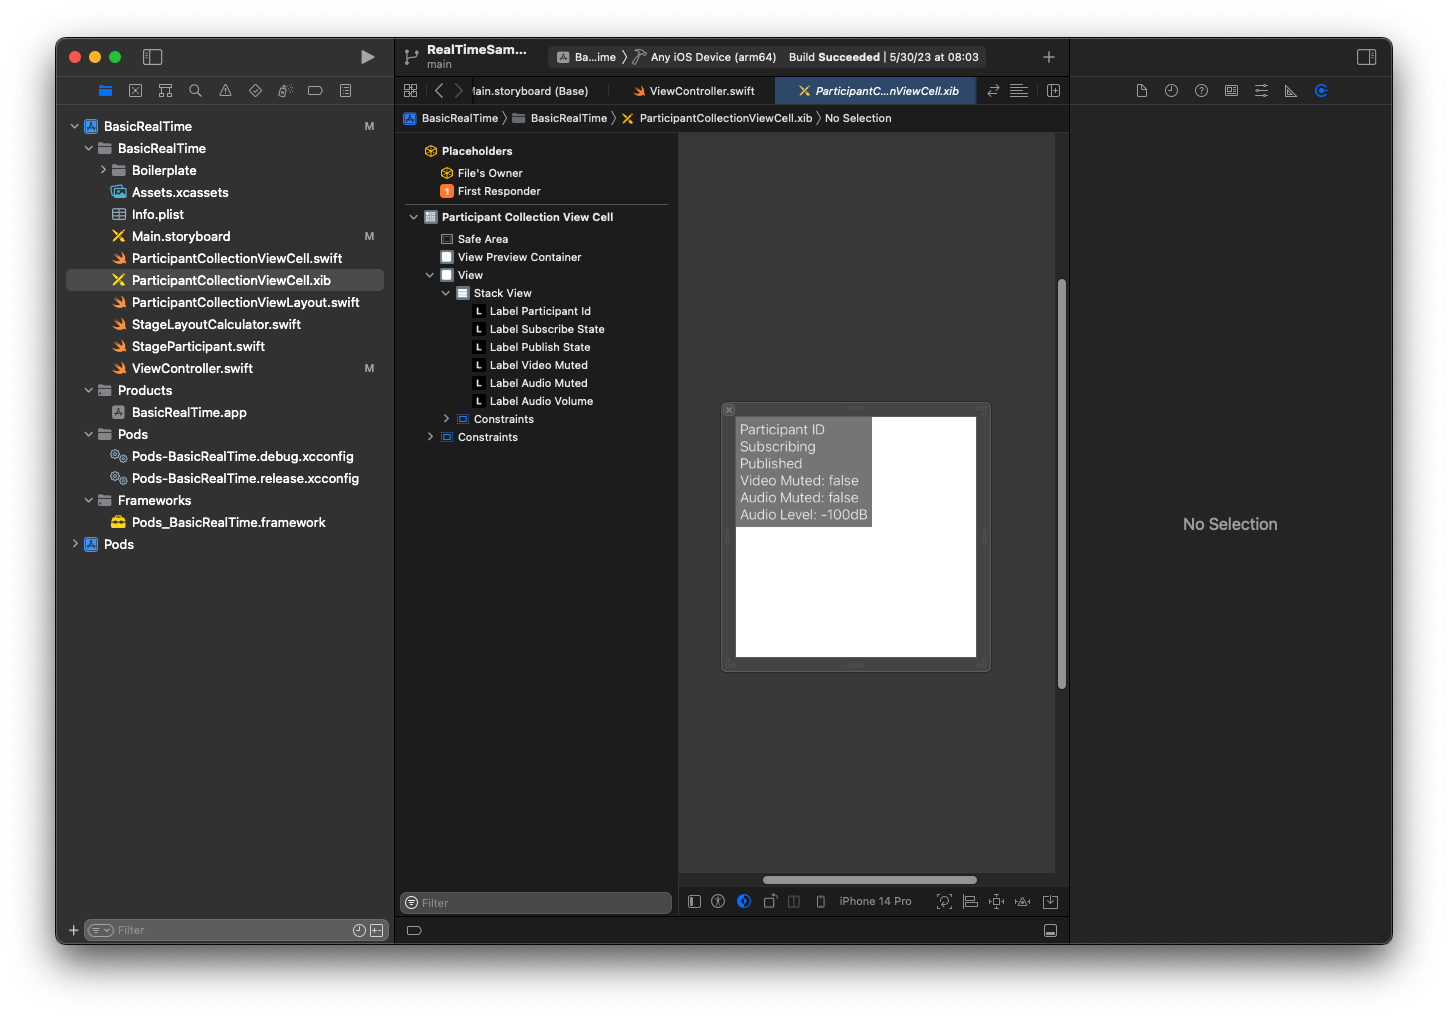
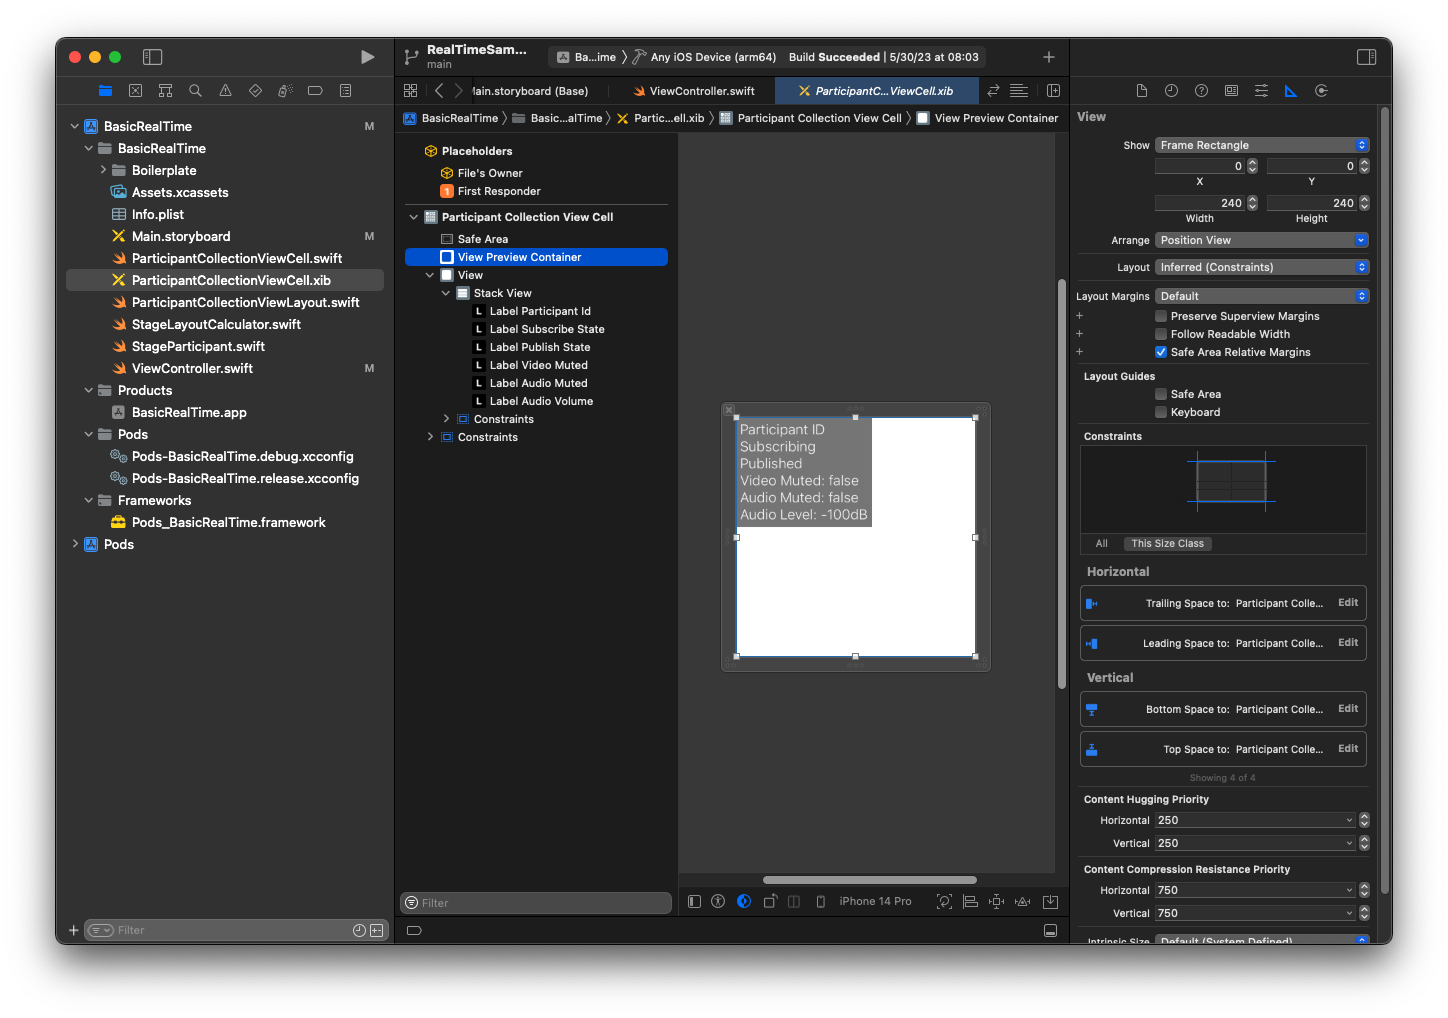
Für AutoLayout ändern wir erneut drei Ansichten. Die erste Ansicht ist Vorschaucontainer anzeigen. Setzen Sie Verfolgend, Führend, Oben und Unterseite zu Sammlungsansicht der Teilnehmer Zelle.
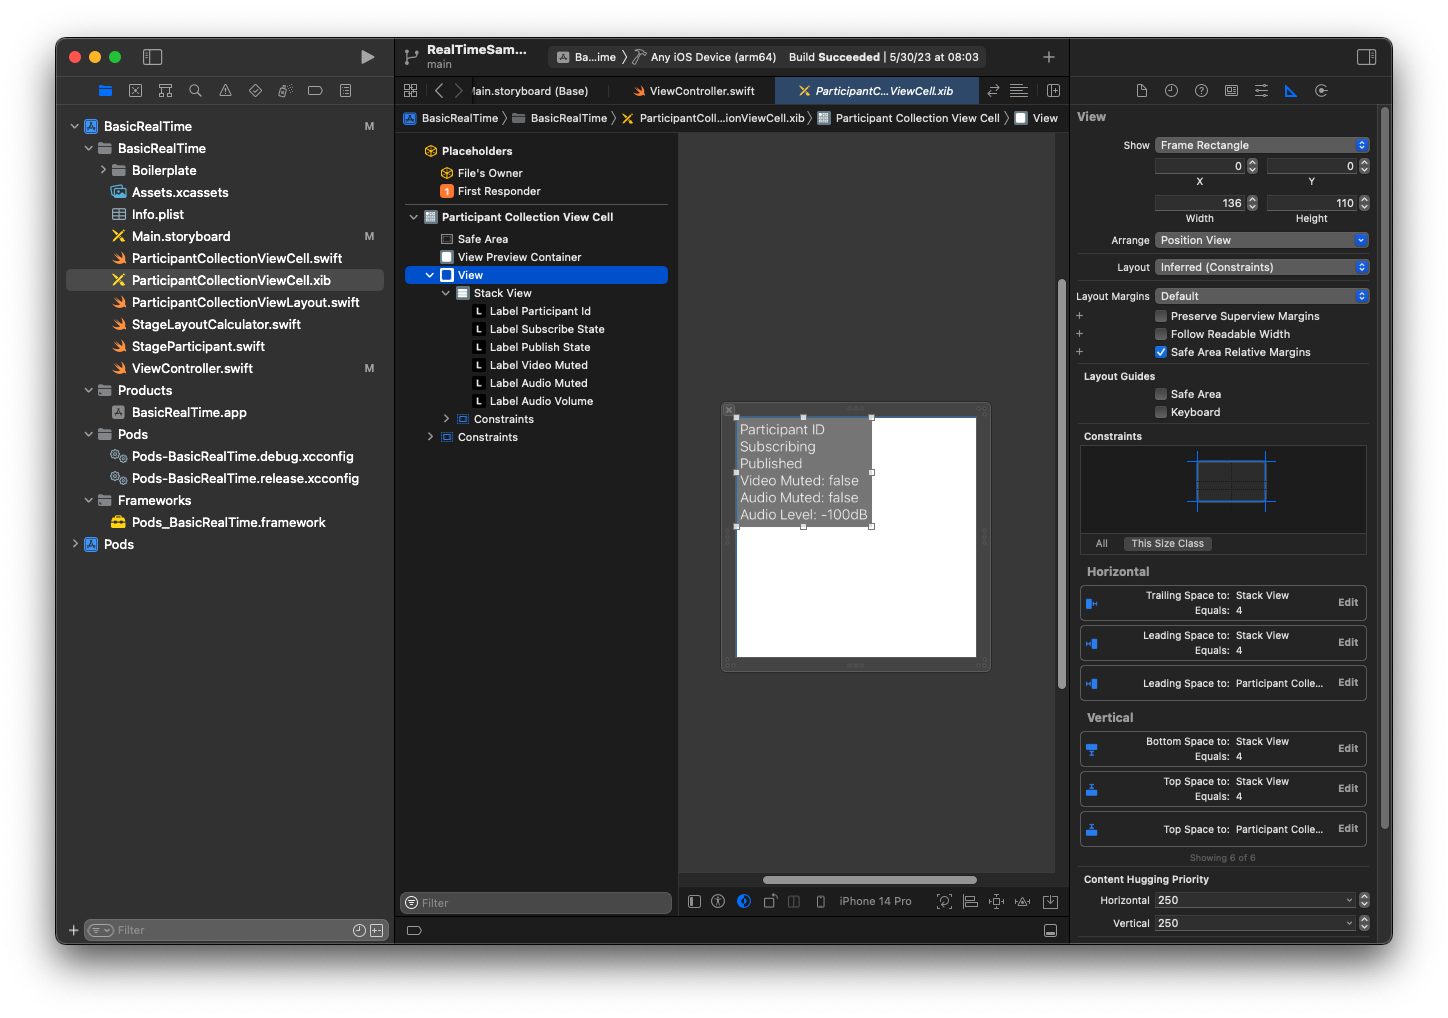
Die zweite Ansicht ist Ansicht. Setzen Sie Führend und Oben zu Sammlungsansicht der Teilnehmer Zelle und ändern Sie den Wert auf 4.
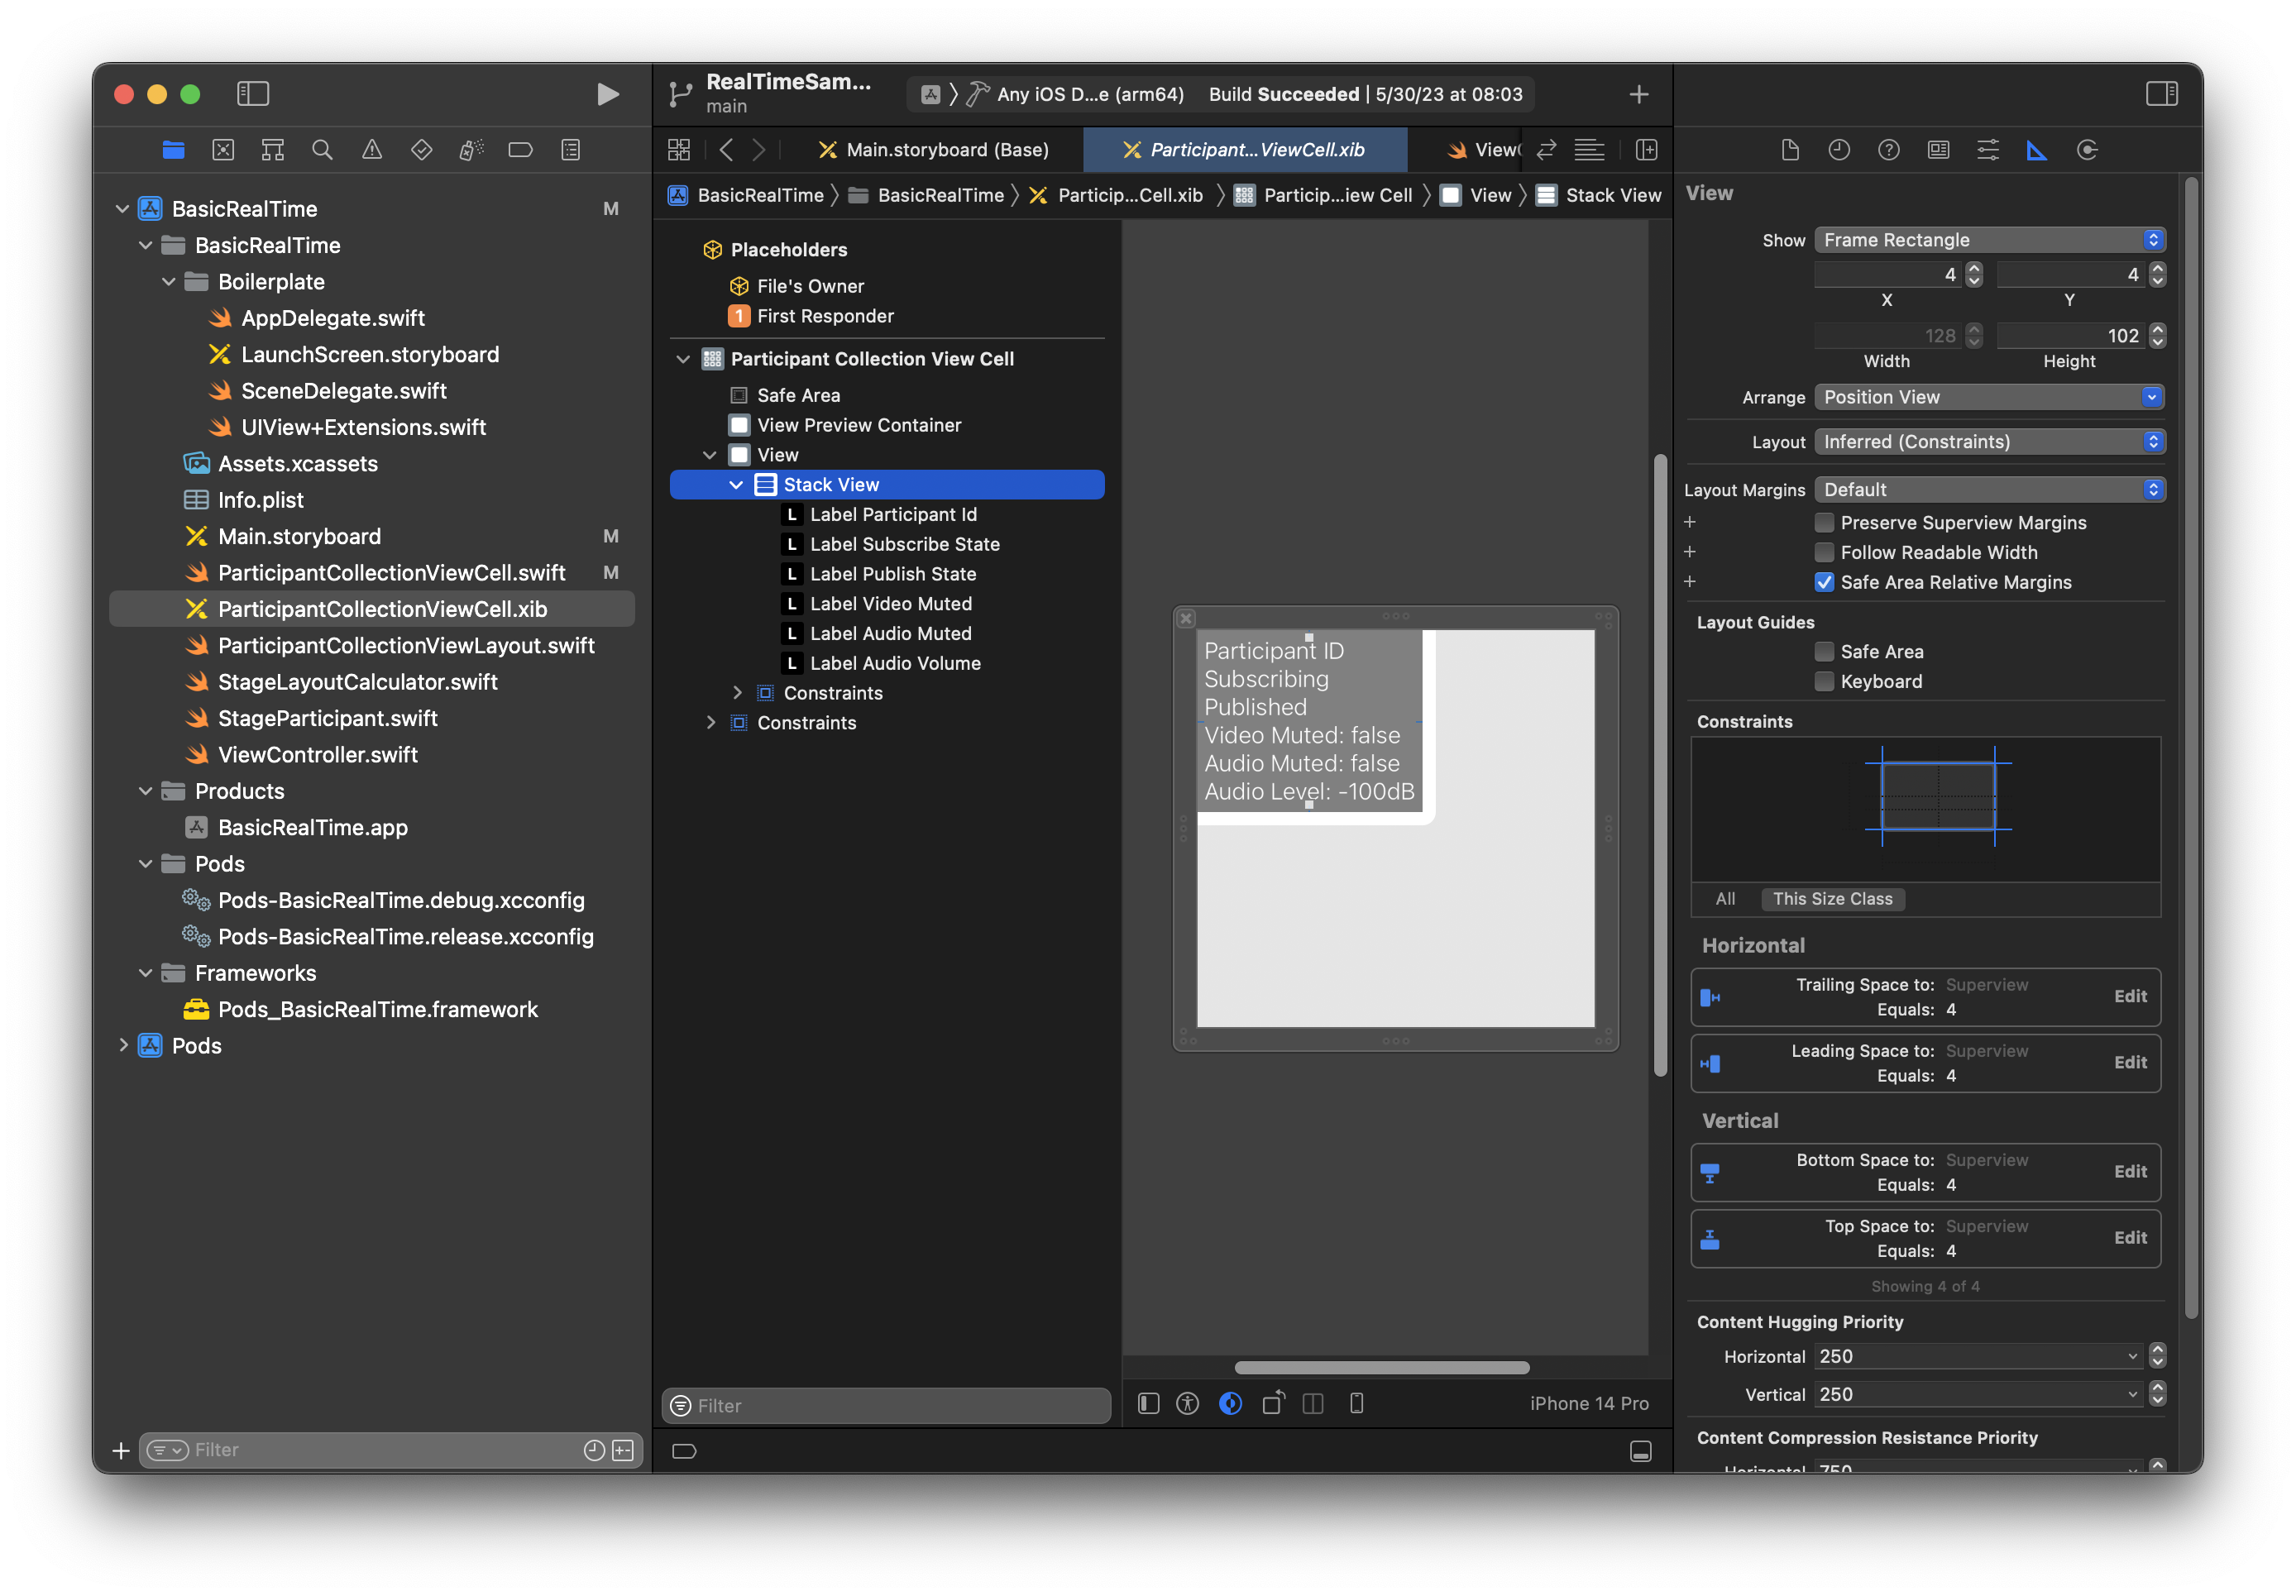
Die dritte Ansicht ist Stapelansicht. Setzen Sie Verfolgend, Führend, Oben und Unterseite zuSuperansicht und ändern Sie den Wert auf 4.
Berechtigungen und Idle Timer
Zurück zu unserem ViewController. Wir werden den System-Leerlauf-Timer deaktivieren, um zu verhindern, dass das Gerät in den Ruhemodus wechselt, während unsere Anwendung verwendet wird:
override func viewDidAppear(_ animated: Bool) {
    super.viewDidAppear(animated)
    // Prevent the screen from turning off during a call.
    UIApplication.shared.isIdleTimerDisabled = true
}

override func viewDidDisappear(_ animated: Bool) {
    super.viewDidDisappear(animated)
    UIApplication.shared.isIdleTimerDisabled = false
}
Als Nächstes fordern wir Kamera- und Mikrofonberechtigungen vom System an:
private func checkPermissions() {
    checkOrGetPermission(for: .video) { [weak self] granted in
        guard granted else {
            print("Video permission denied")
            return
        }
        self?.checkOrGetPermission(for: .audio) { [weak self] granted in
            guard granted else {
                print("Audio permission denied")
                return
            }
            self?.setupLocalUser() // we will cover this later
        }
    }
}

private func checkOrGetPermission(for mediaType: AVMediaType, _ result: @escaping (Bool) -> Void) {
    func mainThreadResult(_ success: Bool) {
        DispatchQueue.main.async {
            result(success)
        }
    }
    switch AVCaptureDevice.authorizationStatus(for: mediaType) {
    case .authorized: mainThreadResult(true)
    case .notDetermined:
        AVCaptureDevice.requestAccess(for: mediaType) { granted in
            mainThreadResult(granted)
        }
    case .denied, .restricted: mainThreadResult(false)
    @unknown default: mainThreadResult(false)
    }
}
Anwendungsstatus
Wir müssen unsere collectionViewParticipants konfigurieren mit der Layout-Datei, die wir zuvor erstellt haben:
override func viewDidLoad() {
    super.viewDidLoad()
    // We render everything to exactly the frame, so don't allow scrolling.
    collectionViewParticipants.isScrollEnabled = false
    collectionViewParticipants.register(UINib(nibName: "ParticipantCollectionViewCell", bundle: .main), forCellWithReuseIdentifier: "ParticipantCollectionViewCell")
}
Um jeden Teilnehmer zu repräsentieren, erstellen wir eine einfache Struktur namens StageParticipant. Diese kann enthalten sein in der ViewController.swift-Datei, oder es kann eine neue Datei erstellt werden.
import Foundation
import AmazonIVSBroadcast

struct StageParticipant {
    let isLocal: Bool
    var participantId: String?
    var publishState: IVSParticipantPublishState = .notPublished
    var subscribeState: IVSParticipantSubscribeState = .notSubscribed
    var streams: [IVSStageStream] = []

    init(isLocal: Bool, participantId: String?) {
        self.isLocal = isLocal
        self.participantId = participantId
    }
}
Um diese Teilnehmer zu verfolgen, verwahren wir eine Reihe von ihnen als Privateigentum in unserem ViewController:
private var participants = [StageParticipant]()
Diese Eigenschaft wird verwendet, um unsere UICollectionViewDataSource anzutreiben, die früher vom Storyboard aus verlinkt wurde:
extension ViewController: UICollectionViewDataSource {

    func collectionView(_ collectionView: UICollectionView, numberOfItemsInSection section: Int) -> Int {
        return participants.count
    }

    func collectionView(_ collectionView: UICollectionView, cellForItemAt indexPath: IndexPath) -> UICollectionViewCell {
        if let cell = collectionView.dequeueReusableCell(withReuseIdentifier: "ParticipantCollectionViewCell", for: indexPath) as? ParticipantCollectionViewCell {
            cell.set(participant: participants[indexPath.row])
            return cell
        } else {
            fatalError("Couldn't load custom cell type 'ParticipantCollectionViewCell'")
        }
    }

}
Um Ihre eigene Vorschau zu sehen, bevor Sie eine Stage betreten, erstellen wir sofort einen lokalen Teilnehmer:
override func viewDidLoad() {
    /* existing UICollectionView code */
    participants.append(StageParticipant(isLocal: true, participantId: nil))
}
Dies führt dazu, dass sofort nach dem Ausführen der App eine Teilnehmerzelle gerendert wird, die den lokalen Teilnehmer darstellt.
Die Benutzer möchten sich selbst sehen können, bevor sie einer Phase beitreten. Deshalb implementieren wir als Nächstes die setupLocalUser()-Methode, die zuvor aus dem Code zur Bearbeitung von Berechtigungen aufgerufen wurde. Wir speichern die Kamera- und Mikrofonreferenz als IVSLocalStageStream-Objekte.
private var streams = [IVSLocalStageStream]()
private let deviceDiscovery = IVSDeviceDiscovery()

private func setupLocalUser() {
    // Gather our camera and microphone once permissions have been granted
    let devices = deviceDiscovery.listLocalDevices()
    streams.removeAll()
    if let camera = devices.compactMap({ $0 as? IVSCamera }).first {
        streams.append(IVSLocalStageStream(device: camera))
        // Use a front camera if available.
        if let frontSource = camera.listAvailableInputSources().first(where: { $0.position == .front }) {
            camera.setPreferredInputSource(frontSource)
        }
    }
    if let mic = devices.compactMap({ $0 as? IVSMicrophone }).first {
        streams.append(IVSLocalStageStream(device: mic))
    }
    participants[0].streams = streams
    participantsChanged(index: 0, changeType: .updated)
}
Hier haben wir die Kamera und das Mikrofon des Geräts über das SDK gefunden und sie in unserem lokalen streams-Objekt gespeichert, dann zum streams-Array des ersten Teilnehmers (des lokalen Teilnehmers, den wir zuvor erstellt haben) zu unserem streams zugewiesen. Schließlich rufen wir participantsChanged mit einem index von 0 und changeType von updated auf. Diese Funktion ist eine Hilfsfunktion für die Aktualisierung unserer UICollectionView mit hübschen Animationen. So sieht es aus:
private func participantsChanged(index: Int, changeType: ChangeType) {
    switch changeType {
    case .joined:
        collectionViewParticipants?.insertItems(at: [IndexPath(item: index, section: 0)])
    case .updated:
        // Instead of doing reloadItems, just grab the cell and update it ourselves. It saves a create/destroy of a cell
        // and more importantly fixes some UI flicker. We disable scrolling so the index path per cell
        // never changes.
        if let cell = collectionViewParticipants?.cellForItem(at: IndexPath(item: index, section: 0)) as? ParticipantCollectionViewCell {
            cell.set(participant: participants[index])
        }
    case .left:
        collectionViewParticipants?.deleteItems(at: [IndexPath(item: index, section: 0)])
    }
}
Machen Sie sich jetzt keine Sorgen über cell.set. Darauf kommen wir später zurück, aber dort werden wir den Inhalt der Zelle basierend auf dem Teilnehmer rendern.
Der ChangeType ist eine einfache Aufzählung:
enum ChangeType {
    case joined, updated, left
}
Schließlich möchten wir verfolgen, ob die Stage angeschlossen ist. Wir verwenden eine einfache bool, um das zu verfolgen, wodurch unsere Benutzeroberfläche automatisch aktualisiert wird, wenn sie selbst aktualisiert wird.
private var connectingOrConnected = false {
    didSet {
        buttonJoin.setTitle(connectingOrConnected ? "Leave" : "Join", for: .normal)
        buttonJoin.tintColor = connectingOrConnected ? .systemRed : .systemBlue
    }
}
Implementierung des Stage-SDK
Drei Kernkonzepte liegen der Echtzeit-Funktionalität zugrunde: Stage, Strategie und Renderer. Das Designziel besteht in der Minimierung der Menge an clientseitiger Logik, die für die Entwicklung eines funktionierenden Produkts erforderlich ist.
IVSStageStrategy
Die IVSStageStrategy-Implementierung ist einfach:
extension ViewController: IVSStageStrategy {
    func stage(_ stage: IVSStage, streamsToPublishForParticipant participant: IVSParticipantInfo) -> [IVSLocalStageStream] {
        // Return the camera and microphone to be published.
        // This is only called if `shouldPublishParticipant` returns true.
        return streams
    }

    func stage(_ stage: IVSStage, shouldPublishParticipant participant: IVSParticipantInfo) -> Bool {
        // Our publish status is based directly on the UISwitch view
        return switchPublish.isOn
    }

    func stage(_ stage: IVSStage, shouldSubscribeToParticipant participant: IVSParticipantInfo) -> IVSStageSubscribeType {
        // Subscribe to both audio and video for all publishing participants.
        return .audioVideo
    }
}
Zusammenfassend lässt sich sagen, dass wir nur veröffentlichen, wenn die Option „Veröffentlichen“ aktiviert ist, und wenn wir veröffentlichen, veröffentlichen wir die Streams, die wir zuvor gesammelt haben. Schließlich abonnieren wir für dieses Beispiel immer andere Teilnehmer und erhalten sowohl ihr Audio als auch ihr Video.
IVSStageRenderer
Die IVSStageRenderer-Implementierung ist ebenfalls ziemlich einfach, obwohl sie angesichts der Anzahl der Funktionen reichlich mehr Code enthält. Der allgemeine Ansatz in diesem Renderer besteht darin, unser participants-Array zu aktualisieren, wenn das SDK uns über eine Änderung an einen Teilnehmer informiert. Es gibt bestimmte Szenarien, in denen wir mit lokalen Teilnehmern anders umgehen, weil wir beschlossen haben, sie selbst zu verwalten, sodass sie ihre Kameravorschau sehen können, bevor sie beitreten.
extension ViewController: IVSStageRenderer {

    func stage(_ stage: IVSStage, didChange connectionState: IVSStageConnectionState, withError error: Error?) {
        labelState.text = connectionState.text
        connectingOrConnected = connectionState != .disconnected
    }

    func stage(_ stage: IVSStage, participantDidJoin participant: IVSParticipantInfo) {
        if participant.isLocal {
            // If this is the local participant joining the Stage, update the first participant in our array because we
            // manually added that participant when setting up our preview
            participants[0].participantId = participant.participantId
            participantsChanged(index: 0, changeType: .updated)
        } else {
            // If they are not local, add them to the array as a newly joined participant.
            participants.append(StageParticipant(isLocal: false, participantId: participant.participantId))
            participantsChanged(index: (participants.count - 1), changeType: .joined)
        }
    }

    func stage(_ stage: IVSStage, participantDidLeave participant: IVSParticipantInfo) {
        if participant.isLocal {
            // If this is the local participant leaving the Stage, update the first participant in our array because
            // we want to keep the camera preview active
            participants[0].participantId = nil
            participantsChanged(index: 0, changeType: .updated)
        } else {
            // If they are not local, find their index and remove them from the array.
            if let index = participants.firstIndex(where: { $0.participantId == participant.participantId }) {
                participants.remove(at: index)
                participantsChanged(index: index, changeType: .left)
            }
        }
    }

    func stage(_ stage: IVSStage, participant: IVSParticipantInfo, didChange publishState: IVSParticipantPublishState) {
        // Update the publishing state of this participant
        mutatingParticipant(participant.participantId) { data in
            data.publishState = publishState
        }
    }

    func stage(_ stage: IVSStage, participant: IVSParticipantInfo, didChange subscribeState: IVSParticipantSubscribeState) {
        // Update the subscribe state of this participant
        mutatingParticipant(participant.participantId) { data in
            data.subscribeState = subscribeState
        }
    }

    func stage(_ stage: IVSStage, participant: IVSParticipantInfo, didChangeMutedStreams streams: [IVSStageStream]) {
        // We don't want to take any action for the local participant because we track those streams locally
        if participant.isLocal { return }
        // For remote participants, notify the UICollectionView that they have updated. There is no need to modify
        // the `streams` property on the `StageParticipant` because it is the same `IVSStageStream` instance. Just
        // query the `isMuted` property again.
        if let index = participants.firstIndex(where: { $0.participantId == participant.participantId }) {
            participantsChanged(index: index, changeType: .updated)
        }
    }

    func stage(_ stage: IVSStage, participant: IVSParticipantInfo, didAdd streams: [IVSStageStream]) {
        // We don't want to take any action for the local participant because we track those streams locally
        if participant.isLocal { return }
        // For remote participants, add these new streams to that participant's streams array.
        mutatingParticipant(participant.participantId) { data in
            data.streams.append(contentsOf: streams)
        }
    }

    func stage(_ stage: IVSStage, participant: IVSParticipantInfo, didRemove streams: [IVSStageStream]) {
        // We don't want to take any action for the local participant because we track those streams locally
        if participant.isLocal { return }
        // For remote participants, remove these streams from that participant's streams array.
        mutatingParticipant(participant.participantId) { data in
            let oldUrns = streams.map { $0.device.descriptor().urn }
            data.streams.removeAll(where: { stream in
                return oldUrns.contains(stream.device.descriptor().urn)
            })
        }
    }

    // A helper function to find a participant by its ID, mutate that participant, and then update the UICollectionView accordingly.
    private func mutatingParticipant(_ participantId: String?, modifier: (inout StageParticipant) -> Void) {
        guard let index = participants.firstIndex(where: { $0.participantId == participantId }) else {
            fatalError("Something is out of sync, investigate if this was a sample app or SDK issue.")
        }

        var participant = participants[index]
        modifier(&participant)
        participants[index] = participant
        participantsChanged(index: index, changeType: .updated)
    }
}
Dieser Code verwendet eine Erweiterung, um den Verbindungsstatus in menschenfreundlichen Text umzuwandeln:
extension IVSStageConnectionState {
    var text: String {
        switch self {
        case .disconnected: return "Disconnected"
        case .connecting: return "Connecting"
        case .connected: return "Connected"
        @unknown default: fatalError()
        }
    }
}
Implementierung eines benutzerdefinierten UICollectionViewLayouts
Die Festlegung verschiedener Teilnehmerzahlen kann komplex sein. Sie möchten, dass sie den gesamten Frame der übergeordneten Ansicht einnehmen, aber Sie möchten nicht jede Teilnehmerkonfiguration unabhängig voneinander handhaben. Um dies zu vereinfachen, führen wir die Implementierung eines UICollectionViewLayout durch.
Erstellen Sie eine weitere neue Datei, ParticipantCollectionViewLayout.swift, welche UICollectionViewLayout erweitern soll. Diese Klasse verwendet eine andere Klasse namens StageLayoutCalculator, was wir bald behandeln werden. Die Klasse erhält berechnete Rahmenwerte für jeden Teilnehmer und generiert dann die notwendigen UICollectionViewLayoutAttributes-Objekte.
import Foundation
import UIKit

/**
 Code modified from https://developer.apple.com/documentation/uikit/views_and_controls/collection_views/layouts/customizing_collection_view_layouts?language=objc
 */
class ParticipantCollectionViewLayout: UICollectionViewLayout {

    private let layoutCalculator = StageLayoutCalculator()

    private var contentBounds = CGRect.zero
    private var cachedAttributes = [UICollectionViewLayoutAttributes]()

    override func prepare() {
        super.prepare()

        guard let collectionView = collectionView else { return }

        cachedAttributes.removeAll()
        contentBounds = CGRect(origin: .zero, size: collectionView.bounds.size)

        layoutCalculator.calculateFrames(participantCount: collectionView.numberOfItems(inSection: 0),
                                         width: collectionView.bounds.size.width,
                                         height: collectionView.bounds.size.height,
                                         padding: 4)
        .enumerated()
        .forEach { (index, frame) in
            let attributes = UICollectionViewLayoutAttributes(forCellWith: IndexPath(item: index, section: 0))
            attributes.frame = frame
            cachedAttributes.append(attributes)
            contentBounds = contentBounds.union(frame)
        }
    }

    override var collectionViewContentSize: CGSize {
        return contentBounds.size
    }

    override func shouldInvalidateLayout(forBoundsChange newBounds: CGRect) -> Bool {
        guard let collectionView = collectionView else { return false }
        return !newBounds.size.equalTo(collectionView.bounds.size)
    }

    override func layoutAttributesForItem(at indexPath: IndexPath) -> UICollectionViewLayoutAttributes? {
        return cachedAttributes[indexPath.item]
    }

    override func layoutAttributesForElements(in rect: CGRect) -> [UICollectionViewLayoutAttributes]? {
        var attributesArray = [UICollectionViewLayoutAttributes]()

        // Find any cell that sits within the query rect.
        guard let lastIndex = cachedAttributes.indices.last, let firstMatchIndex = binSearch(rect, start: 0, end: lastIndex) else {
            return attributesArray
        }

        // Starting from the match, loop up and down through the array until all the attributes
        // have been added within the query rect.
        for attributes in cachedAttributes[..<firstMatchIndex].reversed() {
            guard attributes.frame.maxY >= rect.minY else { break }
            attributesArray.append(attributes)
        }

        for attributes in cachedAttributes[firstMatchIndex...] {
            guard attributes.frame.minY <= rect.maxY else { break }
            attributesArray.append(attributes)
        }

        return attributesArray
    }

    // Perform a binary search on the cached attributes array.
    func binSearch(_ rect: CGRect, start: Int, end: Int) -> Int? {
        if end < start { return nil }

        let mid = (start + end) / 2
        let attr = cachedAttributes[mid]

        if attr.frame.intersects(rect) {
            return mid
        } else {
            if attr.frame.maxY < rect.minY {
                return binSearch(rect, start: (mid + 1), end: end)
            } else {
                return binSearch(rect, start: start, end: (mid - 1))
            }
        }
    }
}
Wichtiger ist die StageLayoutCalculator.swift-Klasse. Es ist so konzipiert, dass es die Rahmen für jeden Teilnehmer auf der Grundlage der Anzahl der Teilnehmer in einem fließenden Zeilen-/Spaltenlayout berechnet. Jede Zeile hat dieselbe Höhe wie die anderen, aber Spalten können pro Zeile unterschiedlich breit sein. Sehen Sie den Code-Kommentar über der layouts-Variable für eine Beschreibung, wie dieses Verhalten angepasst werden kann.
import Foundation
import UIKit

class StageLayoutCalculator {

    /// This 2D array contains the description of how the grid of participants should be rendered
    /// The index of the 1st dimension is the number of participants needed to active that configuration
    /// Meaning if there is 1 participant, index 0 will be used. If there are 5 participants, index 4 will be used.
    ///
    /// The 2nd dimension is a description of the layout. The length of the array is the number of rows that
    /// will exist, and then each number within that array is the number of columns in each row.
    ///
    /// See the code comments next to each index for concrete examples.
    ///
    /// This can be customized to fit any layout configuration needed.
    private let layouts: [[Int]] = [
        // 1 participant
        [ 1 ], // 1 row, full width
        // 2 participants
        [ 1, 1 ], // 2 rows, all columns are full width
        // 3 participants
        [ 1, 2 ], // 2 rows, first row's column is full width then 2nd row's columns are 1/2 width
        // 4 participants
        [ 2, 2 ], // 2 rows, all columns are 1/2 width
        // 5 participants
        [ 1, 2, 2 ], // 3 rows, first row's column is full width, 2nd and 3rd row's columns are 1/2 width
        // 6 participants
        [ 2, 2, 2 ], // 3 rows, all column are 1/2 width
        // 7 participants
        [ 2, 2, 3 ], // 3 rows, 1st and 2nd row's columns are 1/2 width, 3rd row's columns are 1/3rd width
        // 8 participants
        [ 2, 3, 3 ],
        // 9 participants
        [ 3, 3, 3 ],
        // 10 participants
        [ 2, 3, 2, 3 ],
        // 11 participants
        [ 2, 3, 3, 3 ],
        // 12 participants
        [ 3, 3, 3, 3 ],
    ]

    // Given a frame (this could be for a UICollectionView, or a Broadcast Mixer's canvas), calculate the frames for each
    // participant, with optional padding.
    func calculateFrames(participantCount: Int, width: CGFloat, height: CGFloat, padding: CGFloat) -> [CGRect] {
        if participantCount > layouts.count {
            fatalError("Only \(layouts.count) participants are supported at this time")
        }
        if participantCount == 0 {
            return []
        }
        var currentIndex = 0
        var lastFrame: CGRect = .zero

        // If the height is less than the width, the rows and columns will be flipped.
        // Meaning for 6 participants, there will be 2 rows of 3 columns each.
        let isVertical = height > width

        let halfPadding = padding / 2.0

        let layout = layouts[participantCount - 1] // 1 participant is in index 0, so `-1`.
        let rowHeight = (isVertical ? height : width) / CGFloat(layout.count)

        var frames = [CGRect]()
        for row in 0 ..< layout.count {
            // layout[row] is the number of columns in a layout
            let itemWidth = (isVertical ? width : height) / CGFloat(layout[row])
            let segmentFrame = CGRect(x: (isVertical ? 0 : lastFrame.maxX) + halfPadding,
                                      y: (isVertical ? lastFrame.maxY : 0) + halfPadding,
                                      width: (isVertical ? itemWidth : rowHeight) - padding,
                                      height: (isVertical ? rowHeight : itemWidth) - padding)

            for column in 0 ..< layout[row] {
                var frame = segmentFrame
                if isVertical {
                    frame.origin.x = (itemWidth * CGFloat(column)) + halfPadding
                } else {
                    frame.origin.y = (itemWidth * CGFloat(column)) + halfPadding
                }
                frames.append(frame)
                currentIndex += 1
            }

            lastFrame = segmentFrame
            lastFrame.origin.x += halfPadding
            lastFrame.origin.y += halfPadding
        }
        return frames
    }

}
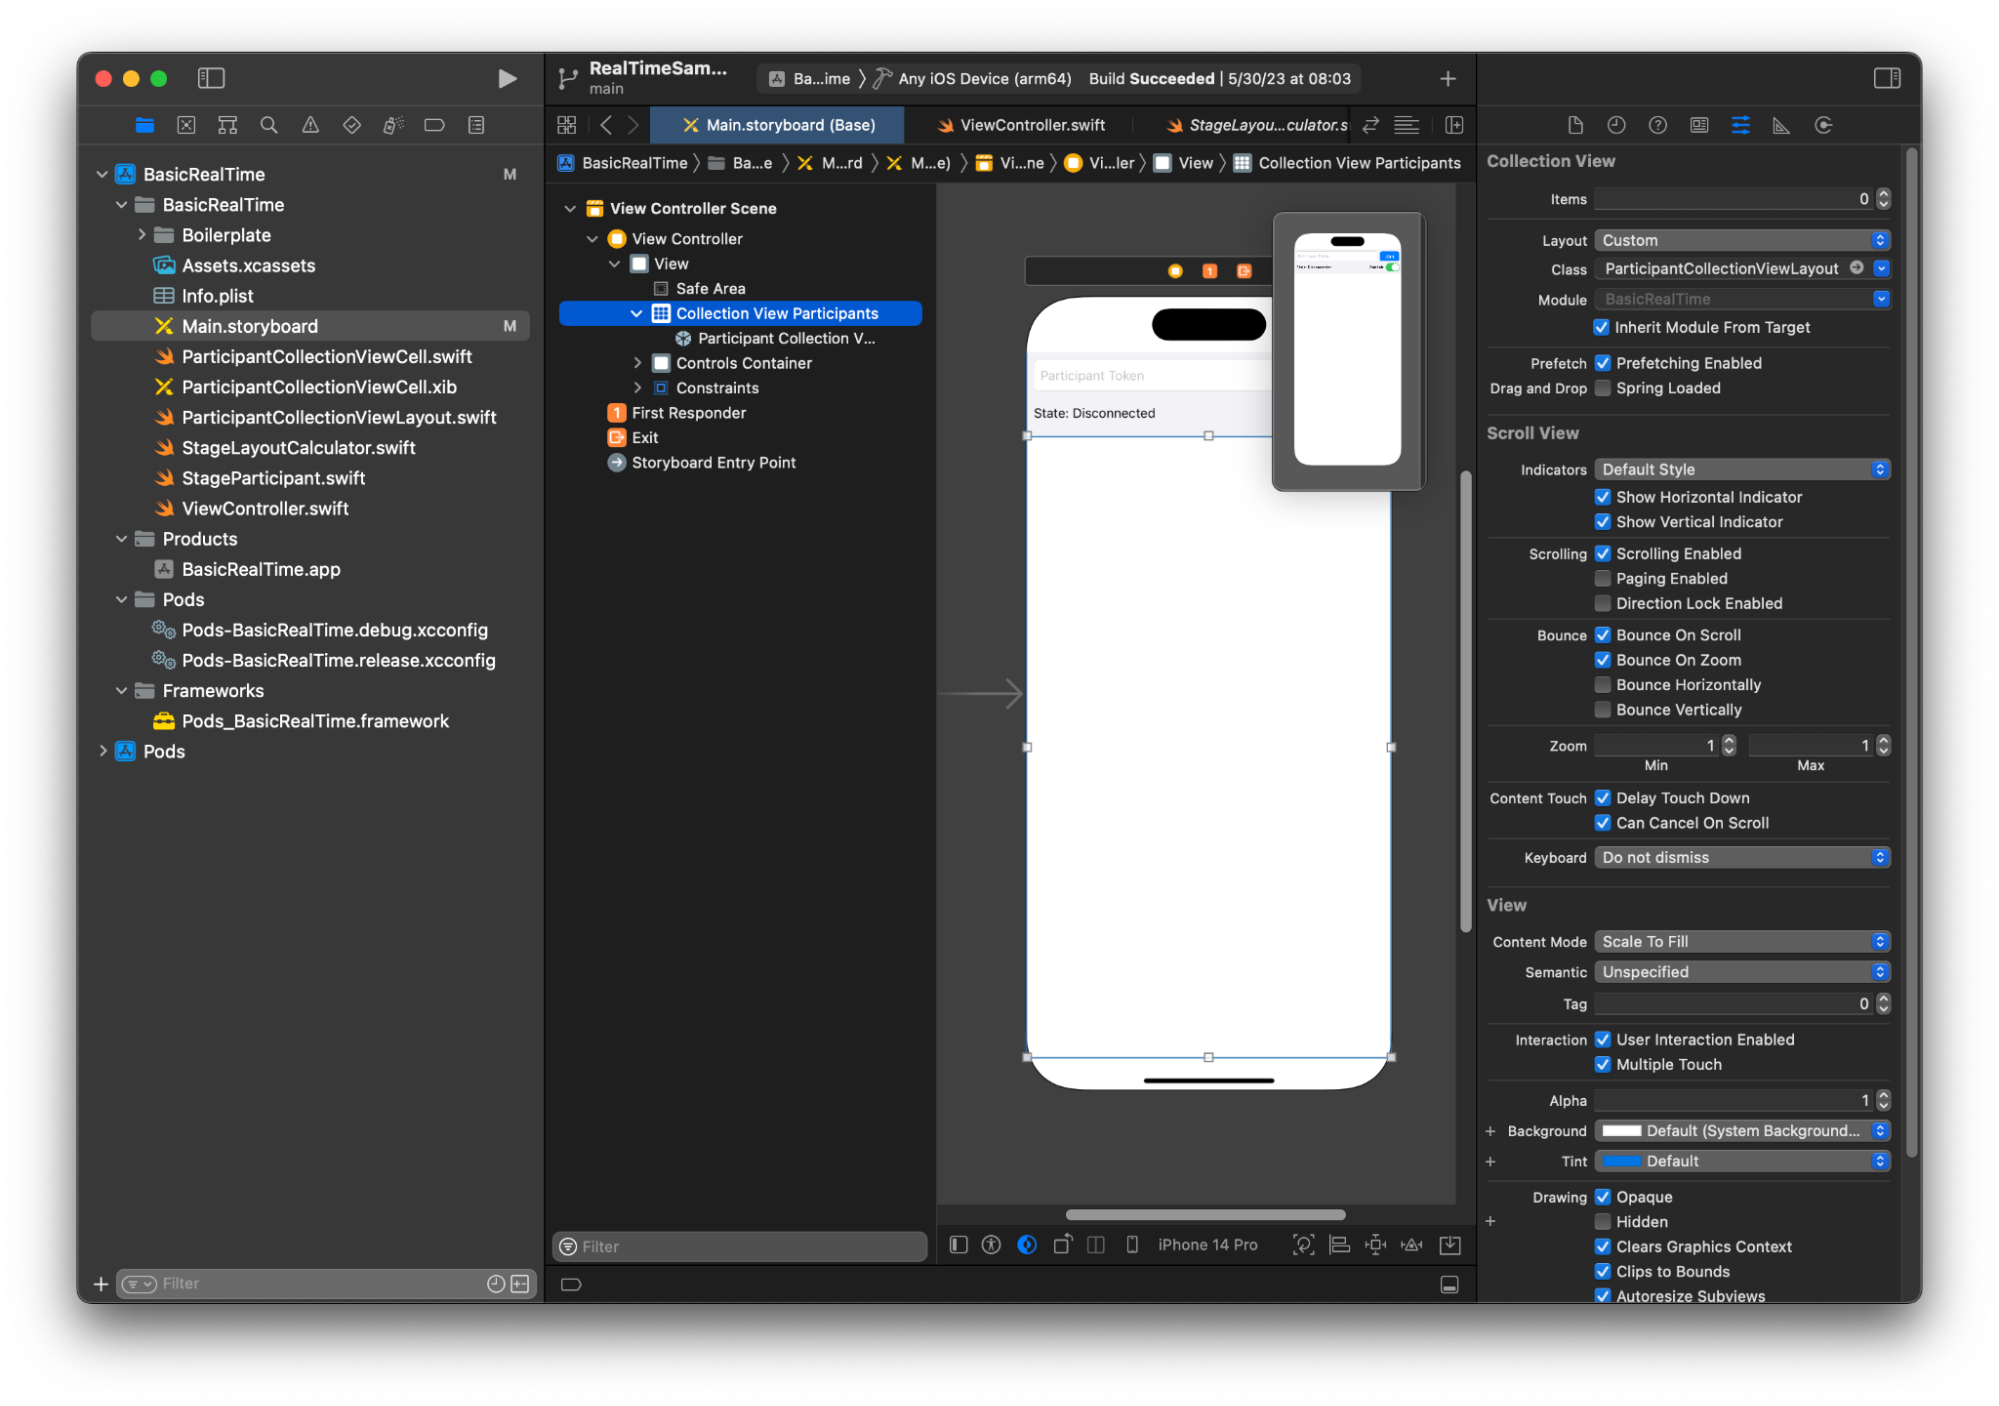
Wieder in Main.storyboard, stellen Sie sicher, dass Sie die Layoutklasse für die UICollectionView festlegen zu der Klasse, die wir gerade erstellt haben:
UI-Aktionen verbinden
Wir sind nah dran, es gibt ein paar IBActions die wir erstellen müssen.
Zuerst kümmern wir uns um die „Beitreten“-Schaltfläche. Sie reagiert unterschiedlich je nach Wert von connectingOrConnected. Wenn sie bereits angeschlossen ist, verlässt sie einfach die Stage. Wenn die Verbindung unterbrochen ist, liest sie den Text aus dem Token UITextFieldund schafft eine neue IVSStage mit diesem Text. Dann fügen wir unseren ViewController hinzu als strategy, errorDelegate, und Renderer für IVSStage, und schließlich treten wir asynchron der Stage bei.
@IBAction private func joinTapped(_ sender: UIButton) {
    if connectingOrConnected {
        // If we're already connected to a Stage, leave it.
        stage?.leave()
    } else {
        guard let token = textFieldToken.text else {
            print("No token")
            return
        }
        // Hide the keyboard after tapping Join
        textFieldToken.resignFirstResponder()
        do {
            // Destroy the old Stage first before creating a new one.
            self.stage = nil
            let stage = try IVSStage(token: token, strategy: self)
            stage.errorDelegate = self
            stage.addRenderer(self)
            try stage.join()
            self.stage = stage
        } catch {
            print("Failed to join stage - \(error)")
        }
    }
}
Die andere UI-Aktion, die wir anschließen müssen, ist der Publish-Switch:
@IBAction private func publishToggled(_ sender: UISwitch) {
    // Because the strategy returns the value of `switchPublish.isOn`, just call `refreshStrategy`.
    stage?.refreshStrategy()
}
Rendern der Teilnehmer
Schließlich müssen wir die Daten, die wir vom SDK erhalten, in die Teilnehmerzelle rendern, die wir zuvor erstellt haben. Wir haben die Logik von UICollectionView bereits fertig, also müssen wir nur noch die API von set in ParticipantCollectionViewCell.swift implementieren.
Wir beginnen mit dem Hinzufügen der empty-Funktion und gehen Sie sie dann Schritt für Schritt durch:
func set(participant: StageParticipant) {

}
Zuerst kümmern wir uns um den Status „Einfach“, die Teilnehmer-ID, den Veröffentlichungsstatus und den Abonnementstatus. Für diese aktualisieren wir einfach unsere UILabels direkt:
labelParticipantId.text = participant.isLocal ? "You (\(participant.participantId ?? "Disconnected"))" : participant.participantId
labelPublishState.text = participant.publishState.text
labelSubscribeState.text = participant.subscribeState.text
Die Texteigenschaften der Publish- und Subscribe-Enums stammen aus lokalen Erweiterungen:
extension IVSParticipantPublishState {
    var text: String {
        switch self {
        case .notPublished: return "Not Published"
        case .attemptingPublish: return "Attempting to Publish"
        case .published: return "Published"
        @unknown default: fatalError()
        }
    }
}

extension IVSParticipantSubscribeState {
    var text: String {
        switch self {
        case .notSubscribed: return "Not Subscribed"
        case .attemptingSubscribe: return "Attempting to Subscribe"
        case .subscribed: return "Subscribed"
        @unknown default: fatalError()
        }
    }
}
Als Nächstes aktualisieren wir die stummgeschalteten Audio- und Videozustände. Um den Stummschaltzustand zu erhalten, müssen wir den IVSImageDevice und IVSAudioDevice aus dem streams-Array finden. Um die Leistung zu optimieren, erinnern wir uns an die zuletzt angehängten Geräte-IDs.
// This belongs outside `set(participant:)`
private var registeredStreams: Set<IVSStageStream> = []
private var imageDevice: IVSImageDevice? {
    return registeredStreams.lazy.compactMap { $0.device as? IVSImageDevice }.first
}
private var audioDevice: IVSAudioDevice? {
    return registeredStreams.lazy.compactMap { $0.device as? IVSAudioDevice }.first
}

// This belongs inside `set(participant:)`
let existingAudioStream = registeredStreams.first { $0.device is IVSAudioDevice }
let existingImageStream = registeredStreams.first { $0.device is IVSImageDevice }

registeredStreams = Set(participant.streams)

let newAudioStream = participant.streams.first { $0.device is IVSAudioDevice }
let newImageStream = participant.streams.first { $0.device is IVSImageDevice }

// `isMuted != false` covers the stream not existing, as well as being muted.
labelVideoMuted.text = "Video Muted: \(newImageStream?.isMuted != false)"
labelAudioMuted.text = "Audio Muted: \(newAudioStream?.isMuted != false)"
Abschließend wollen wir eine Vorschau für das imageDevice rendern und Audiostatistiken der audioDevice anzeigen:
if existingImageStream !== newImageStream {
    // The image stream has changed
    updatePreview() // We’ll cover this next
}

if existingAudioStream !== newAudioStream {
    (existingAudioStream?.device as? IVSAudioDevice)?.setStatsCallback(nil)
    audioDevice?.setStatsCallback( { [weak self] stats in
        self?.labelAudioVolume.text = String(format: "Audio Level: %.0f dB", stats.rms)
    })
    // When the audio stream changes, it will take some time to receive new stats. Reset the value temporarily.
    self.labelAudioVolume.text = "Audio Level: -100 dB"
}
Die letzte Funktion, die wir erstellen müssen, ist updatePreview(), was unserer Ansicht eine Vorschau des Teilnehmers hinzufügt:
private func updatePreview() {
    // Remove any old previews from the preview container
    viewPreviewContainer.subviews.forEach { $0.removeFromSuperview() }
    if let imageDevice = self.imageDevice {
        if let preview = try? imageDevice.previewView(with: .fit) {
            viewPreviewContainer.addSubviewMatchFrame(preview)
        }
    }
}
Das Obige verwendet eine Hilfsfunktion auf UIView, um das Einbetten von Unteransichten zu vereinfachen:
extension UIView {
    func addSubviewMatchFrame(_ view: UIView) {
        view.translatesAutoresizingMaskIntoConstraints = false
        self.addSubview(view)
        NSLayoutConstraint.activate([
            view.topAnchor.constraint(equalTo: self.topAnchor, constant: 0),
            view.bottomAnchor.constraint(equalTo: self.bottomAnchor, constant: 0),
            view.leadingAnchor.constraint(equalTo: self.leadingAnchor, constant: 0),
            view.trailingAnchor.constraint(equalTo: self.trailingAnchor, constant: 0),
        ])
    }
}