Amazon SageMaker Unified Studio is in preview release and is subject to change.
Create a radio station app
In these getting started instructions you create a chat agent app for a radio station. The app can generate playlists and get the dates and locations of upcoming shows. The instructions introduce you to the following concepts:
-
Prompt – a message that you send to the model that the app uses. The model uses the prompt to generate a response. In the app, you can send prompts such as
Create a playlist of songs
                        about Welsh castles
. -
System prompt – A system prompt is a type of prompt that provides instructions or context to the model about the task it should perform, or the persona it should adopt during the conversation. In the app, you use a system prompt to let the model know that the app creates 2 hour playlists for a radio show.
-
Data source – Information not known to the model. In the app, the data source contains dates and locations for upcoming shows. The model uses the data source to help generate a response to prompts such as
When does the band Nova Noise play next?.
For more information, see Build a chat agent app with Amazon Bedrock IDE.
Generate a playlist
In this procedure, you build the initial app. You select the Amazon Bedrock model that you want to use. You also set the system prompt so that the app knows its main purpose is to generate playlists for a fictional rock and pop themed radio station.
To create a Amazon Bedrock IDE chat agent app
-
Navigate to the Amazon SageMaker Unified Studio landing page by using the URL from your admininstrator.
-
Access Amazon SageMaker Unified Studio using your IAM or single sign-on (SSO) credentials. For more information, see Access Amazon SageMaker Unified Studio.
-
On the Amazon SageMaker Unified Studio home page, in the Generative AI app development tile, choose Build chat agent to create a new chat agent app. The Select or create a new project to continue dialog box opens.

-
Choose Create project and follow the instructions at Create a new project. For step 1, do the following:
-
For Project name enter
my_radio_station_project. -
For Project profile choose Generative AI application development.
Use the default options for the remaining steps.
-
-
In Untitled App - nnnn, enter
Get started radio
                        show
as the name for your app. -
In the Configs pane, do the following:
-
For Models, select a model that supports Data. Selecting such a model lets you create a data source in the next procedure. If you don't have access to the model, choose a different model or contact your administrator.

-
For Enter a system prompt in Instructions for chat agent & examples, enter
You are a
                                    chat agent app that creates 2 hour long playlists for a radio
                                    station that plays rock and pop music.
.
-
-
Choose Save to save the current draft of your app.
-
In the Preview pane, in the Enter prompt text box, enter
Create a playlist of songs
                            where each song on the list is related to the next song, by musician,
                            bands, or other connections. Be sure to explain the connection from one
                            song to the next.
-
Choose the run button (or press Enter on your keyboard) to send the prompt to the model.
Choose Save to save your app.
-
Next step: Get the dates and location of shows by following the instructions at Find show dates and locations.
Find show dates and locations
Users of your app might want to know when local artists and bands have upcoming
shows. This information isn't available from a model without providing a data
source. In this procedure you add a data source to your app so that the model can
generate responses to prompts such as When does the band Nova Noise play
next?.
The data source you use is an Amazon Bedrock knowledge base that you create with a CSV file. The CSV file contains show information for ficticious local bands. For more information, see Add a data source to your app.
In this procedure you add a data source
To add your own data to an Amazon Bedrock IDE app
-
Create a CSV file name band-dates.csv and fill it with the following ficticious CSV data.
artist,location,date Neon Pulse,Starlight Arena,2025-01-14 Quantum Echoes,Nebula Hall,2024-12-07 Ethereal Surge,Dreamweaver Dome,2025-02-22 Cosmic Rhythm,Galaxy Gardens,2025-03-09 Velvet Voltage,Electric Avenue Theater,2024-12-18 Astral Whispers,Moonbeam Amphitheater,2025-01-30 Pixel Pioneers,Digital Dreamland,2025-02-11 Chrono Cascade,Temporal Tower,2024-12-29 Luminous Lullaby,Aurora Auditorium,2025-03-17 Synth Sirens,Neon Nights Club,2025-01-05 Holographic Harmony,Prism Pavilion,2025-02-28 Radiant Rebels,Sunburst Square,2024-12-13 Nova Noise,Cosmic Coliseum,2025-03-01 Quantum Quill,Paradox Plaza,2025-01-22 Echoing Embers,Phoenix Fire Pit,2025-02-08 Cyber Serenade,Circuit City Center,2024-12-21 Stellar Storm,Constellation Court,2025-03-25 Neon Nebula,Glowworm Grotto,2025-01-09 Bioluminescent Beat,Firefly Forest,2025-02-17 Zeitgeist Zephyr,Clockwork Castle,2024-12-03 -
If it isn't already, open the app that you created in Generate a playlist.
-
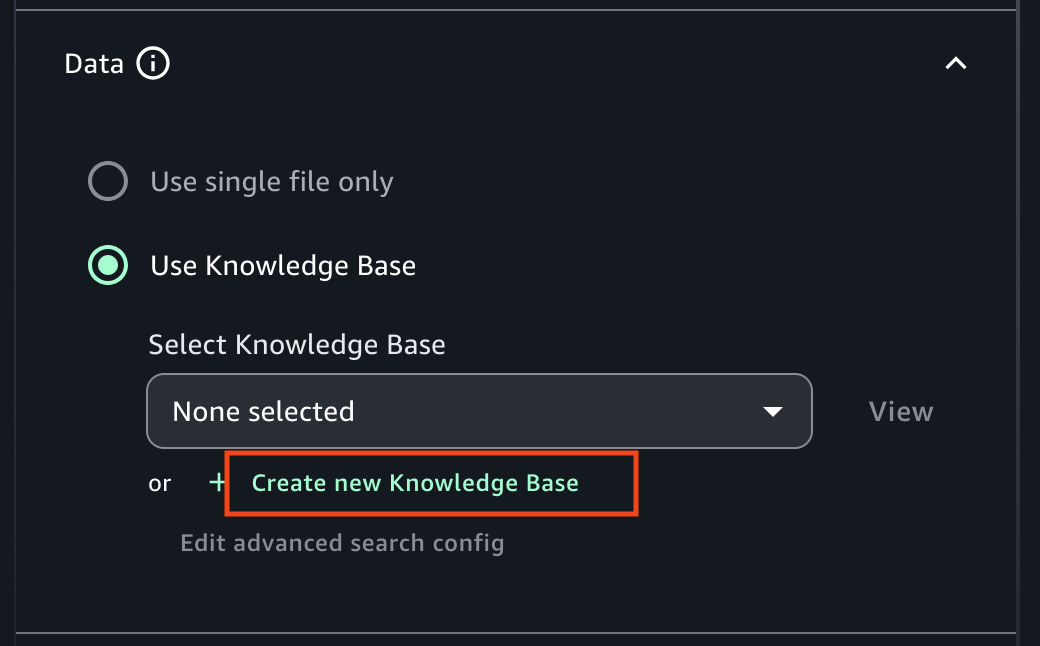
In Data choose Use Knowledge Base and then Create new Knowledge Base. The Create Knowledge Base pane is shown.

-
For Name, enter
Local_shows. -
For Description, enter
Information about local band shows.. -
In Add data sources, choose Local file.
-
Choose Click to upload and upload the CSV file that you created in step 1. Alternatively, add the CSV by dragging and dropping the document from your computer.
For more information, see Document data source.
-
For Embeddings model, choose a model for converting your data into vector embeddings.
-
Choose Create. It might take Amazon Bedrock IDE a few minutes to create the knowledge base.
-
In the Configs pane, For Select Knowledge Base, select the knowledge base that you just created. You might need to wait until Amazon Bedrock IDE finishes creating the knowledge base.
Choose Save.
-
Test the data source by entering
When does the band Nova Noise play next?in the prompt text box. -
Choose the run button to send the prompt to the model. The model should respond with the date of the next show by Nova Noise.