Prerequisites for BYOIP in Amazon EC2
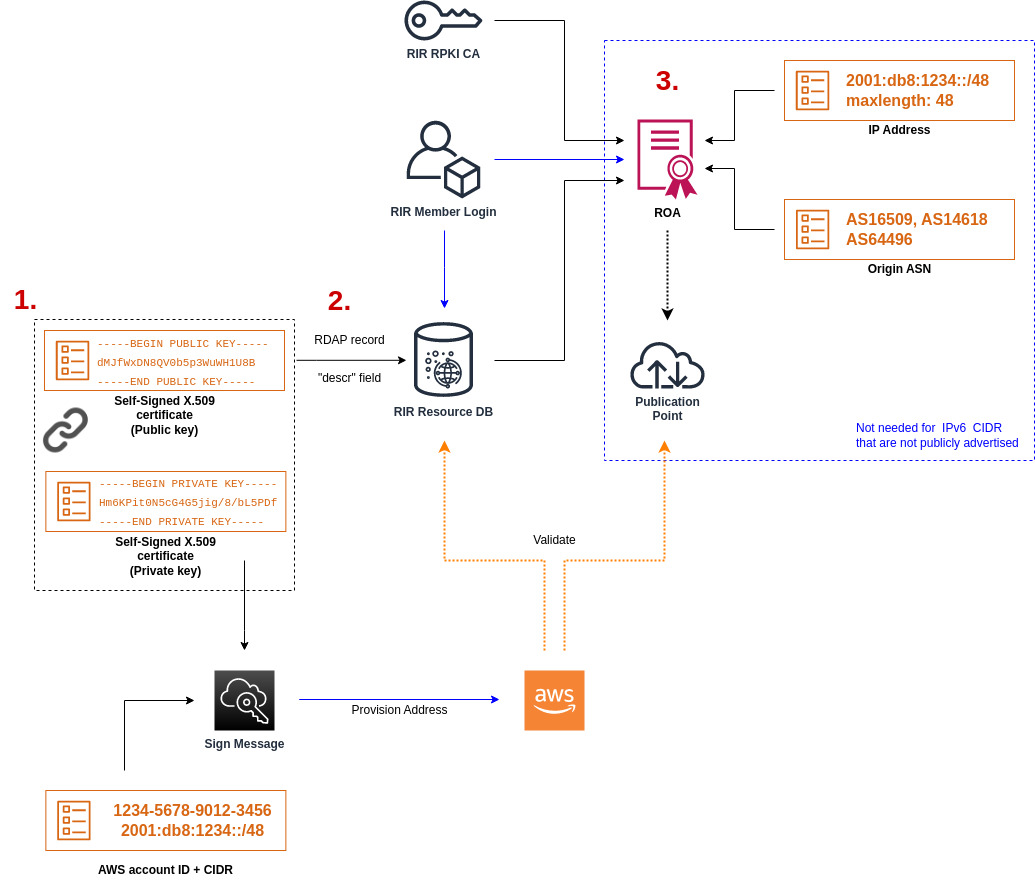
The onboarding process for BYOIP has two phases, for which you must perform three steps. These steps correspond to the steps depicted in the following diagram. We include manual steps in this documentation, but your RIR might offer managed services to help you with these steps.
Tip
The tasks in this section require a Linux terminal and may be performed using Linux, the
AWS CloudShell
Contents
Overview
Preparation phase
[1] Create a private key and use it to generate a self-signed X.509 certificate for authentication purposes. This certificate is only used during the provisioning phase. You can remove the certificate from your RIR's record after provisioning is complete
RIR configuration phase
[2] Upload the self-signed certificate to your RDAP record comments.
[3] Create a ROA object in your RIR. The ROA defines the desired address range, the Autonomous System Numbers (ASNs) allowed to advertise the address range, and an expiration date to register with the Resource Public Key Infrastructure (RPKI) of your RIR.
Note
A ROA is not required for non-publicly advertisable IPv6 address space.
To bring on multiple non-contiguous address ranges, you must repeat this process with each address range. However, the preparation and RIR configuration steps don't need to be repeated if splitting a contiguous block across several different AWS Regions.
Bringing on an address range has no effect on any address ranges that you brought on previously.
Create a private key and generate an X.509 certificate
Use the following procedure to create a self-signed X.509 certificate and add it to the RDAP record for your RIR. This key pair is used to authenticate the address range with the RIR. The openssl commands require OpenSSL version 1.0.2 or later.
Copy the following commands and replace only the placeholder values (in colored italic text).
This procedure follows the best practice of encrypting your private RSA key and requiring a passphrase to access it.
-
Generate an RSA 2048-bit private key as shown in the following.
$openssl genpkey -aes256 -algorithm RSA -pkeyopt rsa_keygen_bits:2048 -out private-key.pemThe
-aes256parameter specifies the algorithm used to encrypt the private key. The command returns the following output, including prompts to set a passphrase:......+++ .+++ Enter PEM pass phrase:xxxxxxxVerifying - Enter PEM pass phrase:xxxxxxxYou can inspect the key using the following command:
$openssl pkey -in private-key.pem -textThis returns a passphrase prompt and the contents of the key, which should be similar to the following:
Enter pass phrase for private-key.pem:xxxxxxx-----BEGIN PRIVATE KEY----- MIIEvgIBADANBgkqhkiG9w0BAQEFAASCBKgwggSkAgEAAoIBAQDFBXHRI4HVKAhh 3seiciooizCRTbJe1+YsxNTja4XyKypVGIFWDGhZs44FCHlPOOSVJ+NqP74w96oM 7DPS3xo9kaQyZBFn2YEp2EBq5vf307KHNRmZZUmkn0zHOSEpNmY2fMxISBxewlxR FAniwmSd/8TDvHJMY9FvAIvWuTsv5l0tJKk+a91K4+tO3UdDR7Sno5WXExfsBrW3 g1ydo3TBsx8i5/YiVOcNApy7ge2/FiwY3aCXJB6r6nuF6H8mRgI4r4vkMRsOlAhJ DnZPNeweboo+K3Q3lwbgbmOKD/z9svk8N/+hUTBtIX0fRtbG+PLIw3xWRHGrMSn2 BzsPVuDLAgMBAAECggEACiJUj2hfJkKv47Dc3es3Zex67A5uDVjXmxfox2Xhdupn fAcNqAptV6fXt0SPUNbhUxbBKNbshoJGufFwXPli1SXnpzvkdU4Hyco4zgbhXFsE RNYjYfOGzTPwdBLpNMB6k3Tp4RHse6dNrlH0jDhpioL8cQEBdBJyVF5X0wymEbmV mC0jgH/MxsBAPWW6ZKicg9ULMlWiAZ3MRAZPjHHgpYkAAsUWKAbCBwVQcVjGO59W jfZjzTX5pQtVVH68ruciH88DTZCwjCkjBhxg+OIkJBLE5wkh82jIHSivZ63flwLw z+E0+HhELSZJrn2MY6Jxmik3qNNUOF/Z+3msdj2luQKBgQDjwlC/3jxp8zJy6P8o JQKv7TdvMwUj4VSWOHZBHLv4evJaaia0uQjIo1UDa8AYitqhX1NmCCehGH8yuXj/ v6V3CzMKDkmRr1NrONnSz5QsndQ04Z6ihAQlPmJ96g4wKtgoC7AYpyP0g1a+4/sj b1+o3YQI4pD/F71c+qaztH7PRwKBgQDdc23yNmT3+Jyptf0fKjEvONK+xwUKzi9c L/OzBq5yOIC1Pz2T85gOe1i8kwZws+xlpG6uBT6lmIJELd0k59FyupNu4dPvX5SD 6GGqdx4jk9KvI74usGeOBohmF0phTHkrWKBxXiyT0oS8zjnJlEn8ysIpGgO28jjr LpaHNZ/MXQKBgQDfLNcnS0LzpsS2aK0tzyZU8SMyqVHOGMxj7quhneBq2T6FbiLD T9TVlYaGNZ0j71vQaLI19qOubWymbautH0Op5KV8owdf4+bf1/NJaPIOzhDUSIjD Qo01WW31Z9XDSRhKFTnWzmCjBdeIcajyzf10YKsycaAW9lItu8aBrMndnQKBgQDb nNp/JyRwqjOrNljk7DHEs+SD39kHQzzCfqd+dnTPv2sc06+cpym3yulQcbokULpy fmRo3bin/pvJQ3aZX/Bdh9woTXqhXDdrrSwWInVYMQPyPk8f/D9mIOJp5FUWMwHD U+whIZSxsEeE+jtixlWtheKRYkQmzQZXbWdIhYyI3QKBgD+F/6wcZ85QW8nAUykA 3WrSIx/3cwDGdm4NRGct8ZOZjTHjiy9ojMOD1L7iMhRQ/3k3hUsin5LDMp/ryWGG x4uIaLat40kiC7T4I66DM7P59euqdz3w0PD+VU+h7GSivvsFDdySUt7bNK0AUVLh dMJfWxDN8QV0b5p3WuWH1U8B -----END PRIVATE KEY----- Private-Key: (2048 bit) modulus: 00:c5:05:71:d1:23:81:d5:28:08:61:de:c7:a2:72: 2a:28:8b:30:91:4d:b2:5e:d7:e6:2c:c4:d4:e3:6b: 85:f2:2b:2a:55:18:81:56:0c:68:59:b3:8e:05:08: 79:4f:38:e4:95:27:e3:6a:3f:be:30:f7:aa:0c:ec: 33:d2:df:1a:3d:91:a4:32:64:11:67:d9:81:29:d8: 40:6a:e6:f7:f7:d3:b2:87:35:19:99:65:49:a4:9f: 4c:c7:39:21:29:36:66:36:7c:cc:48:48:1c:5e:c2: 5c:51:14:09:e2:c2:64:9d:ff:c4:c3:bc:72:4c:63: d1:6f:00:8b:d6:b9:3b:2f:e6:5d:2d:24:a9:3e:6b: dd:4a:e3:eb:4e:dd:47:43:47:b4:a7:a3:95:97:13: 17:ec:06:b5:b7:83:5c:9d:a3:74:c1:b3:1f:22:e7: f6:22:54:e7:0d:02:9c:bb:81:ed:bf:16:2c:18:dd: a0:97:24:1e:ab:ea:7b:85:e8:7f:26:46:02:38:af: 8b:e4:31:1b:0e:94:08:49:0e:76:4f:35:ec:1e:6e: 8a:3e:2b:74:37:97:06:e0:6e:63:8a:0f:fc:fd:b2: f9:3c:37:ff:a1:51:30:6d:21:7d:1f:46:d6:c6:f8: f2:c8:c3:7c:56:44:71:ab:31:29:f6:07:3b:0f:56: e0:cb publicExponent: 65537 (0x10001) privateExponent: 0a:22:54:8f:68:5f:26:42:af:e3:b0:dc:dd:eb:37: 65:ec:7a:ec:0e:6e:0d:58:d7:9b:17:e8:c7:65:e1: 76:ea:67:7c:07:0d:a8:0a:6d:57:a7:d7:b7:44:8f: 50:d6:e1:53:16:c1:28:d6:ec:86:82:46:b9:f1:70: 5c:f9:62:d5:25:e7:a7:3b:e4:75:4e:07:c9:ca:38: ce:06:e1:5c:5b:04:44:d6:23:61:f3:86:cd:33:f0: 74:12:e9:34:c0:7a:93:74:e9:e1:11:ec:7b:a7:4d: ae:51:f4:8c:38:69:8a:82:fc:71:01:01:74:12:72: 54:5e:57:d3:0c:a6:11:b9:95:98:2d:23:80:7f:cc: c6:c0:40:3d:65:ba:64:a8:9c:83:d5:0b:32:55:a2: 01:9d:cc:44:06:4f:8c:71:e0:a5:89:00:02:c5:16: 28:06:c2:07:05:50:71:58:c6:3b:9f:56:8d:f6:63: cd:35:f9:a5:0b:55:54:7e:bc:ae:e7:22:1f:cf:03: 4d:90:b0:8c:29:23:06:1c:60:f8:e2:24:24:12:c4: e7:09:21:f3:68:c8:1d:28:af:67:ad:df:97:02:f0: cf:e1:34:f8:78:44:2d:26:49:ae:7d:8c:63:a2:71: 9a:29:37:a8:d3:54:38:5f:d9:fb:79:ac:76:3d:a5: b9 prime1: 00:e3:c2:50:bf:de:3c:69:f3:32:72:e8:ff:28:25: 02:af:ed:37:6f:33:05:23:e1:54:96:38:76:41:1c: bb:f8:7a:f2:5a:6a:26:b4:b9:08:c8:a3:55:03:6b: c0:18:8a:da:a1:5f:53:66:08:27:a1:18:7f:32:b9: 78:ff:bf:a5:77:0b:33:0a:0e:49:91:af:53:6b:38: d9:d2:cf:94:2c:9d:d4:34:e1:9e:a2:84:04:25:3e: 62:7d:ea:0e:30:2a:d8:28:0b:b0:18:a7:23:f4:83: 56:be:e3:fb:23:6f:5f:a8:dd:84:08:e2:90:ff:17: bd:5c:fa:a6:b3:b4:7e:cf:47 prime2: 00:dd:73:6d:f2:36:64:f7:f8:9c:a9:b5:fd:1f:2a: 31:2f:38:d2:be:c7:05:0a:ce:2f:5c:2f:f3:b3:06: ae:72:38:80:b5:3f:3d:93:f3:98:0e:7b:58:bc:93: 06:70:b3:ec:65:a4:6e:ae:05:3e:a5:98:82:44:2d: dd:24:e7:d1:72:ba:93:6e:e1:d3:ef:5f:94:83:e8: 61:aa:77:1e:23:93:d2:af:23:be:2e:b0:67:8e:06: 88:66:17:4a:61:4c:79:2b:58:a0:71:5e:2c:93:d2: 84:bc:ce:39:c9:94:49:fc:ca:c2:29:1a:03:b6:f2: 38:eb:2e:96:87:35:9f:cc:5d exponent1: 00:df:2c:d7:27:4b:42:f3:a6:c4:b6:68:ad:2d:cf: 26:54:f1:23:32:a9:51:ce:18:cc:63:ee:ab:a1:9d: e0:6a:d9:3e:85:6e:22:c3:4f:d4:d5:95:86:86:35: 9d:23:ef:5b:d0:68:b2:35:f6:a3:ae:6d:6c:a6:6d: ab:ad:1f:43:a9:e4:a5:7c:a3:07:5f:e3:e6:df:d7: f3:49:68:f2:0e:ce:10:d4:48:88:c3:42:8d:35:59: 6d:f5:67:d5:c3:49:18:4a:15:39:d6:ce:60:a3:05: d7:88:71:a8:f2:cd:fd:74:60:ab:32:71:a0:16:f6: 52:2d:bb:c6:81:ac:c9:dd:9d exponent2: 00:db:9c:da:7f:27:24:70:aa:33:ab:36:58:e4:ec: 31:c4:b3:e4:83:df:d9:07:43:3c:c2:7e:a7:7e:76: 74:cf:bf:6b:1c:d3:af:9c:a7:29:b7:ca:e9:50:71: ba:24:50:ba:72:7e:64:68:dd:b8:a7:fe:9b:c9:43: 76:99:5f:f0:5d:87:dc:28:4d:7a:a1:5c:37:6b:ad: 2c:16:22:75:58:31:03:f2:3e:4f:1f:fc:3f:66:20: e2:69:e4:55:16:33:01:c3:53:ec:21:21:94:b1:b0: 47:84:fa:3b:62:c6:55:ad:85:e2:91:62:44:26:cd: 06:57:6d:67:48:85:8c:88:dd coefficient: 3f:85:ff:ac:1c:67:ce:50:5b:c9:c0:53:29:00:dd: 6a:d2:23:1f:f7:73:00:c6:76:6e:0d:44:67:2d:f1: 93:99:8d:31:e3:8b:2f:68:8c:c3:83:d4:be:e2:32: 14:50:ff:79:37:85:4b:22:9f:92:c3:32:9f:eb:c9: 61:86:c7:8b:88:68:b6:ad:e3:49:22:0b:b4:f8:23: ae:83:33:b3:f9:f5:eb:aa:77:3d:f0:d0:f0:fe:55: 4f:a1:ec:64:a2:be:fb:05:0d:dc:92:52:de:db:34: ad:00:51:52:e1:74:c2:5f:5b:10:cd:f1:05:74:6f: 9a:77:5a:e5:87:d5:4f:01Keep your private key in a secure location when it is not in use.
-
Generate an X.509 certificate using the private key created in the previous step. In this example, the certificate expires in 365 days, after which time it cannot be trusted. Be sure to set the expiration appropriately. The certificate must only be valid for the duration of the provisioning process. You can remove the certificate from your RIR's record after provisioning is complete. The
tr -d "\n"command strips newline characters (line breaks) from the output. You need to provide a Common Name when prompted, but the other fields can be left blank.$openssl req -new -x509 -key private-key.pem -days 365 | tr -d "\n" > certificate.pemThis results in output similar to the following:
Enter pass phrase for private-key.pem:xxxxxxxYou are about to be asked to enter information that will be incorporated into your certificate request. What you are about to enter is what is called a Distinguished Name or a DN. There are quite a few fields but you can leave some blank For some fields there will be a default value, If you enter '.', the field will be left blank. ----- Country Name (2 letter code) []: State or Province Name (full name) []: Locality Name (eg, city) []: Organization Name (eg, company) []: Organizational Unit Name (eg, section) []: Common Name (eg, fully qualified host name) []:example.comEmail Address []:Note
The Common Name is not needed for AWS provisioning. It can be any internal or public domain name.
You can inspect the certificate with the following command:
$cat certificate.pemThe output should be a long, PEM-encoded string without line breaks, prefaced by
-----BEGIN CERTIFICATE-----and followed by-----END CERTIFICATE-----.
Upload the X.509 certificate to the RDAP record in your RIR
Add the certificate that you previously created to the RDAP record for your RIR.
Be sure to include the -----BEGIN CERTIFICATE----- and -----END
CERTIFICATE----- strings before and after the encoded portion. All of
this content must be on a single, long line. The procedure for updating RDAP depends
on your RIR:
-
For ARIN, use the Account Manager portal
to add the certificate in the "Public Comments" section for the "Network Information" object representing your address range. Do not add it to the comments section for your organization. -
For RIPE, add the certificate as a new "descr" field to the "inetnum" or "inet6num" object representing your address range. These can usually be found in the "My Resources" section of the RIPE Database portal
. Do not add it to the comments section for your organization or the "remarks" field of the above objects. -
For APNIC, email the certificate to helpdesk@apnic.net
to manually add it to the "remarks" field for your address range. Send the email using the APNIC authorized contact for the IP addresses.
You can remove the certificate from your RIR's record after the provisioning stage below has been completed.
Create a ROA object in your RIR
Create a ROA object to authorize the Amazon ASNs 16509 and 14618 to advertise your address range, as well as the ASNs that are currently authorized to advertise the address range. For the AWS GovCloud (US) Regions, authorize ASN 8987 instead of 16509 and 14618. You must set the maximum length to the size of the CIDR that you are bringing in. The most specific IPv4 prefix you can bring is /24. The most specific IPv6 address range that you can bring is /48 for CIDRs that are publicly advertisable and /56 for CIDRs that are not publicly advertisable.
Important
If you are creating a ROA object for Amazon VPC IP Address Manager (IPAM),
when you create the ROAs, for IPv4 CIDRs you must set the maximum length of an
IP address prefix to /24. For IPv6 CIDRs, if you are adding them to
an advertisable pool, the maximum length of an IP address prefix must be
/48. This ensures that you have full flexibility to divide your
public IP address across AWS Regions. IPAM enforces the maximum length you
set. For more information about BYOIP addresses to IPAM, see Tutorial: BYOIP address CIDRs to IPAM in the
Amazon VPC IPAM User Guide.
It might take up to 24 hours for the ROA to become available to Amazon. For more information, consult your RIR:
-
ARIN — ROA Requests
-
RIPE — Managing ROAs
-
APNIC — Route Management
When you migrate advertisements from an on-premises workload to AWS, you must create a ROA for your existing ASN before creating the ROAs for Amazon's ASNs. Otherwise, you might see an impact to your existing routing and advertisements.
Important
For Amazon to advertise and continue advertising your IP address range, your ROAs with Amazon ASNs must be compliant with the above guidelines. If your ROAs are invalid or not compliant with the above guidelines, Amazon reserves the right to stop advertising your IP address range.
Note
This step is not required for non-publicly advertisable IPv6 address space.
