Publication et abonnement avec le SDK de diffusion iOS IVS
Cette section explique les étapes nécessaires à la publication et à l'abonnement à une étape à l'aide de votre application iOS.
Créer les vues
Nous commençons par utiliser le fichier ViewController.swift créé automatiquement pour importer AmazonIVSBroadcast, puis ajouter quelques @IBOutlets à lier :
import AmazonIVSBroadcast

class ViewController: UIViewController {

    @IBOutlet private var textFieldToken: UITextField!
    @IBOutlet private var buttonJoin: UIButton!
    @IBOutlet private var labelState: UILabel!
    @IBOutlet private var switchPublish: UISwitch!
    @IBOutlet private var collectionViewParticipants: UICollectionView!
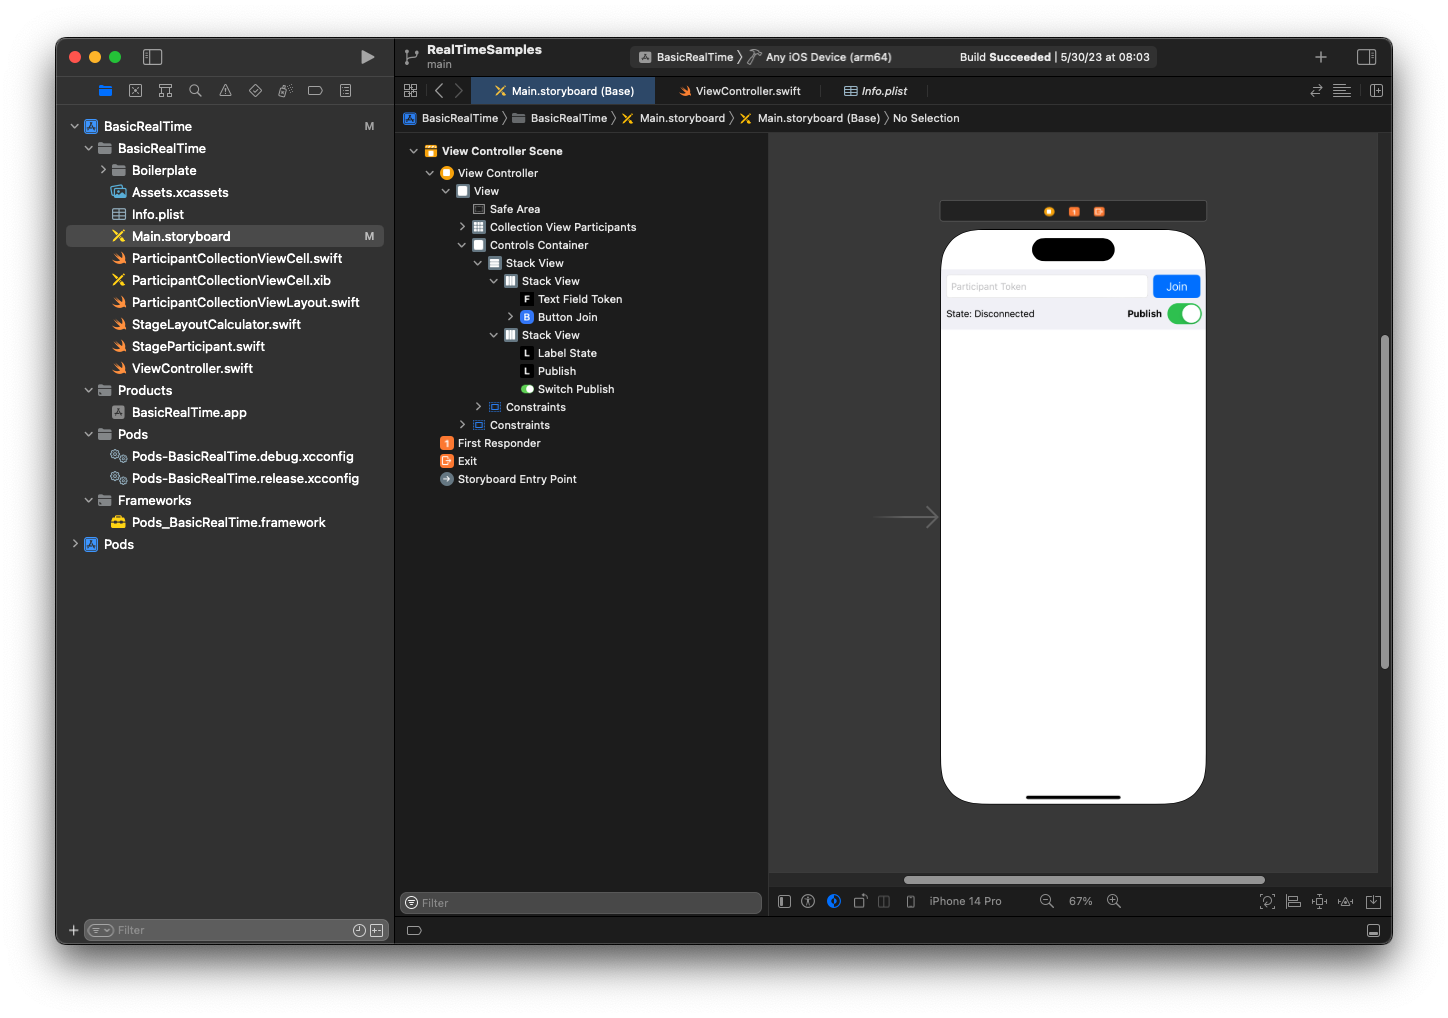
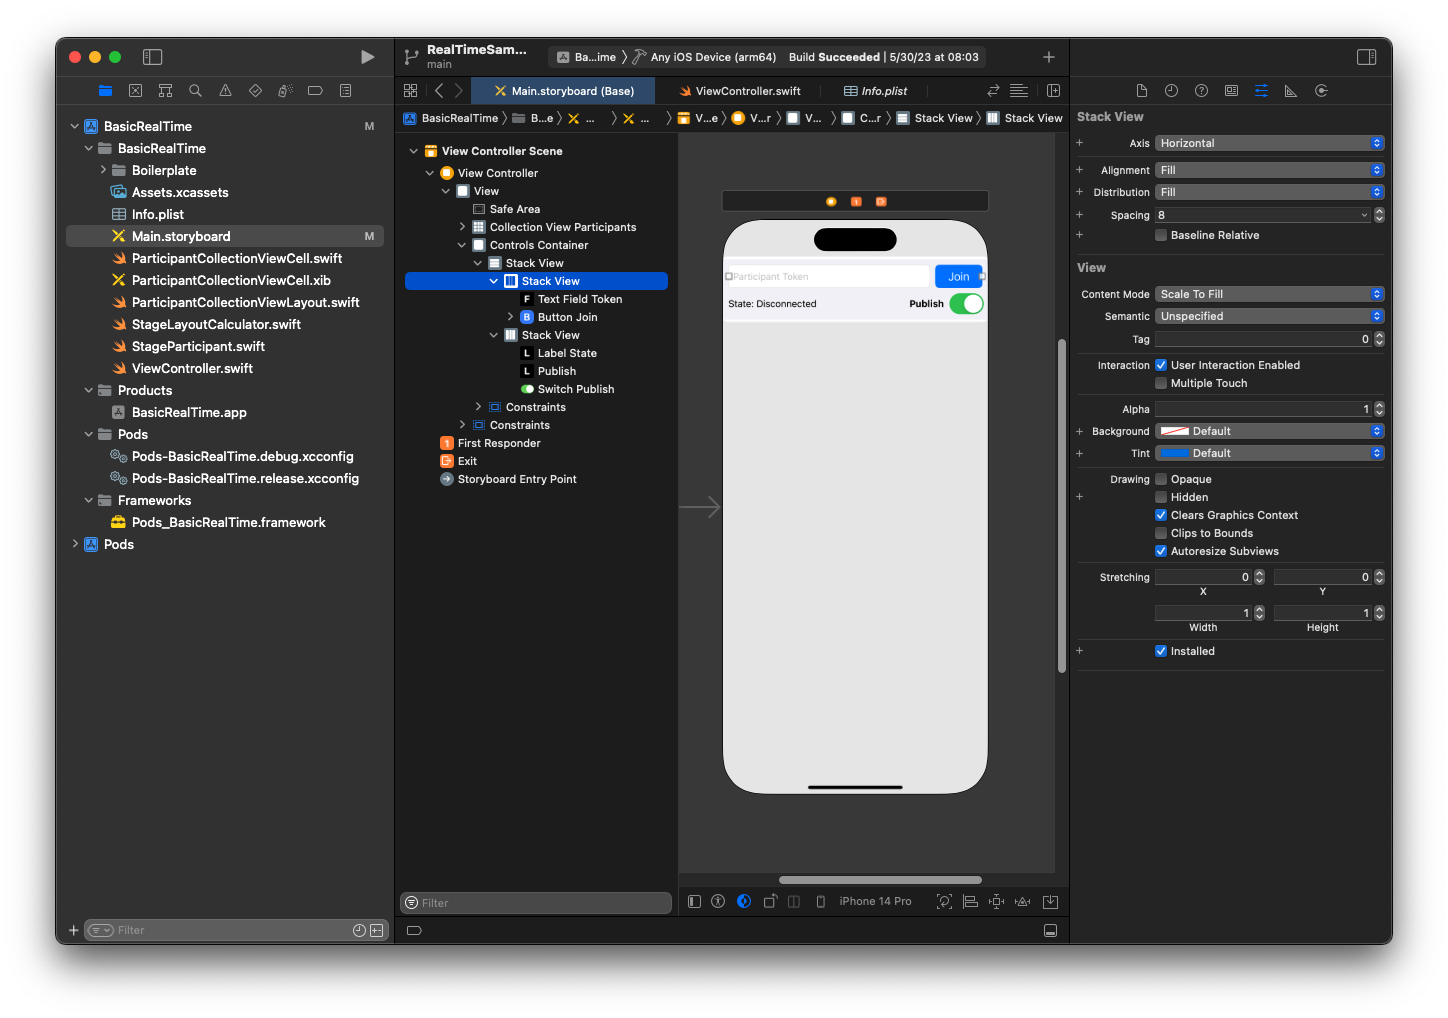
Nous créons maintenant ces vues et les relions dans Main.storyboard. Voici la structure de vue que nous allons utiliser :
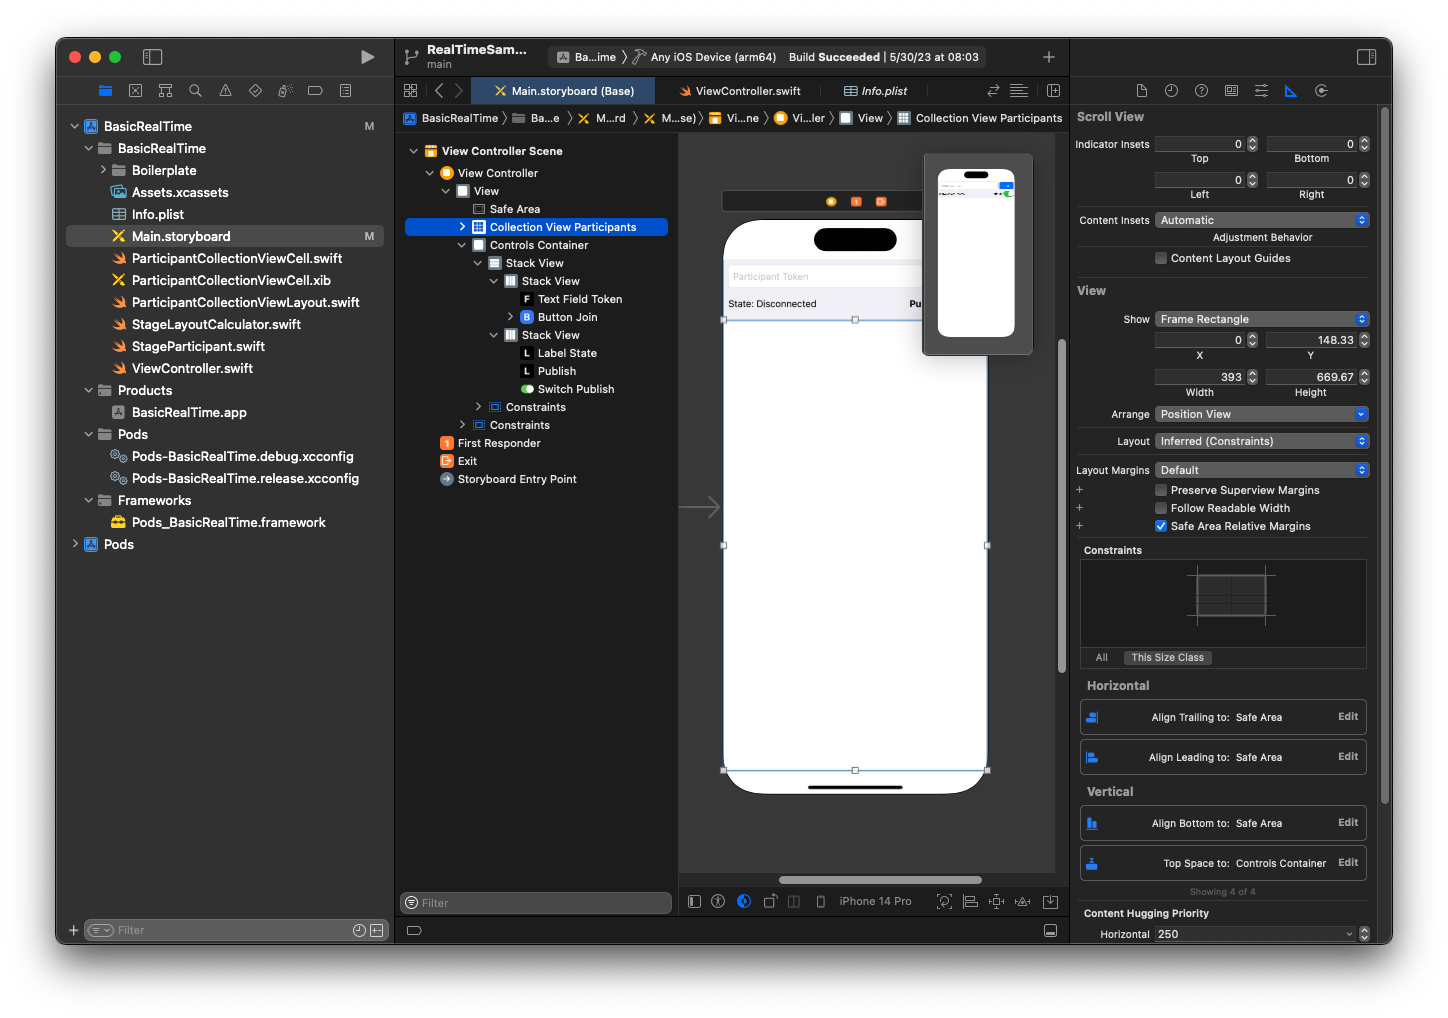
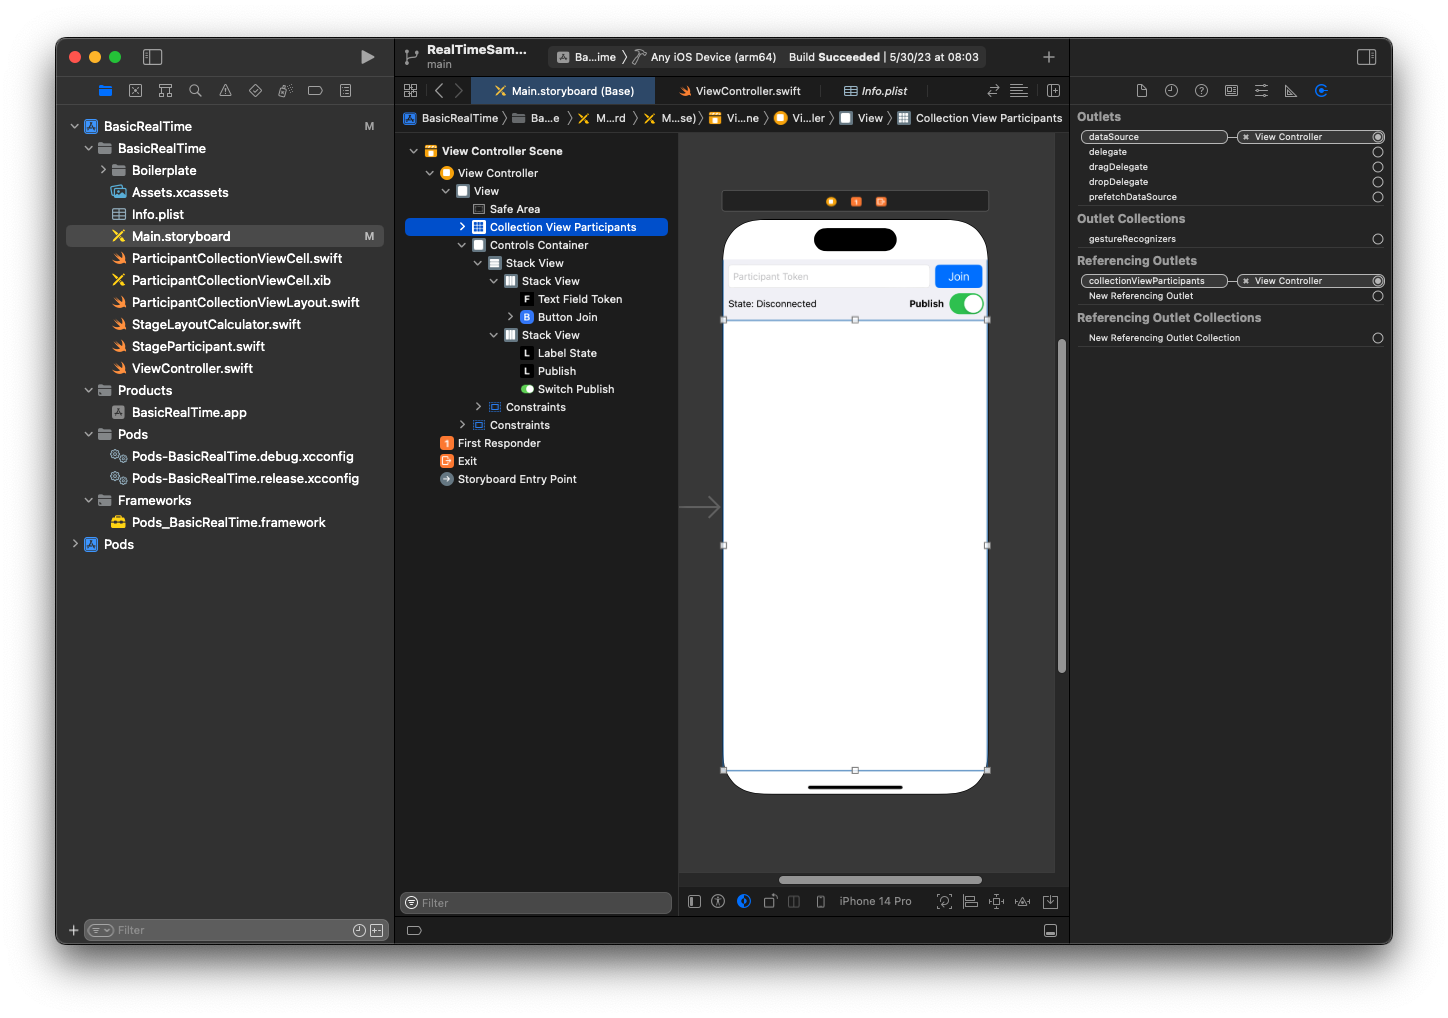
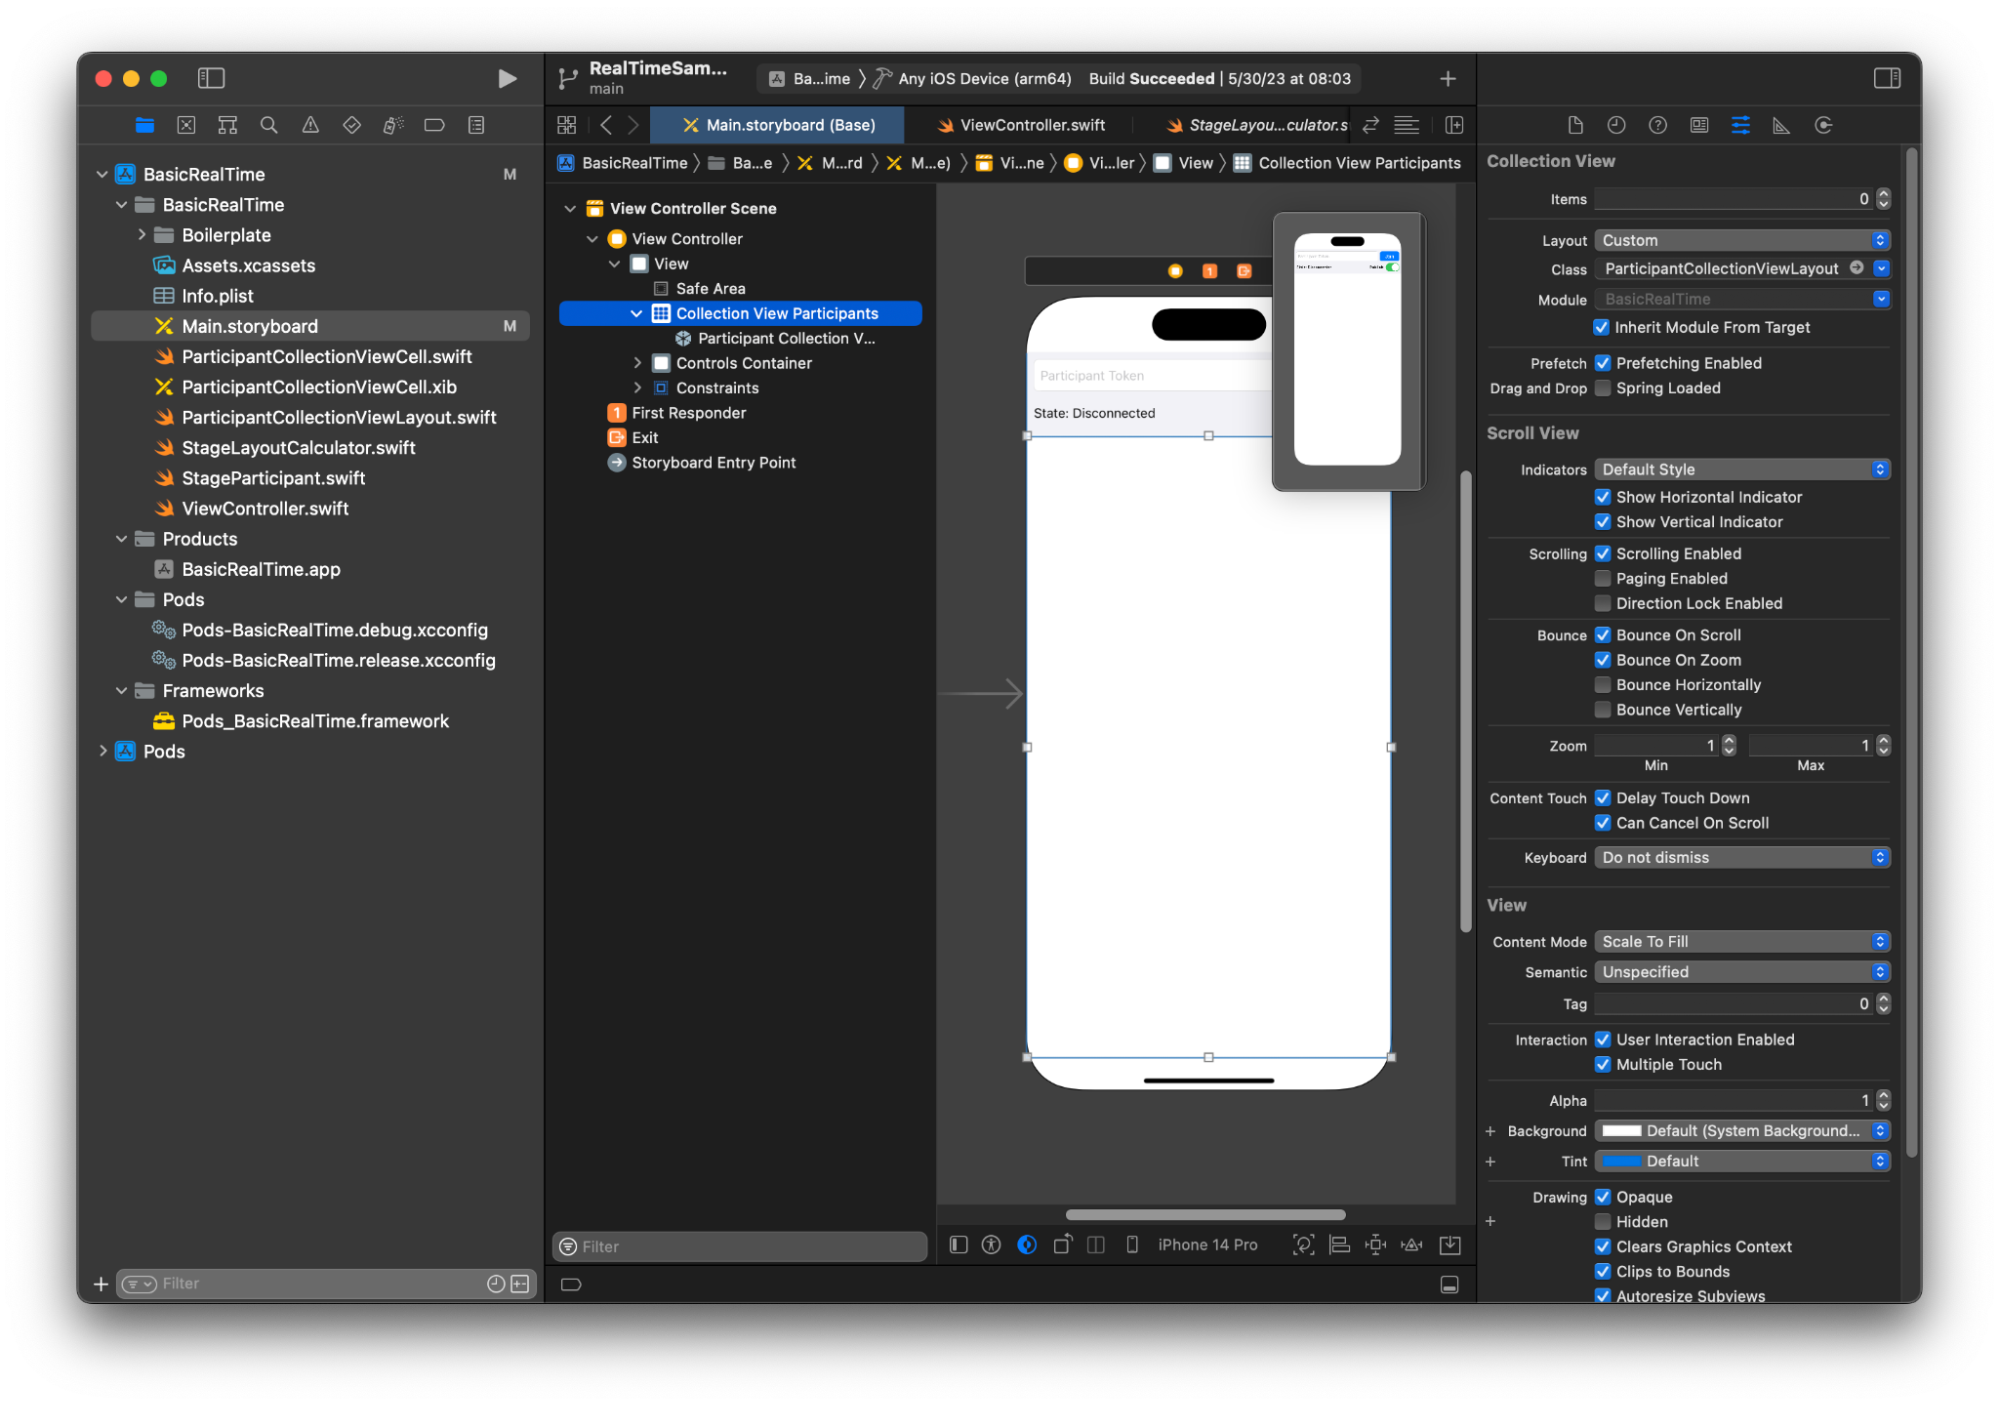
Pour la configuration d’AutoLayout, nous devons personnaliser trois vues. La première vue est Collection View Participants (une UICollectionView). Liez Leading, Trailing, et Bottom à Safe Area. Liez également Top à Controls Container.
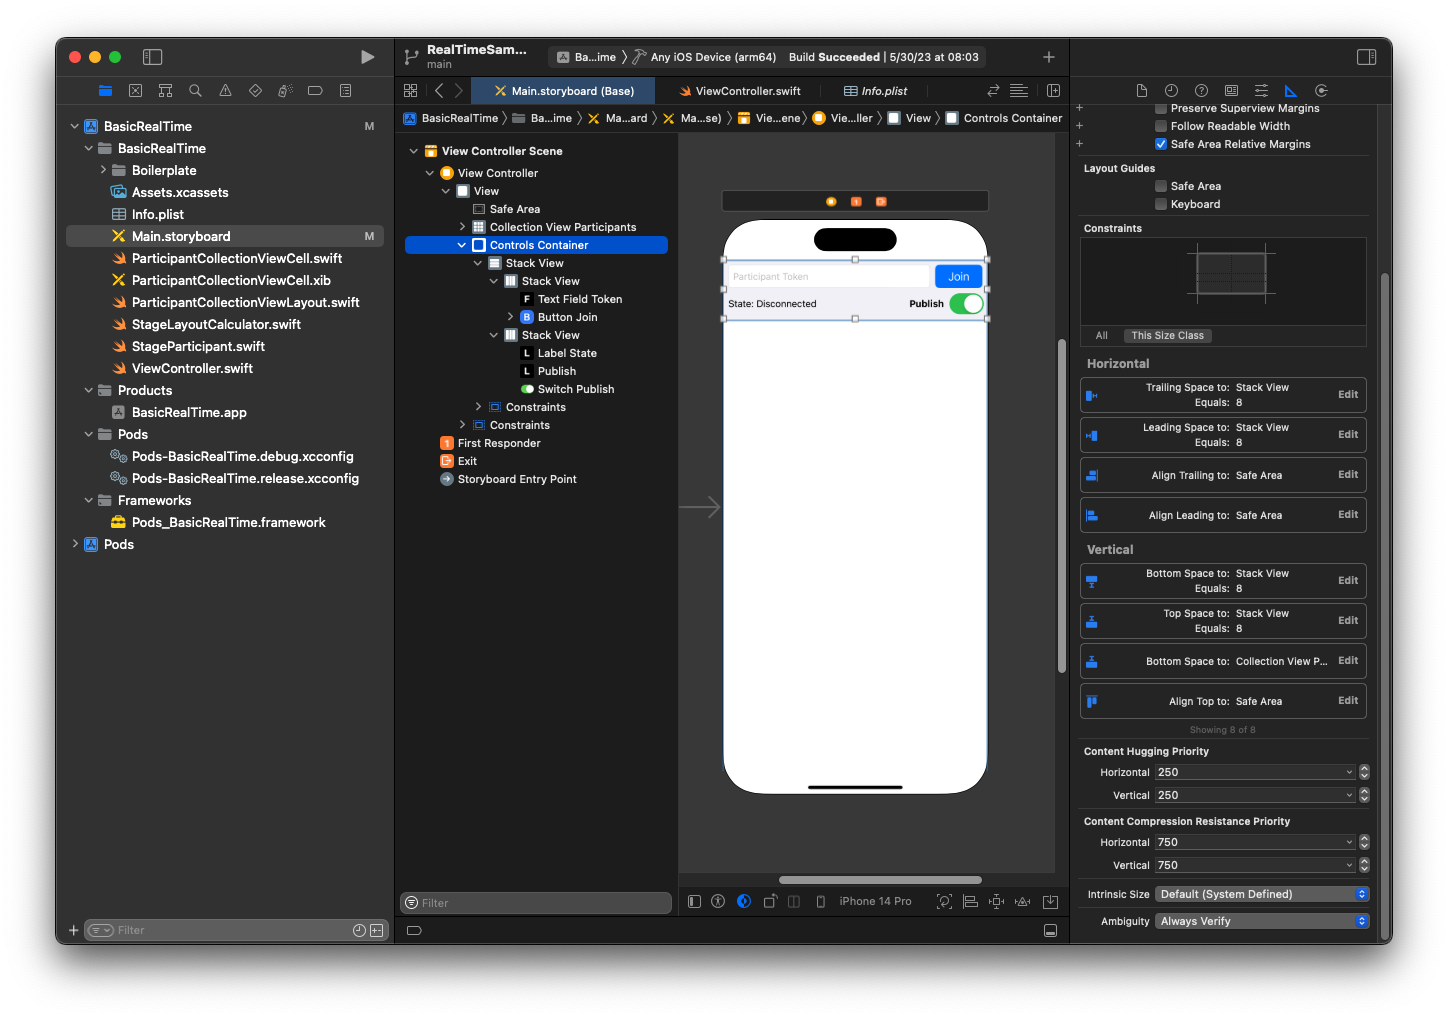
La deuxième vue est Controls Container. Liez Leading, Trailing, et Top à Safe Area :
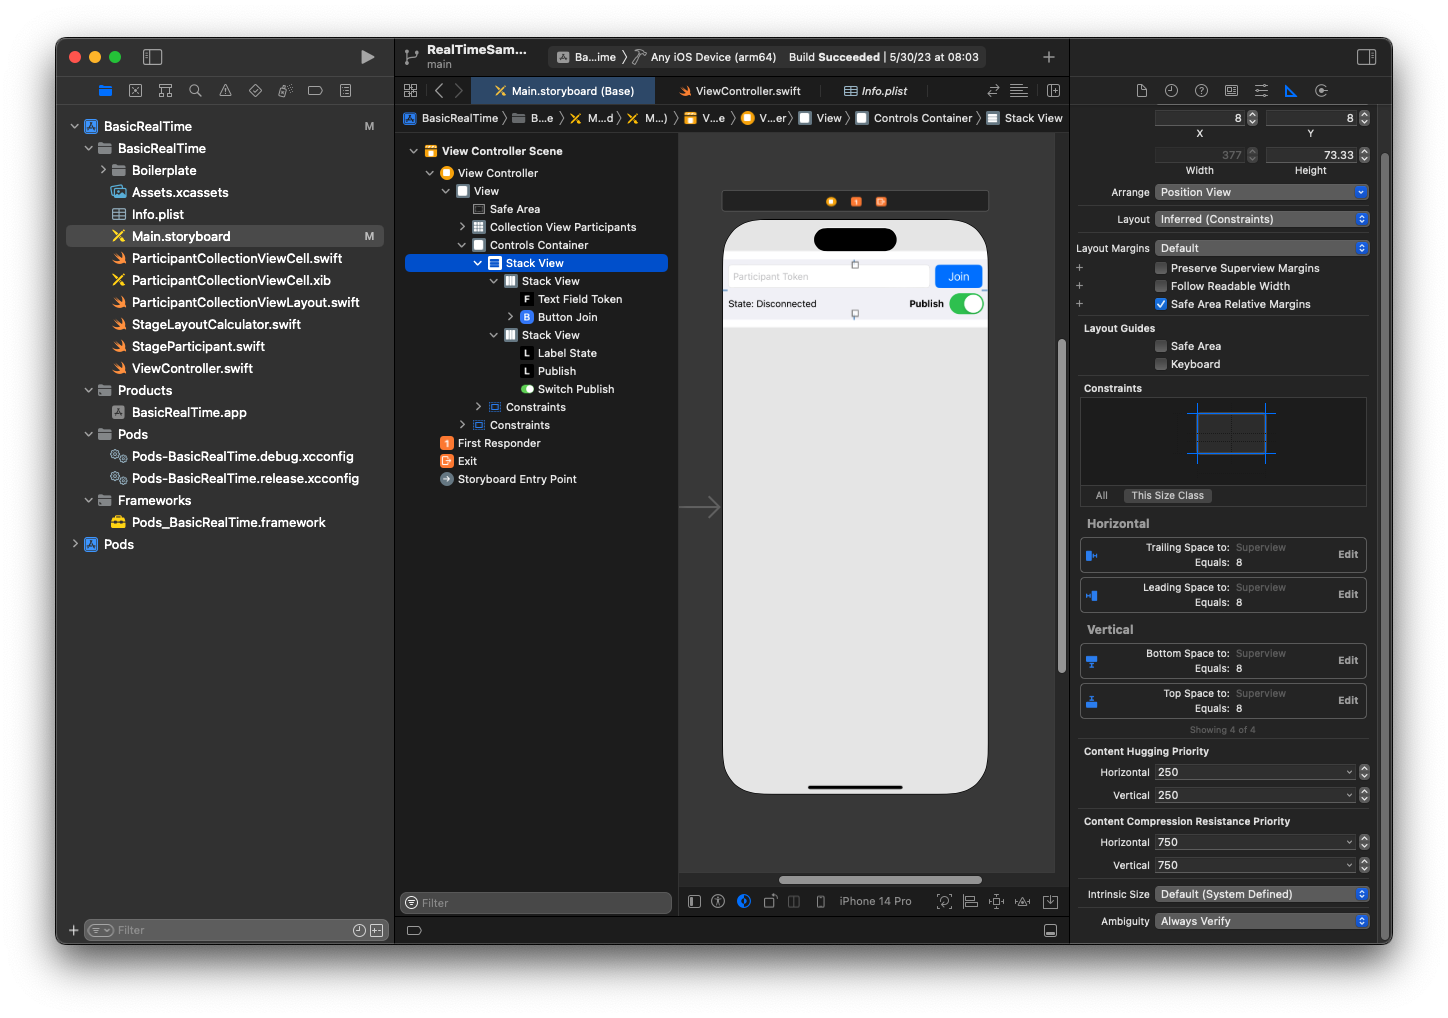
La troisième et dernière vue est Vertical Stack View. Liez Top, Leading, Trailing, et Bottom à Superview. Pour le style, définissez l’espacement sur 8 au lieu de 0.
Les UIStackViews s’occupent de gérer la disposition des vues restantes. Pour les trois UIStackViews, utilisez Fill pour Alignment et Distribution.
Enfin, relions ces vues à notre ViewController. De dessus, cartographiez les vues suivantes :
-
Text Field Join est relié à
textFieldToken. -
Button Join est relié à
buttonJoin. -
Label State est relié à
labelState. -
Switch Publish est relié à
switchPublish. -
Collection View Participants est relié à
collectionViewParticipants.
Profitez également de cette période pour définir la dataSource de l’élément Collection View Participants sur le ViewController propriétaire :
Nous créons maintenant la sous-classe UICollectionViewCell dans laquelle afficher les participants. Commencez par créer un fichier Cocoa Touch Class :
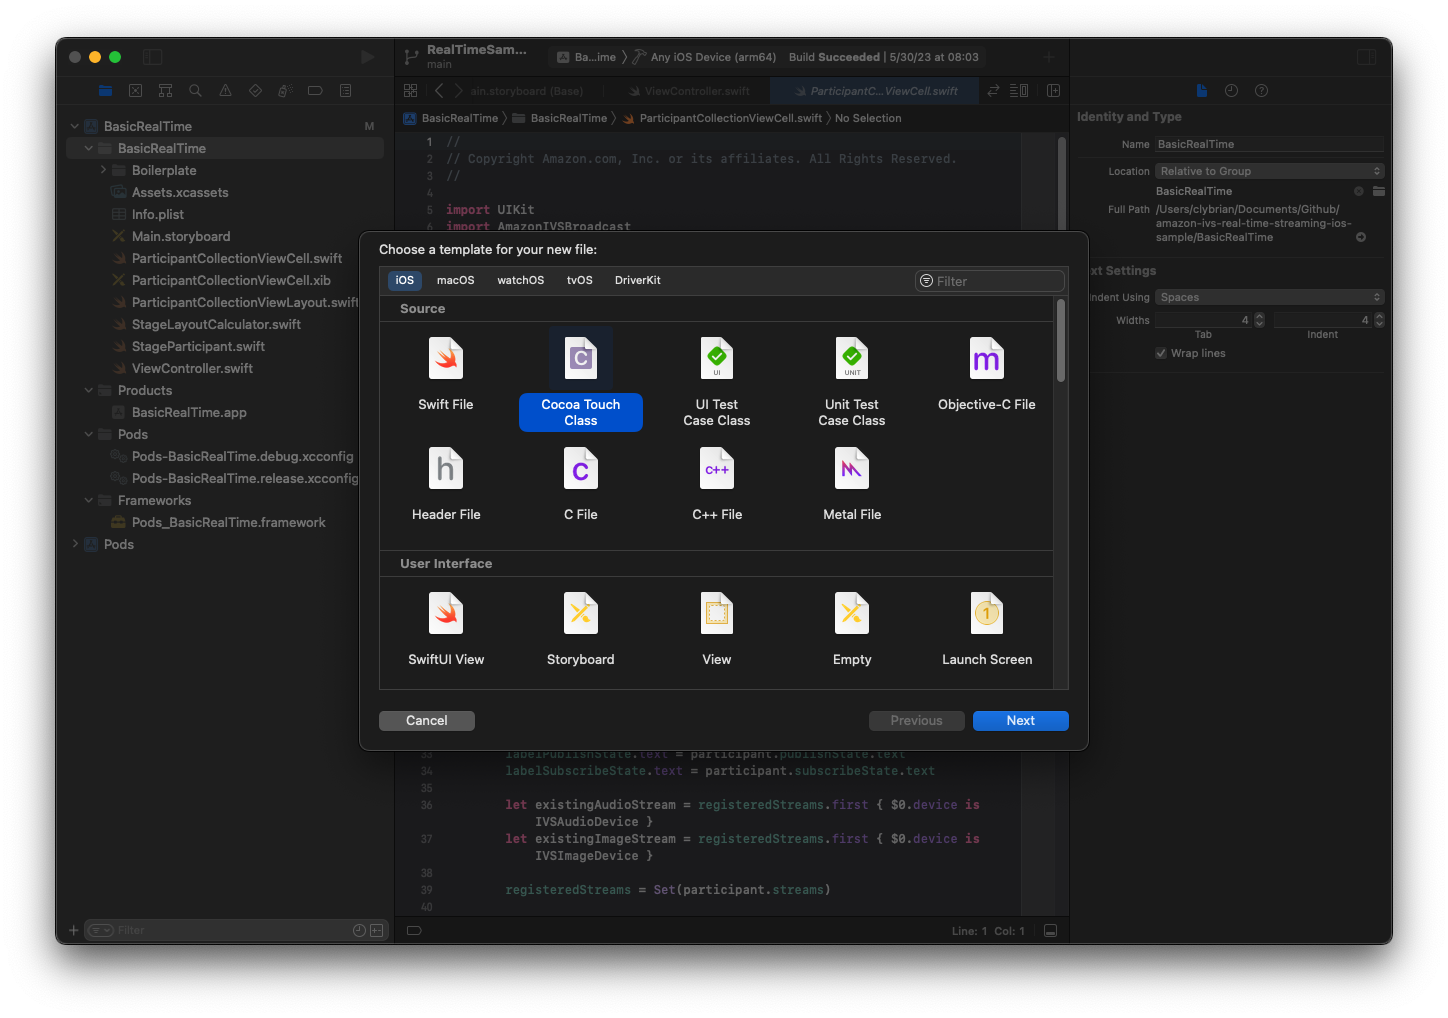
Nommez-le ParticipantUICollectionViewCell et faites-en une sous-classe de UICollectionViewCell dans Swift. Nous recommençons dans le fichier Swift, en créant nos @IBOutlets à lier :
import AmazonIVSBroadcast

class ParticipantCollectionViewCell: UICollectionViewCell {

    @IBOutlet private var viewPreviewContainer: UIView!
    @IBOutlet private var labelParticipantId: UILabel!
    @IBOutlet private var labelSubscribeState: UILabel!
    @IBOutlet private var labelPublishState: UILabel!
    @IBOutlet private var labelVideoMuted: UILabel!
    @IBOutlet private var labelAudioMuted: UILabel!
    @IBOutlet private var labelAudioVolume: UILabel!
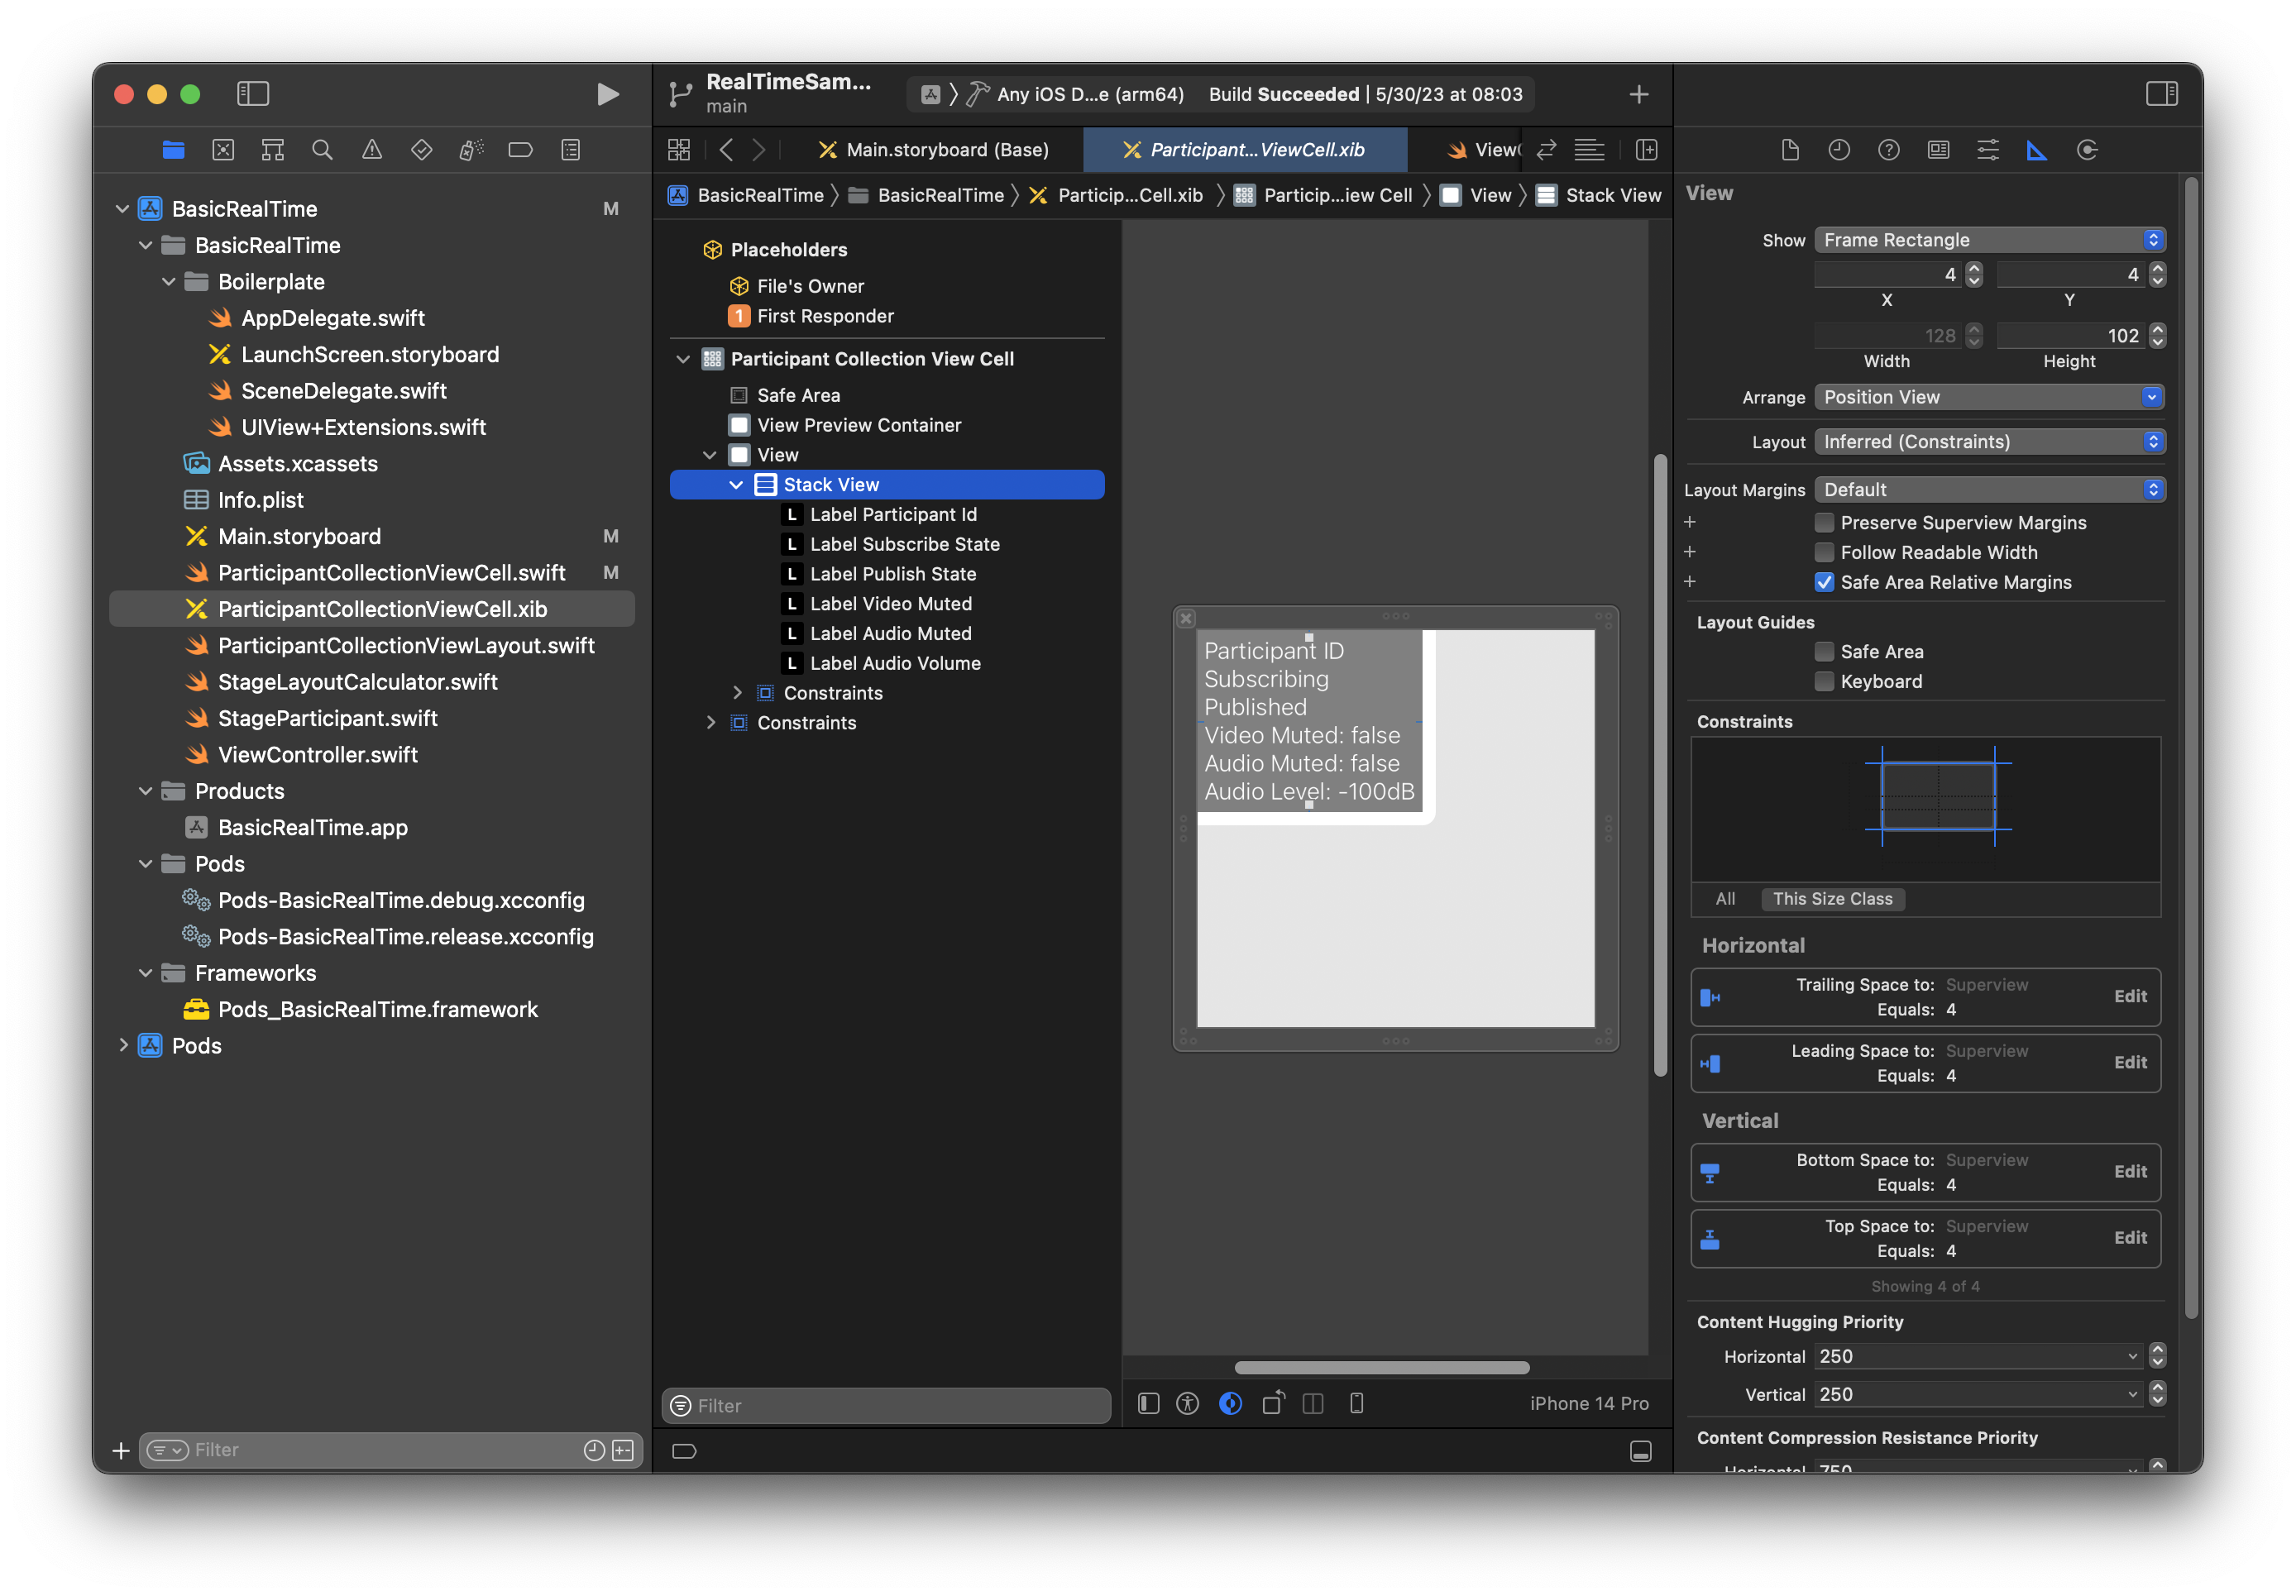
Dans le fichier XIB associé, créez cette hiérarchie de vues :
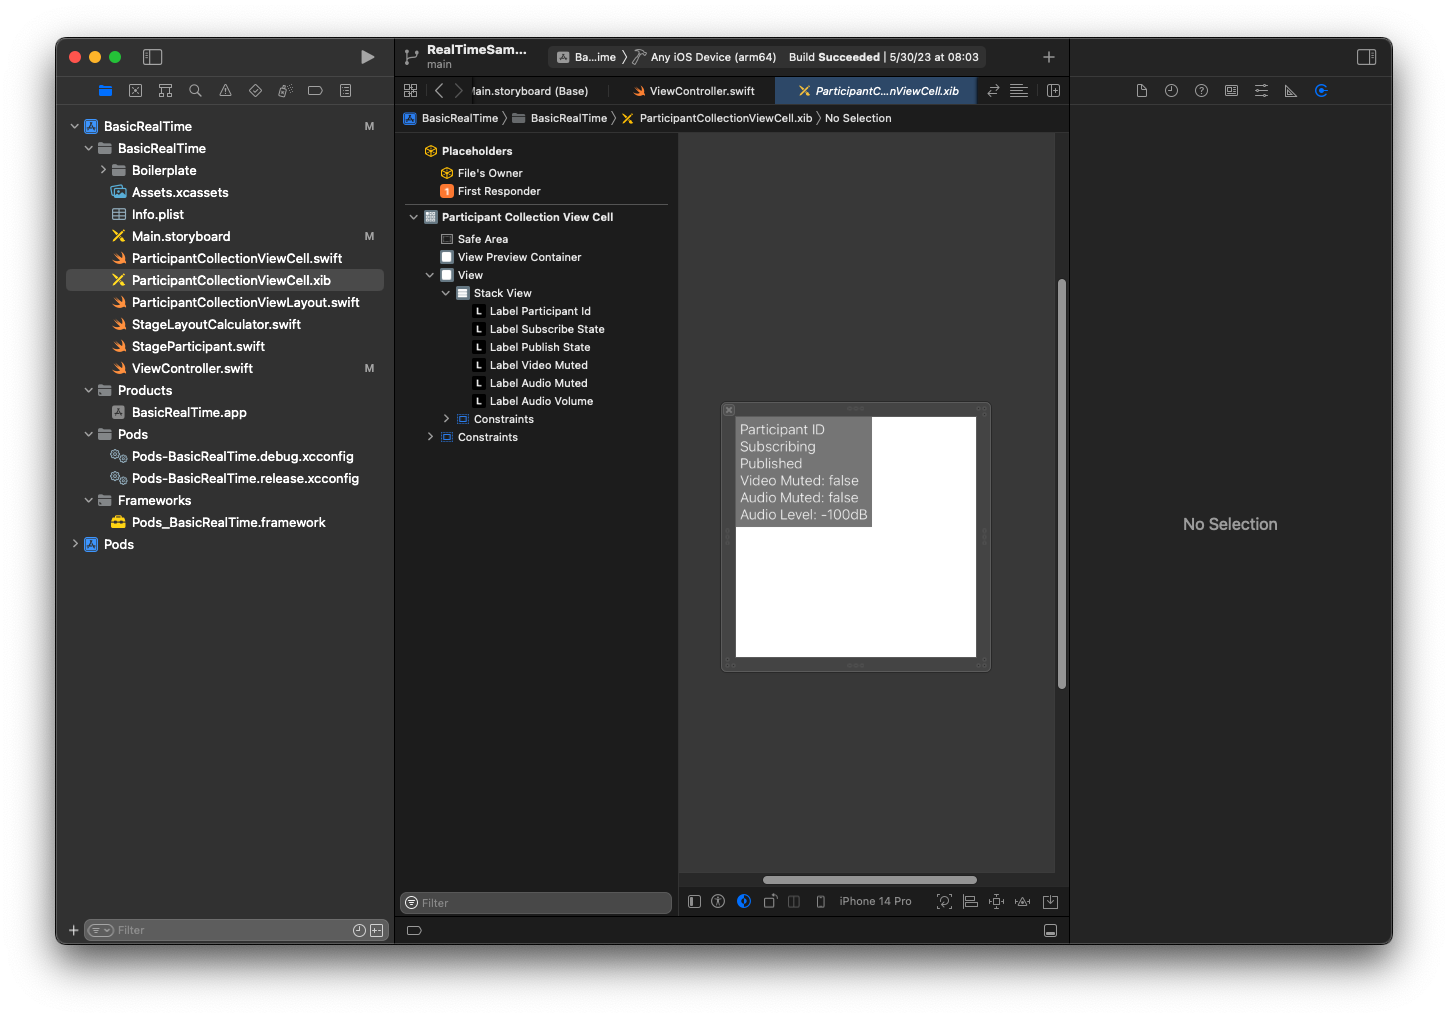
Pour AutoLayout, nous allons à nouveau modifier trois vues. La première vue est View Preview Container. Liez Trailing, Leading, Top et Bottom à Participant Collection View Cell.

La deuxième vue est View. Liez Leading et Top à Participant Collection View Cell et définissez la valeur sur 4.

La troisième vue est Stack View. Liez Trailing, Leading, Top et Bottom à Superview et définissez la valeur sur 4.
Autorisations et minuteur d’inactivité
De retour à notre ViewController, nous allons désactiver le minuteur d’inactivité du système pour empêcher l’appareil de se mettre en veille pendant l’utilisation de notre application :
override func viewDidAppear(_ animated: Bool) {
    super.viewDidAppear(animated)
    // Prevent the screen from turning off during a call.
    UIApplication.shared.isIdleTimerDisabled = true
}

override func viewDidDisappear(_ animated: Bool) {
    super.viewDidDisappear(animated)
    UIApplication.shared.isIdleTimerDisabled = false
}
Ensuite, nous demandons les autorisations de caméra et de microphone auprès du système :
private func checkPermissions() {
    checkOrGetPermission(for: .video) { [weak self] granted in
        guard granted else {
            print("Video permission denied")
            return
        }
        self?.checkOrGetPermission(for: .audio) { [weak self] granted in
            guard granted else {
                print("Audio permission denied")
                return
            }
            self?.setupLocalUser() // we will cover this later
        }
    }
}

private func checkOrGetPermission(for mediaType: AVMediaType, _ result: @escaping (Bool) -> Void) {
    func mainThreadResult(_ success: Bool) {
        DispatchQueue.main.async {
            result(success)
        }
    }
    switch AVCaptureDevice.authorizationStatus(for: mediaType) {
    case .authorized: mainThreadResult(true)
    case .notDetermined:
        AVCaptureDevice.requestAccess(for: mediaType) { granted in
            mainThreadResult(granted)
        }
    case .denied, .restricted: mainThreadResult(false)
    @unknown default: mainThreadResult(false)
    }
}
État de l’application
Nous devons configurer notre collectionViewParticipants avec le fichier de disposition que nous avons créé précédemment :
override func viewDidLoad() {
    super.viewDidLoad()
    // We render everything to exactly the frame, so don't allow scrolling.
    collectionViewParticipants.isScrollEnabled = false
    collectionViewParticipants.register(UINib(nibName: "ParticipantCollectionViewCell", bundle: .main), forCellWithReuseIdentifier: "ParticipantCollectionViewCell")
}
Pour représenter chaque participant, nous créons une structure simple appelée StageParticipant. Cela peut être inclus dans le fichier ViewController.swift, ou un nouveau fichier peut être créé.
import Foundation
import AmazonIVSBroadcast

struct StageParticipant {
    let isLocal: Bool
    var participantId: String?
    var publishState: IVSParticipantPublishState = .notPublished
    var subscribeState: IVSParticipantSubscribeState = .notSubscribed
    var streams: [IVSStageStream] = []

    init(isLocal: Bool, participantId: String?) {
        self.isLocal = isLocal
        self.participantId = participantId
    }
}
Pour suivre ces participants, nous en conservons une liste en tant que propriété privée dans notre ViewController :
private var participants = [StageParticipant]()
Cette propriété sera utilisée pour alimenter notre UICollectionViewDataSource qui était lié depuis le storyboard plus tôt :
extension ViewController: UICollectionViewDataSource {

    func collectionView(_ collectionView: UICollectionView, numberOfItemsInSection section: Int) -> Int {
        return participants.count
    }

    func collectionView(_ collectionView: UICollectionView, cellForItemAt indexPath: IndexPath) -> UICollectionViewCell {
        if let cell = collectionView.dequeueReusableCell(withReuseIdentifier: "ParticipantCollectionViewCell", for: indexPath) as? ParticipantCollectionViewCell {
            cell.set(participant: participants[indexPath.row])
            return cell
        } else {
            fatalError("Couldn't load custom cell type 'ParticipantCollectionViewCell'")
        }
    }

}
Pour voir votre propre aperçu avant de rejoindre une scène, nous créons immédiatement un participant local :
override func viewDidLoad() {
    /* existing UICollectionView code */
    participants.append(StageParticipant(isLocal: true, participantId: nil))
}
Cela se traduit par le rendu d’une cellule de participant immédiatement après l’exécution de l’application, représentant le participant local.
Les utilisateurs veulent pouvoir se voir eux-mêmes avant de rejoindre une scène. Nous allons donc implémenter la méthode setupLocalUser() qui est appelée précédemment par le code de gestion des autorisations. Nous stockons la référence de la caméra et du microphone en tant qu’objets IVSLocalStageStream.
private var streams = [IVSLocalStageStream]()
private let deviceDiscovery = IVSDeviceDiscovery()

private func setupLocalUser() {
    // Gather our camera and microphone once permissions have been granted
    let devices = deviceDiscovery.listLocalDevices()
    streams.removeAll()
    if let camera = devices.compactMap({ $0 as? IVSCamera }).first {
        streams.append(IVSLocalStageStream(device: camera))
        // Use a front camera if available.
        if let frontSource = camera.listAvailableInputSources().first(where: { $0.position == .front }) {
            camera.setPreferredInputSource(frontSource)
        }
    }
    if let mic = devices.compactMap({ $0 as? IVSMicrophone }).first {
        streams.append(IVSLocalStageStream(device: mic))
    }
    participants[0].streams = streams
    participantsChanged(index: 0, changeType: .updated)
}
Ici, nous avons trouvé la caméra et le microphone de l’appareil via le SDK et les avons stockés dans notre objet local streams, puis nous avons assigné le tableau de streams du premier participant (le participant local que nous avons créé plus tôt) à notre streams. Enfin, nous appelons participantsChanged avec un index défini sur 0 et un changeType défini sur updated. Cette fonction est une fonction d’aide à la mise à jour de notre UICollectionView avec de belles animations. Voici à quoi cela ressemble :
private func participantsChanged(index: Int, changeType: ChangeType) {
    switch changeType {
    case .joined:
        collectionViewParticipants?.insertItems(at: [IndexPath(item: index, section: 0)])
    case .updated:
        // Instead of doing reloadItems, just grab the cell and update it ourselves. It saves a create/destroy of a cell
        // and more importantly fixes some UI flicker. We disable scrolling so the index path per cell
        // never changes.
        if let cell = collectionViewParticipants?.cellForItem(at: IndexPath(item: index, section: 0)) as? ParticipantCollectionViewCell {
            cell.set(participant: participants[index])
        }
    case .left:
        collectionViewParticipants?.deleteItems(at: [IndexPath(item: index, section: 0)])
    }
}
Ne vous préoccupez pas encore de cell.set ; nous y reviendrons plus tard, mais c’est là que nous afficherons le contenu de la cellule en fonction du participant.
Le ChangeType est une simple énumération :
enum ChangeType {
    case joined, updated, left
}
Enfin, nous voulons savoir si la scène est connectée. Nous utilisons un simple bool pour suivre cela, qui mettra automatiquement à jour notre interface utilisateur lorsqu’elle sera elle-même mise à jour.
private var connectingOrConnected = false {
    didSet {
        buttonJoin.setTitle(connectingOrConnected ? "Leave" : "Join", for: .normal)
        buttonJoin.tintColor = connectingOrConnected ? .systemRed : .systemBlue
    }
}
Implémenter le SDK Scène
Trois concepts de base sous-tendent la fonctionnalité temps réel : scène, stratégie et moteur de rendu. L’objectif de la conception consiste à minimiser la quantité de logique côté client nécessaire à la création d’un produit fonctionnel.
IVSStageStrategy
L’implémentation de notre IVSStageStrategy est simple :
extension ViewController: IVSStageStrategy {
    func stage(_ stage: IVSStage, streamsToPublishForParticipant participant: IVSParticipantInfo) -> [IVSLocalStageStream] {
        // Return the camera and microphone to be published.
        // This is only called if `shouldPublishParticipant` returns true.
        return streams
    }

    func stage(_ stage: IVSStage, shouldPublishParticipant participant: IVSParticipantInfo) -> Bool {
        // Our publish status is based directly on the UISwitch view
        return switchPublish.isOn
    }

    func stage(_ stage: IVSStage, shouldSubscribeToParticipant participant: IVSParticipantInfo) -> IVSStageSubscribeType {
        // Subscribe to both audio and video for all publishing participants.
        return .audioVideo
    }
}
En résumé, nous ne publions que si l’interrupteur de publication est en position « activé », et si nous le faisons, seuls les flux que nous avons collectés précédemment sont publiés. Enfin, pour cet exemple, nous nous abonnons toujours aux autres participants, pour recevoir à la fois leur audio et leur vidéo.
IVSStageRenderer
L’implémentation de IVSStageRenderer est également assez simple, bien que compte tenu du nombre de fonctions, elle contienne un peu plus de code. L’approche générale de ce moteur de rendu consiste à mettre à jour notre tableau participants lorsque le SDK nous informe d’une modification apportée à un participant. Dans certains cas, nous traitons les participants locaux différemment, car nous avons décidé de les gérer nous-mêmes afin qu’ils puissent voir l’aperçu de leur caméra avant de rejoindre le groupe.
extension ViewController: IVSStageRenderer {

    func stage(_ stage: IVSStage, didChange connectionState: IVSStageConnectionState, withError error: Error?) {
        labelState.text = connectionState.text
        connectingOrConnected = connectionState != .disconnected
    }

    func stage(_ stage: IVSStage, participantDidJoin participant: IVSParticipantInfo) {
        if participant.isLocal {
            // If this is the local participant joining the Stage, update the first participant in our array because we
            // manually added that participant when setting up our preview
            participants[0].participantId = participant.participantId
            participantsChanged(index: 0, changeType: .updated)
        } else {
            // If they are not local, add them to the array as a newly joined participant.
            participants.append(StageParticipant(isLocal: false, participantId: participant.participantId))
            participantsChanged(index: (participants.count - 1), changeType: .joined)
        }
    }

    func stage(_ stage: IVSStage, participantDidLeave participant: IVSParticipantInfo) {
        if participant.isLocal {
            // If this is the local participant leaving the Stage, update the first participant in our array because
            // we want to keep the camera preview active
            participants[0].participantId = nil
            participantsChanged(index: 0, changeType: .updated)
        } else {
            // If they are not local, find their index and remove them from the array.
            if let index = participants.firstIndex(where: { $0.participantId == participant.participantId }) {
                participants.remove(at: index)
                participantsChanged(index: index, changeType: .left)
            }
        }
    }

    func stage(_ stage: IVSStage, participant: IVSParticipantInfo, didChange publishState: IVSParticipantPublishState) {
        // Update the publishing state of this participant
        mutatingParticipant(participant.participantId) { data in
            data.publishState = publishState
        }
    }

    func stage(_ stage: IVSStage, participant: IVSParticipantInfo, didChange subscribeState: IVSParticipantSubscribeState) {
        // Update the subscribe state of this participant
        mutatingParticipant(participant.participantId) { data in
            data.subscribeState = subscribeState
        }
    }

    func stage(_ stage: IVSStage, participant: IVSParticipantInfo, didChangeMutedStreams streams: [IVSStageStream]) {
        // We don't want to take any action for the local participant because we track those streams locally
        if participant.isLocal { return }
        // For remote participants, notify the UICollectionView that they have updated. There is no need to modify
        // the `streams` property on the `StageParticipant` because it is the same `IVSStageStream` instance. Just
        // query the `isMuted` property again.
        if let index = participants.firstIndex(where: { $0.participantId == participant.participantId }) {
            participantsChanged(index: index, changeType: .updated)
        }
    }

    func stage(_ stage: IVSStage, participant: IVSParticipantInfo, didAdd streams: [IVSStageStream]) {
        // We don't want to take any action for the local participant because we track those streams locally
        if participant.isLocal { return }
        // For remote participants, add these new streams to that participant's streams array.
        mutatingParticipant(participant.participantId) { data in
            data.streams.append(contentsOf: streams)
        }
    }

    func stage(_ stage: IVSStage, participant: IVSParticipantInfo, didRemove streams: [IVSStageStream]) {
        // We don't want to take any action for the local participant because we track those streams locally
        if participant.isLocal { return }
        // For remote participants, remove these streams from that participant's streams array.
        mutatingParticipant(participant.participantId) { data in
            let oldUrns = streams.map { $0.device.descriptor().urn }
            data.streams.removeAll(where: { stream in
                return oldUrns.contains(stream.device.descriptor().urn)
            })
        }
    }

    // A helper function to find a participant by its ID, mutate that participant, and then update the UICollectionView accordingly.
    private func mutatingParticipant(_ participantId: String?, modifier: (inout StageParticipant) -> Void) {
        guard let index = participants.firstIndex(where: { $0.participantId == participantId }) else {
            fatalError("Something is out of sync, investigate if this was a sample app or SDK issue.")
        }

        var participant = participants[index]
        modifier(&participant)
        participants[index] = participant
        participantsChanged(index: index, changeType: .updated)
    }
}
Ce code utilise une extension pour convertir l’état de connexion en texte convivial :
extension IVSStageConnectionState {
    var text: String {
        switch self {
        case .disconnected: return "Disconnected"
        case .connecting: return "Connecting"
        case .connected: return "Connected"
        @unknown default: fatalError()
        }
    }
}
Implémentation d’un UICollectionViewLayout personnalisé
La répartition des différents nombres de participants peut s’avérer complexe. Vous souhaitez qu’ils occupent l’intégralité du cadre de la vue parent, mais vous ne souhaitez pas gérer la configuration de chaque participant de manière indépendante. Pour vous faciliter la tâche, nous allons procéder à l’implémentation d’un UICollectionViewLayout.
Créez un autre fichier, ParticipantCollectionViewLayout.swift, qui étend UICollectionViewLayout. Cette classe utilisera une autre classe appelée StageLayoutCalculator, que nous aborderons bientôt. La classe reçoit les valeurs de trame calculées pour chaque participant et génère ensuite les objets UICollectionViewLayoutAttributes nécessaires.
import Foundation
import UIKit

/**
 Code modified from https://developer.apple.com/documentation/uikit/views_and_controls/collection_views/layouts/customizing_collection_view_layouts?language=objc
 */
class ParticipantCollectionViewLayout: UICollectionViewLayout {

    private let layoutCalculator = StageLayoutCalculator()

    private var contentBounds = CGRect.zero
    private var cachedAttributes = [UICollectionViewLayoutAttributes]()

    override func prepare() {
        super.prepare()

        guard let collectionView = collectionView else { return }

        cachedAttributes.removeAll()
        contentBounds = CGRect(origin: .zero, size: collectionView.bounds.size)

        layoutCalculator.calculateFrames(participantCount: collectionView.numberOfItems(inSection: 0),
                                         width: collectionView.bounds.size.width,
                                         height: collectionView.bounds.size.height,
                                         padding: 4)
        .enumerated()
        .forEach { (index, frame) in
            let attributes = UICollectionViewLayoutAttributes(forCellWith: IndexPath(item: index, section: 0))
            attributes.frame = frame
            cachedAttributes.append(attributes)
            contentBounds = contentBounds.union(frame)
        }
    }

    override var collectionViewContentSize: CGSize {
        return contentBounds.size
    }

    override func shouldInvalidateLayout(forBoundsChange newBounds: CGRect) -> Bool {
        guard let collectionView = collectionView else { return false }
        return !newBounds.size.equalTo(collectionView.bounds.size)
    }

    override func layoutAttributesForItem(at indexPath: IndexPath) -> UICollectionViewLayoutAttributes? {
        return cachedAttributes[indexPath.item]
    }

    override func layoutAttributesForElements(in rect: CGRect) -> [UICollectionViewLayoutAttributes]? {
        var attributesArray = [UICollectionViewLayoutAttributes]()

        // Find any cell that sits within the query rect.
        guard let lastIndex = cachedAttributes.indices.last, let firstMatchIndex = binSearch(rect, start: 0, end: lastIndex) else {
            return attributesArray
        }

        // Starting from the match, loop up and down through the array until all the attributes
        // have been added within the query rect.
        for attributes in cachedAttributes[..<firstMatchIndex].reversed() {
            guard attributes.frame.maxY >= rect.minY else { break }
            attributesArray.append(attributes)
        }

        for attributes in cachedAttributes[firstMatchIndex...] {
            guard attributes.frame.minY <= rect.maxY else { break }
            attributesArray.append(attributes)
        }

        return attributesArray
    }

    // Perform a binary search on the cached attributes array.
    func binSearch(_ rect: CGRect, start: Int, end: Int) -> Int? {
        if end < start { return nil }

        let mid = (start + end) / 2
        let attr = cachedAttributes[mid]

        if attr.frame.intersects(rect) {
            return mid
        } else {
            if attr.frame.maxY < rect.minY {
                return binSearch(rect, start: (mid + 1), end: end)
            } else {
                return binSearch(rect, start: start, end: (mid - 1))
            }
        }
    }
}
La classe StageLayoutCalculator.swift revêt une plus grande importance. Elle est conçue pour calculer les cadres de chaque participant en fonction du nombre de participants dans une disposition en ligne/colonne basée sur le flux. Chaque ligne a la même hauteur que les autres, mais les colonnes peuvent avoir des largeurs différentes par ligne. Voir le commentaire de code au-dessus de la variable layouts pour une description de la façon de personnaliser ce comportement.
import Foundation
import UIKit

class StageLayoutCalculator {

    /// This 2D array contains the description of how the grid of participants should be rendered
    /// The index of the 1st dimension is the number of participants needed to active that configuration
    /// Meaning if there is 1 participant, index 0 will be used. If there are 5 participants, index 4 will be used.
    ///
    /// The 2nd dimension is a description of the layout. The length of the array is the number of rows that
    /// will exist, and then each number within that array is the number of columns in each row.
    ///
    /// See the code comments next to each index for concrete examples.
    ///
    /// This can be customized to fit any layout configuration needed.
    private let layouts: [[Int]] = [
        // 1 participant
        [ 1 ], // 1 row, full width
        // 2 participants
        [ 1, 1 ], // 2 rows, all columns are full width
        // 3 participants
        [ 1, 2 ], // 2 rows, first row's column is full width then 2nd row's columns are 1/2 width
        // 4 participants
        [ 2, 2 ], // 2 rows, all columns are 1/2 width
        // 5 participants
        [ 1, 2, 2 ], // 3 rows, first row's column is full width, 2nd and 3rd row's columns are 1/2 width
        // 6 participants
        [ 2, 2, 2 ], // 3 rows, all column are 1/2 width
        // 7 participants
        [ 2, 2, 3 ], // 3 rows, 1st and 2nd row's columns are 1/2 width, 3rd row's columns are 1/3rd width
        // 8 participants
        [ 2, 3, 3 ],
        // 9 participants
        [ 3, 3, 3 ],
        // 10 participants
        [ 2, 3, 2, 3 ],
        // 11 participants
        [ 2, 3, 3, 3 ],
        // 12 participants
        [ 3, 3, 3, 3 ],
    ]

    // Given a frame (this could be for a UICollectionView, or a Broadcast Mixer's canvas), calculate the frames for each
    // participant, with optional padding.
    func calculateFrames(participantCount: Int, width: CGFloat, height: CGFloat, padding: CGFloat) -> [CGRect] {
        if participantCount > layouts.count {
            fatalError("Only \(layouts.count) participants are supported at this time")
        }
        if participantCount == 0 {
            return []
        }
        var currentIndex = 0
        var lastFrame: CGRect = .zero

        // If the height is less than the width, the rows and columns will be flipped.
        // Meaning for 6 participants, there will be 2 rows of 3 columns each.
        let isVertical = height > width

        let halfPadding = padding / 2.0

        let layout = layouts[participantCount - 1] // 1 participant is in index 0, so `-1`.
        let rowHeight = (isVertical ? height : width) / CGFloat(layout.count)

        var frames = [CGRect]()
        for row in 0 ..< layout.count {
            // layout[row] is the number of columns in a layout
            let itemWidth = (isVertical ? width : height) / CGFloat(layout[row])
            let segmentFrame = CGRect(x: (isVertical ? 0 : lastFrame.maxX) + halfPadding,
                                      y: (isVertical ? lastFrame.maxY : 0) + halfPadding,
                                      width: (isVertical ? itemWidth : rowHeight) - padding,
                                      height: (isVertical ? rowHeight : itemWidth) - padding)

            for column in 0 ..< layout[row] {
                var frame = segmentFrame
                if isVertical {
                    frame.origin.x = (itemWidth * CGFloat(column)) + halfPadding
                } else {
                    frame.origin.y = (itemWidth * CGFloat(column)) + halfPadding
                }
                frames.append(frame)
                currentIndex += 1
            }

            lastFrame = segmentFrame
            lastFrame.origin.x += halfPadding
            lastFrame.origin.y += halfPadding
        }
        return frames
    }

}
De retour à Main.storyboard, veillez à utiliser la classe que nous venons de créer pour définir la classe de disposition de UICollectionView :
Connexion des actions de l’interface utilisateur
Nous nous rapprochons, il nous reste quelques IBActions à créer.
Nous allons d’abord gérer le bouton Rejoindre. Il répond différemment en fonction de la valeur de connectingOrConnected. Lorsqu’il est déjà connecté, il a pour effet de quitter la scène. S’il est déconnecté, il lit le texte du jeton UITextField et crée un IVSStage avec ce texte. Ensuite, nous ajoutons notre ViewController en tant que strategy, errorDelegate, et moteur de rendu pour IVSStage, et enfin nous rejoignons la scène de manière asynchrone.
@IBAction private func joinTapped(_ sender: UIButton) {
    if connectingOrConnected {
        // If we're already connected to a Stage, leave it.
        stage?.leave()
    } else {
        guard let token = textFieldToken.text else {
            print("No token")
            return
        }
        // Hide the keyboard after tapping Join
        textFieldToken.resignFirstResponder()
        do {
            // Destroy the old Stage first before creating a new one.
            self.stage = nil
            let stage = try IVSStage(token: token, strategy: self)
            stage.errorDelegate = self
            stage.addRenderer(self)
            try stage.join()
            self.stage = stage
        } catch {
            print("Failed to join stage - \(error)")
        }
    }
}
L’autre action de l’interface utilisateur que nous devons connecter est le commutateur de publication :
@IBAction private func publishToggled(_ sender: UISwitch) {
    // Because the strategy returns the value of `switchPublish.isOn`, just call `refreshStrategy`.
    stage?.refreshStrategy()
}
Affichage des participants
Enfin, nous devons rendre les données que nous recevons du SDK sur la cellule de participant que nous avons créée précédemment. La logique du UICollectionView est déjà terminée, il ne nous reste plus qu’à implémenter l’API set dans ParticipantCollectionViewCell.swift.
Nous allons commencer par ajouter la fonction empty, puis nous l’étudierons étape par étape :
func set(participant: StageParticipant) {

}
Nous gérons d’abord l’état simplifié, l’identifiant du participant, l’état de publication et l’état d’abonnement. Pour ceux-ci, nous mettons simplement à jour nos UILabels directement :
labelParticipantId.text = participant.isLocal ? "You (\(participant.participantId ?? "Disconnected"))" : participant.participantId
labelPublishState.text = participant.publishState.text
labelSubscribeState.text = participant.subscribeState.text
Les propriétés de texte des énumérations de publication et d’abonnement proviennent d’extensions locales :
extension IVSParticipantPublishState {
    var text: String {
        switch self {
        case .notPublished: return "Not Published"
        case .attemptingPublish: return "Attempting to Publish"
        case .published: return "Published"
        @unknown default: fatalError()
        }
    }
}

extension IVSParticipantSubscribeState {
    var text: String {
        switch self {
        case .notSubscribed: return "Not Subscribed"
        case .attemptingSubscribe: return "Attempting to Subscribe"
        case .subscribed: return "Subscribed"
        @unknown default: fatalError()
        }
    }
}
Ensuite, nous mettons à jour les états de coupure de l’audio et de la vidéo. Pour obtenir les états de coupure, nous devons trouver IVSImageDevice et IVSAudioDevice à partir du tableau de streams. Pour optimiser les performances, nous mémorisons les derniers identifiants des appareils connectés.
// This belongs outside `set(participant:)`
private var registeredStreams: Set<IVSStageStream> = []
private var imageDevice: IVSImageDevice? {
    return registeredStreams.lazy.compactMap { $0.device as? IVSImageDevice }.first
}
private var audioDevice: IVSAudioDevice? {
    return registeredStreams.lazy.compactMap { $0.device as? IVSAudioDevice }.first
}

// This belongs inside `set(participant:)`
let existingAudioStream = registeredStreams.first { $0.device is IVSAudioDevice }
let existingImageStream = registeredStreams.first { $0.device is IVSImageDevice }

registeredStreams = Set(participant.streams)

let newAudioStream = participant.streams.first { $0.device is IVSAudioDevice }
let newImageStream = participant.streams.first { $0.device is IVSImageDevice }

// `isMuted != false` covers the stream not existing, as well as being muted.
labelVideoMuted.text = "Video Muted: \(newImageStream?.isMuted != false)"
labelAudioMuted.text = "Audio Muted: \(newAudioStream?.isMuted != false)"
Enfin, nous voulons afficher un aperçu du imageDevice et affichez les statistiques audio du audioDevice :
if existingImageStream !== newImageStream {
    // The image stream has changed
    updatePreview() // We’ll cover this next
}

if existingAudioStream !== newAudioStream {
    (existingAudioStream?.device as? IVSAudioDevice)?.setStatsCallback(nil)
    audioDevice?.setStatsCallback( { [weak self] stats in
        self?.labelAudioVolume.text = String(format: "Audio Level: %.0f dB", stats.rms)
    })
    // When the audio stream changes, it will take some time to receive new stats. Reset the value temporarily.
    self.labelAudioVolume.text = "Audio Level: -100 dB"
}
La dernière fonction que nous devons créer est updatePreview(), qui ajoute un aperçu du participant à notre vue :
private func updatePreview() {
    // Remove any old previews from the preview container
    viewPreviewContainer.subviews.forEach { $0.removeFromSuperview() }
    if let imageDevice = self.imageDevice {
        if let preview = try? imageDevice.previewView(with: .fit) {
            viewPreviewContainer.addSubviewMatchFrame(preview)
        }
    }
}
Ce qui précède utilise une fonction d’assistance sur UIView pour faciliter l’intégration de sous-vues :
extension UIView {
    func addSubviewMatchFrame(_ view: UIView) {
        view.translatesAutoresizingMaskIntoConstraints = false
        self.addSubview(view)
        NSLayoutConstraint.activate([
            view.topAnchor.constraint(equalTo: self.topAnchor, constant: 0),
            view.bottomAnchor.constraint(equalTo: self.bottomAnchor, constant: 0),
            view.leadingAnchor.constraint(equalTo: self.leadingAnchor, constant: 0),
            view.trailingAnchor.constraint(equalTo: self.trailingAnchor, constant: 0),
        ])
    }
}
