Terjemahan disediakan oleh mesin penerjemah. Jika konten terjemahan yang diberikan bertentangan dengan versi bahasa Inggris aslinya, utamakan versi bahasa Inggris.
Memanggil sebuah AWS Lambda berfungsi dalam pipa di CodePipeline
AWS Lambda adalah layanan komputasi yang memungkinkan Anda menjalankan kode tanpa perlu menyediakan atau mengelola server. Anda dapat membuat fungsi Lambda dan menambahkannya sebagai tindakan di pipeline Anda. Karena Lambda memungkinkan Anda menulis fungsi untuk melakukan hampir semua tugas, Anda dapat menyesuaikan cara kerja pipeline Anda.
penting
Jangan mencatat peristiwa JSON yang CodePipeline dikirim ke Lambda karena ini dapat mengakibatkan kredenSIAL pengguna masuk ke Log CloudWatch . CodePipeline Peran menggunakan peristiwa JSON untuk meneruskan kredenSIAL sementara ke Lambda di artifactCredentials lapangan. Untuk contoh acara, lihatContoh peristiwa JSON.
Berikut adalah beberapa cara fungsi Lambda dapat digunakan dalam pipeline:
-
Untuk membuat sumber daya sesuai permintaan dalam satu tahap pipeline menggunakan CloudFormation dan menghapusnya di tahap lain.
-
Untuk menerapkan versi aplikasi tanpa downtime dengan fungsi Lambda yang menukar nilai CNAME. AWS Elastic Beanstalk
-
Untuk menerapkan ke instans Amazon ECS Docker.
-
Untuk membuat cadangan sumber daya sebelum membangun atau menerapkan dengan membuat snapshot AMI.
-
Untuk menambahkan integrasi dengan produk pihak ketiga ke pipeline Anda, seperti mengirim pesan ke klien IRC.
catatan
Membuat dan menjalankan fungsi Lambda dapat mengakibatkan tagihan ke AWS akun Anda. Untuk informasi selengkapnya, silakan lihat Harga
Topik ini mengasumsikan Anda AWS CodePipeline terbiasa dengan AWS Lambda dan mengetahui cara membuat pipeline, fungsi, dan kebijakan dan peran IAM yang menjadi sandarannya. Topik ini menunjukkan cara:
-
Buat fungsi Lambda yang menguji apakah halaman web berhasil diterapkan.
-
Konfigurasikan peran eksekusi CodePipeline dan Lambda dan izin yang diperlukan untuk menjalankan fungsi sebagai bagian dari pipeline.
-
Edit pipeline untuk menambahkan fungsi Lambda sebagai tindakan.
-
Uji tindakan dengan melepaskan perubahan secara manual.
catatan
Saat menggunakan tindakan panggil Lambda lintas wilayah di CodePipeline, status eksekusi Lambda menggunakan PutJobSuccessResult dan PutJobFailureResult harus dikirim ke Wil AWS ayah tempat fungsi Lambda hadir dan bukan ke Wilayah di mana ada. CodePipeline
Topik ini mencakup fungsi sampel untuk menunjukkan fleksibilitas bekerja dengan fungsi Lambda di: CodePipeline
-
-
Membuat fungsi Lambda dasar untuk digunakan bersama CodePipeline.
-
Mengembalikan hasil sukses atau gagal ke CodePipeline tautan Detail untuk tindakan tersebut.
-
-
Contoh fungsi Python yang menggunakan AWS CloudFormation templat
-
Menggunakan parameter JSON-encoded pengguna untuk meneruskan beberapa nilai konfigurasi ke function (
get_user_params). -
Berinteraksi dengan artefak.zip dalam bucket artefak ()
get_template. -
Menggunakan token lanjutan untuk memantau proses asinkron yang berjalan lama ().
continue_job_laterHal ini memungkinkan tindakan untuk melanjutkan dan fungsi berhasil bahkan jika melebihi runtime lima belas menit (batas di Lambda).
-
Setiap fungsi sampel menyertakan informasi tentang izin yang harus Anda tambahkan ke peran. Untuk informasi tentang batas di AWS Lambda, lihat B atas di Panduan AWS Lambda Pengembang.
penting
Contoh kode, peran, dan kebijakan yang disertakan dalam topik ini adalah contoh saja, dan disediakan apa adanya.
Topik
Langkah 1: Buat pipeline
Pada langkah ini, Anda membuat pipeline yang nantinya Anda tambahkan fungsi Lambda. Ini adalah pipeline yang sama dengan yang Anda buatCodePipeline tutorial. Jika pipeline itu masih dikonfigurasi untuk akun Anda dan berada di Wilayah yang sama tempat Anda berencana untuk membuat fungsi Lambda, Anda dapat melewati langkah ini.
Untuk membuat alur
-
Ikuti tiga langkah pertama Tutorial: Buat pipeline sederhana (bucket S3) untuk membuat bucket Amazon S3, CodeDeploy sumber daya, dan pipeline dua tahap. Pilih opsi Amazon Linux untuk jenis instans Anda. Anda dapat menggunakan nama apa pun yang Anda inginkan untuk pipeline, tetapi langkah-langkah dalam topik ini digunakan MyLambdaTestPipeline.
-
Pada halaman status untuk pipeline Anda, dalam CodeDeploy tindakan, pilih Detail. Pada halaman detail penerapan untuk grup penerapan, pilih ID instance dari daftar.
-
Di konsol Amazon EC2, pada tab Detail untuk instance, salin alamat IP di alamat IPv4 Pu blik (misalnya,
192.0.2.4). Anda menggunakan alamat ini sebagai target fungsi di AWS Lambda.
catatan
Kebijakan peran layanan default untuk CodePipeline mencakup izin Lambda yang diperlukan untuk memanggil fungsi. Namun, jika Anda telah mengubah peran layanan default atau memilih yang berbeda, pastikan kebijakan untuk peran tersebut mengizinkan lambda:ListFunctions izin lambda:InvokeFunction dan. Jika tidak, pipeline yang menyertakan tindakan Lambda gagal.
Langkah 2: Buat fungsi Lambda
Pada langkah ini, Anda membuat fungsi Lambda yang membuat permintaan HTTP dan memeriksa baris teks pada halaman web. Sebagai bagian dari langkah ini, Anda juga harus membuat kebijakan IAM dan peran eksekusi Lambda. Untuk informasi selengkapnya, lihat Model Iz in di Panduan AWS Lambda Pengembang.
Untuk membuat peran eksekusi
Masuk ke Konsol Manajemen AWS dan buka konsol IAM di https://console.aws.amazon.com/iam/
. -
Pilih Kebijakan, lalu pilih Buat Kebijakan. Pilih tab JSON, lalu tempel kebijakan berikut ke bidang.
-
Pilih Tinjau kebijakan.
-
Pada halaman Kebijakan Tinjauan, di Nama, ketik nama untuk kebijakan tersebut (misalnya,
CodePipelineLambdaExecPolicy). Di Deskripsi, masukkanEnables Lambda to execute code.Pilih Buat Kebijakan.
catatan
Ini adalah izin minimum yang diperlukan untuk fungsi Lambda untuk berinteraksi dengan CodePipeline dan Amazon. CloudWatch Jika Anda ingin memperluas kebijakan ini untuk mengizinkan fungsi yang berinteraksi dengan AWS sumber daya lain, Anda harus mengubah kebijakan ini untuk mengizinkan tindakan yang diperlukan oleh fungsi Lambda tersebut.
-
Pada halaman dasbor kebijakan, pilih Per an, lalu pilih Buat peran.
-
Pada halaman Buat peran, pilih Layanan AWS. Pilih Lambda, lalu pilih Ber ikutnya: Iz in.
-
Pada halaman Lampirkan kebijakan izin, pilih kotak centang di sebelah CodePipelineLambdaExecPolicy, lalu pilih Ber ikutnya: Tag. Pilih Berikutnya: Tinjauan.
-
Pada halaman Tinjauan, di Nama peran, masukkan nama, lalu pilih Buat peran.
Untuk membuat contoh fungsi Lambda untuk digunakan dengan CodePipeline
Masuk ke Konsol Manajemen AWS dan buka AWS Lambda konsol di https://console.aws.amazon.com/lambda/
. -
Pada halaman Functions, pilih Create function.
catatan
Jika Anda melihat halaman Selamat Datang dan bukan halaman Lambda, pilih Mulai Sekarang.
-
Pilih halaman Buat fungsi, pilih Penulis dari scratch. Di Nama fungsi, masukkan nama untuk fungsi Lambda Anda (misalnya,
MyLambdaFunctionForAWSCodePipeline). Dalam Runtime, pilih Node.js 20.x. -
Di bawah Peran, pilih Pilih peran yang ada. Di Peran yang ada, pilih peran Anda, lalu pilih Buat fungsi.
Halaman detail untuk fungsi yang Anda buat terbuka.
-
Salin kode berikut ke kotak kode fungsi:
catatan
Objek acara, di bawah CodePipeline.job kunci, berisi detail pekerjaan. Untuk contoh lengkap peristiwa JSON CodePipeline kembali ke Lambda, lihatContoh peristiwa JSON.
import { CodePipelineClient, PutJobSuccessResultCommand, PutJobFailureResultCommand } from "@aws-sdk/client-codepipeline"; import http from 'http'; import assert from 'assert'; export const handler = (event, context) => { const codepipeline = new CodePipelineClient(); // Retrieve the Job ID from the Lambda action const jobId = event["CodePipeline.job"].id; // Retrieve the value of UserParameters from the Lambda action configuration in CodePipeline, in this case a URL which will be // health checked by this function. const url = event["CodePipeline.job"].data.actionConfiguration.configuration.UserParameters; // Notify CodePipeline of a successful job const putJobSuccess = async function(message) { const command = new PutJobSuccessResultCommand({ jobId: jobId }); try { await codepipeline.send(command); context.succeed(message); } catch (err) { context.fail(err); } }; // Notify CodePipeline of a failed job const putJobFailure = async function(message) { const command = new PutJobFailureResultCommand({ jobId: jobId, failureDetails: { message: JSON.stringify(message), type: 'JobFailed', externalExecutionId: context.awsRequestId } }); await codepipeline.send(command); context.fail(message); }; // Validate the URL passed in UserParameters if(!url || url.indexOf('http://') === -1) { putJobFailure('The UserParameters field must contain a valid URL address to test, including http:// or https://'); return; } // Helper function to make a HTTP GET request to the page. // The helper will test the response and succeed or fail the job accordingly const getPage = function(url, callback) { var pageObject = { body: '', statusCode: 0, contains: function(search) { return this.body.indexOf(search) > -1; } }; http.get(url, function(response) { pageObject.body = ''; pageObject.statusCode = response.statusCode; response.on('data', function (chunk) { pageObject.body += chunk; }); response.on('end', function () { callback(pageObject); }); response.resume(); }).on('error', function(error) { // Fail the job if our request failed putJobFailure(error); }); }; getPage(url, function(returnedPage) { try { // Check if the HTTP response has a 200 status assert(returnedPage.statusCode === 200); // Check if the page contains the text "Congratulations" // You can change this to check for different text, or add other tests as required assert(returnedPage.contains('Congratulations')); // Succeed the job putJobSuccess("Tests passed."); } catch (ex) { // If any of the assertions failed then fail the job putJobFailure(ex); } }); }; -
Biarkan Handler pada nilai default, dan tinggalkan R ole pada default,
CodePipelineLambdaExecRole. -
Di Pengaturan dasar, untuk Waktu habis, masukkan
20detik. -
Pilih Simpan.
Langkah 3: Tambahkan fungsi Lambda ke pipeline di konsol CodePipeline
Pada langkah ini, Anda menambahkan tahap baru ke pipeline Anda, dan kemudian menambahkan tindakan Lambda yang memanggil fungsi Anda ke tahap itu.
Untuk menambahkan panggung
Masuk ke Konsol Manajemen AWS dan buka CodePipeline konsol di http://console.aws.amazon.com/codesuite/codepipeline/home
. -
Pada halaman Selamat Datang, pilih pipeline yang Anda buat.
-
Pada halaman tampilan pipeline, pilih Edit.
-
Pada halaman Edit, pilih + Tambah tahap untuk menambahkan tahap setelah tahap penerapan dengan CodeDeploy tindakan. Masukkan nama untuk panggung (misalnya,
LambdaStage), dan pilih Tam bah tahap.catatan
Anda juga dapat memilih untuk menambahkan tindakan Lambda Anda ke tahap yang ada. Untuk tujuan demonstrasi, kami menambahkan fungsi Lambda sebagai satu-satunya tindakan dalam suatu tahap untuk memungkinkan Anda melihat kemajuannya dengan mudah saat artefak maju melalui pipa.
-
Pilih + Tambahkan grup tindakan. Di Edit tindakan, di Nama tindakan, masukkan nama untuk tindakan Lambda Anda (misalnya,
MyLambdaAction). Di Penyedia, pilih AWS Lambda. Di Nama fungsi, pilih atau masukkan nama fungsi Lambda Anda (misalnya,MyLambdaFunctionForAWSCodePipeline). Di Parameter pengguna, tentukan alamat IP untuk instans Amazon EC2 yang Anda salin sebelumnya (misalnya,http://), lalu pilih Sel esai.192.0.2.4catatan
Topik ini menggunakan alamat IP, tetapi dalam skenario dunia nyata, Anda dapat memberikan nama situs web terdaftar sebagai gantinya (misalnya,
http://). Untuk informasi selengkapnya tentang data peristiwa dan penangan di AWS Lambda, lihat Model Pem rograman di Panduan Peng AWS Lambda embang.www.example.com -
Pada halaman Edit tindakan, pilih S impan.
Langkah 4: Uji pipa dengan fungsi Lambda
Untuk menguji fungsi, lepaskan perubahan terbaru melalui pipeline.
Untuk menggunakan konsol untuk menjalankan versi terbaru dari artefak melalui pipa
-
Pada halaman rincian pipeline, pilih Perubahan rilis. Ini menjalankan revisi terbaru yang tersedia di setiap lokasi sumber yang ditentukan dalam tindakan sumber melalui pipeline.
-
Ketika tindakan Lambda selesai, pilih tautan Detail untuk melihat aliran log untuk fungsi di Amazon CloudWatch, termasuk durasi acara yang ditagih. Jika fungsi gagal, CloudWatch log memberikan informasi tentang penyebabnya.
Langkah 5: Langkah selanjutnya
Sekarang setelah Anda berhasil membuat fungsi Lambda dan menambahkannya sebagai tindakan dalam pipeline, Anda dapat mencoba yang berikut ini:
-
Tambahkan lebih banyak tindakan Lambda ke panggung Anda untuk memeriksa halaman web lainnya.
-
Ubah fungsi Lambda untuk memeriksa string teks yang berbeda.
-
Jelajahi fungsi Lambda dan buat serta tambahkan fungsi Lambda Anda sendiri ke pipeline.
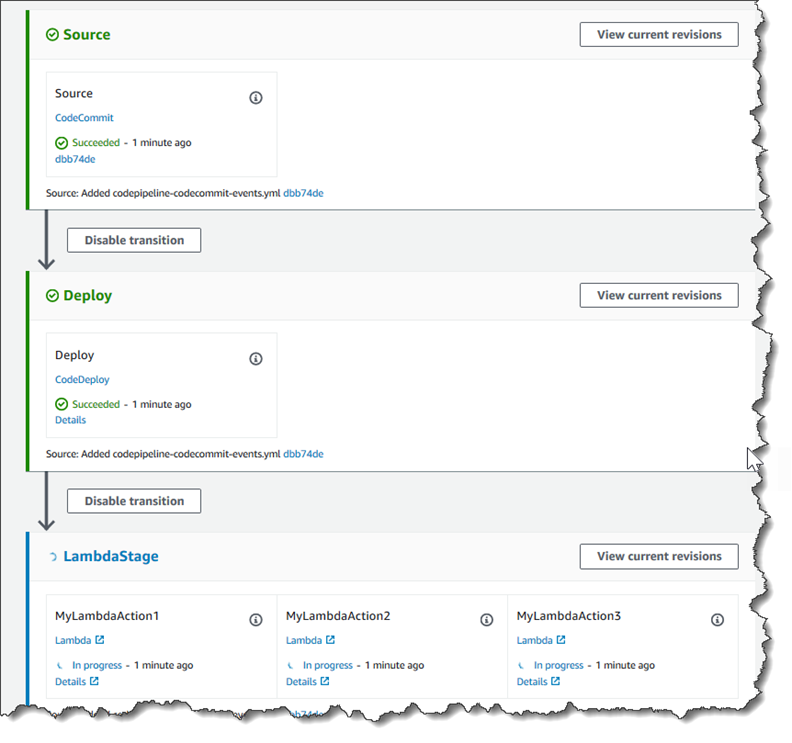
Setelah selesai bereksperimen dengan fungsi Lambda, pertimbangkan untuk menghapusnya dari pipeline Anda, menghapusnya dari AWS Lambda, dan menghapus peran dari IAM untuk menghindari kemungkinan biaya. Untuk informasi selengkapnya, lihatEdit pipa di CodePipeline,Hapus pipa di CodePipeline, dan Menghapus Profil Peran atau Instance.
Contoh peristiwa JSON
Contoh berikut menunjukkan contoh peristiwa JSON yang dikirim ke Lambda oleh CodePipeline. Struktur acara ini mirip dengan respons terhadapGetJobDetails API, tetapi tanpa tipe pipelineContext data actionTypeId dan. Dua detail konfigurasi tindakanUserParameters, FunctionName dan, disertakan dalam peristiwa JSON dan respons terhadap GetJobDetails API. Nilai-nilai di dalamnya red italic text adalah contoh atau penjelasan, bukan nilai nyata.
{
    "CodePipeline.job": {
        "id": "11111111-abcd-1111-abcd-111111abcdef",
        "accountId": "111111111111",
        "data": {
            "actionConfiguration": {
                "configuration": {
                    "FunctionName": "MyLambdaFunctionForAWSCodePipeline",
                    "UserParameters": "some-input-such-as-a-URL"
                }
            },
            "inputArtifacts": [
                {
                    "location": {
                        "s3Location": {
                            "bucketName": "the name of the bucket configured as the pipeline artifact store in Amazon S3, for example codepipeline-us-east-2-1234567890",
                            "objectKey": "the name of the application, for example CodePipelineDemoApplication.zip"
                        },
                        "type": "S3"
                    },
                    "revision": null,
                    "name": "ArtifactName"
                }
            ],
            "outputArtifacts": [],
            "artifactCredentials": {
                "secretAccessKey": "wJalrXUtnFEMI/K7MDENG/bPxRfiCYEXAMPLEKEY",
                "sessionToken": "MIICiTCCAfICCQD6m7oRw0uXOjANBgkqhkiG9w
 0BAQUFADCBiDELMAkGA1UEBhMCVVMxCzAJBgNVBAgTAldBMRAwDgYDVQQHEwdTZ
 WF0dGxlMQ8wDQYDVQQKEwZBbWF6b24xFDASBgNVBAsTC0lBTSBDb25zb2xlMRIw
 EAYDVQQDEwlUZXN0Q2lsYWMxHzAdBgkqhkiG9w0BCQEWEG5vb25lQGFtYXpvbi5
 jb20wHhcNMTEwNDI1MjA0NTIxWhcNMTIwNDI0MjA0NTIxWjCBiDELMAkGA1UEBh
 MCVVMxCzAJBgNVBAgTAldBMRAwDgYDVQQHEwdTZWF0dGxlMQ8wDQYDVQQKEwZBb
 WF6b24xFDASBgNVBAsTC0lBTSBDb25zb2xlMRIwEAYDVQQDEwlUZXN0Q2lsYWMx
 HzAdBgkqhkiG9w0BCQEWEG5vb25lQGFtYXpvbi5jb20wgZ8wDQYJKoZIhvcNAQE
 BBQADgY0AMIGJAoGBAMaK0dn+a4GmWIWJ21uUSfwfEvySWtC2XADZ4nB+BLYgVI
 k60CpiwsZ3G93vUEIO3IyNoH/f0wYK8m9TrDHudUZg3qX4waLG5M43q7Wgc/MbQ
 ITxOUSQv7c7ugFFDzQGBzZswY6786m86gpEIbb3OhjZnzcvQAaRHhdlQWIMm2nr
 AgMBAAEwDQYJKoZIhvcNAQEFBQADgYEAtCu4nUhVVxYUntneD9+h8Mg9q6q+auN
 KyExzyLwaxlAoo7TJHidbtS4J5iNmZgXL0FkbFFBjvSfpJIlJ00zbhNYS5f6Guo
 EDmFJl0ZxBHjJnyp378OD8uTs7fLvjx79LjSTbNYiytVbZPQUQ5Yaxu2jXnimvw
 3rrszlaEXAMPLE=",
                "accessKeyId": "AKIAIOSFODNN7EXAMPLE"
            },
            "continuationToken": "A continuation token if continuing job",
            "encryptionKey": {
              "id": "arn:aws:kms:us-west-2:111122223333:key/1234abcd-12ab-34cd-56ef-1234567890ab",
              "type": "KMS"
            }
        }
    }
}
Fungsi sampel tambahan
Contoh fungsi Lambda berikut menunjukkan fungsionalitas tambahan yang dapat Anda gunakan untuk pipeline Anda. CodePipeline Untuk menggunakan fungsi-fungsi ini, Anda mungkin harus memodifikasi kebijakan untuk peran eksekusi Lambda, seperti yang disebutkan dalam pendahuluan untuk setiap sampel.
Contoh fungsi Python yang menggunakan AWS CloudFormation templat
Contoh berikut menunjukkan fungsi yang membuat atau memperbarui tumpukan berdasarkan CloudFormation template yang disediakan. Template membuat bucket Amazon S3. Ini hanya untuk tujuan demonstrasi, untuk meminimalkan biaya. Idealnya, Anda harus menghapus tumpukan sebelum mengunggah apa pun ke bucket. Jika Anda mengunggah file ke bucket, Anda tidak dapat menghapus bucket saat menghapus tumpukan. Anda harus menghapus semua yang ada di bucket secara manual sebelum Anda dapat menghapus bucket itu sendiri.
Contoh Python ini mengasumsikan Anda memiliki pipeline yang menggunakan bucket Amazon S3 sebagai tindakan sumber, atau bahwa Anda memiliki akses ke bucket Amazon S3 berversi yang dapat Anda gunakan dengan pipeline. Anda membuat CloudFormation template, mengompresnya, dan mengunggahnya ke bucket itu sebagai file.zip. Anda kemudian harus menambahkan tindakan sumber ke pipeline Anda yang mengambil file.zip ini dari bucket.
catatan
Jika Amazon S3 adalah penyedia sumber untuk pipeline Anda, Anda dapat membuat zip file sumber atau file ke dalam satu .zip dan mengunggah.zip ke bucket sumber Anda. Anda juga dapat mengunggah satu file unzip; namun, tindakan hilir yang mengharapkan file.zip akan gagal.
Sampel ini menunjukkan:
-
Penggunaan parameter JSON-encoded pengguna untuk meneruskan beberapa nilai konfigurasi ke fungsi (
get_user_params). -
Interaksi dengan artefak.zip dalam bucket artefak ()
get_template. -
Penggunaan token lanjutan untuk memantau proses asinkron yang berjalan lama ().
continue_job_laterHal ini memungkinkan tindakan untuk melanjutkan dan fungsi berhasil bahkan jika melebihi runtime lima belas menit (batas di Lambda).
Untuk menggunakan fungsi Lambda sampel ini, kebijakan untuk peran eksekusi Lambda harus memiliki Allow izin di CloudFormation, Amazon S3, dan CodePipeline, seperti yang ditunjukkan dalam kebijakan sampel ini:
Untuk membuat CloudFormation template, buka editor teks biasa dan salin dan tempel kode berikut:
{
  "AWSTemplateFormatVersion" : "2010-09-09",
  "Description" : "CloudFormation template which creates an S3 bucket",
  "Resources" : {
    "MySampleBucket" : {
      "Type" : "AWS::S3::Bucket",
      "Properties" : {
      }
    }
  },
  "Outputs" : {
    "BucketName" : {
      "Value" : { "Ref" : "MySampleBucket" },
      "Description" : "The name of the S3 bucket"
    }
  }
}
Simpan ini sebagai file JSON dengan nama template.json di direktori bernamatemplate-package. Buat file terkompresi (.zip) dari direktori ini dan file bernamatemplate-package.zip, dan unggah file terkompresi ke bucket Amazon S3 berversi. Jika Anda sudah memiliki bucket yang dikonfigurasi untuk pipeline Anda, Anda dapat menggunakannya. Selanjutnya, edit pipeline Anda untuk menambahkan tindakan sumber yang mengambil file.zip. Beri nama output untuk tindakan iniMyTemplate. Untuk informasi selengkapnya, lihat Edit pipa di CodePipeline.
catatan
Contoh fungsi Lambda mengharapkan nama-nama file ini dan struktur terkompresi. Namun, Anda dapat mengganti CloudFormation template Anda sendiri untuk sampel ini. Jika Anda menggunakan template sendiri, pastikan Anda mengubah kebijakan untuk peran eksekusi Lambda untuk mengizinkan fungsionalitas tambahan apa pun yang diperlukan oleh CloudFormation templat Anda.
Untuk menambahkan kode berikut sebagai fungsi di Lambda
-
Buka konsol Lambda dan pilih Buat fungsi.
-
Pilih halaman Buat fungsi, pilih Penulis dari scratch. Di Nama fungsi, masukkan nama untuk fungsi Lambda Anda.
-
Di Runtime, pilih Python 2.7.
-
Di bawah Pilih atau buat peran eksekusi, pilih Gunakan peran yang ada. Di Peran yang ada, pilih peran Anda, lalu pilih Buat fungsi.
Halaman detail untuk fungsi yang Anda buat terbuka.
-
Salin kode berikut ke kotak kode fungsi:
from __future__ import print_function from boto3.session import Session import json import urllib import boto3 import zipfile import tempfile import botocore import traceback print('Loading function') cf = boto3.client('cloudformation') code_pipeline = boto3.client('codepipeline') def find_artifact(artifacts, name): """Finds the artifact 'name' among the 'artifacts' Args: artifacts: The list of artifacts available to the function name: The artifact we wish to use Returns: The artifact dictionary found Raises: Exception: If no matching artifact is found """ for artifact in artifacts: if artifact['name'] == name: return artifact raise Exception('Input artifact named "{0}" not found in event'.format(name)) def get_template(s3, artifact, file_in_zip): """Gets the template artifact Downloads the artifact from the S3 artifact store to a temporary file then extracts the zip and returns the file containing the CloudFormation template. Args: artifact: The artifact to download file_in_zip: The path to the file within the zip containing the template Returns: The CloudFormation template as a string Raises: Exception: Any exception thrown while downloading the artifact or unzipping it """ tmp_file = tempfile.NamedTemporaryFile() bucket = artifact['location']['s3Location']['bucketName'] key = artifact['location']['s3Location']['objectKey'] with tempfile.NamedTemporaryFile() as tmp_file: s3.download_file(bucket, key, tmp_file.name) with zipfile.ZipFile(tmp_file.name, 'r') as zip: return zip.read(file_in_zip) def update_stack(stack, template): """Start a CloudFormation stack update Args: stack: The stack to update template: The template to apply Returns: True if an update was started, false if there were no changes to the template since the last update. Raises: Exception: Any exception besides "No updates are to be performed." """ try: cf.update_stack(StackName=stack, TemplateBody=template) return True except botocore.exceptions.ClientError as e: if e.response['Error']['Message'] == 'No updates are to be performed.': return False else: raise Exception('Error updating CloudFormation stack "{0}"'.format(stack), e) def stack_exists(stack): """Check if a stack exists or not Args: stack: The stack to check Returns: True or False depending on whether the stack exists Raises: Any exceptions raised .describe_stacks() besides that the stack doesn't exist. """ try: cf.describe_stacks(StackName=stack) return True except botocore.exceptions.ClientError as e: if "does not exist" in e.response['Error']['Message']: return False else: raise e def create_stack(stack, template): """Starts a new CloudFormation stack creation Args: stack: The stack to be created template: The template for the stack to be created with Throws: Exception: Any exception thrown by .create_stack() """ cf.create_stack(StackName=stack, TemplateBody=template) def get_stack_status(stack): """Get the status of an existing CloudFormation stack Args: stack: The name of the stack to check Returns: The CloudFormation status string of the stack such as CREATE_COMPLETE Raises: Exception: Any exception thrown by .describe_stacks() """ stack_description = cf.describe_stacks(StackName=stack) return stack_description['Stacks'][0]['StackStatus'] def put_job_success(job, message): """Notify CodePipeline of a successful job Args: job: The CodePipeline job ID message: A message to be logged relating to the job status Raises: Exception: Any exception thrown by .put_job_success_result() """ print('Putting job success') print(message) code_pipeline.put_job_success_result(jobId=job) def put_job_failure(job, message): """Notify CodePipeline of a failed job Args: job: The CodePipeline job ID message: A message to be logged relating to the job status Raises: Exception: Any exception thrown by .put_job_failure_result() """ print('Putting job failure') print(message) code_pipeline.put_job_failure_result(jobId=job, failureDetails={'message': message, 'type': 'JobFailed'}) def continue_job_later(job, message): """Notify CodePipeline of a continuing job This will cause CodePipeline to invoke the function again with the supplied continuation token. Args: job: The JobID message: A message to be logged relating to the job status continuation_token: The continuation token Raises: Exception: Any exception thrown by .put_job_success_result() """ # Use the continuation token to keep track of any job execution state # This data will be available when a new job is scheduled to continue the current execution continuation_token = json.dumps({'previous_job_id': job}) print('Putting job continuation') print(message) code_pipeline.put_job_success_result(jobId=job, continuationToken=continuation_token) def start_update_or_create(job_id, stack, template): """Starts the stack update or create process If the stack exists then update, otherwise create. Args: job_id: The ID of the CodePipeline job stack: The stack to create or update template: The template to create/update the stack with """ if stack_exists(stack): status = get_stack_status(stack) if status not in ['CREATE_COMPLETE', 'ROLLBACK_COMPLETE', 'UPDATE_COMPLETE']: # If the CloudFormation stack is not in a state where # it can be updated again then fail the job right away. put_job_failure(job_id, 'Stack cannot be updated when status is: ' + status) return were_updates = update_stack(stack, template) if were_updates: # If there were updates then continue the job so it can monitor # the progress of the update. continue_job_later(job_id, 'Stack update started') else: # If there were no updates then succeed the job immediately put_job_success(job_id, 'There were no stack updates') else: # If the stack doesn't already exist then create it instead # of updating it. create_stack(stack, template) # Continue the job so the pipeline will wait for the CloudFormation # stack to be created. continue_job_later(job_id, 'Stack create started') def check_stack_update_status(job_id, stack): """Monitor an already-running CloudFormation update/create Succeeds, fails or continues the job depending on the stack status. Args: job_id: The CodePipeline job ID stack: The stack to monitor """ status = get_stack_status(stack) if status in ['UPDATE_COMPLETE', 'CREATE_COMPLETE']: # If the update/create finished successfully then # succeed the job and don't continue. put_job_success(job_id, 'Stack update complete') elif status in ['UPDATE_IN_PROGRESS', 'UPDATE_ROLLBACK_IN_PROGRESS', 'UPDATE_ROLLBACK_COMPLETE_CLEANUP_IN_PROGRESS', 'CREATE_IN_PROGRESS', 'ROLLBACK_IN_PROGRESS', 'UPDATE_COMPLETE_CLEANUP_IN_PROGRESS']: # If the job isn't finished yet then continue it continue_job_later(job_id, 'Stack update still in progress') else: # If the Stack is a state which isn't "in progress" or "complete" # then the stack update/create has failed so end the job with # a failed result. put_job_failure(job_id, 'Update failed: ' + status) def get_user_params(job_data): """Decodes the JSON user parameters and validates the required properties. Args: job_data: The job data structure containing the UserParameters string which should be a valid JSON structure Returns: The JSON parameters decoded as a dictionary. Raises: Exception: The JSON can't be decoded or a property is missing. """ try: # Get the user parameters which contain the stack, artifact and file settings user_parameters = job_data['actionConfiguration']['configuration']['UserParameters'] decoded_parameters = json.loads(user_parameters) except Exception as e: # We're expecting the user parameters to be encoded as JSON # so we can pass multiple values. If the JSON can't be decoded # then fail the job with a helpful message. raise Exception('UserParameters could not be decoded as JSON') if 'stack' not in decoded_parameters: # Validate that the stack is provided, otherwise fail the job # with a helpful message. raise Exception('Your UserParameters JSON must include the stack name') if 'artifact' not in decoded_parameters: # Validate that the artifact name is provided, otherwise fail the job # with a helpful message. raise Exception('Your UserParameters JSON must include the artifact name') if 'file' not in decoded_parameters: # Validate that the template file is provided, otherwise fail the job # with a helpful message. raise Exception('Your UserParameters JSON must include the template file name') return decoded_parameters def setup_s3_client(job_data): """Creates an S3 client Uses the credentials passed in the event by CodePipeline. These credentials can be used to access the artifact bucket. Args: job_data: The job data structure Returns: An S3 client with the appropriate credentials """ key_id = job_data['artifactCredentials']['accessKeyId'] key_secret = job_data['artifactCredentials']['secretAccessKey'] session_token = job_data['artifactCredentials']['sessionToken'] session = Session(aws_access_key_id=key_id, aws_secret_access_key=key_secret, aws_session_token=session_token) return session.client('s3', config=botocore.client.Config(signature_version='s3v4')) def lambda_handler(event, context): """The Lambda function handler If a continuing job then checks the CloudFormation stack status and updates the job accordingly. If a new job then kick of an update or creation of the target CloudFormation stack. Args: event: The event passed by Lambda context: The context passed by Lambda """ try: # Extract the Job ID job_id = event['CodePipeline.job']['id'] # Extract the Job Data job_data = event['CodePipeline.job']['data'] # Extract the params params = get_user_params(job_data) # Get the list of artifacts passed to the function artifacts = job_data['inputArtifacts'] stack = params['stack'] artifact = params['artifact'] template_file = params['file'] if 'continuationToken' in job_data: # If we're continuing then the create/update has already been triggered # we just need to check if it has finished. check_stack_update_status(job_id, stack) else: # Get the artifact details artifact_data = find_artifact(artifacts, artifact) # Get S3 client to access artifact with s3 = setup_s3_client(job_data) # Get the JSON template file out of the artifact template = get_template(s3, artifact_data, template_file) # Kick off a stack update or create start_update_or_create(job_id, stack, template) except Exception as e: # If any other exceptions which we didn't expect are raised # then fail the job and log the exception message. print('Function failed due to exception.') print(e) traceback.print_exc() put_job_failure(job_id, 'Function exception: ' + str(e)) print('Function complete.') return "Complete." -
Biarkan Handler pada nilai default, dan tinggalkan R ole pada nama yang Anda pilih atau buat sebelumnya,
CodePipelineLambdaExecRole. -
Dalam pengaturan Das ar, untuk Waktu hab is, ganti default 3 detik dengan
20. -
Pilih Simpan.
-
Dari CodePipeline konsol, edit pipeline untuk menambahkan fungsi sebagai tindakan dalam tahap dalam pipeline Anda. Pilih Edit untuk tahap pipeline yang ingin Anda ubah, dan pilih Tambahkan grup tindakan. Pada halaman Edit tindakan, di Nama tindakan, masukkan nama untuk tindakan Anda. Di penyedia tindakan, pilih Lambda.
Di bawah Artefak masukan, pilih
MyTemplate. Di UserParameters, Anda harus menyediakan string JSON dengan tiga parameter:-
Nama tumpukan
-
CloudFormation nama template dan jalur ke file
-
Artefak masukan
Gunakan tanda kurung keriting ({}) dan pisahkan parameter dengan koma. Misalnya, untuk membuat tumpukan bernama
MyTestStack, untuk pipeline dengan artefak inputMyTemplate, in UserParameters, masukkan: {"stack”:”MyTestStack“, "file” :"template- package/template .json”, "artefact”:” “}.MyTemplatecatatan
Meskipun Anda telah menentukan artefak input di UserParameters, Anda juga harus menentukan artefak input ini untuk tindakan di artefak masukan.
-
-
Simpan perubahan Anda ke pipeline, lalu lepaskan perubahan secara manual untuk menguji tindakan dan fungsi Lambda.
