Configure Amazon S3 Access Grants for Transfer Family web apps
This topic describes how to add an access grant using Amazon S3 Access Grants. This access grant defines access to your data directly to your users and groups in your corporate directory and vends just-in-time, least privilege, temporary credentials based on grants. An individual grant in an S3 Access Grants instance allows a specific user or group in a corporate directory—to get access within a location that is registered in your S3 Access Grants instance. For more details, see S3 Access Grants concepts in the Amazon S3 User Guide.
Note
You can't use the IAM Identity Center directory with S3 Access Grants other than with Transfer Family web apps.
You must specify an Amazon S3 access grant for identity propagation. An Amazon S3 access grant stores the data that your end users must access. When your end users sign in to your Transfer Family web app, S3 Access Grants passes a user's identity to the trusted application. This section describes how to add and configure an Amazon S3 access grant instance and then an access grant for an Amazon S3 bucket.
Note
Have your IAM Identity Center instance ARN and user or group ID ready, as you need them to complete setting up your access grant.
To create a grant using Amazon S3 Access Grants
Sign in to the AWS Management Console and open the Amazon S3 console at https://console.aws.amazon.com/s3/
. -
Create a bucket, or note an existing bucket to use with your web app. For information on creating buckets, see the Amazon S3 User Guide.
-
From the left navigation pane, choose Access Grants.
-
Choose Create S3 Access Grants instance and provide the following information.
-
Select Add IAM Identity Center instance in
your-Regionwhereyour-Regionis your AWS Region. Keep this box cleared if you are not using IAM Identity Center as your identity provider. -
Paste in your IAM Identity Center instance ARN.

Choose Next to continue.
-
-
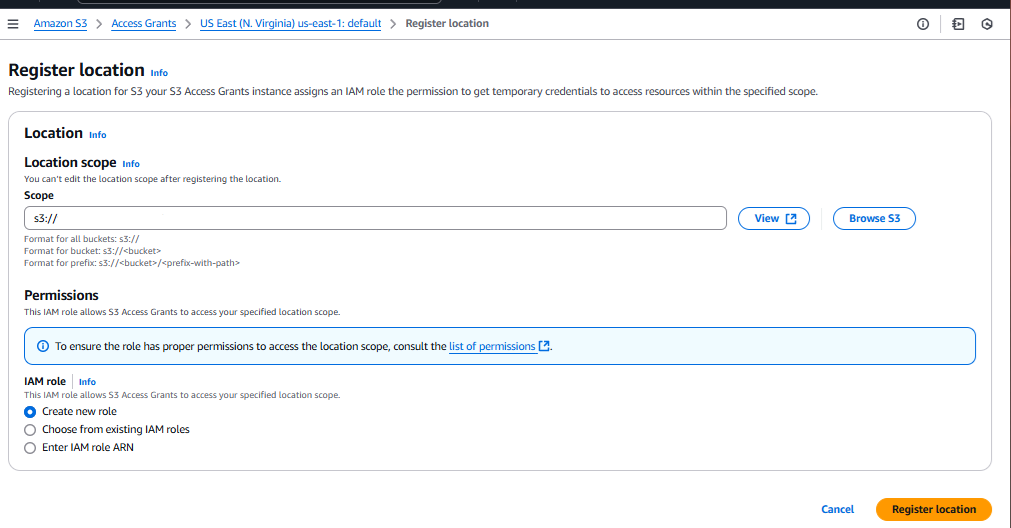
Register S3 Buckets or prefixes as locations. We recommend that you register the default location,
s3://, and map it to an IAM role. The location at this default path covers access to all of your Amazon S3 buckets in the AWS Region of your account. When you create an access grant, you can narrow the scope to a bucket, a prefix, or an object within the default location.Provide the following information.
-
For the Scope, browse for a bucket or enter the name of your bucket, and optionally a prefix.
-
For the IAM role, choose Create new role to have the service create a role.
Alternatively, you can create the role yourself, as described in Configure IAM roles for Transfer Family web apps, and then enter its ARN here.

Choose Next to continue.
-
-
In the Create Grant screen, provide the following details.
-
For Permissions, select Read and Write. The access grant permissions can be either read-only or read & write, but write-only is not supported.
-
For Grantee type, choose Directory identity from IAM Identity Center.
-
For Directory identity type, select User or Group, depending on which type you want to register now.
-
In IAM Identity Center user/group ID, paste in the ID for your user or group. This ID is available in the IAM Identity Center console and in your Transfer Family web app in your users and groups table.

Choose Next.
-
-
Review the settings on the screen. If everything is correct, choose Finish to create the access grant. Alternatively, you can choose Cancel or Previous to make changes.


This completes the setup for your web app. The users and groups that you've configured can visit the web app at the access point, log in, and upload and download files.