翻訳は機械翻訳により提供されています。提供された翻訳内容と英語版の間で齟齬、不一致または矛盾がある場合、英語版が優先します。
AWS CDK での AWS AppSync API の使用
ヒント
CDK を使用する前に、CDK の公式ドキュメントと CDK AWS AppSyncリファレンスを確認することをお勧めします。 https://docs.aws.amazon.com/cdk/api/v2/docs/aws-cdk-lib.aws_appsync-readme.html
このセクションでは、DynamoDB テーブルに項目を追加したり、テーブルから項目を取得したりできる簡単な CDK アプリケーションを作成します。これは、[スキーマの設計]、[データソースのアタッチ]、[リゾルバーの設定 (JavaScript)] セクションのコードの一部を使用したクイックスタートの例です。
CDK プロジェクトのセットアップ
警告
環境によっては、これらの手順が完全に正確ではない場合があります。システムに必要なユーティリティがインストールされていること、 AWS サービスとインターフェイスする方法、および適切な設定が整っていることを前提としています。
最初のステップは AWS CDK のインストールです。CLI で、次のコマンドを入力できます。
npm install -g aws-cdk
次に、プロジェクトディレクトリを作成して、そこに移動する必要があります。ディレクトリを作成して、そこに移動するコマンドのセット例は次のとおりです。
mkdir example-cdk-app
cd example-cdk-app
次に、アプリを作成する必要があります。私たちのサービスは主に TypeScript を使用しています。プロジェクトディレクトリで次のコマンドを入力します。
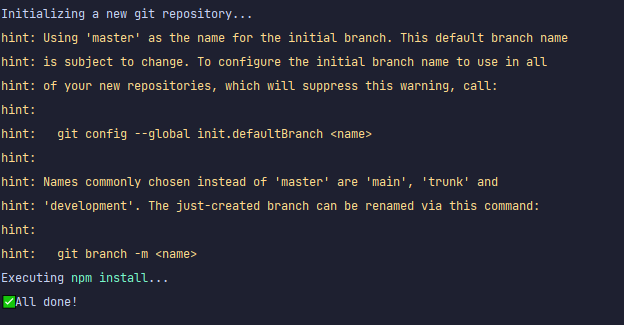
cdk init app --language typescript
これを行うと、CDK アプリとその初期化ファイルがインストールされます。
プロジェクト構造は次のようになります。
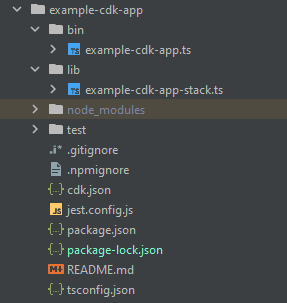
いくつかの重要なディレクトリがあるのがわかります。
-
bin: 最初の bin ファイルによってアプリが作成されます。このガイドではこれについては触れません。 -
lib: lib ディレクトリにはスタックファイルが含まれます。スタックファイルは個々の実行単位と考えることができます。コンストラクトはスタックファイル内にあります。基本的に、これらはアプリケーションのデプロイ CloudFormation 時に でスピンアップされるサービスのリソースです。ほとんどのコーディングはここで行われます。 -
node_modules: このディレクトリは NPM によって作成され、npmコマンドを使用してインストールしたすべてのパッケージ依存関係が含まれます。
最初のスタックファイルには次のような内容が含まれる場合があります。
import * as cdk from 'aws-cdk-lib';
import { Construct } from 'constructs';
// import * as sqs from 'aws-cdk-lib/aws-sqs';

export class ExampleCdkAppStack extends cdk.Stack {
  constructor(scope: Construct, id: string, props?: cdk.StackProps) {
    super(scope, id, props);

    // The code that defines your stack goes here

    // example resource
    // const queue = new sqs.Queue(this, 'ExampleCdkAppQueue', {
    //   visibilityTimeout: cdk.Duration.seconds(300)
    // });
  }
}
これはアプリでスタックを作成するためのボイラープレートコードです。この例では、コードのほとんどはこのクラスのスコープ内にあります。
スタックファイルがアプリ内にあることを確認し、アプリのディレクトリからターミナルで以下のコマンドを実行します。
cdk ls
スタックが一覧表示されます。表示されない場合は、手順をもう一度実行するか、公式ドキュメントでヘルプを確認する必要があります。
デプロイする前にコードの変更をビルドする場合は、ターミナルでいつでも以下のコマンドを実行できます。
npm run build
また、デプロイ前に変更を確認します。
cdk diff
スタックファイルにコードを追加する前に、ブートストラップを実行します。ブートストラップにより、アプリがデプロイされる前に CDK にリソースをプロビジョニングできます。このプロセスの詳細については、こちらを参照してください。ブートストラップを作成するには、以下のコマンドを実行します。
cdk bootstrap aws://ACCOUNT-NUMBER/REGION
ヒント
このステップでは、アカウントに複数の IAM アクセス許可が必要です。これらのアクセス許可がないと、ブートストラップは拒否されます。拒否された場合、ブートストラップが生成する S3 バケットなど、ブートストラップが原因で発生した不完全なリソースを削除しなければならない場合があります。
ブートストラップは複数のリソースを起動します。最終メッセージは次のようになります。

これは各リージョンのアカウントごとに 1 回行われるため、頻繁に行う必要はありません。ブートストラップの主なリソースは、 CloudFormation スタックと Amazon S3 バケットです。
Amazon S3 バケットは、ファイルとデプロイの実行に必要なアクセス許可を付与する IAM ロールを保存するために使用されます。必要なリソースは、ブートストラップ CloudFormation スタックと呼ばれる スタックで定義され、通常は と呼ばれますCDKToolkit。他の CloudFormation スタックと同様に、デプロイされると CloudFormation コンソールに表示されます。

バケットについても同じことが言えます。

スタックファイルで必要なサービスをインポートするには、以下のコマンドを使用できます。
npm install aws-cdk-lib # V2 command
ヒント
V2 に問題がある場合は、V1 コマンドを使用して個々のライブラリをインストールできます。
npm install @aws-cdk/aws-appsync @aws-cdk/aws-dynamodb
V1 は廃止されたため、これはお勧めしません。
CDK プロジェクトを作成する - スキーマ
これで、コードの実装を開始できます。まず、スキーマを作成する必要があります。アプリ内で .graphql ファイルを作成するだけです。
mkdir schema
touch schema.graphql
この例では、schema.graphql を含む schema という最上位ディレクトリを含めました。

スキーマの中に、簡単な例を含めてみましょう。
input CreatePostInput {
    title: String
    content: String
}

type Post {
    id: ID!
    title: String
    content: String
}

type Mutation {
    createPost(input: CreatePostInput!): Post
}

type Query {
    getPost: [Post]
}
スタックファイルに戻って、次の import ディレクティブが定義されていることを確認する必要があります。
import * as cdk from 'aws-cdk-lib';
import * as appsync from 'aws-cdk-lib/aws-appsync';
import * as dynamodb from 'aws-cdk-lib/aws-dynamodb';
import { Construct } from 'constructs';
クラス内に、GraphQL API を作成して schema.graphql ファイルに接続するコードを追加します。
export class ExampleCdkAppStack extends cdk.Stack {
  constructor(scope: Construct, id: string, props?: cdk.StackProps) {
    super(scope, id, props);

    // makes a GraphQL API
    const api = new appsync.GraphqlApi(this, 'post-apis', {
      name: 'api-to-process-posts',
      schema: appsync.SchemaFile.fromAsset('schema/schema.graphql'),
    });
  }
}
また、GraphQL URL、API キー、リージョンを出力するコードもいくつか追加します。
export class ExampleCdkAppStack extends cdk.Stack {
  constructor(scope: Construct, id: string, props?: cdk.StackProps) {
    super(scope, id, props);

    // Makes a GraphQL API construct
    const api = new appsync.GraphqlApi(this, 'post-apis', {
      name: 'api-to-process-posts',
      schema: appsync.SchemaFile.fromAsset('schema/schema.graphql'),
    });

    // Prints out URL
    new cdk.CfnOutput(this, "GraphQLAPIURL", {
      value: api.graphqlUrl
    });

    // Prints out the AppSync GraphQL API key to the terminal
    new cdk.CfnOutput(this, "GraphQLAPIKey", {
      value: api.apiKey || ''
    });

    // Prints out the stack region to the terminal
    new cdk.CfnOutput(this, "Stack Region", {
      value: this.region
    });
  }
}
この時点で、アプリを再度デプロイします。
cdk deploy
こちらがその結果です。
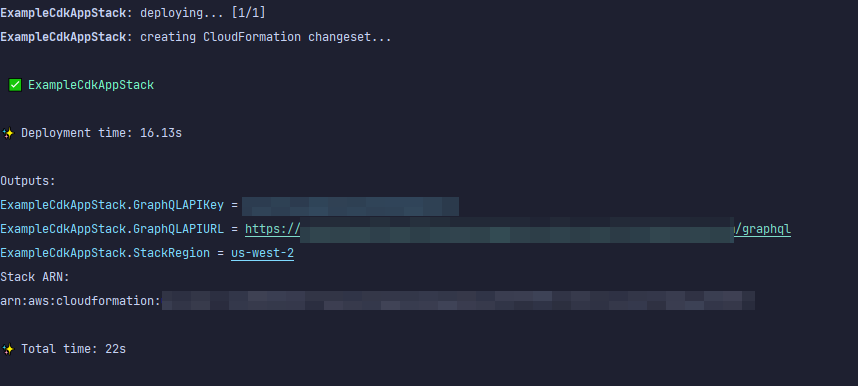
この例は成功したようですが、 AWS AppSync コンソールを確認して確認しましょう。

API が作成されたようです。次に、API に添付されているスキーマを確認します。
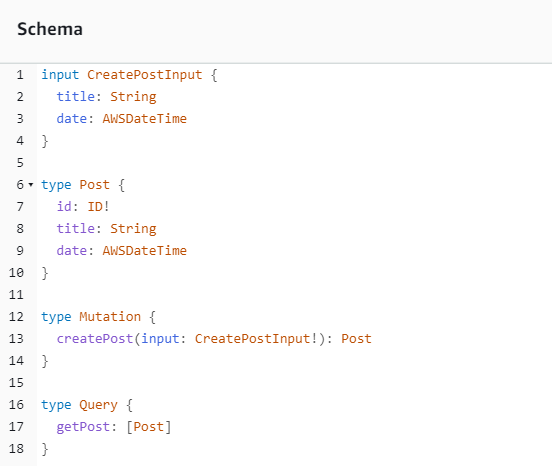
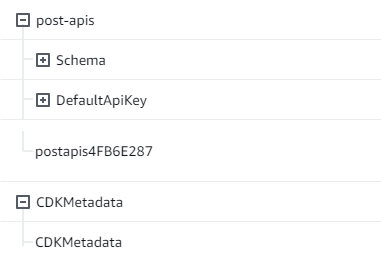
これはスキーマコードと一致しているようなので、成功です。メタデータの観点からこれを確認するもう 1 つの方法は、 CloudFormation スタックを確認することです。

CDK アプリケーションをデプロイすると、ブートストラップなどのリソース CloudFormation がスピンアップされます。アプリ内の各スタックは、 CloudFormation スタックと 1:1 でマッピングされます。スタックコードに戻ると、スタック名はクラス名 ExampleCdkAppStack から取得されています。作成したリソースを確認でき、GraphQL API コンストラクトの命名規則とも一致しています。
CDK プロジェクトの実装 - データソース
次に、データソースを追加する必要があります。この例では DynamoDB テーブルを使用します。stack クラス内に、新しいテーブルを作成するコードをいくつか追加します。
export class ExampleCdkAppStack extends cdk.Stack {
  constructor(scope: Construct, id: string, props?: cdk.StackProps) {
    super(scope, id, props);

    // Makes a GraphQL API construct
    const api = new appsync.GraphqlApi(this, 'post-apis', {
      name: 'api-to-process-posts',
      schema: appsync.SchemaFile.fromAsset('schema/schema.graphql'),
    });

    //creates a DDB table
    const add_ddb_table = new dynamodb.Table(this, 'posts-table', {
      partitionKey: {
        name: 'id',
        type: dynamodb.AttributeType.STRING,
      },
    });

    // Prints out URL
    new cdk.CfnOutput(this, "GraphQLAPIURL", {
      value: api.graphqlUrl
    });

    // Prints out the AppSync GraphQL API key to the terminal
    new cdk.CfnOutput(this, "GraphQLAPIKey", {
      value: api.apiKey || ''
    });

    // Prints out the stack region to the terminal
    new cdk.CfnOutput(this, "Stack Region", {
      value: this.region
    });
  }
}
この時点で、もう一度デプロイしてみましょう。
cdk deploy
DynamoDB コンソールで新しいテーブルを確認する必要があります。

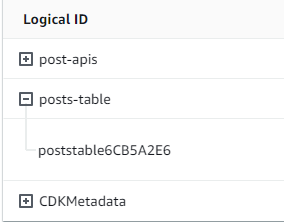
スタック名は正しく、テーブル名はコードと一致しています。 CloudFormation スタックを再度チェックすると、新しいテーブルが表示されます。
CDK プロジェクトを作成する - リゾルバー
この例では、2 つのリゾルバーを使用します。1 つはテーブルのクエリ用、もう 1 つはテーブルへの追加用です。パイプラインリゾルバーを使用しているため、それぞれ 1 つの関数を持つ 2 つのパイプラインリゾルバーを宣言する必要があります。このクエリでは、次のコードを追加します。
export class ExampleCdkAppStack extends cdk.Stack {
  constructor(scope: Construct, id: string, props?: cdk.StackProps) {
    super(scope, id, props);

    // Makes a GraphQL API construct
    const api = new appsync.GraphqlApi(this, 'post-apis', {
      name: 'api-to-process-posts',
      schema: appsync.SchemaFile.fromAsset('schema/schema.graphql'),
    });

    //creates a DDB table
    const add_ddb_table = new dynamodb.Table(this, 'posts-table', {
      partitionKey: {
        name: 'id',
        type: dynamodb.AttributeType.STRING,
      },
    });

    // Creates a function for query
    const add_func = new appsync.AppsyncFunction(this, 'func-get-post', {
      name: 'get_posts_func_1',
      api,
      dataSource: api.addDynamoDbDataSource('table-for-posts', add_ddb_table),
      code: appsync.Code.fromInline(`
          export function request(ctx) {
          return { operation: 'Scan' };
          }

          export function response(ctx) {
          return ctx.result.items;
          }
  `),
      runtime: appsync.FunctionRuntime.JS_1_0_0,
    });

    // Creates a function for mutation
    const add_func_2 = new appsync.AppsyncFunction(this, 'func-add-post', {
      name: 'add_posts_func_1',
      api,
      dataSource: api.addDynamoDbDataSource('table-for-posts-2', add_ddb_table),
      code: appsync.Code.fromInline(`
          export function request(ctx) {
            return {
            operation: 'PutItem',
            key: util.dynamodb.toMapValues({id: util.autoId()}),
            attributeValues: util.dynamodb.toMapValues(ctx.args.input),
            };
          }

          export function response(ctx) {
            return ctx.result;
          }
      `),
      runtime: appsync.FunctionRuntime.JS_1_0_0,
    });

    // Adds a pipeline resolver with the get function
    new appsync.Resolver(this, 'pipeline-resolver-get-posts', {
      api,
      typeName: 'Query',
      fieldName: 'getPost',
      code: appsync.Code.fromInline(`
          export function request(ctx) {
          return {};
          }

          export function response(ctx) {
          return ctx.prev.result;
          }
  `),
      runtime: appsync.FunctionRuntime.JS_1_0_0,
      pipelineConfig: [add_func],
    });

    // Adds a pipeline resolver with the create function
    new appsync.Resolver(this, 'pipeline-resolver-create-posts', {
      api,
      typeName: 'Mutation',
      fieldName: 'createPost',
      code: appsync.Code.fromInline(`
          export function request(ctx) {
          return {};
          }

          export function response(ctx) {
          return ctx.prev.result;
          }
  `),
      runtime: appsync.FunctionRuntime.JS_1_0_0,
      pipelineConfig: [add_func_2],
    });

    // Prints out URL
    new cdk.CfnOutput(this, "GraphQLAPIURL", {
      value: api.graphqlUrl
    });

    // Prints out the AppSync GraphQL API key to the terminal
    new cdk.CfnOutput(this, "GraphQLAPIKey", {
      value: api.apiKey || ''
    });

    // Prints out the stack region to the terminal
    new cdk.CfnOutput(this, "Stack Region", {
      value: this.region
    });
  }
}
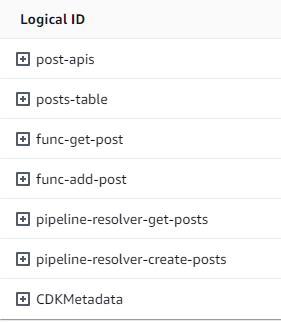
このスニペットでは、func-add-post という関数がアタッチされた pipeline-resolver-create-posts というパイプラインリゾルバーを追加しました。これがテーブルに Posts を追加するコードです。もう一方のパイプラインリゾルバーは pipeline-resolver-get-posts と呼ばれ、テーブルに追加された Posts を取得する func-get-post と呼ばれる関数を持ちます。
これをデプロイして AWS AppSync サービスに追加します。
cdk deploy
AWS AppSync コンソールで、GraphQL API にアタッチされているかどうかを確認します。
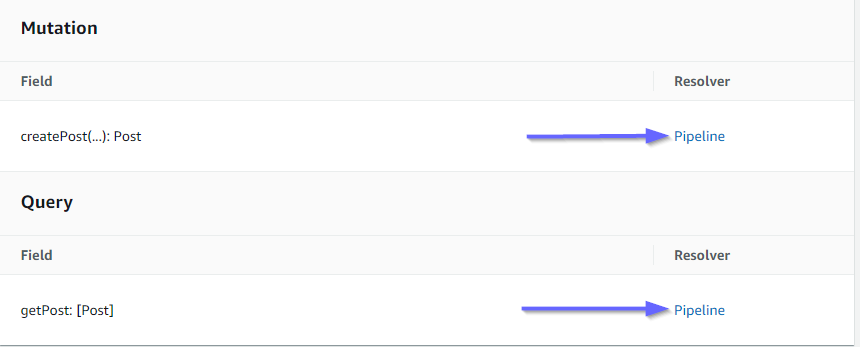
正しく接続されているようです。コードでは、これらのリゾルバーは両方とも、作成した GraphQL API にアタッチされていました (リゾルバーと関数の両方に存在する api props 値で示されます)。GraphQL APIでは、リゾルバーをアタッチしたフィールドも props で指定されていました (各リゾルバーで typename および fieldname props によって定義されます)。
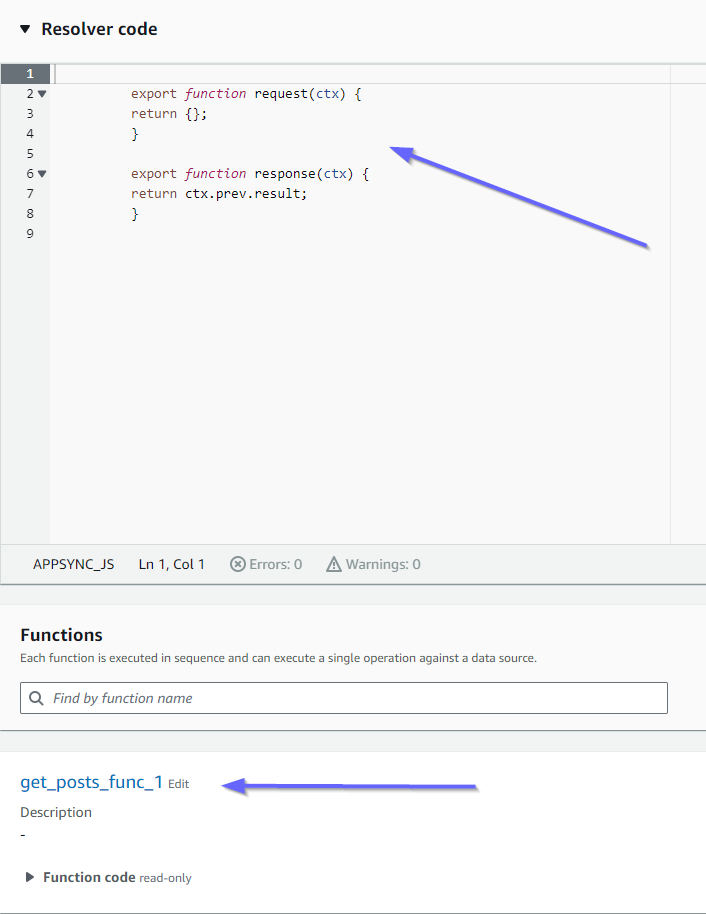
リゾルバーのコンテンツが正しいかどうか、pipeline-resolver-get-posts を手始めに見てみましょう。
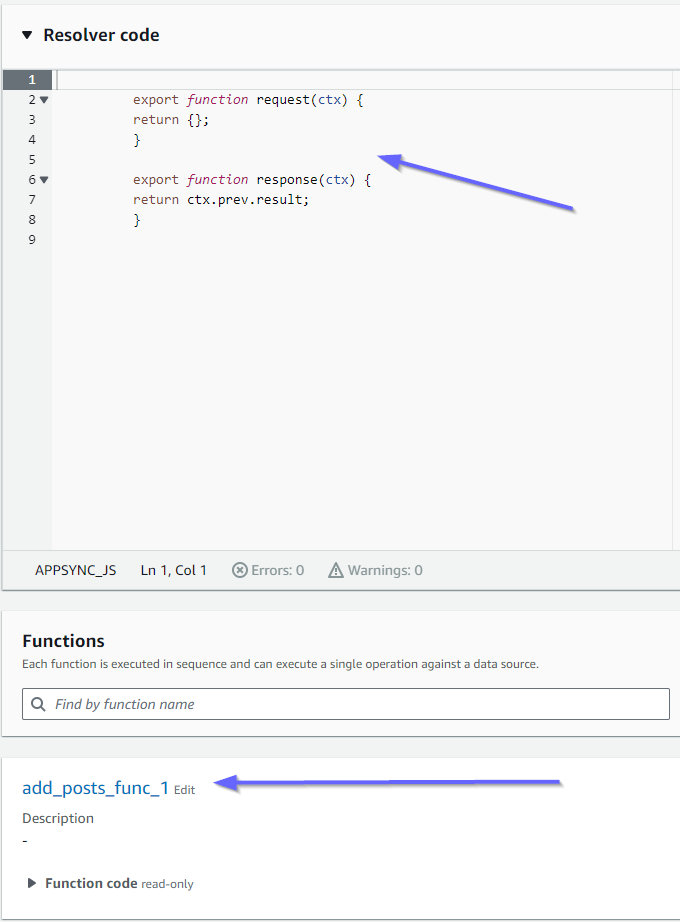
before ハンドラーと after ハンドラーは code props の値と一致しています。また、add_posts_func_1 という関数がリゾルバーにアタッチした関数の名前と一致していることもわかります。
この関数のコードコンテンツを見てみましょう。
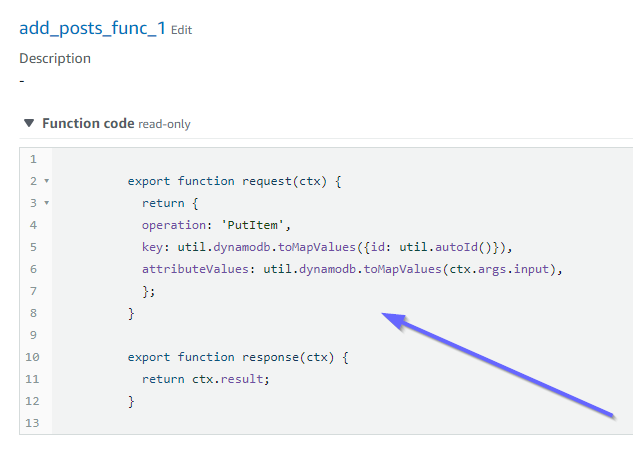
これは add_posts_func_1 関数の code props と一致します。クエリが正常にアップロードされたので、クエリを確認してみましょう。
これらもコードと一致しています。get_posts_func_1 を見てみましょう。
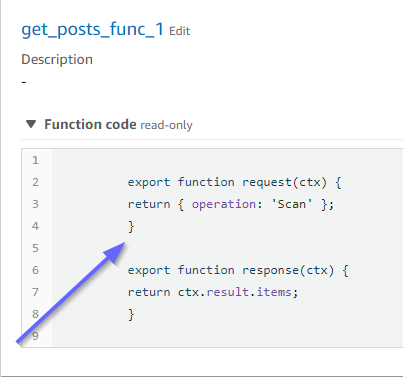
すべてが正常に見えます。メタデータの観点からこれを確認するには、スタックをもう一度 CloudFormation にチェックインします。
次に、いくつかのリクエストを実行して、このコードをテストする必要があります。
CDK プロジェクトの実装 - リクエスト
AWS AppSync コンソールでアプリケーションをテストするために、1 つのクエリと 1 つのミューテーションを作成しました。
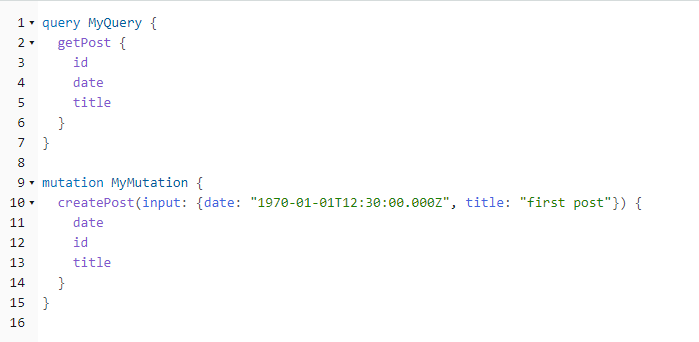
MyMutation には、引数 1970-01-01T12:30:00.000Z と first post を含む createPost オペレーションが含まれています。渡した date および title とともに、自動生成された id 値が返されます。ミューテーションを実行すると、以下の結果が得られます。
{
  "data": {
    "createPost": {
      "date": "1970-01-01T12:30:00.000Z",
      "id": "4dc1c2dd-0aa3-4055-9eca-7c140062ada2",
      "title": "first post"
    }
  }
}
DynamoDB テーブルをすばやく確認すると、スキャンしたときにテーブルにエントリが表示されます。

AWS AppSync コンソールに戻り、クエリを実行してこの を取得するとPost、次の結果が得られます。
{
  "data": {
    "getPost": [
      {
        "id": "9f62c4dd-49d5-48d5-b835-143284c72fe0",
        "date": "1970-01-01T12:30:00.000Z",
        "title": "first post"
      }
    ]
  }
}
