翻訳は機械翻訳により提供されています。提供された翻訳内容と英語版の間で齟齬、不一致または矛盾がある場合、英語版が優先します。
macOS、Linux、または UNIX で SSH キーを作成する
macOS、Linux、または UNIX のオペレーティングシステムでは、ssh-keygen コマンドを使用して、キーペトと呼ばれる SSH パブリックキーと SSH プライベートキーを作成します。
注記
以下の例では、パスフレーズは指定していません。この場合、ツールはパスフレーズの入力を要求し、確認のためもう一度入力するように求めます。パスフレーズを作成すると、秘密鍵の保護が強化され、システム全体のセキュリティも向上する可能性があります。パスフレーズは復元できません。忘れた場合は、新しいキーを作成する必要があります。
ただし、サーバーホスト鍵を生成する場合、Transfer Family サーバーは起動時にパスワードを要求できないため、コマンドで -N "" オプションを指定する(またはプロンプトが表示されたら Enter を 2 回押す)ことで、空のパスフレーズを「必ず」指定する必要があります。
macOS、Linux、または UNIX のオペレーティングシステムで SSH キーを作成するには
-
macOS、Linux、または UNIX でコマンドターミナルを開きます。
-
AWS Transfer Family は、RSA、ECDSA、および ED25519-formattedキーを受け入れます。生成するキーペアのタイプに基づいて適切なコマンドを選択してください。
ヒント: を SSH キーペアファイルの実際の名前
key_name-
4096 ビット RSA キーペアを生成する
ssh-keygen -t rsa -b 4096 -fkey_name -
ECDSA 521 ビットのキーペア (ECDSA のビットサイズは 256、384、521) を生成するには:
ssh-keygen -t ecdsa -b 521 -fkey_name -
ED25519 キーペアを生成するには:
ssh-keygen -t ed25519 -fkey_name
ssh-keygen出力の例を以下に示します。ssh-keygen -t rsa -b 4096 -f key_name Generating public/private rsa key pair. Enter passphrase (empty for no passphrase): Enter same passphrase again: Your identification has been saved in key_name. Your public key has been saved in key_name.pub. The key fingerprint is: SHA256:8tDDwPmanTFcEzjTwPGETVWOGW1nVz+gtCCE8hL7PrQ bob.amazon.com The key's randomart image is: +---[RSA 4096]----+ | . ....E | | . = ... | |. . . = ..o | | . o + oo = | | + = .S.= * | | . o o ..B + o | | .o.+.* . | | =o*+*. | | ..*o*+. | +----[SHA256]-----+ヒント: 前述のように
ssh-keygenコマンドを実行すると、パブリックキーとプライベートキーが現在のディレクトリにファイルとして作成されます。これで、SSH キーペアを使用する準備ができました。ステップ 3 と 4 に従って、サービスマネージドユーザーの SSH パブリックキーを保存します。これらのユーザーは、Transfer Family サーバーエンドポイントでファイルを転送するときにキーを使用します。
-
-
key_name.pub -
テキストをコピーして、サービス管理対象ユーザーの「SSH 公開鍵」に貼り付けます。
-
https://console.aws.amazon.com/transfer/
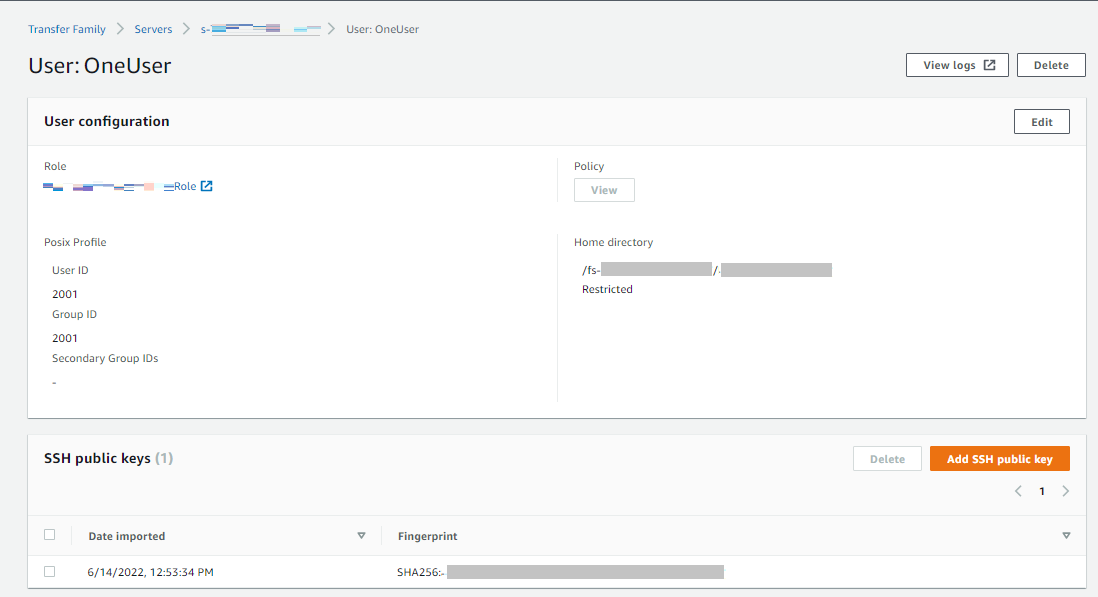
で AWS Transfer Family コンソールを開き、ナビゲーションペインからサーバーを選択します。 -
[サーバー] ページで、更新するユーザーを含むサーバーの [サーバー ID] を選択します。
-
パブリックキーを追加するユーザーを選択します。
-
[SSH 公開鍵] ペインで、[SSH 公開鍵を追加] を選択します。
-
生成した公開鍵のテキストを SSH 公開鍵テキストボックスに貼り付け、[鍵の追加] を選択します。
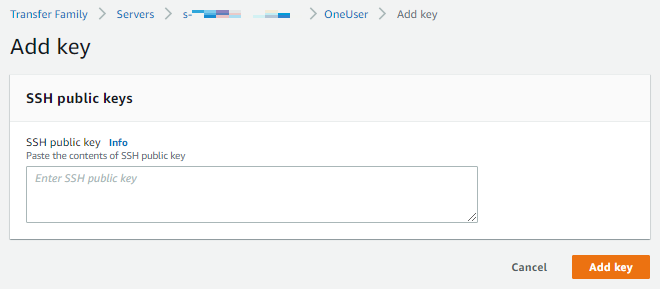
新しい鍵は SSH 公開鍵ペインに一覧表示されます。

-
