翻訳は機械翻訳により提供されています。提供された翻訳内容と英語版の間で齟齬、不一致または矛盾がある場合、英語版が優先します。
WorkSpaces Personal でブランドをカスタマイズする
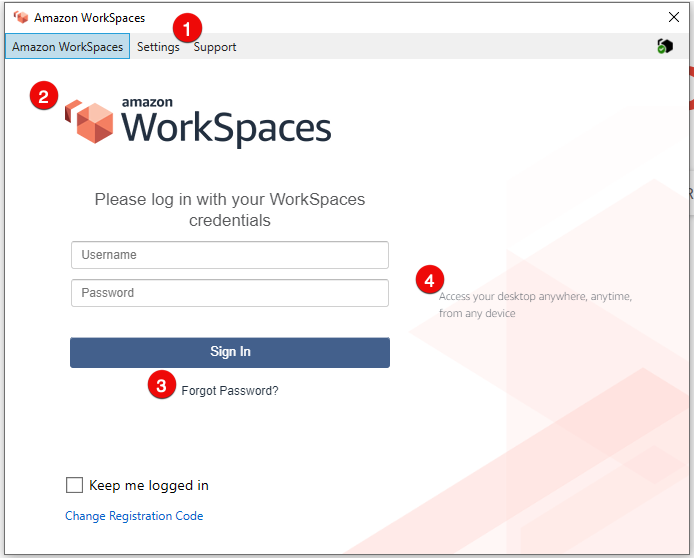
Amazon WorkSpaces では、API を使用して独自のブランドロゴ、IT サポート情報、パスワードを忘れた場合のリンク、ログインメッセージなど、WorkSpace のログインページをカスタマイズすることで、ユーザーに親しみやすい WorkSpaces エクスペリエンスを作成できます。WorkSpace ログインページには、デフォルトの WorkSpaces ブランドに代わり、お客様のブランドがユーザーに表示されます。
以下のクライアントをサポートしています。
Windows
Linux
Android
MacOS
iOS
Web Access
注記
AWS GovCloud (US) Region の ClientBranding API を使用してブランド要素を変更するには、WorkSpaces クライアントバージョン 5.10.0 を使用します。
カスタムブランドのインポート
クライアントのカスタムブランドをインポートするには、ImportClientBranding のアクションを使用します。アクションには以下の要素が含まれます。詳細については、「 API リファレンスの ImportClientBranding」を参照してください。
重要
クライアントのブランド属性は公開されています。機密情報が含まれないようにしてください。

-
サポートリンク
-
ロゴ
-
パスワードを忘れた場合のリンク
-
ログインメッセージ
| ブランド要素 | 説明 | 要件と推奨事項 |
|---|---|---|
| サポートリンク | ユーザーが WorkSpaces に関するヘルプを問い合わせるためのサポート E メールリンクを指定できます。SupportEmail 属性を使用するか、SupportLink 属性を使用してサポートページへのリンクを提供することで指定できます。 |
|
| ロゴ | Logo 属性を使用して、組織のロゴをカスタマイズできます。 |
|
| パスワードを忘れた場合のリンク | ForgotPasswordLink 属性を使用してウェブアドレスを追加し、これによりユーザーが WorkSpace のパスワードを忘れた場合に移動できます。 | 長さの制限:最小長は 1 です。最大長は 200 です。 |
| ログインメッセージ | LoginMessage 属性を使用して、サインイン画面のメッセージをカスタマイズできます。 |
|
以下は、ImportClientBranding を使用するためのサンプルコードスニペットです。
AWS CLI バージョン 2
警告
カスタムブランディングをインポートすると、カスタムデータで指定したプラットフォーム内の属性が上書きされます。また、デフォルトのカスタムブランディング属性値で指定していない属性も上書きされます。上書きしたくない属性のデータを含める必要があります。
aws workspaces import-client-branding \
--cli-input-json file://~/Downloads/import-input.json \
--region us-west-2
インポート JSON ファイルは、以下のようなサンプルコードになります。
{
    "ResourceId": "<directory-id>",
    "DeviceTypeOsx": {
        "Logo": "iVBORw0KGgoAAAANSUhEUgAAAAIAAAACCAYAAABytg0kAAAAC0lEQVR42mNgQAcAABIAAeRVjecAAAAASUVORK5CYII=",
        "ForgotPasswordLink": "https://amazon.com/",
        "SupportLink": "https://amazon.com/",
        "LoginMessage": {
            "en_US": "Hello!!"
        }
    }
}
次のサンプル Java コードスニペットは、ロゴイメージを base64 でエンコードされた文字列に変換します。
// Read image as BufferImage
BufferedImage bi = ImageIO.read(new File("~/Downloads/logo.png"));

// convert BufferedImage to byte[]
ByteArrayOutputStream baos = new ByteArrayOutputStream();
ImageIO.write(bi, "png", baos);
byte[] bytes = baos.toByteArray();

//convert byte[] to base64 format and print it
String bytesBase64 = Base64.encodeBase64String(bytes);
System.out.println(bytesBase64);
次のサンプル Python コードスニペットは、ロゴイメージを base64 でエンコードされた文字列に変換します。
# Read logo into base64-encoded string
with open("~/Downloads/logo.png", "rb") as image_file:
    f = image_file.read()
    base64_string = base64.b64encode(f)
    print(base64_string)
Java
警告
カスタムブランディングをインポートすると、カスタムデータで指定したプラットフォーム内の属性が上書きされます。また、デフォルトのカスタムブランディング属性値で指定していない属性も上書きされます。上書きしたくない属性のデータを含める必要があります。
// Create WS Client
WorkSpacesClient client = WorkSpacesClient.builder().build();

// Read image as BufferImage
BufferedImage bi = ImageIO.read(new File("~/Downloads/logo.png"));

// convert BufferedImage to byte[]
ByteArrayOutputStream baos = new ByteArrayOutputStream();
ImageIO.write(bi, "png", baos);
byte[] bytes = baos.toByteArray();

// Create import attributes for the plateform
DefaultImportClientBrandingAttributes attributes =
        DefaultImportClientBrandingAttributes.builder()
                .logo(SdkBytes.fromByteArray(bytes))
                .forgotPasswordLink("https://aws.amazon.com/")
                .supportLink("https://aws.amazon.com/")
                .build();

// Create import request
ImportClientBrandingRequest request =
        ImportClientBrandingRequest.builder()
                .resourceId("<directory-id>")
                .deviceTypeOsx(attributes)
                .build();

// Call ImportClientBranding API
ImportClientBrandingResponse response = client.importClientBranding(request);
Python
警告
カスタムブランディングをインポートすると、カスタムデータで指定したプラットフォーム内の属性が上書きされます。また、デフォルトのカスタムブランディング属性値で指定していない属性も上書きされます。上書きしたくない属性のデータを含める必要があります。
import boto3

# Read logo into bytearray
with open("~/Downloads/logo.png", "rb") as image_file:
    f = image_file.read()
    bytes = bytearray(f)

# Create WorkSpaces client
client = boto3.client('workspaces')

# Call import API
response = client.import_client_branding(
    ResourceId='<directory-id>',
    DeviceTypeOsx={
        'Logo': bytes,
        'SupportLink': 'https://aws.amazon.com/',
        'ForgotPasswordLink': 'https://aws.amazon.com/',
        'LoginMessage': {
            'en_US': 'Hello!!'
        }
    }
)
PowerShell
#Requires -Modules @{ ModuleName="AWS.Tools.WorkSpaces"; ModuleVersion="4.1.56"}

# Specify Image Path
$imagePath = "~/Downloads/logo.png"

# Create Byte Array from image file
$imageByte = ([System.IO.File]::ReadAllBytes($imagePath))

# Call import API
Import-WKSClientBranding -ResourceId <directory-id> `
    -DeviceTypeLinux_LoginMessage @{en_US="Hello!!"} `
    -DeviceTypeLinux_Logo $imageByte `
    -DeviceTypeLinux_ForgotPasswordLink "https://aws.amazon.com/" `
    -DeviceTypeLinux_SupportLink "https://aws.amazon.com/"
ログインページをプレビューするには、WorkSpaces アプリケーションまたはウェブログインページを起動します。
注記
変更が表示されるまでに最大 1 分程度かかる場合があります。
カスタムブランドの説明
現在使用しているクライアントブランドのカスタマイズの詳細を表示するには、DescribeCustomBranding のアクションを使用します。以下は、DescribeClientBranding を使用するためのサンプルスクリプトです。詳細については、「 API リファレンスの DescribeClientBranding」を参照してください。
aws workspaces describe-client-branding \
--resource-id <directory-id> \
--region us-west-2
カスタムブランドの削除
クライアントブランドのカスタマイズを削除するには、DeleteCustomBranding のアクションを使用します。以下は、DeleteClientBranding を使用するためのサンプルスクリプトです。詳細については、「 API リファレンスの DeleteClientBranding」を参照してください。
aws workspaces delete-client-branding \
--resource-id <directory-id> \
--platforms DeviceTypeAndroid DeviceTypeIos \
--region us-west-2
注記
変更が表示されるまでに最大 1 分程度かかる場合があります。