기계 번역으로 제공되는 번역입니다. 제공된 번역과 원본 영어의 내용이 상충하는 경우에는 영어 버전이 우선합니다.
클러스터링이 포함된 Node.js 익스프레스 애플리케이션을 Elastic Beanstalk에 배포하기
이 자습서에서는 Elastic Beanstalk CLI 명령줄 인터페이스 (EB) 를 사용하여 Elastic Beanstalk에 샘플 애플리케이션을 배포한 다음, Express 프레임워크, Amazon 및 클러스터링을 사용하도록 애플리케이션을 업데이트하는 방법을 안내합니다. ElastiCache
참고
이 예시에서는 AWS 리소스를 생성하므로 요금이 부과될 수 있습니다. AWS 요금에 대한 자세한 내용은 을 참조하십시오https://aws.amazon.com/pricing/
사전 조건
이 튜토리얼의 사전 요구 사항은 다음과 같습니다:
-
Node.js 런타임
-
기본 Node.js 패키지 관리자 소프트웨어인 npm
-
익스프레스 커맨드 라인 생성기
-
Elastic Beanstalk 커맨드 라인 인터페이스 (EB) CLI
나열된 처음 세개 구성 요소의 설치 및 로컬 개발 환경 설정에 대한 자세한 내용은 Elastic Beanstalk를 위한 Node.js 개발 환경 설정하기을 참조하십시오. 이 자습서에서는 참조된 항목에서도 언급한 Node.js AWS SDK 용을 설치할 필요가 없습니다.
EB 설치 및 구성에 대한 자세한 내용은 Elastic Beanstalk 명령줄 인터페이스 설치 및 CLI EB CLI 구성 을 참조하십시오.
Elastic Beanstalk 환경 생성
귀하의 애플리케이션 디렉터리
이 튜토리얼에서는 애플리케이션 소스nodejs-example-express-elasticache 번들용으로 호출되는 디렉터리를 사용합니다. 이 튜토리얼을 위한nodejs-example-express-elasticache 디렉토리를 만드세요.
~$ mkdir nodejs-example-express-elasticache참고
이 장의 각 튜토리얼에서는 애플리케이션 소스 번들용 자체 디렉토리를 사용합니다. 디렉터리 이름은 튜토리얼에서 사용하는 샘플 응용 프로그램의 이름과 일치합니다.
현재 작업 디렉터리를 nodejs-example-express-elasticache로 변경합니다.
~$ cd nodejs-example-express-elasticache이제 Node.js 플랫폼과 샘플 애플리케이션을 실행하는 Elastic Beanstalk 환경을 설정합니다. Elastic Beanstalk 명령줄 인터페이스 (EB) 를 사용하겠습니다. CLI
애플리케이션을 위한 EB CLI 리포지토리를 구성하고 Node.js 플랫폼을 실행하는 Elastic Beanstalk 환경을 만들려면
-
eb init 명령을 사용하여 리포지토리를 만듭니다.
~/nodejs-example-express-elasticache$eb init --platformnode.js--region<region>이 명령은 애플리케이션의 환경을 생성하기 위한 설정을 지정하는
.elasticbeanstalk라는 이름의 폴더에 구성 파일을 만들고 현재 폴더의 이름을 딴 Elastic Beanstalk 애플리케이션을 만듭니다. -
eb create 명령을 사용하여 샘플 애플리케이션을 실행하는 환경을 생성합니다.
~/nodejs-example-express-elasticache$eb create --samplenodejs-example-express-elasticache이 명령은 Node.js 플랫폼의 기본 설정과 다음 리소스를 사용하여 로드 밸런싱 수행 환경을 만듭니다.
-
EC2인스턴스 — 선택한 플랫폼에서 웹 앱을 실행하도록 구성된 Amazon Elastic Compute Cloud (AmazonEC2) 가상 머신입니다.
특정 언어 버전, 프레임워크, 웹 컨테이너 또는 그 조합을 지원하도록 각 플랫폼마다 특정 소프트웨어, 구성 파일 및 스크립트 세트를 실행합니다. 대부분의 플랫폼은 Apache를 사용하거나 웹 앱 앞에 위치하여 요청을 전달하고 정적 자산을 제공하고 액세스 및 오류 로그를 생성하는 역방향 프록시를 사용합니다. NGINX
-
인스턴스 보안 그룹 - 포트 80에서 인바운드 트래픽을 허용하도록 구성된 Amazon EC2 보안 그룹입니다. 이 리소스를 통해 로드 밸런서의 HTTP 트래픽이 웹 앱을 실행하는 EC2 인스턴스에 도달할 수 있습니다. 기본적으로 다른 포트에서는 트래픽이 허용되지 않습니다.
-
로드 밸런서(Load balancer) - 애플리케이션을 실행하는 인스턴스로 요청을 분산하도록 구성된 Elastic Load Balancing 로드 밸런서입니다. 또한 로드 밸런서가 있으면 인터넷에 인스턴스를 직접 노출할 필요가 없습니다.
-
로드 밸런서 보안 그룹 — 포트 80에서 인바운드 트래픽을 허용하도록 구성된 Amazon EC2 보안 그룹입니다. 이 리소스를 통해 인터넷 HTTP 트래픽이 로드 밸런서에 도달할 수 있습니다. 기본적으로 다른 포트에서는 트래픽이 허용되지 않습니다.
-
Auto Scaling 그룹(Auto Scaling group) - 인스턴스가 종료되거나 사용할 수 없게 될 경우 인스턴스를 대체하도록 구성된 Auto Scaling 그룹입니다.
-
Amazon S3 버킷(Amazon S3 bucket) - Elastic Beanstalk 사용 시 생성된 소스 코드, 로그 및 기타 아티팩트의 스토리지 위치입니다.
-
Amazon CloudWatch alarms — 환경 내 인스턴스의 부하를 모니터링하고 부하가 너무 높거나 낮을 경우 트리거되는 두 개의 CloudWatch 경보입니다. 경보가 트리거되면 이에 대한 응답으로 Auto Scaling 그룹이 스케일 업 또는 축소됩니다.
-
AWS CloudFormation 스택 — Elastic AWS CloudFormation Beanstalk는 사용자 환경에서 리소스를 시작하고 구성 변경 사항을 전파하는 데 사용합니다. 리소스는 AWS CloudFormation 콘솔
에서 볼 수 있는 템플릿에서 정의됩니다. -
도메인 이름 — 웹 앱에 다음과 같은 형태로 라우팅되는 도메인 이름
subdomain.region.elasticbeanstalk.com.참고
Elastic Beanstalk 애플리케이션의 보안을 강화하기 위해 elasticbeanstalk.com 도메인은 공개 서픽스 목록 () 에 등록되어 있습니다. PSL
보안 강화를 위해 Elastic Beanstalk 애플리케이션 기본 도메인 이름에 민감한 쿠키를 설정해야 하는 경우 __Host-접두사가 있는 쿠키를 사용하는 것이 좋습니다. 이렇게 하면 사이트 간 요청 위조 시도 () 로부터 도메인을 보호하는 데 도움이 됩니다. CSRF 자세한 내용은 Mozilla 개발자 네트워크의 Set-Cookie페이지를 참조하십시오.
-
-
환경 생성이 완료되면 eb open명령을 사용하여 기본 URL 브라우저에서 환경을 여십시오.
~/nodejs-example-express-elasticache$eb open
이제 샘플 애플리케이션을 사용하여 Node.js Elastic Beanstalk 환경을 생성했습니다. 자체 애플리케이션으로 업데이트할 수 있습니다. 다음으로 Express 프레임워크를 사용하도록 샘플 애플리케이션을 업데이트합니다.
Express를 사용하도록 애플리케이션을 업데이트하려면
Express 프레임워크를 사용하도록 Elastic Beanstalk 환경에서 샘플 애플리케이션을 업데이트합니다.
nodejs-example-express-elasticache.zip에서 최종 소스 코드를 다운로드할 수 있습니다.
Express를 사용하도록 애플리케이션을 업데이트하려면
샘플 애플리케이션이 있는 환경을 생성한 후 이를 자체 애플리케이션으로 업데이트할 수 있습니다. 이 절차에서는 먼저express 및npm install 명령을 실행하여 애플리케이션 디렉터리에 Express 프레임워크를 설정합니다.
-
express명령을 실행합니다. 이는package.json,app.js및 몇 개의 디렉터리를 생성합니다.~/nodejs-example-express-elasticache$express계속할지 여부를 묻는 메시지가 표시되면
y를 입력합니다.참고
express명령이 작동하지 않는 경우 이전 사전 요구 사항 섹션에 설명된 대로 Express 명령줄 생성기를 설치하지 않았기 때문일 수 있습니다. 또는express 명령을 실행하려면 로컬 시스템의 디렉터리 경로 설정을 설정해야 할 수 있습니다. 개발 환경 설정에 대한 자세한 단계는 필수 조건 섹션을 참조하십시오. 그러면 이 자습서를 계속 진행할 수 있습니다.
-
로컬 종속 항목을 설정합니다.
~/nodejs-example-express-elasticache$npm install -
(선택) 웹 앱 서버가 시작되는지 확인합니다.
~/nodejs-example-express-elasticache$npm start다음과 유사한 출력 화면이 표시되어야 합니다.
> nodejs@0.0.0 start /home/local/user/node-express
> node ./bin/www
서버는 기본적으로 포트 3000에서 실행됩니다. 테스트하려면 다른
curl http://localhost:3000터미널에서 실행하거나 로컬 컴퓨터에서 브라우저를 열고 URL 주소를http://localhost:3000입력합니다.Ctrl+C를 눌러 서버를 중지합니다.
-
nodejs-example-express-elasticache/app.js을nodejs-example-express-elasticache/express-app.js로 바꿉니다.~/nodejs-example-express-elasticache$mvapp.js express-app.js -
다음으로
nodejs-example-express-elasticache/express-app.js의var app = express();행을 업데이트하십시오.var app = module.exports = express(); -
로컬 컴퓨터에서 다음 코드로
nodejs-example-express-elasticache/app.js로 명명된 파일을 만듭니다./** * Module dependencies. */ const express = require('express'), session = require('express-session'), bodyParser = require('body-parser'), methodOverride = require('method-override'), cookieParser = require('cookie-parser'), fs = require('fs'), filename = '/var/nodelist', app = express(); let MemcachedStore = require('connect-memcached')(session); function setup(cacheNodes) { app.use(bodyParser.raw()); app.use(methodOverride()); if (cacheNodes.length > 0) { app.use(cookieParser()); console.log('Using memcached store nodes:'); console.log(cacheNodes); app.use(session({ secret: 'your secret here', resave: false, saveUninitialized: false, store: new MemcachedStore({ 'hosts': cacheNodes }) })); } else { console.log('Not using memcached store.'); app.use(session({ resave: false, saveUninitialized: false, secret: 'your secret here' })); } app.get('/', function (req, resp) { if (req.session.views) { req.session.views++ resp.setHeader('Content-Type', 'text/html') resp.send(`You are session: ${req.session.id}. Views: ${req.session.views}`) } else { req.session.views = 1 resp.send(`You are session: ${req.session.id}. No views yet, refresh the page!`) } }); if (!module.parent) { console.log('Running express without cluster. Listening on port %d', process.env.PORT || 5000) app.listen(process.env.PORT || 5000) } } console.log("Reading elastic cache configuration") // Load elasticache configuration. fs.readFile(filename, 'UTF8', function (err, data) { if (err) throw err; let cacheNodes = [] if (data) { let lines = data.split('\n'); for (let i = 0; i < lines.length; i++) { if (lines[i].length > 0) { cacheNodes.push(lines[i]) } } } setup(cacheNodes) }); module.exports = app; -
nodejs-example-express-elasticache/bin/www파일의 내용을 다음으로 바꿉니다:#!/usr/bin/env node /** * Module dependencies. */ const app = require('../app'); const cluster = require('cluster'); const debug = require('debug')('nodejs-example-express-elasticache:server'); const http = require('http'); const workers = {}, count = require('os').cpus().length; function spawn() { const worker = cluster.fork(); workers[worker.pid] = worker; return worker; } /** * Get port from environment and store in Express. */ const port = normalizePort(process.env.PORT || '3000'); app.set('port', port); if (cluster.isMaster) { for (let i = 0; i < count; i++) { spawn(); } // If a worker dies, log it to the console and start another worker. cluster.on('exit', function (worker, code, signal) { console.log('Worker ' + worker.process.pid + ' died.'); cluster.fork(); }); // Log when a worker starts listening cluster.on('listening', function (worker, address) { console.log('Worker started with PID ' + worker.process.pid + '.'); }); } else { /** * Create HTTP server. */ let server = http.createServer(app); /** * Event listener for HTTP server "error" event. */ function onError(error) { if (error.syscall !== 'listen') { throw error; } const bind = typeof port === 'string' ? 'Pipe ' + port : 'Port ' + port; // handle specific listen errors with friendly messages switch (error.code) { case 'EACCES': console.error(bind + ' requires elevated privileges'); process.exit(1); break; case 'EADDRINUSE': console.error(bind + ' is already in use'); process.exit(1); break; default: throw error; } } /** * Event listener for HTTP server "listening" event. */ function onListening() { const addr = server.address(); const bind = typeof addr === 'string' ? 'pipe ' + addr : 'port ' + addr.port; debug('Listening on ' + bind); } /** * Listen on provided port, on all network interfaces. */ server.listen(port); server.on('error', onError); server.on('listening', onListening); } /** * Normalize a port into a number, string, or false. */ function normalizePort(val) { const port = parseInt(val, 10); if (isNaN(port)) { // named pipe return val; } if (port >= 0) { // port number return port; } return false; } -
eb deploy 명령으로 Elastic Beanstalk 환경으로 변경된 애플리케이션을 배포합니다.
~/nodejs-example-express-elasticache$eb deploy -
몇 분 후 환경이 업데이트됩니다. 환경이 녹색으로 변하고 준비가 되면 새로 URL 고침하여 제대로 작동하는지 확인합니다. “Welcome to Express”라는 웹 페이지가 보일 것입니다.
애플리케이션을 실행하는 EC2 인스턴스의 로그에 액세스할 수 있습니다. 로그 액세스 방법에 대한 지침은 Elastic Beanstalk 환경에서 Amazon EC2 인스턴스의 로그 보기 단원을 참조하십시오.
다음으로 Amazon을 사용하도록 Express 애플리케이션을 업데이트해 보겠습니다 ElastiCache.
Amazon을 사용하도록 Express 애플리케이션을 업데이트하려면 ElastiCache
-
로컬 컴퓨터에서 소스 번들의 최상위 디렉터리에
.ebextensions디렉터리를 생성합니다. 이 예제에서는nodejs-example-express-elasticache/.ebextensions을 사용합니다. -
다음 코드 조각을 사용하여 구성 파일
nodejs-example-express-elasticache/.ebextensions/elasticache-iam-with-script.config를 만듭니다. 구성 파일에 대한 자세한 내용은 Node.js 구성 네임스페이스 섹션을 참조하세요. 이렇게 하면 Elasticache 노드를 검색하는 데 필요한 권한을 가진 IAM 사용자가 생성되고 캐시가 변경될 때마다 파일에 쓸 수 있습니다. .zip에서 nodejs-example-express-elasticache 파일을 복사할 수도 있습니다. ElastiCache속성에 대한 자세한 내용은 을 참조하십시오예: ElastiCache.참고
YAML일관된 들여쓰기가 필요합니다. 예제 구성 파일의 콘텐츠를 바꿀 때 들여쓰기 레벨을 일치시키고, 텍스트 편집기가 탭 문자 대신 공백을 사용해 들여쓰기를 하도록 합니다.
Resources: MyCacheSecurityGroup: Type: 'AWS::EC2::SecurityGroup' Properties: GroupDescription: "Lock cache down to webserver access only" SecurityGroupIngress: - IpProtocol: tcp FromPort: Fn::GetOptionSetting: OptionName: CachePort DefaultValue: 11211 ToPort: Fn::GetOptionSetting: OptionName: CachePort DefaultValue: 11211 SourceSecurityGroupName: Ref: AWSEBSecurityGroup MyElastiCache: Type: 'AWS::ElastiCache::CacheCluster' Properties: CacheNodeType: Fn::GetOptionSetting: OptionName: CacheNodeType DefaultValue: cache.t2.micro NumCacheNodes: Fn::GetOptionSetting: OptionName: NumCacheNodes DefaultValue: 1 Engine: Fn::GetOptionSetting: OptionName: Engine DefaultValue: redis VpcSecurityGroupIds: - Fn::GetAtt: - MyCacheSecurityGroup - GroupId AWSEBAutoScalingGroup : Metadata : ElastiCacheConfig : CacheName : Ref : MyElastiCache CacheSize : Fn::GetOptionSetting: OptionName : NumCacheNodes DefaultValue: 1 WebServerUser : Type : AWS::IAM::User Properties : Path : "/" Policies: - PolicyName: root PolicyDocument : Statement : - Effect : Allow Action : - cloudformation:DescribeStackResource - cloudformation:ListStackResources - elasticache:DescribeCacheClusters Resource : "*" WebServerKeys : Type : AWS::IAM::AccessKey Properties : UserName : Ref: WebServerUser Outputs: WebsiteURL: Description: sample output only here to show inline string function parsing Value: | http://`{ "Fn::GetAtt" : [ "AWSEBLoadBalancer", "DNSName" ] }` MyElastiCacheName: Description: Name of the elasticache Value: Ref : MyElastiCache NumCacheNodes: Description: Number of cache nodes in MyElastiCache Value: Fn::GetOptionSetting: OptionName : NumCacheNodes DefaultValue: 1 files: "/etc/cfn/cfn-credentials" : content : | AWSAccessKeyId=`{ "Ref" : "WebServerKeys" }` AWSSecretKey=`{ "Fn::GetAtt" : ["WebServerKeys", "SecretAccessKey"] }` mode : "000400" owner : root group : root "/etc/cfn/get-cache-nodes" : content : | # Define environment variables for command line tools export AWS_ELASTICACHE_HOME="/home/ec2-user/elasticache/$(ls /home/ec2-user/elasticache/)" export AWS_CLOUDFORMATION_HOME=/opt/aws/apitools/cfn export PATH=$AWS_CLOUDFORMATION_HOME/bin:$AWS_ELASTICACHE_HOME/bin:$PATH export AWS_CREDENTIAL_FILE=/etc/cfn/cfn-credentials export JAVA_HOME=/usr/lib/jvm/jre # Grab the Cache node names and configure the PHP page aws cloudformation list-stack-resources --stack `{ "Ref" : "AWS::StackName" }` --region `{ "Ref" : "AWS::Region" }` --output text | grep MyElastiCache | awk '{print $4}' | xargs -I {} aws elasticache describe-cache-clusters --cache-cluster-id {} --region `{ "Ref" : "AWS::Region" }` --show-cache-node-info --output text | grep '^ENDPOINT' | awk '{print $2 ":" $3}' > `{ "Fn::GetOptionSetting" : { "OptionName" : "NodeListPath", "DefaultValue" : "/var/www/html/nodelist" } }` mode : "000500" owner : root group : root "/etc/cfn/hooks.d/cfn-cache-change.conf" : "content": | [cfn-cache-size-change] triggers=post.update path=Resources.AWSEBAutoScalingGroup.Metadata.ElastiCacheConfig action=/etc/cfn/get-cache-nodes runas=root sources : "/home/ec2-user/elasticache" : "https://elasticache-downloads.s3.amazonaws.com/AmazonElastiCacheCli-latest.zip" commands: make-elasticache-executable: command: chmod -R ugo+x /home/ec2-user/elasticache/*/bin/* packages : "yum" : "aws-apitools-cfn" : [] container_commands: initial_cache_nodes: command: /etc/cfn/get-cache-nodes -
로컬 컴퓨터에서 다음 스니펫을 사용하여 구성 파일을
nodejs-example-express-elasticache/.ebextensions/elasticache_settings.config만들어 구성합니다. ElastiCacheoption_settings: "aws:elasticbeanstalk:customoption": CacheNodeType: cache.t2.micro NumCacheNodes: 1 Engine: memcached NodeListPath: /var/nodelist -
로컬 컴퓨터에서
nodejs-example-express-elasticache/express-app.js를 다음 코드 조각으로 교체합니다. 이 파일은 디스크(/var/nodelist)에서 노드 목록을 읽고 노드가 있는 경우 express가memcached를 세션 저장소로 사용하도록 구성합니다. 파일은 다음과 같습니다./** * Module dependencies. */ var express = require('express'), session = require('express-session'), bodyParser = require('body-parser'), methodOverride = require('method-override'), cookieParser = require('cookie-parser'), fs = require('fs'), filename = '/var/nodelist', app = module.exports = express(); var MemcachedStore = require('connect-memcached')(session); function setup(cacheNodes) { app.use(bodyParser.raw()); app.use(methodOverride()); if (cacheNodes) { app.use(cookieParser()); console.log('Using memcached store nodes:'); console.log(cacheNodes); app.use(session({ secret: 'your secret here', resave: false, saveUninitialized: false, store: new MemcachedStore({'hosts': cacheNodes}) })); } else { console.log('Not using memcached store.'); app.use(cookieParser('your secret here')); app.use(session()); } app.get('/', function(req, resp){ if (req.session.views) { req.session.views++ resp.setHeader('Content-Type', 'text/html') resp.write('Views: ' + req.session.views) resp.end() } else { req.session.views = 1 resp.end('Refresh the page!') } }); if (!module.parent) { console.log('Running express without cluster.'); app.listen(process.env.PORT || 5000); } } // Load elasticache configuration. fs.readFile(filename, 'UTF8', function(err, data) { if (err) throw err; var cacheNodes = []; if (data) { var lines = data.split('\n'); for (var i = 0 ; i < lines.length ; i++) { if (lines[i].length > 0) { cacheNodes.push(lines[i]); } } } setup(cacheNodes); }); -
로컬 컴퓨터에서
package.json업데이트합니다:"dependencies": { "cookie-parser": "~1.4.4", "debug": "~2.6.9", "express": "~4.16.1", "http-errors": "~1.6.3", "jade": "~1.11.0", "morgan": "~1.9.1", "connect-memcached": "*", "express-session": "*", "body-parser": "*", "method-override": "*" } -
npm install를 실행합니다.
~/nodejs-example-express-elasticache$npm install -
업데이트된 애플리케이션을 배포합니다.
~/nodejs-example-express-elasticache$eb deploy -
몇 분 후 환경이 업데이트됩니다. 환경이 녹색이고 준비되면 코드가 제대로 작동하는지 확인합니다.
-
Amazon CloudWatch 콘솔에서
ElastiCache 지표를 확인하십시오. ElastiCache 지표를 보려면 왼쪽 창에서 지표를 선택한 다음 CurrItems검색하십시오. ElastiCache > 캐시 노드 지표를 선택한 다음 캐시 노드를 선택하여 캐시에 있는 항목 수를 확인합니다. 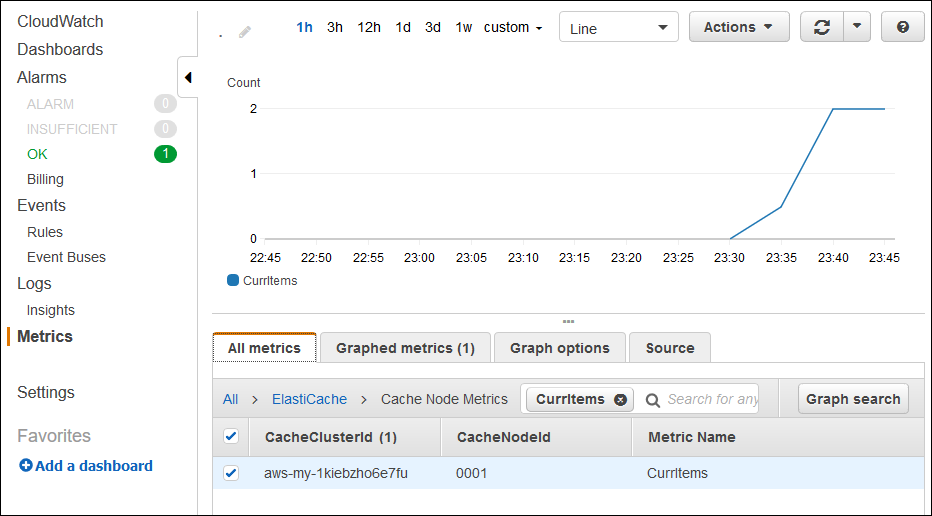
참고
애플리케이션을 배포한 해당 리전을 확인해야 합니다.
애플리케이션을 복사하여 다른 웹 URL 브라우저에 붙여넣고 페이지를 새로 고치면 5분 후에 CurrItem 개수가 증가하는 것을 볼 수 있습니다.
-
사용자 로그의 스냅샷을 생성합니다. 로그 검색에 대한 자세한 내용은 Elastic Beanstalk 환경에서 Amazon EC2 인스턴스의 로그 보기 단원을 참조하십시오.
-
로그 번들에서 파일
/var/log/nodejs/nodejs.log를 확인합니다. 다음과 유사한 결과가 출력되어야 합니다.Using memcached store nodes: [ 'aws-my-1oys9co8zt1uo.1iwtrn.0001.use1.cache.amazonaws.com:11211' ]
-
정리
더 이상 애플리케이션을 실행하지 않으려면 환경을 종료하고 애플리케이션을 삭제하여 정리할 수 있습니다.
eb terminate 명령을 사용하여 환경을 종료하고 eb delete 명령을 사용하여 애플리케이션을 삭제합니다.
환경을 종료하려면
로컬 리포지토리를 생성한 디렉터리에서 eb terminate을 실행합니다.
$ eb terminate이 프로세스는 몇 분 정도 걸릴 수 있습니다. 환경이 성공적으로 종료되면 Elastic Beanstalk가 메시지를 표시합니다.
