기계 번역으로 제공되는 번역입니다. 제공된 번역과 원본 영어의 내용이 상충하는 경우에는 영어 버전이 우선합니다.
Amazon S3 이벤트 알림을 사용하여 크롤링 가속화
Amazon S3 또는 데이터 카탈로그 대상의 객체를 나열하는 대신 Amazon S3 이벤트를 사용하여 변경 사항을 찾도록 크롤러를 구성할 수 있습니다. 이 기능은 전체 Amazon S3 또는 데이터 카탈로그 대상을 나열하는 대신 Amazon S3 이벤트를 통해 이벤트를 트리거한 하위 폴더의 모든 파일을 나열하여 두 크롤링 간의 변경 사항을 식별하므로 다시 크롤링하는 시간이 단축됩니다.
첫 번째 크롤링은 대상의 모든 Amazon S3 객체를 나열합니다. 첫 번째 크롤링이 성공한 후에는 수동으로 또는 정해진 일정에 따라 다시 크롤링하도록 선택할 수 있습니다. 크롤러는 모든 객체를 나열하지 않고 해당 이벤트의 객체만 나열합니다.
Amazon S3 이벤트 기반 크롤러로 이동할 경우의 이점은 다음과 같습니다.
대상의 모든 객체를 나열할 필요 없이 객체가 추가되거나 삭제되는 특정 폴더가 나열되므로 더 빠르게 다시 크롤링할 수 있습니다.
객체가 추가되거나 삭제되는 특정 폴더가 나열되므로 전체 크롤링 비용이 절감됩니다.
Amazon S3 이벤트 크롤링은 크롤러 일정에 따라 SQS 대기열의 Amazon S3 이벤트를 사용하여 실행됩니다. 대기열에 이벤트가 없으면 비용이 발생하지 않습니다. SQS 대기열이나 여러 소비자가 동일한 이벤트를 필요로 하는 경우 SNS와 SQS의 조합으로 바로 이동하도록 Amazon S3 이벤트를 구성할 수 있습니다. 자세한 내용은 Amazon S3 이벤트 알림을 위해 계정 설정 단원을 참조하십시오.
이벤트 모드로 크롤러를 생성하고 구성한 후 첫 번째 크롤링은 Amazon S3 또는 데이터 카탈로그 대상을 모두 나열하여 목록 모드로 실행됩니다. "크롤링이 Amazon S3 이벤트를 사용하여 실행되고 있습니다."라는 로그는 첫 번째 크롤링이 성공적으로 끝난 후 크롤링이 Amazon S3 이벤트를 사용하여 작동하고 있음을 확인합니다.
Amazon S3 이벤트 크롤링을 생성하고 크롤링에 영향을 줄 수 있는 크롤러 속성을 업데이트하면 크롤링이 목록 모드로 작동하고 "크롤링이 S3 이벤트 모드로 실행되고 있지 않습니다."라는 로그가 추가됩니다.
참고
사용할 수 있는 최대 메시지 수는 크롤링당 10,000개입니다.
카탈로그 대상
대상이 데이터 카탈로그인 경우 크롤러는 변경 내용을 사용하여 데이터 카탈로그의 기존 테이블을 업데이트합니다(예: 테이블의 추가 파티션).
Amazon S3 이벤트 알림을 위해 계정 설정
이 섹션에서는 Amazon S3 이벤트 알림을 위해 계정을 설정하는 방법을 설명하고 스크립트 또는 AWS Glue 콘솔을 사용하여 계정을 설정하는 지침을 제공합니다.
사전 조건
다음 설정 태스크를 완료합니다. 괄호 안의 값은 스크립트에서 구성 가능한 설정을 가리킵니다.
Amazon S3 버킷(
s3_bucket_name)을 생성합니다.식별된 버킷의 경로인 크롤러 대상('test1'과 같은
folder_name)을 식별합니다.크롤러 이름(
crawler_name)을 준비합니다.SNS 주제 이름(
sns_topic_name)을 준비합니다. 크롤러 이름과 같을 수 있습니다.크롤러를 실행해야 하고 S3 버킷이 있는 AWS 리전(
region)을 준비합니다.이메일을 사용하여 Amazon S3 이벤트를 가져오는 경우 선택적으로 이메일 주소(
subscribing_email)를 준비합니다.
CloudFormation 스택을 사용하여 리소스를 생성할 수도 있습니다. 다음 단계를 완료합니다.
-
미국 동부(버지니아 북부)에서 CloudFormation 스택을 시작
합니다. 파라미터 아래에 Amazon S3 버킷의 이름(계정 번호 포함)을 입력합니다.
I acknowledge that AWS CloudFormation might create IAM resources with custom names을 선택합니다.Create stack를 선택합니다.
제한:
Amazon S3 대상이든 Data Catalog 대상이든 크롤러는 단일 대상만 지원합니다.
프라이빗 VPC의 SQS는 지원되지 않습니다.
Amazon S3 샘플링은 지원되지 않습니다.
크롤러 대상은 Amazon S3 대상의 폴더이거나 데이터 카탈로그 대상에 대한 하나 이상의 AWS Glue 데이터 카탈로그 테이블이어야 합니다.
'everything' 경로 와일드카드는 지원되지 않습니다(s3://%).
데이터 카탈로그 대상의 경우 모든 카탈로그 테이블은 Amazon S3 이벤트 모드에 대해 동일한 Amazon S3 버킷을 가리켜야 합니다.
데이터 카탈로그 대상의 경우 카탈로그 테이블은 Delta Lake 형식(_symlink 폴더 포함 또는 카탈로그 테이블의
InputFormat확인)의 Amazon S3 위치를 가리키지 않아야 합니다.
Amazon S3 이벤트 기반 크롤러를 사용하려면 S3 대상 및 SQS의 스토어와 동일한 접두사에서 필터링된 이벤트를 사용하여 S3 버킷에서 이벤트 알림을 사용해야 합니다. 콘솔을 통해 연습: 알림용 버킷 구성 단계를 수행하거나 SQS를 생성하고 대상의 Amazon S3 이벤트를 구성하는 스크립트를 사용하여 SQS와 이벤트 알림을 설정할 수 있습니다.
SQS 정책
크롤러가 사용하는 역할에 연결해야 하는 다음 SQS 정책을 추가합니다.
{
    "Version": "2012-10-17",
    "Statement": [
        {
            "Sid": "VisualEditor0",
            "Effect": "Allow",
            "Action": [
                "sqs:DeleteMessage",
                "sqs:GetQueueUrl",
                "sqs:ListDeadLetterSourceQueues",
                "sqs:ReceiveMessage",
                "sqs:GetQueueAttributes",
                "sqs:ListQueueTags",
                "sqs:SetQueueAttributes",
                "sqs:PurgeQueue"
            ],
            "Resource": "arn:aws:sqs:{region}:{accountID}:cfn-sqs-queue"
        }
    ]
}
SQS를 생성하고 대상의 Amazon S3 이벤트를 구성하는 스크립트
사전 조건이 충족되었는지 확인한 후 다음 Python 스크립트를 실행하여 SQS를 생성할 수 있습니다. 구성 가능한 설정을 사전 조건에서 준비된 이름으로 바꿉니다.
참고
스크립트를 실행한 후 SQS 콘솔에 로그인하여 생성된 SQS의 ARN을 찾습니다.
Amazon SQS에서 다른 소비자가 메시지를 수신하고 처리할 수 없도록 차단하는 기간인 가시성 시간 제한을 설정합니다. 가시성 시간 제한을 크롤링 실행 시간과 거의 동일하게 설정합니다.
#!venv/bin/python
import boto3
import botocore

#---------Start : READ ME FIRST ----------------------#
# 1. Purpose of this script is to create the SQS, SNS and enable S3 bucket notification.
#     The following are the operations performed by the scripts:
#      a. Enable S3 bucket notification to trigger 's3:ObjectCreated:' and 's3:ObjectRemoved:' events.
#      b. Create SNS topic for fan out.
#      c. Create SQS queue for saving events which will be consumed by the crawler.
#          SQS Event Queue ARN will be used to create the crawler after running the script.
# 2. This script does not create the crawler.
# 3. SNS topic is created to support FAN out of S3 events. If S3 event is also used by another
#    purpose, SNS topic created by the script can be used.
# 1. Creation of bucket is an optional step.
#    To create a bucket set create_bucket variable to true.
# 2. The purpose of crawler_name is to easily locate the SQS/SNS.
#     crawler_name is used to create SQS and SNS with the same name as crawler.
# 3. 'folder_name' is the target of crawl inside the specified bucket 's3_bucket_name'
#
#---------End : READ ME FIRST ------------------------#


#--------------------------------#
# Start : Configurable settings  #
#--------------------------------#

#Create
region = 'us-west-2'
s3_bucket_name = 's3eventtestuswest2'
folder_name = "test"
crawler_name = "test33S3Event"
sns_topic_name = crawler_name
sqs_queue_name = sns_topic_name
create_bucket = False

#-------------------------------#
# End : Configurable settings   #
#-------------------------------#

# Define aws clients
dev = boto3.session.Session(profile_name='myprofile')
boto3.setup_default_session(profile_name='myprofile')
s3 = boto3.resource('s3', region_name=region)
sns = boto3.client('sns', region_name=region)
sqs = boto3.client('sqs', region_name=region)
client = boto3.client("sts")
account_id = client.get_caller_identity()["Account"]
queue_arn = ""


def print_error(e):
    print(e.message + ' RequestId: ' + e.response['ResponseMetadata']['RequestId'])

def create_s3_bucket(bucket_name, client):
    bucket = client.Bucket(bucket_name)
    try:
        if not create_bucket:
            return True
        response = bucket.create(
            ACL='private',
            CreateBucketConfiguration={
                'LocationConstraint': region
            },
        )
        return True
    except botocore.exceptions.ClientError as e:
        print_error(e)
        if 'BucketAlreadyOwnedByYou' in e.message:  # we own this bucket so continue
            print('We own the bucket already. Lets continue...')
            return True
    return False

def create_s3_bucket_folder(bucket_name, client, directory_name):
    s3.put_object(Bucket=bucket_name, Key=(directory_name + '/'))

def set_s3_notification_sns(bucket_name, client, topic_arn):
    bucket_notification = client.BucketNotification(bucket_name)
    try:

        response = bucket_notification.put(
            NotificationConfiguration={
                'TopicConfigurations': [
                    {
                        'Id' : crawler_name,
                        'TopicArn': topic_arn,
                        'Events': [
                            's3:ObjectCreated:*',
                            's3:ObjectRemoved:*',

                        ],
                        'Filter' :  {'Key': {'FilterRules': [{'Name': 'prefix', 'Value': folder_name}]}}
                    },
                ]
            }
        )
        return True
    except botocore.exceptions.ClientError as e:
        print_error(e)
    return False


def create_sns_topic(topic_name, client):
    try:
        response = client.create_topic(
            Name=topic_name
        )
        return response['TopicArn']
    except botocore.exceptions.ClientError as e:
        print_error(e)
    return None

def set_sns_topic_policy(topic_arn, client, bucket_name):
    try:
        response = client.set_topic_attributes(
            TopicArn=topic_arn,
            AttributeName='Policy',
            AttributeValue='''{
              "Version": "2008-10-17",
              "Id": "s3-publish-to-sns",
              "Statement": [{
                  "Effect": "Allow",
                  "Principal": { "AWS" : "*" },
                  "Action": [ "SNS:Publish" ],
                  "Resource": "%s",
                  "Condition": {
                    "StringEquals": {
                        "AWS:SourceAccount": "%s"
                      },
                      "ArnLike": {
                          "aws:SourceArn": "arn:aws:s3:*:*:%s"
                      }
                  }
              }]
  }''' % (topic_arn, account_id, bucket_name)
        )
        return True
    except botocore.exceptions.ClientError as e:
        print_error(e)

    return False


def subscribe_to_sns_topic(topic_arn, client, protocol, endpoint):
    try:
        response = client.subscribe(
            TopicArn=topic_arn,
            Protocol=protocol,
            Endpoint=endpoint
        )
        return response['SubscriptionArn']
    except botocore.exceptions.ClientError as e:
        print_error(e)
    return None


def create_sqs_queue(queue_name, client):
    try:
        response = client.create_queue(
            QueueName=queue_name,
        )
        return response['QueueUrl']
    except botocore.exceptions.ClientError as e:
        print_error(e)
    return None


def get_sqs_queue_arn(queue_url, client):
    try:
        response = client.get_queue_attributes(
            QueueUrl=queue_url,
            AttributeNames=[
                'QueueArn',
            ]
        )
        return response['Attributes']['QueueArn']
    except botocore.exceptions.ClientError as e:
        print_error(e)
    return None

def set_sqs_policy(queue_url, queue_arn, client, topic_arn):
    try:
        response = client.set_queue_attributes(
            QueueUrl=queue_url,
            Attributes={
                'Policy': '''{
                  "Version": "2012-10-17",
                  "Id": "AllowSNSPublish",
                  "Statement": [
                    {
                      "Sid": "AllowSNSPublish01",
                      "Effect": "Allow",
                      "Principal": "*",
                      "Action": "SQS:SendMessage",
                      "Resource": "%s",
                      "Condition": {
                        "ArnEquals": {
                          "aws:SourceArn": "%s"
                        }
                      }
                    }
                  ]
}''' % (queue_arn, topic_arn)
            }
        )
        return True
    except botocore.exceptions.ClientError as e:
        print_error(e)
    return False


if __name__ == "__main__":
    print('Creating S3 bucket %s.' % s3_bucket_name)
    if create_s3_bucket(s3_bucket_name, s3):
        print('\nCreating SNS topic %s.' % sns_topic_name)
        topic_arn = create_sns_topic(sns_topic_name, sns)
        if topic_arn:
            print('SNS topic created successfully: %s' % topic_arn)

            print('Creating SQS queue %s' % sqs_queue_name)
            queue_url = create_sqs_queue(sqs_queue_name, sqs)
            if queue_url is not None:
                print('Subscribing sqs queue with sns.')
                queue_arn = get_sqs_queue_arn(queue_url, sqs)
                if queue_arn is not None:
                    if set_sqs_policy(queue_url, queue_arn, sqs, topic_arn):
                        print('Successfully configured queue policy.')
                        subscription_arn = subscribe_to_sns_topic(topic_arn, sns, 'sqs', queue_arn)
                        if subscription_arn is not None:
                            if 'pending confirmation' in subscription_arn:
                                print('Please confirm SNS subscription by visiting the subscribe URL.')
                            else:
                                print('Successfully subscribed SQS queue: ' + queue_arn)
                        else:
                            print('Failed to subscribe SNS')
                    else:
                        print('Failed to set queue policy.')
                else:
                    print("Failed to get queue arn for %s" % queue_url)
            # ------------ End subscriptions to SNS topic -----------------

            print('\nSetting topic policy to allow s3 bucket %s to publish.' % s3_bucket_name)
            if set_sns_topic_policy(topic_arn, sns, s3_bucket_name):
                print('SNS topic policy added successfully.')
                if set_s3_notification_sns(s3_bucket_name, s3, topic_arn):
                    print('Successfully configured event for S3 bucket %s' % s3_bucket_name)
                    print('Create S3 Event Crawler using SQS ARN %s' % queue_arn)
                else:
                    print('Failed to configure S3 bucket notification.')
            else:
                print('Failed to add SNS topic policy.')
        else:
            print('Failed to create SNS topic.')
콘솔을 사용하여 Amazon S3 이벤트 알림용 크롤러 설정(Amazon S3 대상)
Amazon S3 대상에 대한 AWS Glue 콘솔을 사용하여 Amazon S3 이벤트 알림용 크롤러를 설정하려면
-
크롤러 속성을 설정합니다. 자세한 내용을 알아보려면 AWS Glue 콘솔에서 크롤러 구성 옵션 설정을 참조하세요.
-
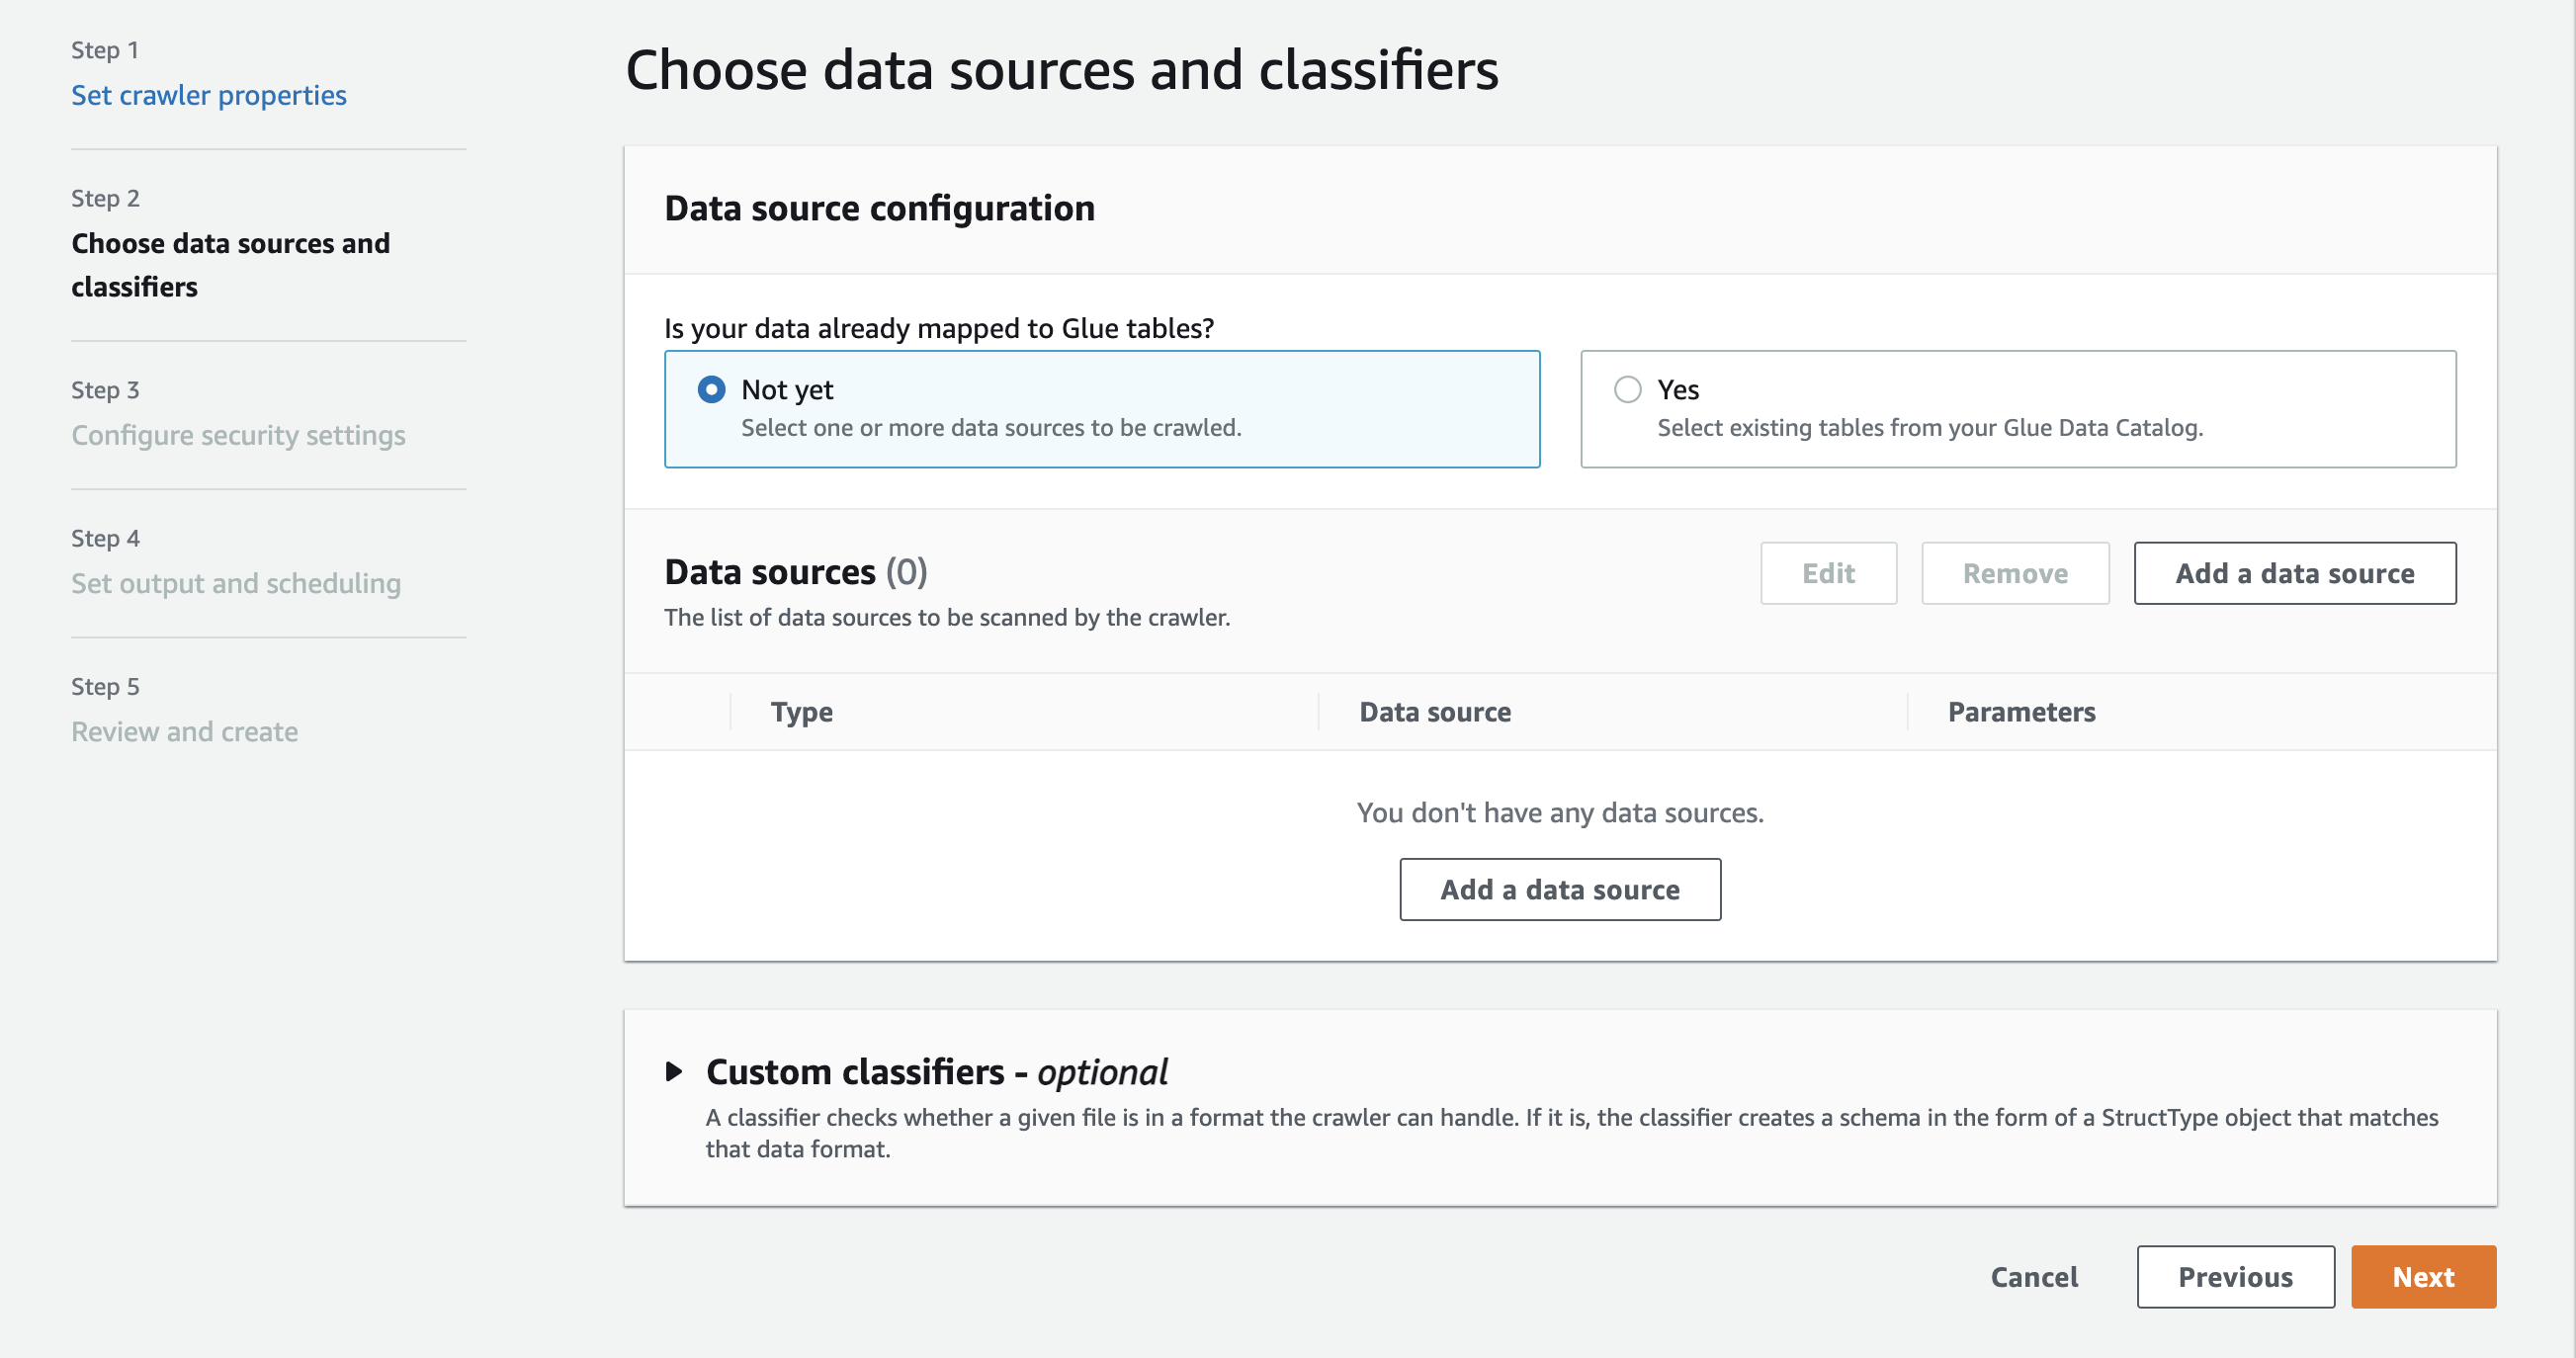
Data source configuration(데이터 소스 구성) 섹션에 Is your data already mapped to AWS Glue tables?라는 메시지가 표시됩니다.
기본적으로 Not yet(아직)이 이미 선택되어 있습니다. Amazon S3 데이터 소스를 사용 중이고 데이터가 AWS Glue 테이블에 아직 매핑되지 않았으므로 이 항목을 기본값으로 둡니다.
-
Data sources(데이터 소스) 섹션에서 Add a data source(데이터 소스 추가)를 선택합니다.
-
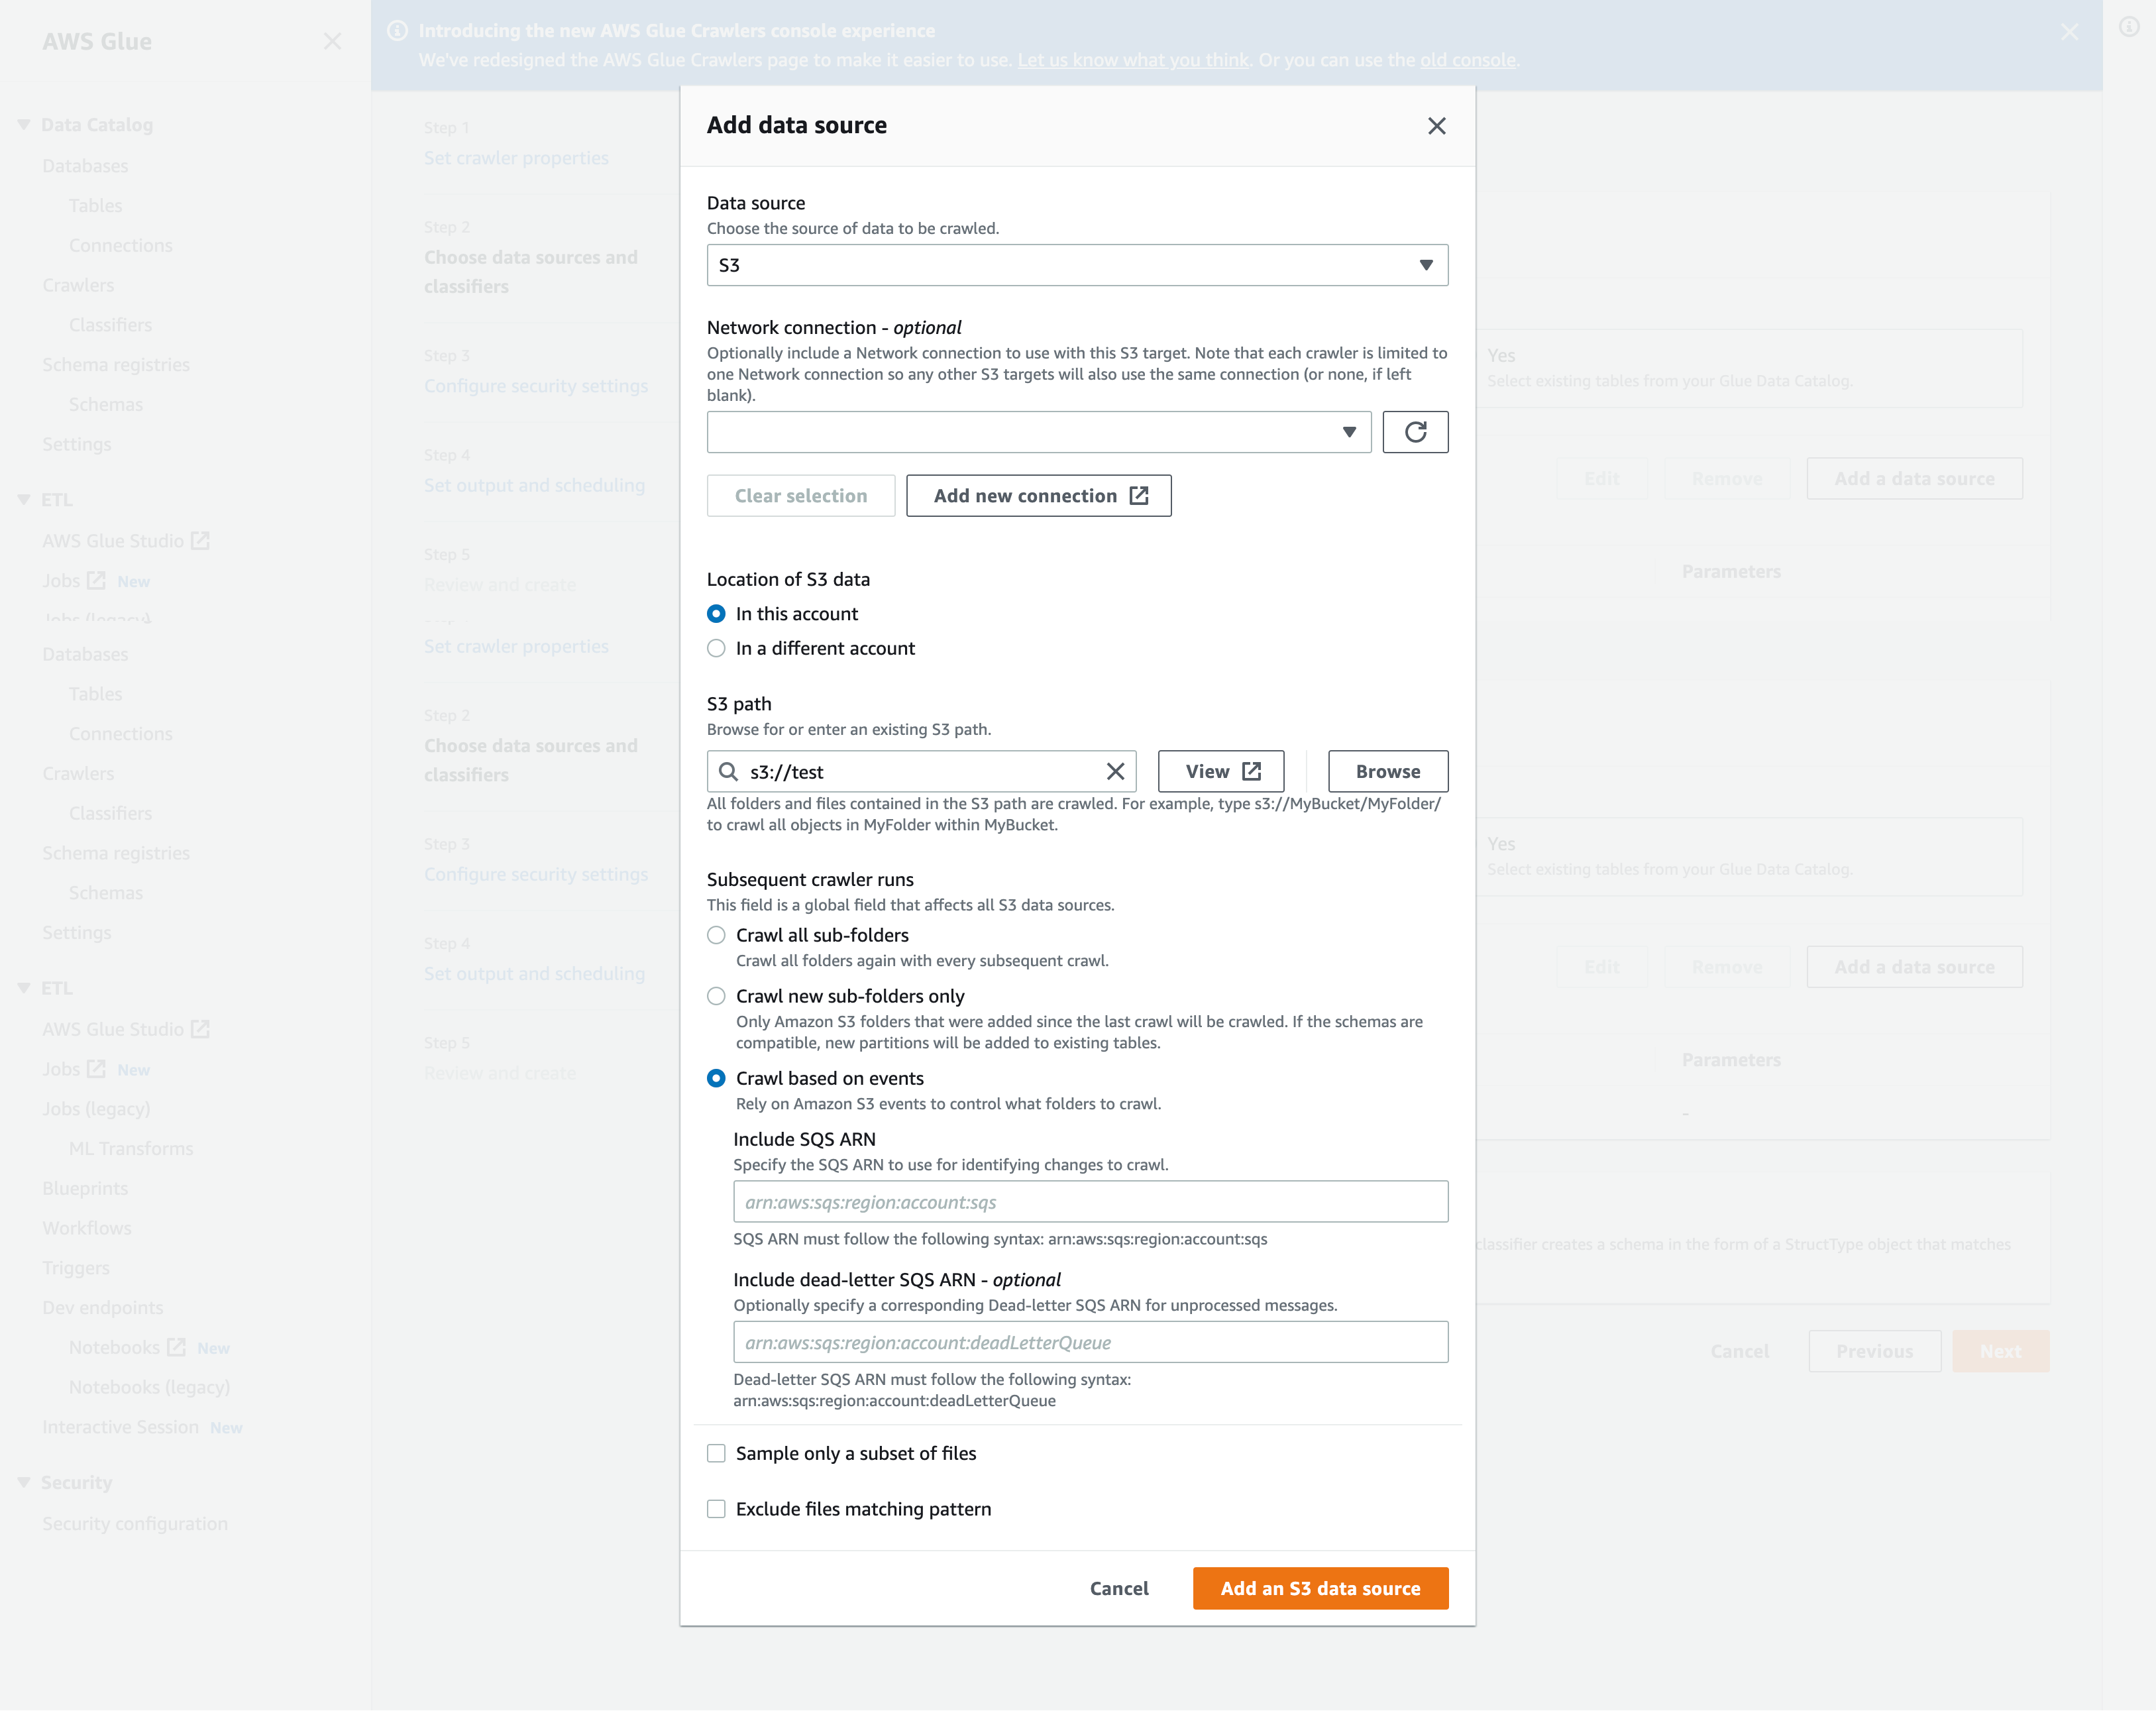
Add data source(데이터 소스 추가) 모달에서 Amazon S3 데이터 소스를 구성합니다.
-
Data source(데이터 소스): 기본적으로 Amazon S3가 선택됩니다.
-
Network connection(네트워크 연결)(선택 사항): Add new connection(새 연결 추가)을 선택합니다.
-
Location of Amazon S3 data(Amazon S3 데이터 위치): 기본적으로 In this account(이 계정에서)가 선택됩니다.
-
Amazon S3 path(Amazon S3 경로): 폴더와 파일이 크롤링되는 Amazon S3 경로를 지정합니다.
-
Subsequent crawler runs(후속 크롤러 실행): 크롤러에 대한 Amazon S3 이벤트 알림을 사용하려면 Crawl based on events(이벤트 기반 크롤링)를 선택합니다.
-
Include SQS ARN(SQS ARN 포함): 유효한 SQS ARN을 포함하는 데이터 스토어 파라미터를 지정합니다. (예:
arn:aws:sqs:region:account:sqs). -
Include dead-letter SQS ARN(배달 못한 편지 SQS ARN 포함)(선택 사항): 유효한 Amazon 배달 못한 편지 SQS ARN을 지정합니다. (예:
arn:aws:sqs:region:account:deadLetterQueue). -
Add an Amazon S3 data source(Amazon S3 데이터 소스 추가)를 선택합니다.
-
AWS CLI를 사용하여 Amazon S3 이벤트 알림용 크롤러 설정
다음은 Amazon S3 대상 버킷에서 SQS 대기열을 생성하고 이벤트 알림을 설정하기 위한 Amazon S3 AWS CLI 직접 호출 예제입니다.
S3 Event AWS CLI
aws sqs create-queue --queue-name MyQueue --attributes file://create-queue.json
create-queue.json
```
{
    "Policy": {
        "Version": "2012-10-17",
        "Id": "example-ID",
        "Statement": [
            {
                "Sid": "example-statement-ID",
                "Effect": "Allow",
                "Principal": {
                    "Service": "s3.amazonaws.com"
                },
                "Action": [
                    "SQS:SendMessage"
                ],
                "Resource": "SQS-queue-ARN",
                "Condition": {
                    "ArnLike": {
                        "aws:SourceArn": "arn:aws:s3:*:*:awsexamplebucket1"
                    },
                    "StringEquals": {
                        "aws:SourceAccount": "bucket-owner-account-id"
                    }
                }
            }
        ]
    }
}
```
aws s3api put-bucket-notification-configuration --bucket customer-data-pdx --notification-configuration file://s3-event-config.json
s3-event-config.json
```
{
    "QueueConfigurations": [
        {
          "Id": "s3event-sqs-queue",
          "QueueArn": "arn:aws:sqs:{region}:{account}:queuename",
          "Events": [
                "s3:ObjectCreated:*",
                "s3:ObjectRemoved:*"
          ],
          "Filter": {
              "Key": {
                  "FilterRules": [
                      {
                          "Name": "Prefix",
                          "Value": "/json"
                      }
                  ]
              }
          }
        }
    ]
}
```
Create Crawler:
콘솔을 사용하여 Amazon S3 이벤트 알림용 크롤러 설정(데이터 카탈로그 대상)
카탈로그 대상이 있는 경우, AWS Glue 콘솔을 사용하여 Amazon S3 이벤트 알림용 크롤러를 설정합니다.
-
크롤러 속성을 설정합니다. 자세한 내용을 알아보려면 AWS Glue 콘솔에서 크롤러 구성 옵션 설정을 참조하세요.
-
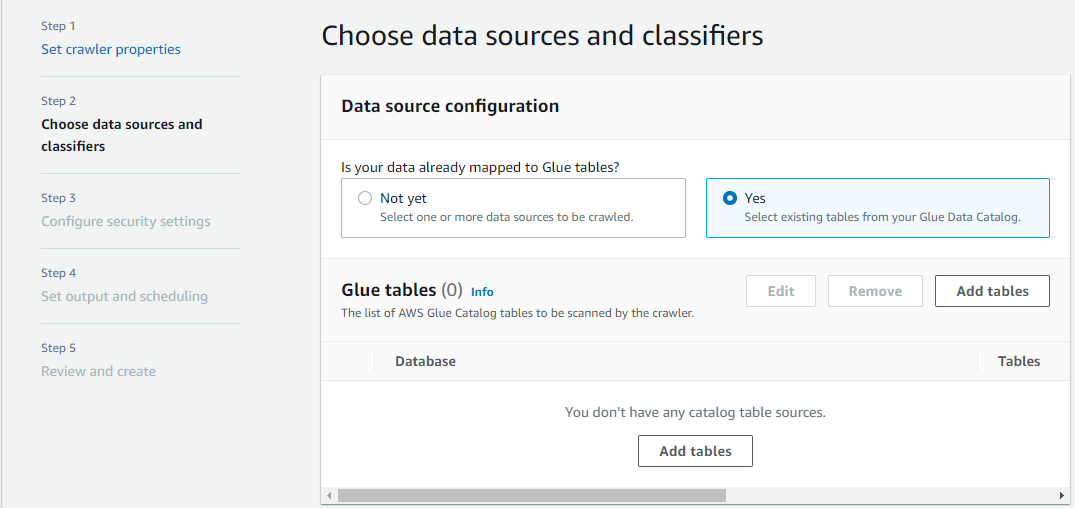
Data source configuration(데이터 소스 구성) 섹션에 Is your data already mapped to AWS Glue tables?라는 메시지가 표시됩니다.
데이터 카탈로그의 기존 테이블을 데이터 소스로 선택하려면 예(Yes)를 선택합니다.
-
Glue 테이블(Glue tables) 섹션에서 테이블 추가(Add tables)를 선택합니다.
-
테이블 추가(Add table) 모달에서 데이터베이스 및 테이블을 구성합니다.
-
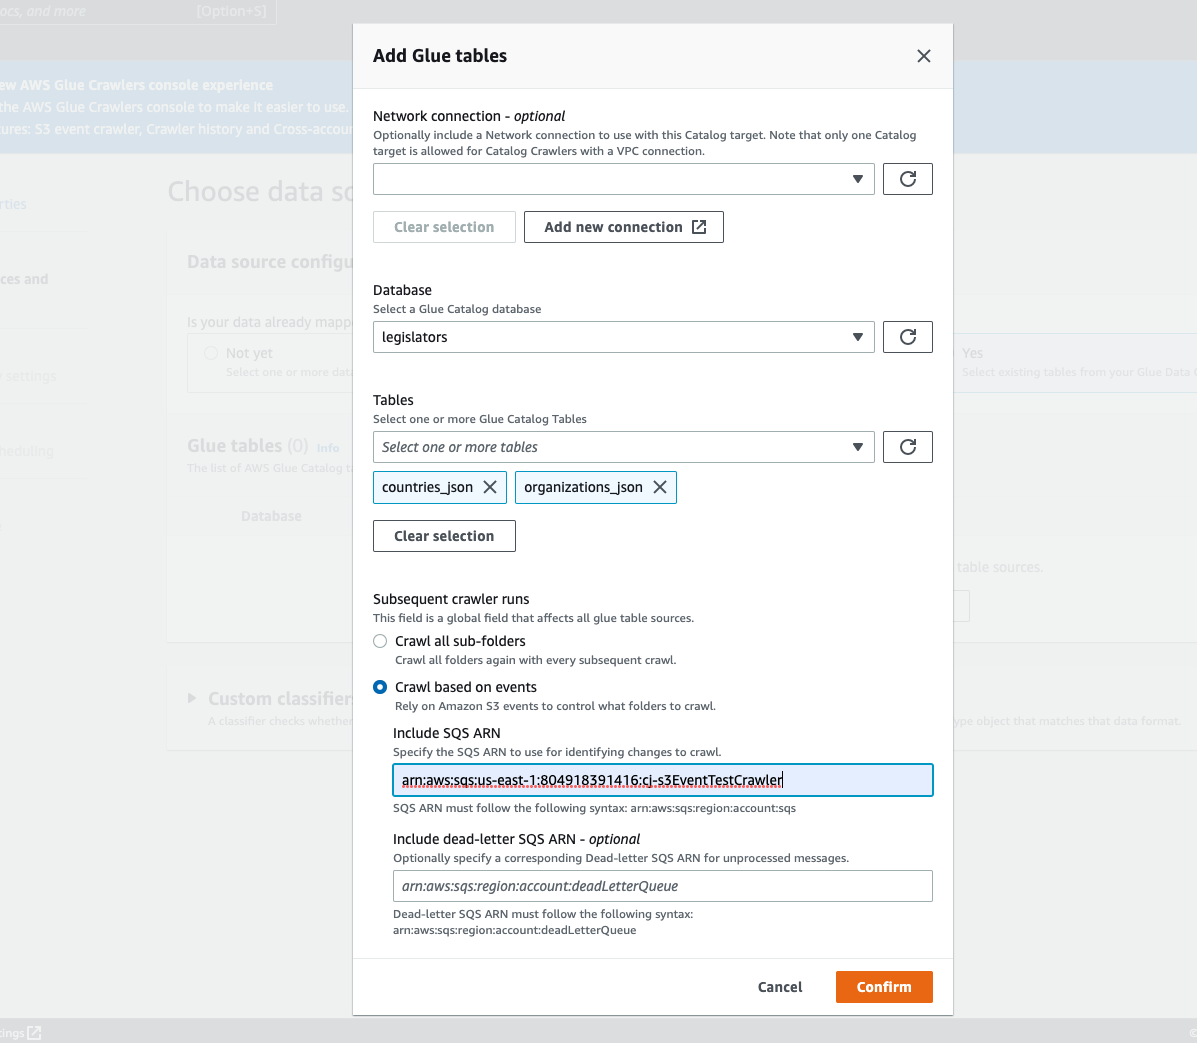
Network connection(네트워크 연결)(선택 사항): Add new connection(새 연결 추가)을 선택합니다.
-
데이터베이스(Database): 데이터 카탈로그의 데이터베이스를 선택합니다.
-
테이블(Tables): 데이터 카탈로그의 해당 데이터베이스에서 하나 이상의 테이블을 선택합니다.
-
Subsequent crawler runs(후속 크롤러 실행): 크롤러에 대한 Amazon S3 이벤트 알림을 사용하려면 Crawl based on events(이벤트 기반 크롤링)를 선택합니다.
-
Include SQS ARN(SQS ARN 포함): 유효한 SQS ARN을 포함하는 데이터 스토어 파라미터를 지정합니다. (예:
arn:aws:sqs:region:account:sqs). -
Include dead-letter SQS ARN(배달 못한 편지 SQS ARN 포함)(선택 사항): 유효한 Amazon 배달 못한 편지 SQS ARN을 지정합니다. (예:
arn:aws:sqs:region:account:deadLetterQueue). -
확인(Confirm)을 선택합니다.
-
