기계 번역으로 제공되는 번역입니다. 제공된 번역과 원본 영어의 내용이 상충하는 경우에는 영어 버전이 우선합니다.
애플리케이션에 Amazon Location 검색 추가
애플리케이션의 마지막 단계는 맵에 검색을 추가하는 것입니다. 이 경우 특정 위치에서 항목을 찾을 수 있는 역방향 지오코딩 검색을 추가합니다.
참고
또한 Amazon Location Service는 이름이나 주소를 검색하여 맵에서 장소의 위치를 찾을 수 있는 기능을 제공합니다.
애플리케이션에 검색 기능을 추가하려면
-
이전 섹션에서 생성한
main.js파일을 엽니다. -
다음과 같이
main함수를 수정합니다. 변경해야 하는 내용은green에 나와 있습니다.async function main() {// Create an authentication helper instance using an API key const authHelper = await amazonLocationAuthHelper.withAPIKey(apiKey);// Initialize map and Amazon Location SDK client: const map = await initializeMap();const client = new amazonLocationClient.LocationClient({ region, ...authHelper.getLocationClientConfig(), // Provides configuration required to make requests to Amazon Location }); // On mouse click, display marker and get results: map.on("click", async function (e) { // Set up parameters for search call let params = { IndexName: placesName, Position: [e.lngLat.lng, e.lngLat.lat], Language: "en", MaxResults: "5", }; // Set up command to search for results around clicked point const searchCommand = new amazonLocationClient.SearchPlaceIndexForPositionCommand(params); try { // Make request to search for results around clicked point const data = await client.send(searchCommand); // Write JSON response data to HTML document.querySelector("#response").textContent = JSON.stringify(data, undefined, 2); // Display place label in an alert box alert(data.Results[0].Place.Label); } catch (error) { // Write JSON response error to HTML document.querySelector("#response").textContent = JSON.stringify(error, undefined, 2); // Display error in an alert box alert("There was an error searching."); } });}이 코드는 API 키를 사용하도록 Amazon Location 인증 도우미를 설정하는 것으로 시작됩니다.
const authHelper = await amazonLocationAuthHelper.withAPIKey(apiKey);그런 다음 해당 인증 도우미와 새 Amazon Location 클라이언트를 생성하는 데 사용하는 리전을 사용합니다.
const client = new amazonLocationClient.LocationClient({
    region,
    ...authHelper.getLocationClientConfig(),
  });
다음으로 코드는 사용자가 맵 컨트롤에서 지점을 선택하면 응답합니다. 에 대해 MapLibre 제공된 이벤트를 캡처하여 이 작업을 수행합니다
click.map.on("click", async function(e) { ... });이벤트는 MapLibre
click사용자가 선택한 위도 및 경도()를 포함하는 파라미터를 제공합니다e.lngLat.click이벤트 내에서 코드는 지정된 위도와 경도에 있는 엔티티를 찾기 위해searchPlaceIndexForPositionCommand를 만듭니다.// Set up parameters for search call let params = { IndexName: placesName, Position: [e.lngLat.lng, e.lngLat.lat], Language: "en", MaxResults: "5" }; // Set up command to search for results around clicked point const searchCommand = new amazonLocationClient.SearchPlaceIndexForPositionCommand(params); try { // Make request to search for results around clicked point const data = await client.send(searchCommand); ... });여기서
IndexName는 이전에 생성한 장소 색인 리소스의 이름이고,Position는 검색할 위도와 경도이고,Language는 검색 결과에 사용할 기본 언어이고,MaxResults는 Amazon Location에 최대 5개의 결과만 반환하도록 지시합니다.나머지 코드는 오류를 확인한 다음
response이라는<pre>요소에 검색 결과를 표시하고 알림 상자에 상위 결과를 표시합니다. -
(선택 사항) 지금
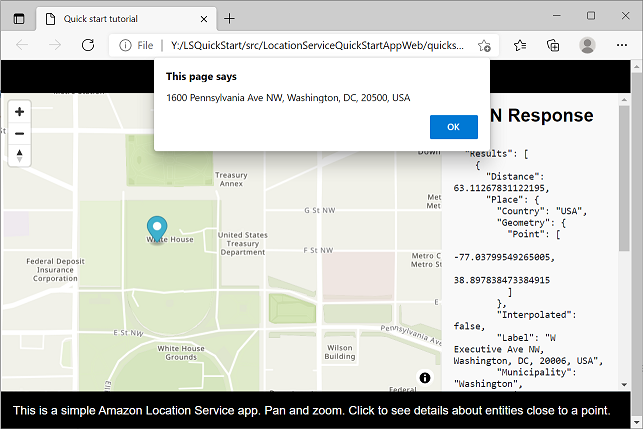
quickstart.html파일을 저장하고 브라우저에서 여는 경우 맵에서 위치를 선택하면 선택한 장소의 이름 또는 주소가 표시됩니다. -
애플리케이션의 마지막 단계는 MapLibre 기능을 사용하여 사용자가 선택한 지점에 마커를 추가하는 것입니다.
main함수를 다음과 같이 수정합니다. 변경해야 하는 내용은green에 나와 있습니다.async function main() { // Create an authentication helper instance using an API key const authHelper = await amazonLocationAuthHelper.withAPIKey(apiKey); // Initialize map and Amazon Location SDK client const map = await initializeMap(); const client = new amazonLocationClient.LocationClient({ region, ...authHelper.getLocationClientConfig(), // Provides configuration required to make requests to Amazon Location });// Variable to hold marker that will be rendered on click let marker;// On mouse click, display marker and get results: map.on("click", async function (e) {// Remove any existing marker if (marker) { marker.remove(); } // Render a marker on clicked point marker = new maplibregl.Marker().setLngLat([e.lngLat.lng, e.lngLat.lat]).addTo(map);// Set up parameters for search call let params = { IndexName: placesName, Position: [e.lngLat.lng, e.lngLat.lat], Language: "en", MaxResults: "5", }; // Set up command to search for results around clicked point const searchCommand = new amazonLocationClient.SearchPlaceIndexForPositionCommand(params); ...이 코드는 사용자가 위치를 선택할 때마다 채워지는
marker변수를 선언하여 선택한 위치를 표시합니다..addTo(map);를 사용하여 마커를 맵에 추가하면 맵 컨트롤에서 마커를 자동으로 렌더링합니다. 또한 코드는 이전 마커를 확인하고 제거하여 화면에 한 번에 하나의 마커만 표시되도록 합니다. -
main.js파일을 저장하고 브라우저에서quickstart.html파일을 엽니다. 이전과 마찬가지로 맵을 이동 및 확대/축소할 수 있지만, 이제 위치를 선택하면 선택한 위치에 대한 세부 정보가 표시됩니다.
빠른 시작 애플리케이션을 완료했습니다. 이 자습서에서는 다음과 같은 정적 HTML 애플리케이션을 생성하는 방법을 보여줍니다.
-
사용자가 상호 작용할 수 있는 맵을 만듭니다.
-
맵 이벤트(
click)를 처리합니다. -
Amazon Location Service 를 호출합니다. API특히 를 사용하여 특정 위치에서 맵을 검색합니다
searchPlaceIndexForPosition. -
MapLibre 맵 제어를 사용하여 마커를 추가합니다.