Create and attach Lightsail block storage disks to Windows Server instances
If you need additional storage space, you can create and attach block storage disks to your Windows Server instance in Amazon Lightsail. For more information about block storage disks, see Block storage disks.
This guide shows you how to create a new block storage disk and attach it to your Windows Server instance using the Lightsail console. It also describes how to connect to your Windows Server instance using RDP so that you can bring the disk online and initialize it.
Note
If you have a Linux or Unix instance, see Create and attach disks to your Linux or Unix instance.
Step 1: Create a new block storage disk and attach it to your instance
Create a new block storage disk and attach it to your instance using the Amazon Lightsail console.
To create a new block storage disk and attach it to your instance
-
Sign in to the Lightsail console
. -
Choose the Storage tab, then choose Create disk.
-
Choose the AWS Region and Availability Zone where your Lightsail instance is located.
-
Choose a disk size.
-
Enter a name for your storage disk.
Resource names:
-
Must be unique within each AWS Region in your Lightsail account.
-
Must contain 2 to 255 characters.
-
Must start and end with an alphanumeric character or number.
-
Can include alphanumeric characters, numbers, periods, dashes, and underscores.
-
-
Choose one of the following options to add tags to your disk:
-
Add key-only tags or Edit key-only tags (if tags have already been added). Enter your new tag into the tag key text box, and press Enter. Choose Save when you’re done entering your tags to add them, or choose Cancel to not add them.

-
Create a key-value tag, then enter a key into the Key text box, and a value into the Value text box. Choose Save when you’re done entering your tags, or choose Cancel to not add them.
Key-value tags can only be added one at a time before saving. To add more than one key-value tag, repeat the previous steps.

Note
For more information about key-only and key-value tags, see Tags.
-
-
Choose Create disk.
After a few seconds, the disk is created and you can view information about it on the disk management page.
-
Choose your instance from the list, and then choose Attach to attach the new disk to your instance.

Continue to the Step 2: Connect to your instance and bring the block storage disk online section of this guide to bring the block storage disk online.
Step 2: Connect to your instance and bring the block storage disk online
Connect to your Windows Server instance and use the Disk Management utility to bring the recently attached block storage disk online.
To connect to your instance and bring the block storage disk online
-
Navigate to the Lightsail console home page
. -
Choose the name of the instance to which you attached the additional storage disk earlier in this guide.
-
Under the Connect tab, choose Connect using RDP.
-
On the Windows Start menu, search for Computer Management, and in the search results, choose Computer Management.

-
In Computer Management, in the left pane, choose Disk Management.
-
In the bottom pane of the Disk Management utility, select the disk labeled as Unknown / Offline. This is the block storage disk that you attached to your instance earlier in this guide.

-
With the disk selected, on the Action menu, choose All Tasks, and then choose Online.

You should see the status of the block storage disk update to Not Initialized. The block storage disk is not yet online. Continue to the Step 3: Initialize the block storage disk section of this guide to initialize the block storage disk.
Step 3: Initialize the block storage disk
Initialize the block storage disk so that you can format it.
Important
If you're mounting a disk that already has data on it, such as a disk that you created from a snapshot, be sure that you don't reformat the disk and delete the existing data.
To initialize the block storage disk
-
In the bottom pane of the Disk Management utility, select the disk labeled as Unknown / Not initialized.

-
With the disk selected, on the Action menu, choose All Tasks, and then choose Initialize Disk.

-
Choose the partition style for your new disk, and then choose OK.
Note
For more information about partition styles, see the About partition styles - GPT and MBR
article from Microsoft. You should see the status of the block storage disk update to Online. Continue to the Step 4: Format the disk with a file system section of this guide to format your block storage disk with a file system.
Step 4: Format the disk with a file system
Use the New Simple Volume wizard in Windows Server to assign a drive letter and format the disk with a file system.
To format the disk with a file system
-
In the bottom pane of the Disk Management utility, select the partition on the block storage disk labeled as Unallocated.

-
With the partition selected, on the Action menu, choose All Tasks, and then choose New Simple Volume.

-
Follow the instructions in the New Simple Volume wizard to choose an NTFS, FAT32, or ReFS file system type and format the disk.
Note
For more information about each of these file systems, see the NTFS overview
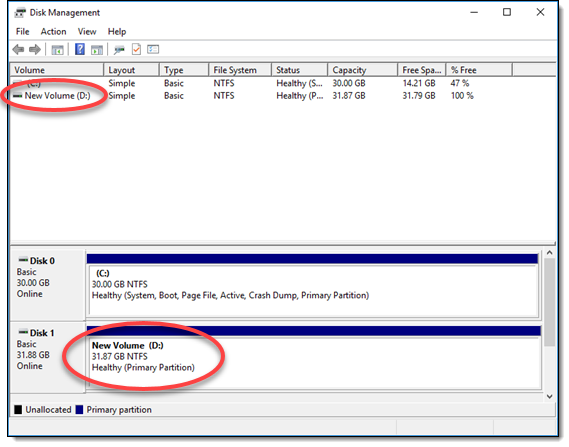
, Resilient File System (ReFS) overview , and Description of the FAT32 File System articles from Microsoft. When complete, you see a drive letter and the following message in the Disk Management utility.
