AWS Mainframe Modernization self-managed experience is no longer open to new customers. For capabilities similar to AWS Mainframe Modernization self-managed experience, explore capabilities from vendor-direct offerings and from AWS Transform. Existing customers can continue to use the service as normal. For more information, see AWS Mainframe Modernization availability change.
AWS Mainframe Modernization Service (Managed Runtime Environment experience) is no longer open to new customers. For capabilities similar to AWS Mainframe Modernization Service (Managed Runtime Environment experience) explore AWS Mainframe Modernization Service (Self-Managed Experience). Existing customers can continue to use the service as normal. For more information, see AWS Mainframe Modernization availability change.
Tutorial: Set up managed runtime for Rocket Software (formerly Micro Focus)
You can deploy and run an application in AWS Mainframe Modernization managed runtime environment with the Rocket Software runtime engine. This tutorial shows how to deploy and run the CardDemo sample application in an AWS Mainframe Modernization managed runtime environment with the Rocket Software runtime engine. The CardDemo sample application is a simplified credit card application developed to test and showcase AWS and partner technology for mainframe modernization use cases.
In the tutorial, you create resources in other AWS services. These include Amazon Simple Storage Service, Amazon Relational Database Service, AWS Key Management Service, and AWS Secrets Manager.
Prerequisites
-
Make sure that you have access to a 3270 emulator to use the CICS connection. Free and trial 3270 emulators are available from third party websites. Alternatively, you can start an AWS Mainframe Modernization WorkSpaces Applications Rocket Software instance and use the Rumba 3270 emulator (not available for free).
For information about WorkSpaces Applications, see Tutorial: Set up WorkSpaces Applications for use with Rocket Enterprise Analyzer and Rocket Enterprise Developer.
Note
When creating the stack, choose the Enterprise Developer (ED) option and not Enterprise Analyzer (EA).
-
Download the CardDemo sample application
and unzip the downloaded file to any local directory. This directory will contain a subdirectory titled CardDemo_runtime. -
Identify a VPC in your account where you can define the resources created in this tutorial. The VPC will need subnets in at least two Availability Zones. For more information about Amazon VPC, see How Amazon VPC works.
Step 1: Create and load an Amazon S3 bucket
In this step, you create an Amazon S3 bucket and upload CardDemo files to this bucket. Later in this tutorial, you use these files to deploy and run the CardDemo sample application in an AWS Mainframe Modernization Rocket Software Managed Runtime environment.
Note
You do not have to create a new S3 bucket but the bucket that you choose must be in the same Region as other resources used in this tutorial.
To create an Amazon S3 bucket
-
Open the Amazon S3 console
, and choose Create bucket. -
In General configuration, choose the AWS Region where you want to build the AWS Mainframe Modernization Rocket Software Managed Runtime.
-
Enter a Bucket name, for example,
yourname-aws-region-carddemo. Keep the default settings, and choose Create bucket. Alternatively, you can also copy settings from an existing Amazon S3 bucket and then choose Create bucket. -
Choose the bucket that you just created, and then choose Upload.
-
In the Upload section, choose Add Folder, and then browse to the
CardDemo_runtimedirectory from you local computer. -
Choose Upload to start the upload process. Upload times vary based on your connection speeds.
-
When the upload completes, confirm that all files have been successfully uploaded, and then choose Close.
Your Amazon S3 bucket now contains the CardDemo_runtime folder.

For information about S3 buckets, see Creating, configuring, and working with Amazon S3 buckets.
Step 2: Create and configure a database
In this step, you create a PostgreSQL database in Amazon Relational Database Service (Amazon RDS). For the tutorial, this database contains the data sets that the CardDemo sample application uses for customer tasks regarding credit card transactions.
To create a database in Amazon RDS
-
Open the Amazon RDS console
. -
Choose the AWS Region in which you want to create the database instance.
-
From the navigation pane, choose Databases.
-
Choose Create database, and then choose Standard create.
-
For Engine type, choose PostgreSQL.
-
Choose an Engine version of 15 or higher.
Note
Save the engine version because you need it later in this tutorial.
-
In Templates, choose Free tier.
-
Change the DB instance identifier to something meaningful, for example,
MicroFocus-Tutorial. -
Refrain from managing master credentials in AWS Secrets Manager. Instead, enter a master password and confirm it.
Note
Save the username and password that you use for the database. You will store them securely in the next steps of this tutorial.
-
Under Connectivity, choose the VPC where you want to create the AWS Mainframe Modernization managed runtime environment.
-
Choose Create database.
To create a custom parameter group in Amazon RDS
-
In the Amazon RDS console navigation pane, choose Parameter groups, and then choose Create parameter group.
-
In the Create parameter group window, for Parameter group family, select the Postgres option that matches your database version.
Note
Some Postgres versions require a Type. Select DB Parameter Group if needed. Enter a Group name and Description for the parameter group.
-
Choose Create.
To configure the custom parameter group
-
Choose the newly created parameter group.
-
Choose Actions, and then choose Edit.
-
Filter on
max_prepared_transactionsand change the parameter value to 100. -
Choose Save Changes.
To associate the custom parameter group with the database
-
In the Amazon RDS console navigation pane, choose Databases, and then choose the database instance that you want to modify.
-
Choose Modify. The Modify DB instance page appears.
Note
The Modify option is not available until the database has finished creating and backing-up, which might take several minutes.
-
On the Modify DB instance page, navigate to Additional configuration, and change the DB parameter group to your parameter group. If your parameter group is not available in the list, check if it was created with the correct database version.
-
Choose Continue, and check the summary of modifications.
-
Choose Apply immediately to apply the changes instantly.
-
Choose Modify DB instance to save your changes.
For more information on parameter groups, see Working with parameter groups.
Note
You can also use an Amazon Aurora PostgreSQL database with AWS Mainframe Modernization but there is no free tier option. For more information, see Working with Amazon Aurora postgreSQL.
Step 3: Create and configure an AWS KMS key
To store credentials securely for the Amazon RDS instance, first create an AWS KMS key.
To create an AWS KMS key
-
Open the Key Management Service console
. -
Choose Create Key.
-
Leave the defaults of Symmetric for key type and Encrypt and decrypt for key usage.
-
Choose Next.
-
Give the key an Alias such as
MicroFocus-Tutorial-RDS-Keyand an optional description. -
Choose Next.
-
Assign a key administrator by checking the box next to your user or role.
-
Choose Next .
-
Assign key usage permission by checking the box next to your user or role.
-
Choose Next.
-
On the review screen, edit the Key policy, then enter the following inside the existing "Statement" array:
{
     "Sid" : "Allow access for Mainframe Modernization Service",
     "Effect" : "Allow",
        "Principal" : {
           "Service" : "m2.amazonaws.com"
                 },
      "Action" : "kms:Decrypt",
      "Resource" : "*"
},
This policy grants AWS Mainframe Modernization decrypt permissions using this specific key policy.
-
Choose Finish to create the key.
For more information, see Creating keys in the AWS Key Management Service Developer Guide.
Step 4: Create and configure an AWS Secrets Manager database secret
Now store the database credentials securely using the AWS Secrets Manager and AWS KMS key.
To create and configure an AWS Secrets Manager database secret
-
Open the Secrets Manager console
. -
In the navigation pane, choose Secrets.
-
In Secrets, choose Store a new secret.
-
Set the Secret type to Credentials for Amazon RDS database.
-
Enter the Credentials that you specified when you created the database.
-
Under Encryption key, select the key that you created in step 3.
-
In the Database section, select the database that you created for this tutorial, and then choose Next.
-
Under Secret name, enter a name such as
MicroFocus-Tutorial-RDS-Secretand an optional description. -
In the Resource permissions section, choose Edit permissions, and replace the contents with the following policy:
-
Choose Save.
-
Choose Next for the subsequent screens, and then choose Store.
Step 5: Add the sslMode to the secret
To add the sslMode to the secret
-
Refresh the secrets list to see the new secret.
-
Choose the newly created secret in step 4, and note the
Secret
                        ARN
because you need it later in the tutorial. -
In the Overview tab of the secret, choose Retrieve secret value.
-
Choose Edit, and then choose Add row.
-
Add a Key for
sslModewith a Value ofverify-full:
-
Choose Save.
Step 6: Create a runtime environment
To create a runtime environment
-
Open the AWS Mainframe Modernization console
. -
In the navigation pane, choose Environments. Then choose Create environment.

-
Under Specify basic information,
-
Enter
MicroFocus-Environmentfor the environment name. -
Under engine options, make sure Micro Focus (Rocket) is selected.
-
Choose the latest Micro Focus (Rocket) Version.
-
Choose Next.

-
-
Configure the environment
-
Under Availability, choose High availability cluster.
-
Under Resources, choose either M2.c5.large or M2.m5.large for the instance type, and the number of instances that you want. Specify up to two instances.
-
Under Security and network, choose Allow applications deployed to this environment to be publicly accessible and choose at least two public subnets.
-
Choose Next.

-
-
On the Attach storage page, choose Next.
-
On the Schedule maintenance page, choose No preference and then choose Next.

-
On the Review and create page, review all the configurations that you provided for the runtime environment, and then choose Create environment.

When you've created your environment, a banner appears that says Environment
name was created successfully, and the
Status field changes to Available. The
environment creation process takes several minutes but you can continue with the next
steps while it runs.

Step 7: Create an application
To create an application
-
In the navigation pane, choose Applications. Then choose Create application.

-
On the Create application page, under Specify basic information, enter
MicroFocus-CardDemofor the application name and under Engine type make sure Micro Focus (Rocket) is selected. Then choose Next.
-
Under Specify resources and configurations, choose the option to specify the application definition with its resources and configurations using the inline editor.

Enter the following application definition in the editor:
{
  "template-version": "2.0",
  "source-locations": [
    {
      "source-id": "s3-source",
      "source-type": "s3",
      "properties": {
        "s3-bucket": "yourname-aws-region-carddemo",
        "s3-key-prefix": "CardDemo_runtime"
      }
    }
  ],
  "definition": {
    "listeners": [
      {
        "port": 6000,
        "type": "tn3270"
      }
    ],
    "dataset-location": {
      "db-locations": [
        {
          "name": "Database1",
          "secret-manager-arn": "arn:aws:secretsmanager:Region:123456789012:secret:MicroFocus-Tutorial-RDS-Secret-xxxxxx"
        }
      ]
    },
    "batch-settings": {
      "initiators": [
        {
          "classes": [
               "A",
               "B"
            ],
          "description": "initiator_AB...."
        },
        {
          "classes": [
                "C",
                "D"
             ],
          "description": "initiator_CD...."
        }
      ],
      "jcl-file-location": "${s3-source}/catalog/jcl"
    },
    "cics-settings": {
      "binary-file-location": "${s3-source}/loadlib",
      "csd-file-location": "${s3-source}/rdef",
      "system-initialization-table": "CARDSIT"
    },
    "xa-resources": [
      {
        "name": "XASQL",
        "secret-manager-arn": "arn:aws:secretsmanager:Region:123456789012:secret:MicroFocus-Tutorial-RDS-Secret-xxxxxx",
        "module": "${s3-source}/xa/ESPGSQLXA64.so"
      }
    ]
  }
}
Note
This file is subject to change.
-
Edit the application JSON in the properties object of source-locations as follows:
-
Replace the value for
s3_bucketwith the name of the Amazon S3 bucket that you created in Step 1. -
Replace the value for
s3-key-prefixwith the folder (key prefix) where you uploaded the CardDemo sample files. If you uploaded theCardDemodirectory directly to an Amazon S3 bucket, then thes3-key-prefixdoesn’t need to be changed. -
Replace both
secret-manager-arnvalues with the ARN for the database secret that you created in Step 4.

For more information on the application definition, see Rocket Software (formerly Micro Focus) application definition.
-
-
Choose Next to continue.
-
On the Review and create page, review the information that you provided, and then choose Create application.

When you've created your application, a banner appears that says Application
name was created successfully. And the Status field changes to Available.
Step 8: Deploy an application
To deploy an application
-
In the navigation pane, choose Applications, and then choose
MicroFocus-CardDemo. -
Under Deploy application, choose Deploy.

-
Choose the latest version of the application and the environment that you created previously, and then choose Deploy.
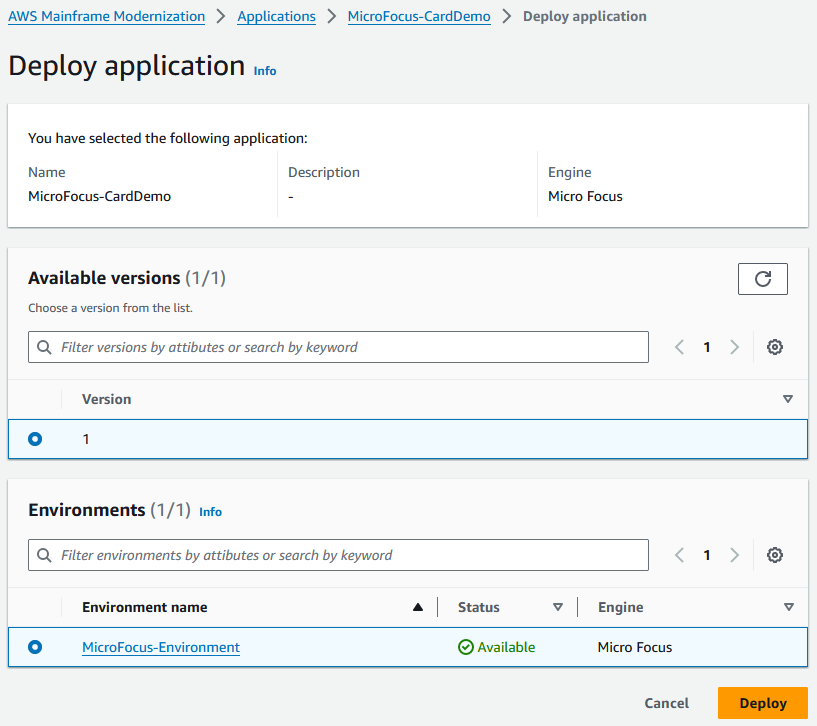
When the CardDemo application deploys successfully, the status changes to Ready.

Step 9: Import data sets
To import data sets
-
In the navigation pane, choose Applications, and then choose the application.
-
Choose the Data sets tab. Then choose Import.
-
Choose Import and Edit JSON configuration, and then choose the Copy and paste your own JSON option.

-
Copy and paste the following JSON but don't choose "Submit" yet. This JSON contains all the data sets required for the demo application but needs your Amazon S3 bucket details.
{ "dataSets": [ { "dataSet": { "storageType": "Database", "datasetName": "AWS.M2.CARDDEMO.ACCTDATA.VSAM.KSDS", "relativePath": "DATA", "datasetOrg": { "vsam": { "format": "KS", "encoding": "A", "primaryKey": { "length": 11, "offset": 0 } } }, "recordLength": { "min": 300, "max": 300 } }, "externalLocation": { "s3Location": "s3://<s3-bucket-name>/CardDemo_runtime/catalog/data/AWS.M2.CARDDEMO.ACCTDATA.VSAM.KSDS.DAT" } }, { "dataSet": { "storageType": "Database", "datasetName": "AWS.M2.CARDDEMO.CARDDATA.VSAM.AIX.PATH", "relativePath": "DATA", "datasetOrg": { "vsam": { "format": "KS", "encoding": "A", "primaryKey": { "length": 11, "offset": 16 } } }, "recordLength": { "min": 150, "max": 150 } }, "externalLocation": { "s3Location": "s3://<s3-bucket-name>/CardDemo_runtime/catalog/data/AWS.M2.CARDDEMO.CARDDATA.VSAM.KSDS.DAT" } }, { "dataSet": { "storageType": "Database", "datasetName": "AWS.M2.CARDDEMO.CARDDATA.VSAM.KSDS", "relativePath": "DATA", "datasetOrg": { "vsam": { "format": "KS", "encoding": "A", "primaryKey": { "length": 16, "offset": 0 } } }, "recordLength": { "min": 150, "max": 150 } }, "externalLocation": { "s3Location": "s3://<s3-bucket-name>/CardDemo_runtime/catalog/data/AWS.M2.CARDDEMO.CARDDATA.VSAM.KSDS.DAT" } }, { "dataSet": { "storageType": "Database", "datasetName": "AWS.M2.CARDDEMO.CARDXREF.VSAM.KSDS", "relativePath": "DATA", "datasetOrg": { "vsam": { "format": "KS", "encoding": "A", "primaryKey": { "length": 16, "offset": 0 } } }, "recordLength": { "min": 50, "max": 50 } }, "externalLocation": { "s3Location": "s3://<s3-bucket-name>/CardDemo_runtime/catalog/data/AWS.M2.CARDDEMO.CARDXREF.VSAM.KSDS.DAT" } }, { "dataSet": { "storageType": "Database", "datasetName": "AWS.M2.CARDDEMO.CUSTDATA.VSAM.KSDS", "relativePath": "DATA", "datasetOrg": { "vsam": { "format": "KS", "encoding": "A", "primaryKey": { "length": 9, "offset": 0 } } }, "recordLength": { "min": 500, "max": 500 } }, "externalLocation": { "s3Location": "s3://<s3-bucket-name>/CardDemo_runtime/catalog/data/AWS.M2.CARDDEMO.CUSTDATA.VSAM.KSDS.DAT" } }, { "dataSet": { "storageType": "Database", "datasetName": "AWS.M2.CARDDEMO.CARDXREF.VSAM.AIX.PATH", "relativePath": "DATA", "datasetOrg": { "vsam": { "format": "KS", "encoding": "A", "primaryKey": { "length": 11, "offset": 25 } } }, "recordLength": { "min": 50, "max": 50 } }, "externalLocation": { "s3Location": "s3://<s3-bucket-name>/CardDemo_runtime/catalog/data/AWS.M2.CARDDEMO.CARDXREF.VSAM.KSDS.DAT" } }, { "dataSet": { "storageType": "Database", "datasetName": "AWS.M2.CARDDEMO.TRANSACT.VSAM.KSDS", "relativePath": "DATA", "datasetOrg": { "vsam": { "format": "KS", "encoding": "A", "primaryKey": { "length": 16, "offset": 0 } } }, "recordLength": { "min": 350, "max": 350 } }, "externalLocation": { "s3Location": "s3://<s3-bucket-name>/CardDemo_runtime/catalog/data/AWS.M2.CARDDEMO.TRANSACT.VSAM.KSDS.DAT" } }, { "dataSet": { "storageType": "Database", "datasetName": "AWS.M2.CARDDEMO.USRSEC.VSAM.KSDS", "relativePath": "DATA", "datasetOrg": { "vsam": { "format": "KS", "encoding": "A", "primaryKey": { "length": 8, "offset": 0 } } }, "recordLength": { "min": 80, "max": 80 } }, "externalLocation": { "s3Location": "s3://<s3-bucket-name>/CardDemo_runtime/catalog/data/AWS.M2.CARDDEMO.USRSEC.VSAM.KSDS.DAT" } } ] } -
Replace each occurrence of
<s3-bucket-name>(there are eight) with the name of the Amazon S3 bucket that contains the CardDemo folder, for example,your-name-aws-region-carddemo.Note
To copy the Amazon S3 URI for the folder in Amazon S3, select the folder, and then choose Copy Amazon S3 URI.
-
Choose Submit.
When the import finishes, a banner appears with the following message:
Import task with resource
                    identifier name was completed successfully.
A list of the imported datasets is shown.
You can also view the status of all data set imports by choosing Import History on the Data sets tab.
Step 10: Start an application
To start an application
-
In the navigation pane, choose Applications, and then choose the application.
-
Choose Start application.

When the CardDemo application starts to run successfully, a banner appears with the
following message: Application name was started
successfully. The Status field changes to
Running.

Step 11: Connect to the CardDemo CICS application
Before you connect, make sure that the VPC and security group that you specified for the application are the same as the ones that you applied for your network interface that you will connect from.
To configure the TN3270 connection, you also need the DNS hostname and the port of the application.
To configure and connect an application to mainframe using terminal emulator
-
Open the AWS Mainframe Modernization console and choose Applications, and then choose
MicroFocus-CardDemo. -
Choose the copy icon to copy the DNS Hostname. Also make sure to note the Ports number.
-
Start a terminal emulator. This tutorial uses Micro Focus Rumba+.
Note
The configuration steps vary by emulator.
-
Choose Mainframe Display.

-
Choose Connection, and then choose Configure.

-
Under Installed Interfaces, choose
TN3270, and then chooseTN3270again under the Connection menu.
-
Choose Insert, and paste the
DNS
                        Hostname
for the Application. Specify6000for the Telnet Port.
Note
If you are using AWS AppStream 2.0 in a browser and having difficulties with pasting values, please refer to Troubleshooting AppStream 2.0 User Issues.
-
Under Connection, choose Advanced, and then choose Send Keep Alive and Send NOP, and enter 180 for the Interval.
Note
Configuring the keep alive setting on your TN3270 terminal to at least 180 seconds helps ensure that the Network Load Balancer doesn’t drop your connection.

-
Choose Connect.
Note
If the connection fails:
-
If you are using AppStream 2.0, confirm that the VPC and security group specified for the application's environment are the same as the AppStream 2.0 fleet.
-
Use the VPC Reachability Analyzer to analyze the connection. You can access the Reachability Analyzer through the console
. -
As a diagnostic step, try adding or changing the Security Group inbound rules for the application to allow traffic for port 6000 from anywhere (i.e. CIDR Block 0.0.0.0/0). If you successfully connect, then you know the security group was blocking your traffic. Change the security group source to something more specific. For more information on security groups, see Security group basics.
-
-
Enter
USER0001for the username andpasswordfor the password.Note
In Rumba, the default for Clear is ctrl-shift-z, and the default for Reset is ctrl-r.

-
After you log in successfully, you can navigate through the CardDemo application.
-
Enter
01for the Account View.
-
Enter
00000000010for the Account Number and press Enter on your keyboard.Note
Other valid accounts are
0000000011and00000000020.
-
Press F3 to Exit to the menu, and F3 to exit the transaction.
Clean up resources
If you no longer need the resources that you created for this tutorial, delete them to avoid additional charges. To do so, complete the following steps:
-
If necessary, stop the application.
-
Delete the application. For more information, see Delete an AWS Mainframe Modernization application.
-
Delete the runtime environment. For more information, see Delete an AWS Mainframe Modernization runtime environment.
-
Delete the Amazon S3 buckets that you created for this tutorial. For more information, see Deleting a bucket in the Amazon S3 User Guide.
-
Delete the AWS Secrets Manager secret that you created for this tutorial. For more information, see Delete a secret.
-
Delete the KMS key that you created for this tutorial. For more information, see Deleting AWS KMS keys.
-
Delete the Amazon RDS database that you created for this tutorial. For more information, see Delete the EC2 instance and DB instance in the Amazon RDS User Guide.
-
If you added a Security Group rule for port 6000, delete the rule.
Next steps
To learn how to set up a development environment for your modernized applications, see Tutorial: Set up AppStream 2.0 for use with Rocket Enterprise Analyzer and Rocket Enterprise Developer.
