Connecting to an Amazon RDS database
With AWS Explorer, you can select an Amazon RDS database, choose an authentication method, and then configure the connection settings. After you've successfully tested the connection, you can start interacting with the data source using JetBrains DataGrip.
Important
Ensure that you've completed the prerequisites to enable users to access and interact with Amazon RDS databases.
Select a tab for instructions on connecting to a database instance using your preferred authentication method.
- Connect with IAM credentials
-
-
Open AWS Explorer, if it isn't already open.
-
Click the Amazon RDS node to expand the list of supported database engines.
-
Click a supported database engine (Aurora, MySQL, or PostgreSQL) node to expand the list of available database instances.
Note
If you select Aurora, you can choose between expanding a MySQL cluster and a PostgreSQL cluster.
Right-click a database and choose Connect with IAM credentials.
Note
You can also choose Copy Arn to add the database's Amazon Resource Name (ARN) to your clipboard.
-
In the Data Sources and Drivers dialog box, do the following to ensure a database connection can be opened:
In the Imported Data Sources pane, confirm that the correct the correct data source is selected.
If a message indicates that you need to Download missing driver files, choose Go to Driver (the wrench icon) to download the required files.
In the General tab of the Settings pane, confirm that the following fields display the correct values:
Host/Port – The endpoint and port used for connections to the database. For Amazon RDS databases hosted in the AWS Cloud, endpoints always end with
rds.amazon.com. If you're connecting to a DB instance through a proxy, use these fields to specify the proxy's connection details.Authentication – AWS IAM (authentication using IAM credentials).
User – The name of your database user account.
Credentials – The credentials used to access your AWS account.
Region – The AWS Region where the database is hosted.
RDS Host/Port – The endpoint and port for the database as listed in the AWS Management Console. If you're using a different endpoint to connect to a DB instance, specify the proxy's connection details in the Host/Port fields (described previously).
Database – The name of the database.
URL – The URL that the JetBrains IDE will use to connect to the database.

Note
For a full description of the connection settings that you can configure using the Data sources and drivers dialog box, see the documentation for the JetBrains IDE
that you're using. -
To verify the connection settings are correct, choose Test Connection.
A green check mark indicates a successful test.
-
Choose Apply to apply your settings, and then choose OK to start working with the data source.
The Database tool window opens. This displays the available data sources as a tree with nodes representing database elements such as schemas, tables, and keys.
Important
To use the Database tool window, you must first download and install DataGrip from JetBrains. For more information, see https://www.jetbrains.com/datagrip/
.
-
- Connect with Secrets Manager
-
-
Open AWS Explorer, if it isn't already open.
-
Click the Amazon RDS node to expand the list of supported database engines.
-
Click a supported database engine (Aurora, MySQL, or PostgreSQL) node to expand the list of available database instances.
Note
If you select Aurora, you can choose between expanding a MySQL cluster and a PostgreSQL cluster.
Right-click a database and choose Connect with Secrets Manager.
Note
You can also choose Copy Arn to add the database's Amazon Resource Name (ARN) to your clipboard.
In the Select a Database Secret dialog box, use the drop-down field to pick credentials for the database, and then choose Create.
-
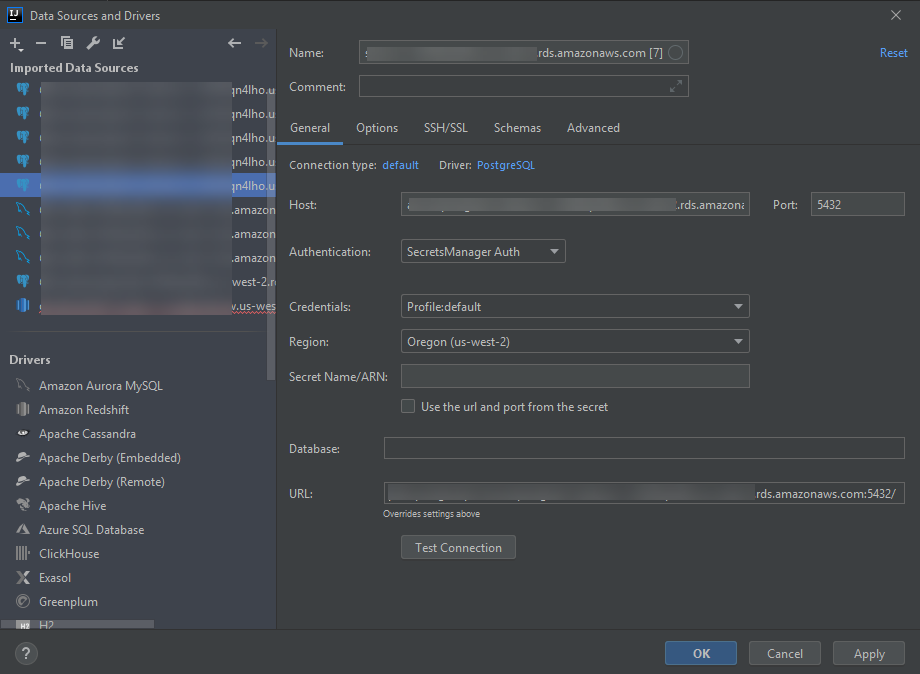
In the Data Sources and Drivers dialog box, do the following to ensure a database connection can be opened:
In the Imported Data Sources pane, confirm that the correct the correct data source is selected.
If a message indicates that you need to Download missing driver files, choose Go to Driver (the wrench icon) to download the required files.
In the General tab of the Settings pane, confirm that the following fields display the correct values:
Host/Port – The endpoint and port used for connections to the database. For Amazon RDS databases hosted in the AWS Cloud, endpoints always end with
rds.amazon.com. If you're connecting to a database through a proxy database, use these fields to specify the proxy's connection details.Authentication – SecretsManager Auth (authentication using AWS Secrets Manager).
Credentials – The credentials used to access your AWS account.
Region – The AWS Region where the database is hosted.
Secret Name/ARN – The name and ARN of the secret containing authentication credentials. To override the connection settings in the Host/Port fields, select the Use the url and port from the secret check box.
Database – The name of the database instance you selected in AWS Explorer.
URL – The URL that the JetBrains IDE will use to connect to the database.
Note
If you're using Secrets Manager for authentication, there are no fields for a user name and password for the database. This information is contained in the encrypted secret data portion of a secret.
Note
For a full description of the connection settings that you can configure using the Data sources and drivers dialog box, see the documentation for the JetBrains IDE
that you're using. -
To verify the connection settings are correct, choose Test Connection.
A green check mark indicates a successful test.
-
Choose Apply to apply your settings, and then choose OK to start working with the data source.
The Database tool window opens. This displays the available data sources as a tree with nodes representing database elements such as schemas, tables, and keys.
Important
To use the Database tool window, you must first download and install DataGrip from JetBrains. For more information, see https://www.jetbrains.com/datagrip/
.
-
