Amazon Virtual Private Cloud (VPC)
Amazon Virtual Private Cloud (Amazon VPC) enables you to launch Amazon Web Services resources into a virtual network you've defined. This virtual network resembles a traditional network that you'd operate in your own data center, with the benefits of using the scalable infrastructure of AWS. For more information, go to the Amazon VPC User Guide.
The Toolkit for Visual Studio enables a developer to access VPC functionality similar to that exposed by the AWS Management Console
Creating a Public-Private VPC for Deployment with AWS Elastic Beanstalk
This section describes how to create an Amazon VPC that contains both public and private subnets. The public subnet contains an Amazon EC2 instance that performs network address translation (NAT) to enable instances in the private subnet to communicate with the public internet. The two subnets must reside in the same Availability Zone (AZ).
This is the minimal VPC configuration required to deploy an AWS Elastic Beanstalk environment in a VPC. In this scenario, the Amazon EC2 instances that host your application reside in the private subnet; the Elastic Load Balancing load balancer that routes incoming traffic to your application resides in the public subnet.
For more information about network address translation (NAT), go to NAT Instances in the Amazon Virtual Private Cloud User Guide. For an example of how to configure your deployment to use a VPC, see Deploying to Elastic Beanstalk.
To create a public-private subnet VPC
-
In the Amazon VPC node in AWS Explorer, open the VPCs subnode, then choose Create VPC.

-
Configure the VPC as follows:
-
Type a name for your VPC.
-
Select the With Public Subnet and the With Private Subnet check boxes.
-
From the Availability Zone drop-down list box for each subnet, choose an Availability Zone. Be sure to use the same AZ for both subnets.
-
For the private subnet, in NAT Key Pair Name, provide a key pair. This key pair is used for the Amazon EC2 instance that performs network address translation from the private subnet to the public Internet.
-
Select the Configure default security group to allow traffic to NAT check box.
Type a name for your VPC. Select the With Public Subnet and the With Private Subnet check boxes. From the Availability Zone drop-down list box for each subnet, choose an Availability Zone. Be sure to use the same AZ for both subnets. For the private subnet, in NAT Key Pair Name, provide a key pair. This key pair is used for the Amazon EC2 instance that performs network address translation from the private subnet to the public Internet. Select the Configure default security group to allow traffic to NAT check box.
Choose OK.

-
You can view the new VPC in the VPCs tab in AWS Explorer.

The NAT instance might take a few minutes to launch. When it is available, you can view it by expanding the Amazon EC2 node in AWS Explorer and then opening the Instances subnode.
An AWS Elastic Beanstalk (Amazon EBS) volume is created for the NAT instance automatically. For more information about Elastic Beanstalk, go to AWS Elastic Beanstalk (EBS) in the Amazon EC2 User Guide for Linux Instances.

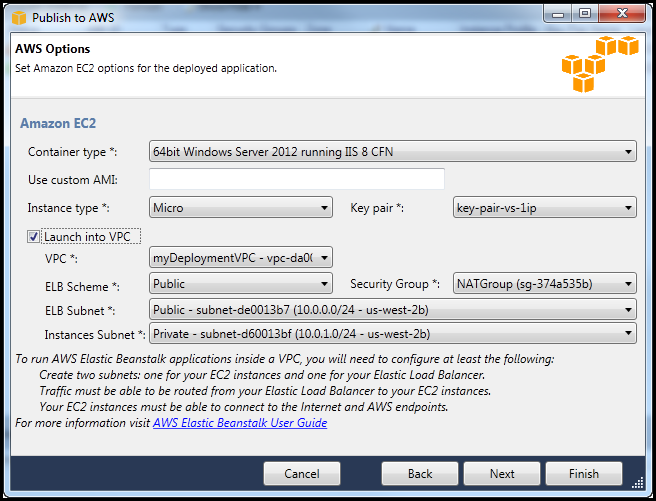
If you deploy an application to an AWS Elastic Beanstalk environment and choose to launch the environment in a VPC, the Toolkit will populate the Publish to Amazon Web Services dialog box with the configuration information for your VPC.
The Toolkit populates the dialog box with information only from VPCs that were created in the Toolkit, not from VPCs created using the AWS Management Console. This is because when the Toolkit creates a VPC, it tags the components of the VPC so that it can access their information.
The following screenshot from the Deployment Wizard shows an example of a dialog box populated with values from a VPC created in the Toolkit.

To delete a VPC
To delete the VPC, you must first terminate any Amazon EC2 instances in the VPC.
-
If you have deployed an application to an AWS Elastic Beanstalk environment in the VPC, delete the environment. This will terminate any Amazon EC2 instances hosting your application along with the Elastic Load Balancing load balancer.
If you attempt to directly terminate the instances hosting your application without deleting the environment, the Auto Scaling service will automatically create new instances to replace the deleted ones. For more information, go to the Auto Scaling Developer Guide.
-
Delete the NAT instance for the VPC.
You do not need to delete the Amazon EBS volume associated with the NAT instance in order to delete the VPC. However, if you do not delete the volume, you will continue to be charged for it even if you delete the NAT instance and the VPC.
-
On the VPC tab, choose the Delete link to delete the VPC.

-
In the Delete VPC dialog box, choose OK.
