# How AWS Client VPN works
With AWS Client VPN, there are two types of user personas that interact with the Client VPN endpoint: administrators and clients.
Client VPN supports IPv4, IPv6, and dual-stack (both IPv4 and IPv6) connectivity. You can create endpoints that use IPv4, IPv6, or both, allowing you to connect to IPv6 resources in your VPCs or connect from clients on IPv6 networks. This flexibility helps organizations that have already implemented or are transitioning to IPv6 infrastructure.
The *administrator* is responsible for setting up and configuring the service. This involves creating the Client VPN endpoint, associating the target network, configuring the authorization rules, and setting up additional routes (if required). After the Client VPN endpoint is set up and configured, the administrator downloads the Client VPN endpoint configuration file and distributes it to the clients who need access. The Client VPN endpoint configuration file includes the DNS name of the Client VPN endpoint and authentication information that's required to establish a VPN session. For more information about setting up the service, see [Get started with AWS Client VPN](cvpn-getting-started.md).
The *client* is the end user. This is the person who connects to the Client VPN endpoint to establish a VPN session. The client establishes the VPN session from their local computer or mobile device using an OpenVPN-based VPN client application. After they have established the VPN session, they can securely access the resources in the VPC in which the associated subnet is located. They can also access other resources in AWS, an on-premises network, or other clients if the required route and authorization rules have been configured. For more information about connecting to a Client VPN endpoint to establish a VPN session, see [Getting Started](https://docs.aws.amazon.com/vpn/latest/clientvpn-user/user-getting-started.html) in the *AWS Client VPN User Guide*.
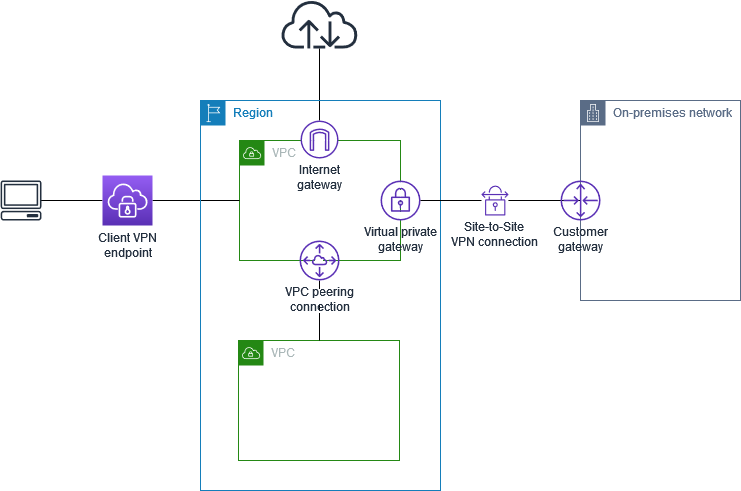
The following graphic illustrates the basic Client VPN architecture.
## Scenarios and examples for Client VPN
AWS Client VPN is a fully-managed remote access VPN solution that you use to allow clients secure access to resources within both AWS and your on-premises network. There are multiple options for how you configure access. This section provides examples for creating and configuring Client VPN access for your clients.
**Scenarios**
+ [Access a VPC using Client VPN](#scenario-vpc)
+ [Access a peered VPC using Client VPN](#scenario-peered)
+ [Access an on-premises network using Client VPN](#scenario-onprem)
+ [Access the internet using Client VPN](#scenario-internet)
+ [Client-to-client access using Client VPN](#scenario-client-to-client)
+ [Restrict access to your network using Client VPN](#scenario-restrict)
### Access a VPC using Client VPN
The AWS Client VPN configuration for this scenario includes a single target VPC. We recommend this configuration if you need to give clients access to the resources inside a single VPC only.

Before you begin, do the following:
+ Create or identify a VPC with at least one subnet. Identify the subnet in the VPC to associate with the Client VPN endpoint and note its IPv4 CIDR ranges.
+ Identify a suitable CIDR range for the client IP addresses that does not overlap with the VPC CIDR.
+ Review the rules and limitations for Client VPN endpoints in [Rules and best practices for using AWS Client VPN](what-is-best-practices.md).
**To implement this configuration**
1. Create a Client VPN endpoint in the same Region as the VPC. To do this, perform the steps described in [Create an AWS Client VPN endpoint](cvpn-working-endpoint-create.md).
1. Associate the subnet with the Client VPN endpoint. To do this, perform the steps described in [Associate a target network with an AWS Client VPN endpoint](cvpn-working-target-associate.md) and select the subnet and the VPC you identified earlier.
1. Add an authorization rule to give clients access to the VPC. To do this, perform the steps described in [Add an authorization rule](cvpn-working-rule-authorize-add.md), and for **Destination network**, enter the IPv4 CIDR range of the VPC.
1. Add a rule to your resources' security groups to allow traffic from the security group that was applied to the subnet association in step 2. For more information, see [Security groups](client-authorization.md#security-groups).
### Access a peered VPC using Client VPN
The AWS Client VPN configuration for this scenario includes a target VPC (VPC A) that is peered with an additional VPC (VPC B). We recommend this configuration if you need to give clients access to the resources inside a target VPC and to other VPCs that are peered with it (such as VPC B).
**Note**
The procedure for allowing access to a peered VPC (outlined following the network diagram) is required only if the Client VPN endpoint was configured for split-tunnel mode. In full-tunnel mode, access to the peered VPC is allowed by default.

Before you begin, do the following:
+ Create or identify a VPC with at least one subnet. Identify the subnet in the VPC to associate with the Client VPN endpoint and note its IPv4 CIDR ranges.
+ Identify a suitable CIDR range for the client IP addresses that does not overlap with the VPC CIDR.
+ Review the rules and limitations for Client VPN endpoints in [Rules and best practices for using AWS Client VPN](what-is-best-practices.md).
**To implement this configuration**
1. Establish the VPC peering connection between the VPCs. Follow the steps at [Creating and accepting a VPC peering connection](https://docs.aws.amazon.com/vpc/latest/peering/create-vpc-peering-connection.html) in the *Amazon VPC Peering Guide*. Confirm that instances in VPC A can communicate with instances in VPC B using the peering connection.
1. Create a Client VPN endpoint in the same Region as the target VPC. In the diagram, this is VPC A. Perform the steps described in [Create an AWS Client VPN endpoint](cvpn-working-endpoint-create.md).
1. Associate the subnet that you identified with the Client VPN endpoint that you created. To do this, perform the steps described in [Associate a target network with an AWS Client VPN endpoint](cvpn-working-target-associate.md), selecting the VPC and the subnet. By default, we associate the default security group of the VPC with the Client VPN endpoint. You can associate a different security group using the steps described in [Apply a security group to a target network in AWS Client VPN](cvpn-working-target-apply.md).
1. Add an authorization rule to give clients access to the target VPC. To do this, perform the steps described in [Add an authorization rule](cvpn-working-rule-authorize-add.md). For **Destination network to enable **, enter the IPv4 CIDR range of the VPC.
1. Add a route to direct traffic to the peered VPC. In the diagram, this is VPC B. To do this, perform the steps described in [Create an AWS Client VPN endpoint route](cvpn-working-routes-create.md). For **Route destination**, enter the IPv4 CIDR range of the peered VPC. For **Target VPC Subnet ID**, select the subnet you associated with the Client VPN endpoint.
1. Add an authorization rule to give clients access to peered VPC. To do this, perform the steps described in [Add an authorization rule](cvpn-working-rule-authorize-add.md). For **Destination network**, enter the IPv4 CIDR range of the peered VPC.
1. Add a rule to the security groups for your instances in VPC A and VPC B to allow traffic from the security group that was applied the Client VPN endpoint in step 3. For more information, see [Security groups](client-authorization.md#security-groups).
### Access an on-premises network using Client VPN
The AWS Client VPN configuration for this scenario includes access to an on-premises network only. We recommend this configuration if you need to give clients access to the resources inside an on-premises network only.
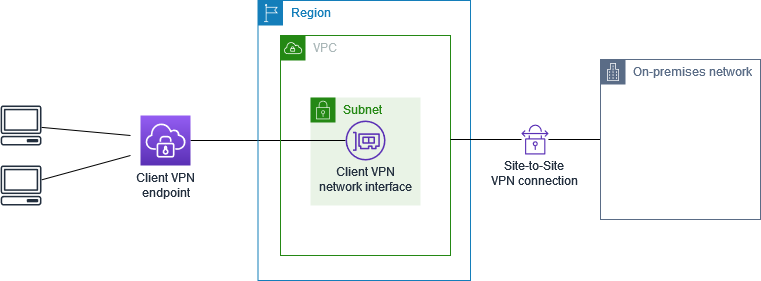
Before you begin, do the following:
+ Create or identify a VPC with at least one subnet. Identify the subnet in the VPC to associate with the Client VPN endpoint and note its IPv4 CIDR ranges.
+ Identify a suitable CIDR range for the client IP addresses that does not overlap with the VPC CIDR.
+ Review the rules and limitations for Client VPN endpoints in [Rules and best practices for using AWS Client VPN](what-is-best-practices.md).
**To implement this configuration**
1. Enable communication between the VPC and your own on-premises network over an AWS Site-to-Site VPN connection. To do this, perform the steps described in [Getting started](https://docs.aws.amazon.com/vpn/latest/s2svpn/SetUpVPNConnections.html) in the *AWS Site-to-Site VPN User Guide*.
**Note**
Alternatively, you can implement this scenario by using an Direct Connect connection between your VPC and your on-premises network. For more information, see the [Direct Connect User Guide](https://docs.aws.amazon.com/directconnect/latest/UserGuide/).
1. Test the AWS Site-to-Site VPN connection you created in the previous step. To do this, perform the steps described in [Testing the Site-to-Site VPN connection](https://docs.aws.amazon.com/vpn/latest/s2svpn/HowToTestEndToEnd_Linux.html) in the *AWS Site-to-Site VPN User Guide*. If the VPN connection is functioning as expected, continue to the next step.
1. Create a Client VPN endpoint in the same Region as the VPC. To do this, perform the steps described in [Create an AWS Client VPN endpoint](cvpn-working-endpoint-create.md).
1. Associate the subnet that you identified earlier with the Client VPN endpoint. To do this, perform the steps described in [Associate a target network with an AWS Client VPN endpoint](cvpn-working-target-associate.md) and select the VPC and the subnet.
1. Add a route that allows access to the AWS Site-to-Site VPN connection. To do this, perform the steps described in [Create an AWS Client VPN endpoint route](cvpn-working-routes-create.md); for **Route destination**, enter the IPv4 CIDR range of the AWS Site-to-Site VPN connection, and for **Target VPC Subnet ID**, select the subnet you associated with the Client VPN endpoint.
1. Add an authorization rule to give clients access to the AWS Site-to-Site VPN connection. To do this, perform the steps described in [Add an authorization rule to an AWS Client VPN endpoint](cvpn-working-rule-authorize-add.md); for **Destination network**, enter the AWS Site-to-Site VPN connection IPv4 CIDR range.
### Access the internet using Client VPN
The AWS Client VPN configuration for this scenario includes a single target VPC and access to the internet. We recommend this configuration if you need to give clients access to the resources inside a single target VPC and also allow access to the internet.
If you completed the [Get started with AWS Client VPN](cvpn-getting-started.md) tutorial, then you've already implemented this scenario.
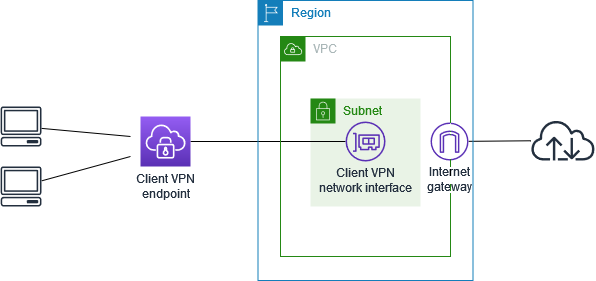
Before you begin, do the following:
+ Create or identify a VPC with at least one subnet. Identify the subnet in the VPC to associate with the Client VPN endpoint and note its IPv4 CIDR ranges.
+ Identify a suitable CIDR range for the client IP addresses that does not overlap with the VPC CIDR.
+ Review the rules and limitations for Client VPN endpoints in [Rules and best practices for using AWS Client VPN](what-is-best-practices.md).
**To implement this configuration**
1. Ensure that the security group that you'll use for the Client VPN endpoint allows outbound traffic to the internet. To do this, add outbound rules that allow traffic to 0.0.0.0/0 for HTTP and HTTPS traffic.
1. Create an internet gateway and attach it to your VPC. For more information, see [Creating and Attaching an Internet Gateway](https://docs.aws.amazon.com/vpc/latest/userguide/VPC_Internet_Gateway.html#Add_IGW_Attach_Gateway) in the *Amazon VPC User Guide*.
1. Make your subnet public by adding a route to the internet gateway to its route table. In the VPC console, choose **Subnets**, select the subnet you intend to associate with the Client VPN endpoint, choose **Route Table**, and then choose the route table ID. Choose **Actions**, choose **Edit routes**, and choose **Add route**. For **Destination**, enter `0.0.0.0/0`, and for **Target**, choose the internet gateway from the previous step.
1. Create a Client VPN endpoint in the same Region as the VPC. To do this, perform the steps described in [Create an AWS Client VPN endpoint](cvpn-working-endpoint-create.md).
1. Associate the subnet that you identified earlier with the Client VPN endpoint. To do this, perform the steps described in [Associate a target network with an AWS Client VPN endpoint](cvpn-working-target-associate.md) and select the VPC and the subnet.
1. Add an authorization rule to give clients access to the VPC. To do this, perform the steps described in [Add an authorization rule](cvpn-working-rule-authorize-add.md); and for **Destination network to enable **, enter the IPv4 CIDR range of the VPC.
1. Add a route that enables traffic to the internet. To do this, perform the steps described in [Create an AWS Client VPN endpoint route](cvpn-working-routes-create.md); for **Route destination**, enter `0.0.0.0/0`, and for **Target VPC Subnet ID**, select the subnet you associated with the Client VPN endpoint.
1. Add an authorization rule to give clients access to the internet. To do this, perform the steps described in [Add an authorization rule](cvpn-working-rule-authorize-add.md); for **Destination network**, enter `0.0.0.0/0`.
1. Ensure that the security groups for the resources in your VPC have a rule that allows access from the security group associated with the Client VPN endpoint. This enables your clients to access the resources in your VPC.
### Client-to-client access using Client VPN
The AWS Client VPN configuration for this scenario enables clients to access a single VPC, and enables clients to route traffic to each other. We recommend this configuration if the clients that connect to the same Client VPN endpoint also need to communicate with each other. Clients can communicate with each other using the unique IP address that's assigned to them from the client CIDR range when they connect to the Client VPN endpoint.

Before you begin, do the following:
+ Create or identify a VPC with at least one subnet. Identify the subnet in the VPC to associate with the Client VPN endpoint and note its IPv4 CIDR ranges.
+ Identify a suitable CIDR range for the client IP addresses that does not overlap with the VPC CIDR.
+ Review the rules and limitations for Client VPN endpoints in [Rules and best practices for using AWS Client VPN](what-is-best-practices.md).
**Note**
Network-based authorization rules using Active Directory groups or SAML-based IdP groups are not supported in this scenario.
**To implement this configuration**
1. Create a Client VPN endpoint in the same Region as the VPC. To do this, perform the steps described in [Create an AWS Client VPN endpoint](cvpn-working-endpoint-create.md).
1. Associate the subnet that you identified earlier with the Client VPN endpoint. To do this, perform the steps described in [Associate a target network with an AWS Client VPN endpoint](cvpn-working-target-associate.md) and select the VPC and the subnet.
1. Add a route to the local network in the route table. To do this, perform the steps described in [Create an AWS Client VPN endpoint route](cvpn-working-routes-create.md). For **Route destination**, enter the client CIDR range, and for **Target VPC Subnet ID**, specify `local`.
1. Add an authorization rule to give clients access to the VPC. To do this, perform the steps described in [Add an authorization rule](cvpn-working-rule-authorize-add.md). For **Destination network to enable **, enter the IPv4 CIDR range of the VPC.
1. Add an authorization rule to give clients access to the client CIDR range. To do this, perform the steps described in [Add an authorization rule](cvpn-working-rule-authorize-add.md). For **Destination network to enable**, enter the client CIDR range.
### Restrict access to your network using Client VPN
You can configure your AWS Client VPN endpoint to restrict access to specific resources in your VPC. For user-based authentication, you can also restrict access to parts of your network, based on the user group that accesses the Client VPN endpoint.
#### Restrict access using security groups
You can grant or deny access to specific resources in your VPC by adding or removing security group rules that reference the security group that was applied to the target network association (the Client VPN security group). This configuration expands on the scenario described in [Access a VPC using Client VPN](#scenario-vpc). This configuration is applied in addition to the authorization rule configured in that scenario.
To grant access to a specific resource, identify the security group that's associated with the instance on which your resource is running. Then, create a rule that allows traffic from the Client VPN security group.
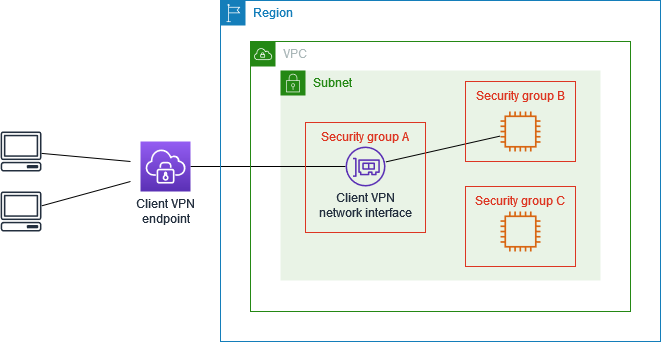
In the following diagram, security group A is the Client VPN security group, security group B is associated with an EC2 instance, and security group C is associated with an EC2 instance. If you add a rule to security group B that allows access from security group A, then clients can access the instance associated with security group B. If security group C does not have a rule that allows access from security group A, then clients can't access the instance associated with security group C.
Before you begin, check if the Client VPN security group is associated with other resources in your VPC. If you add or remove rules that reference the Client VPN security group, you might grant or deny access for the other associated resources too. To prevent this, use a security group that is specifically created for use with your Client VPN endpoint.
**To create a security group rule**
1. Open the Amazon VPC console at [https://console.aws.amazon.com/vpc/](https://console.aws.amazon.com/vpc/).
1. In the navigation pane, choose **Security Groups**.
1. Choose the security group that's associated with the instance on which your resource is running.
1. Choose **Actions**, **Edit inbound rules**.
1. Choose **Add rule**, and then do the following:
+ For **Type**, choose **All traffic**, or a specific type of traffic that you want to allow.
+ For **Source**, choose **Custom**, and then enter or choose the ID of the Client VPN security group.
1. Choose **Save rules**
To remove access to a specific resource, check the security group that's associated with the instance on which your resource is running. If there is a rule that allows traffic from the Client VPN security group, delete it.
**To check your security group rules**
1. Open the Amazon VPC console at [https://console.aws.amazon.com/vpc/](https://console.aws.amazon.com/vpc/).
1. In the navigation pane, choose **Security Groups**.
1. Choose **Inbound Rules**.
1. Review the list of rules. If there is a rule where **Source** is the Client VPN security group, choose **Edit Rules**, and choose **Delete** (the x icon) for the rule. Choose **Save rules**.
#### Restrict access based on user groups
If your Client VPN endpoint is configured for user-based authentication, you can grant specific groups of users access to specific parts of your network. To do this, complete the following steps:
1. Configure users and groups in Directory Service or your IdP. For more information, see the following topics:
+ [Active Directory authentication in Client VPN](ad.md)
+ [Requirements and considerations for SAML-based federated authentication](federated-authentication.md#saml-requirements)
1. Create an authorization rule for your Client VPN endpoint that allows a specified group access to all or part of your network. For more information, see [AWS Client VPN authorization rules](cvpn-working-rules.md).
If your Client VPN endpoint is configured for mutual authentication, you cannot configure user groups. When you create an authorization rule, you must grant access to all users. To enable specific groups of users access to specific parts of your network, you can create multiple Client VPN endpoints. For example, for each group of users that accesses your network, do the following:
1. Create a set of server and client certificates and keys for that group of users. For more information, see [Mutual authentication in AWS Client VPN](mutual.md).
1. Create a Client VPN endpoint. For more information, see [Create an AWS Client VPN endpoint](cvpn-working-endpoint-create.md).
1. Create an authorization rule that grants access to all or part of your network. For example, for a Client VPN endpoint that is used by administrators, you might create an authorization rule that grants access to the entire network. For more information, see [Add an authorization rule](cvpn-working-rule-authorize-add.md).