使用 IVS iOS 广播 SDK 发布和订阅
本部分将引导您完成使用 iOS 应用程序发布和订阅舞台所涉及的步骤。
创建视图
首先使用自动创建的 ViewController.swift 文件来导入 AmazonIVSBroadcast,然后添加一些要链接的 @IBOutlets:
import AmazonIVSBroadcast

class ViewController: UIViewController {

    @IBOutlet private var textFieldToken: UITextField!
    @IBOutlet private var buttonJoin: UIButton!
    @IBOutlet private var labelState: UILabel!
    @IBOutlet private var switchPublish: UISwitch!
    @IBOutlet private var collectionViewParticipants: UICollectionView!
现在创建这些视图,然后在 Main.storyboard 中将其链接起来。以下是将使用的视图结构:
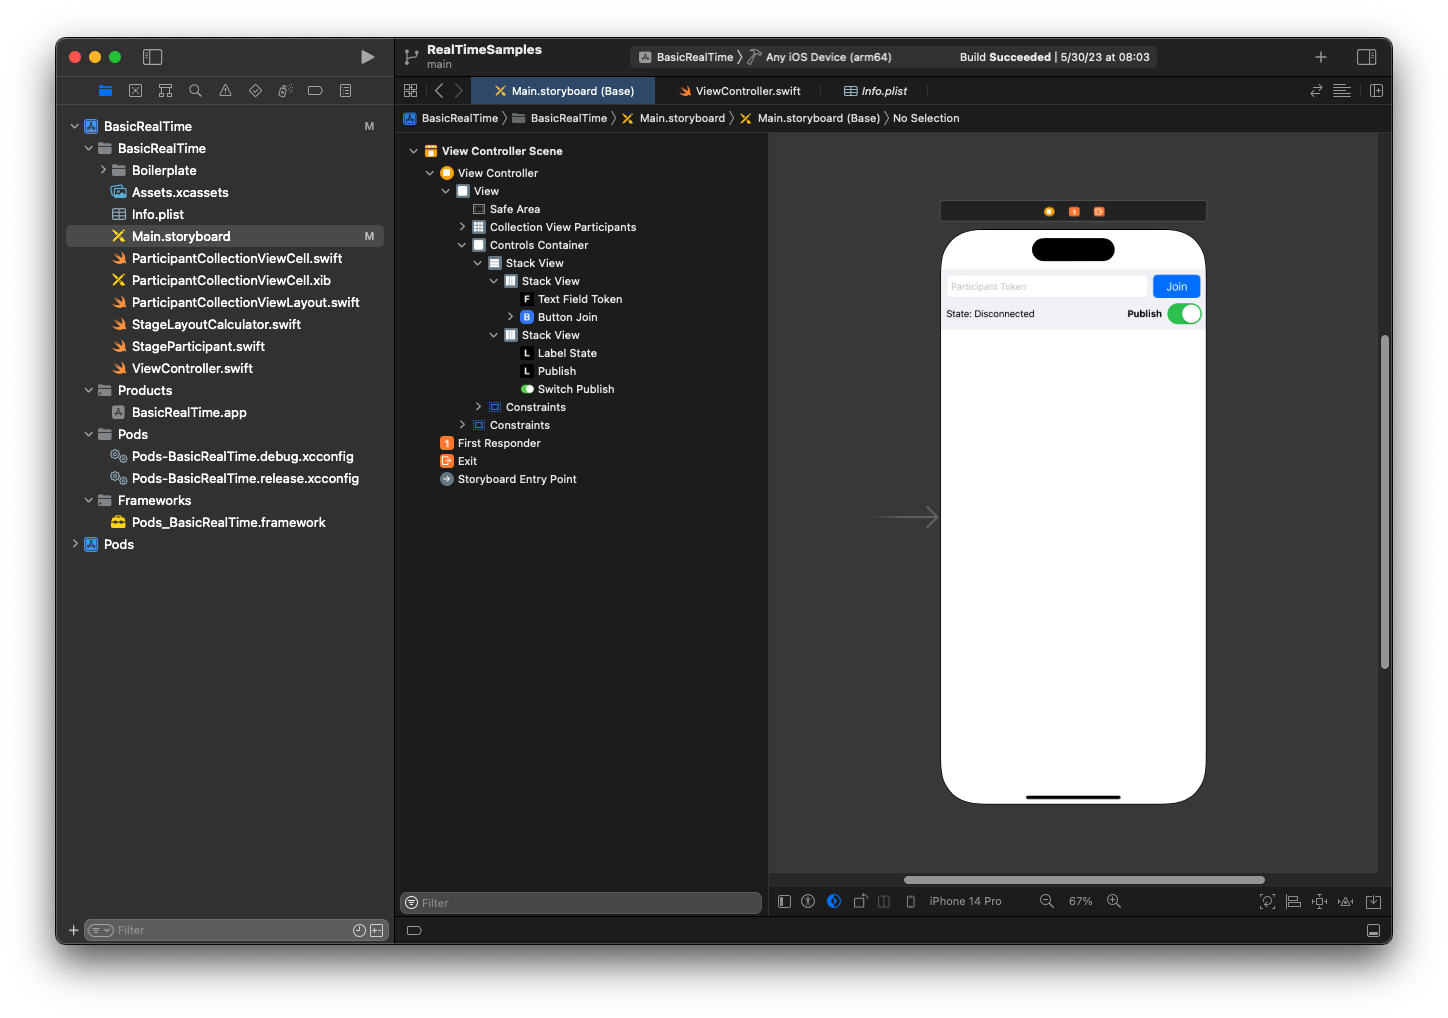
对于 AutoLayout 配置,需要自定义三个视图。第一个视图是集合视图参与者 (UICollectionView)。将开头、结尾和底部绑定到安全区域。同时将顶部绑定到控件容器。
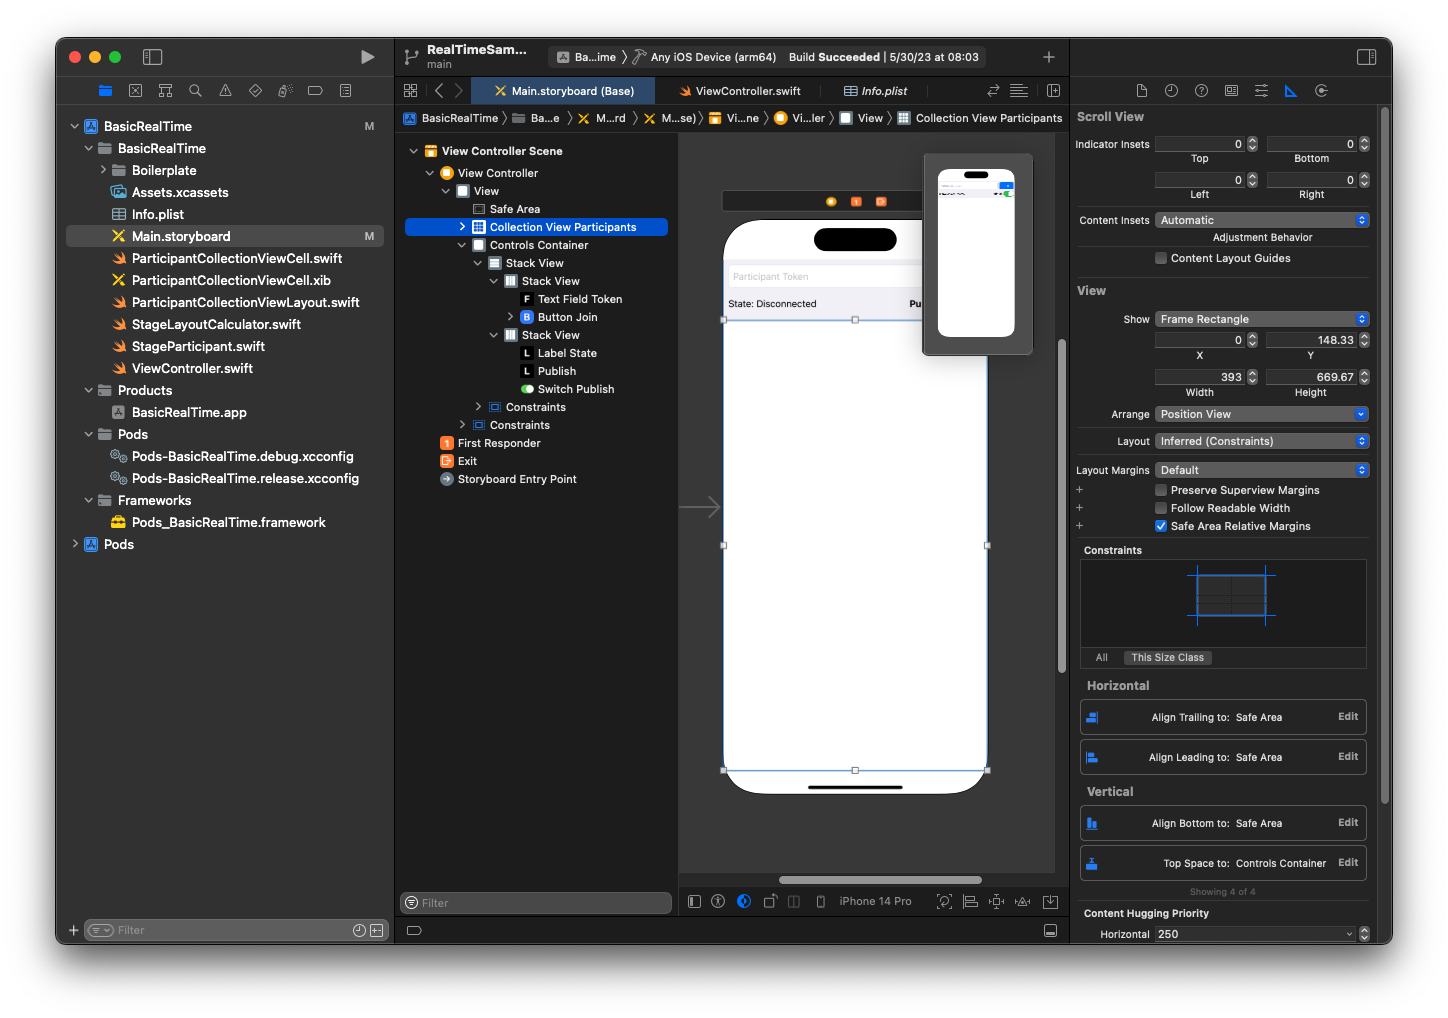
第二个视图是控件容器。将开头、结尾和顶部绑定到安全区域:
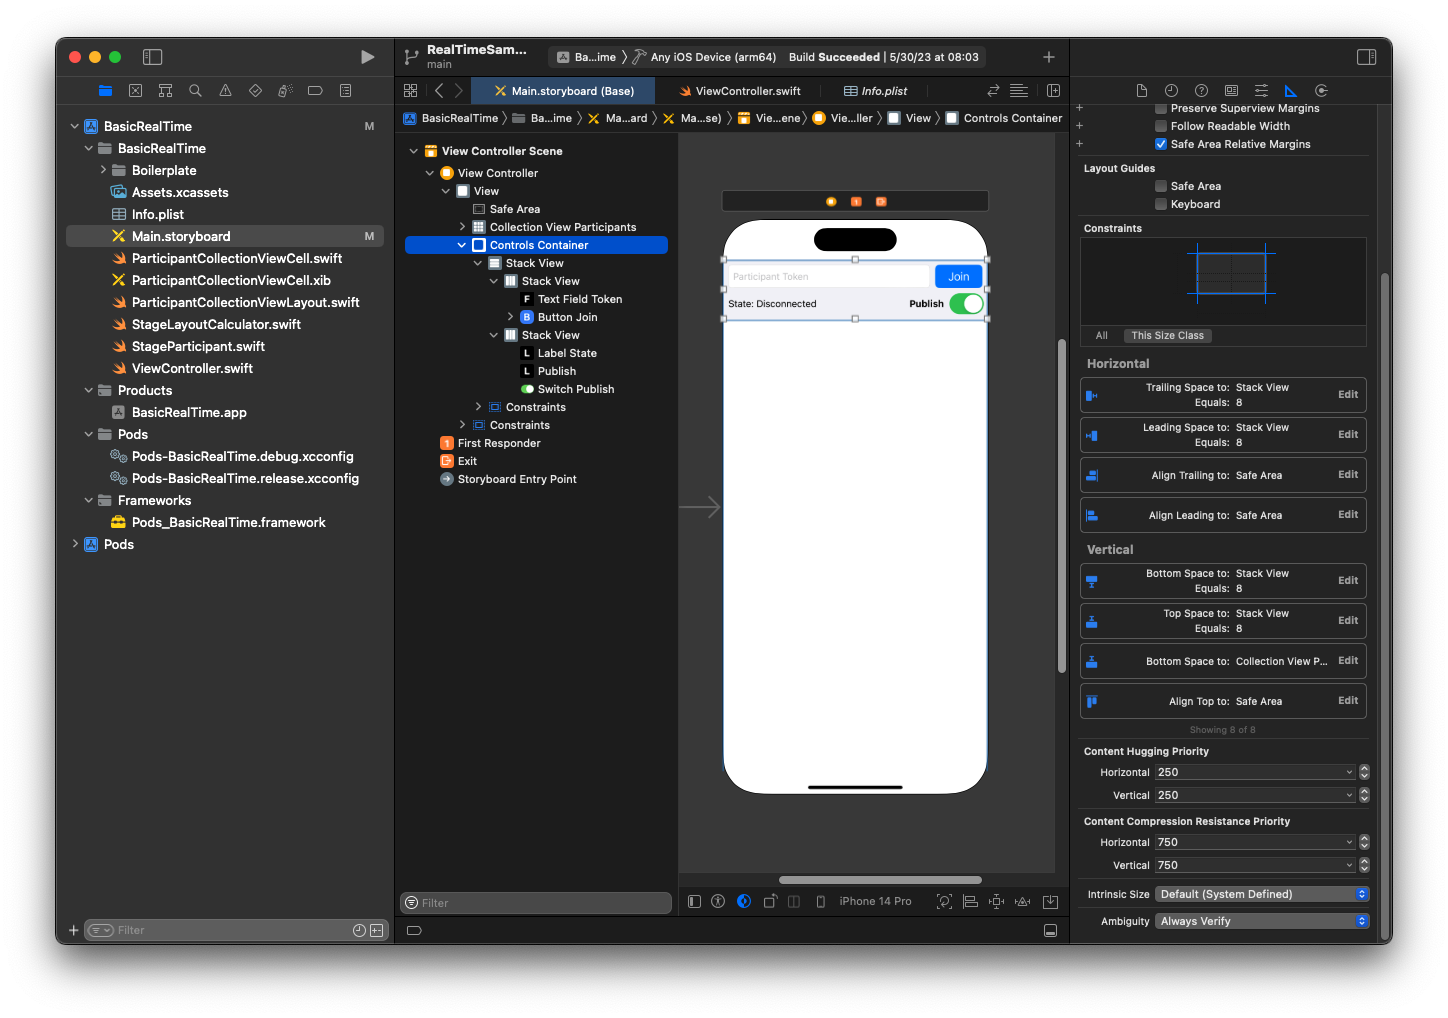
第三个也是最后一个视图是垂直堆栈视图。将顶部、开头、结尾和底部绑定到超级视图。对于样式,将间距设置为 8 而不是 0。
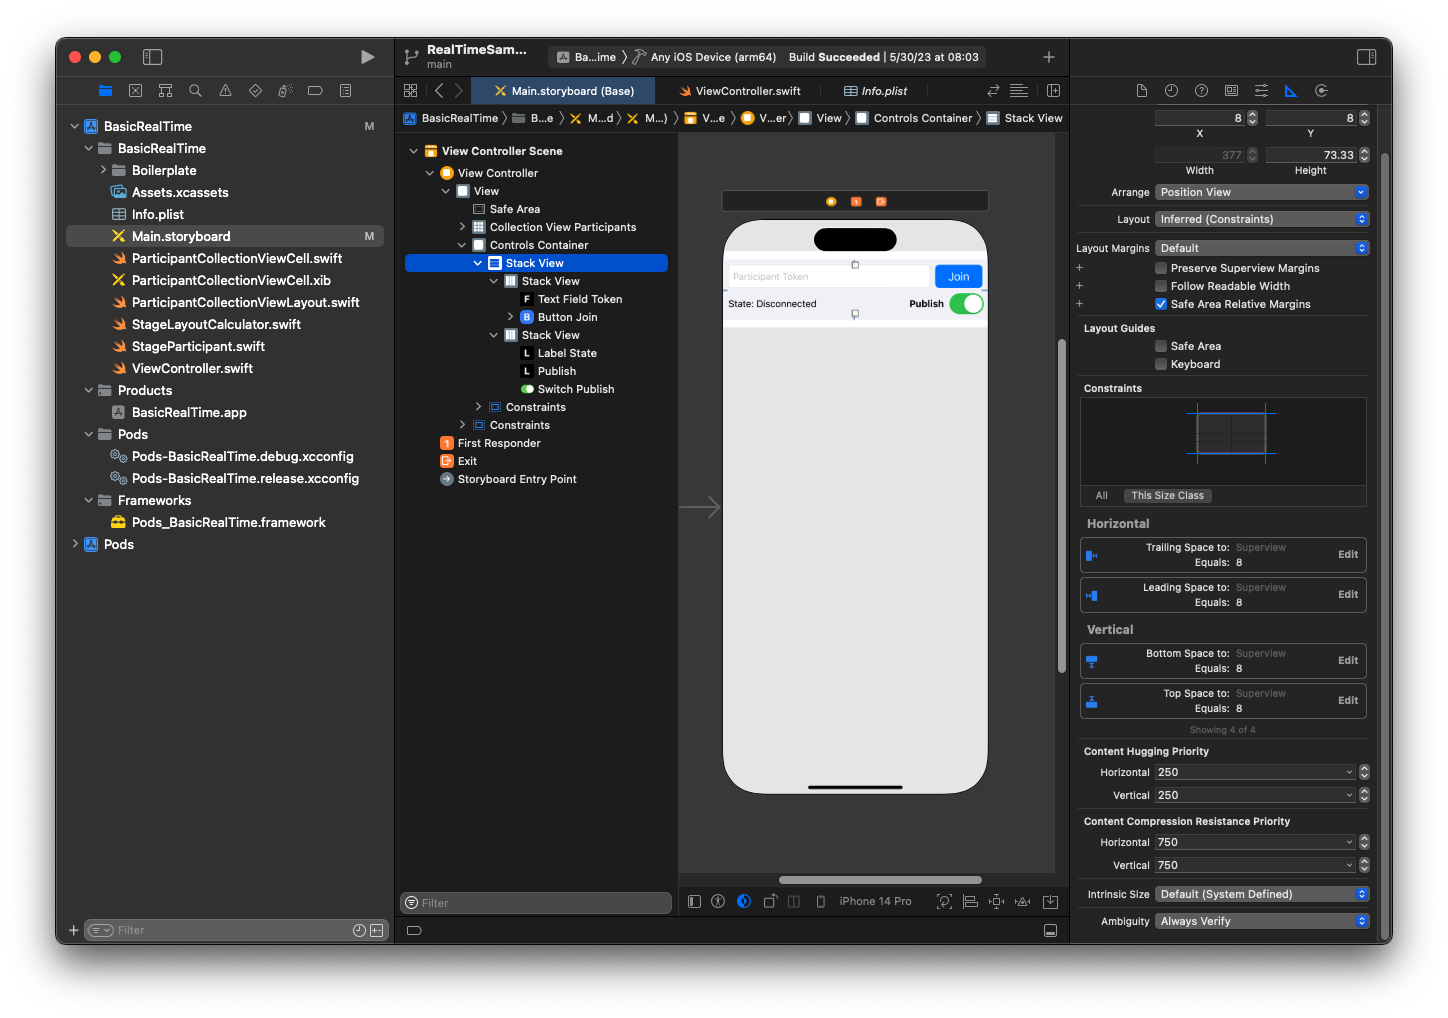
UIStackViews 将处理剩余视图的布局。对于所有三个 UIStackViews,使用填充作为对齐和分布。
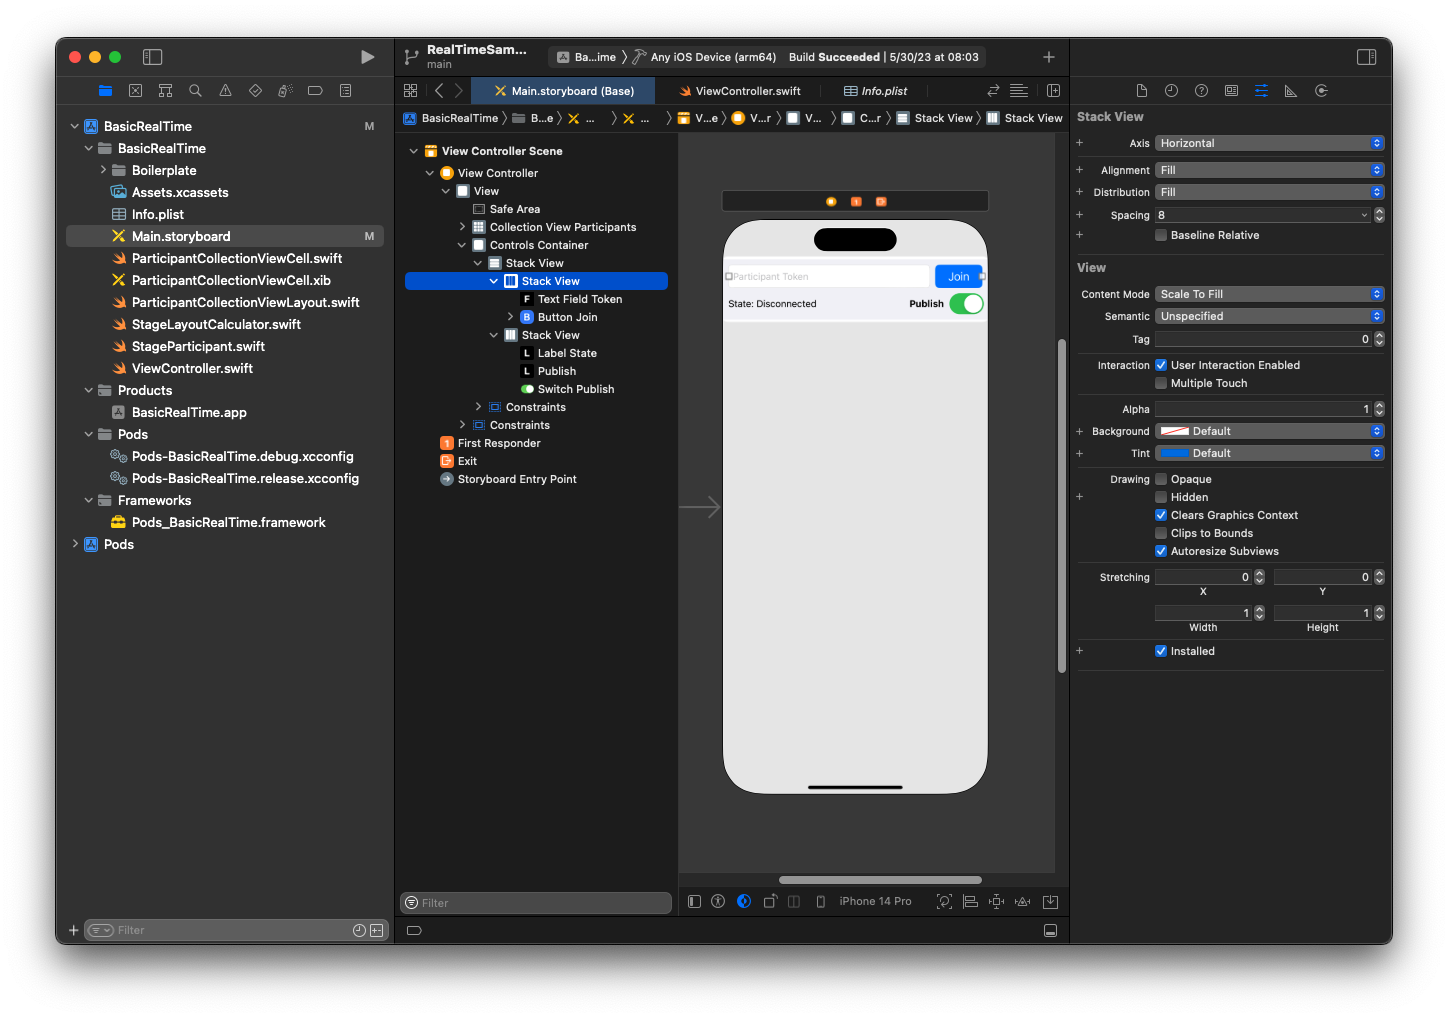
最后,将这些观点链接到 ViewController。从上面绘制以下视图:
-
将文本字段加入绑定到
textFieldToken。 -
将按钮加入绑定到
buttonJoin。 -
将标签状态绑定到
labelState。 -
将切换发布绑定到
switchPublish。 -
将集合视图参与者绑定到
collectionViewParticipants。
也可以利用这段时间将集合视图参与者项的 dataSource 设置为所属 ViewController:
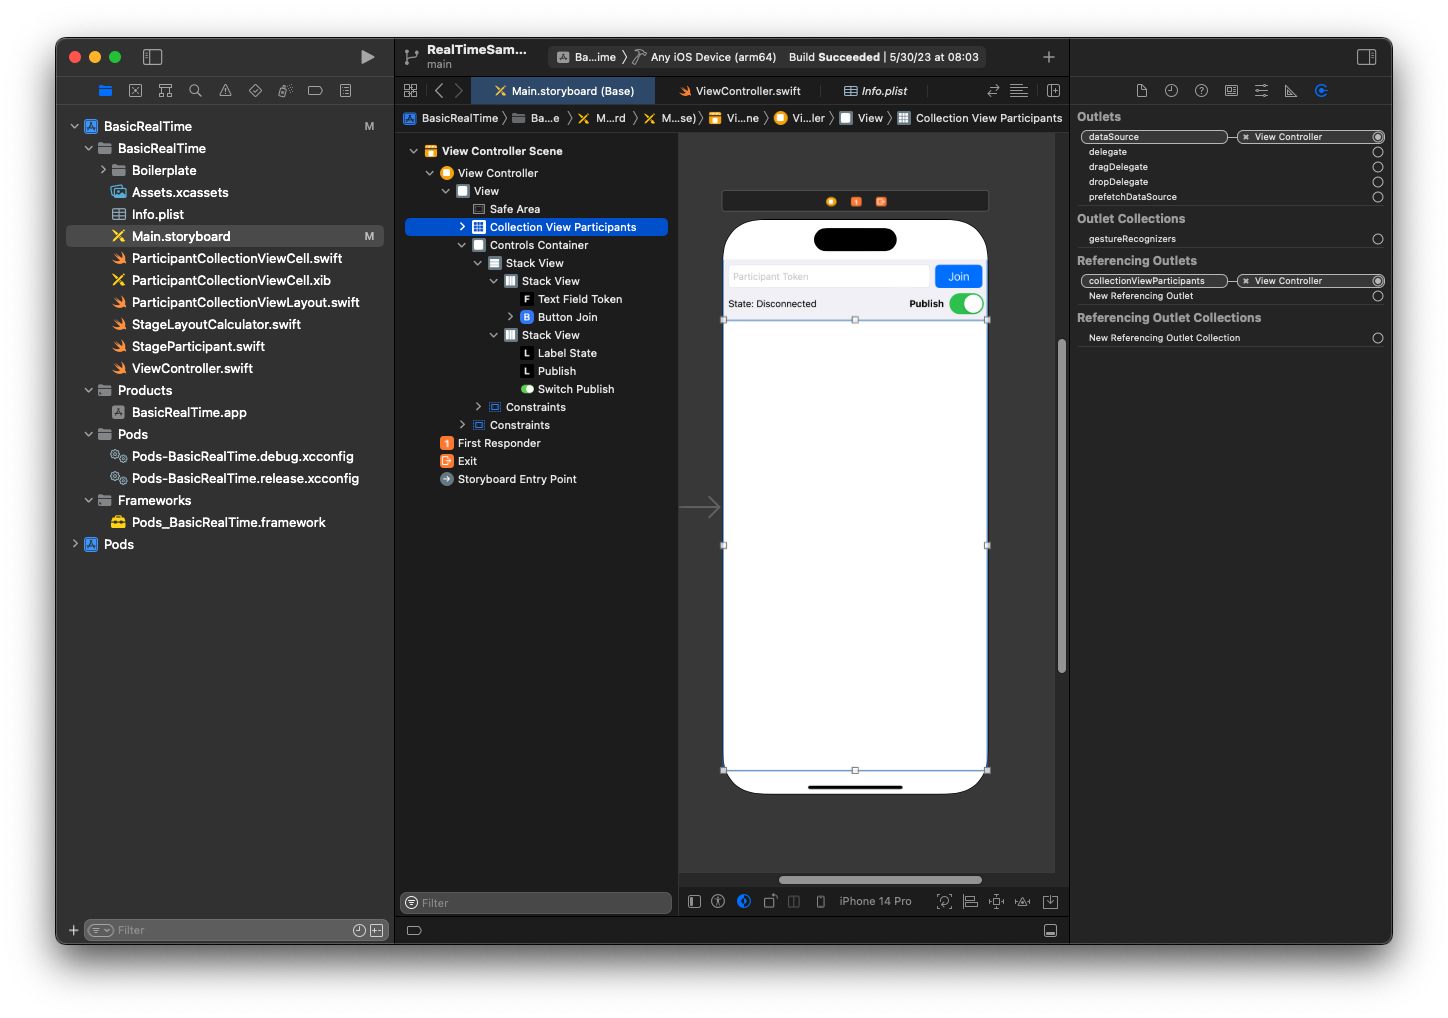
现在创建 UICollectionViewCell 子类以在其中渲染参与者。首先创建一个新的 Cocoa Touch 类文件:
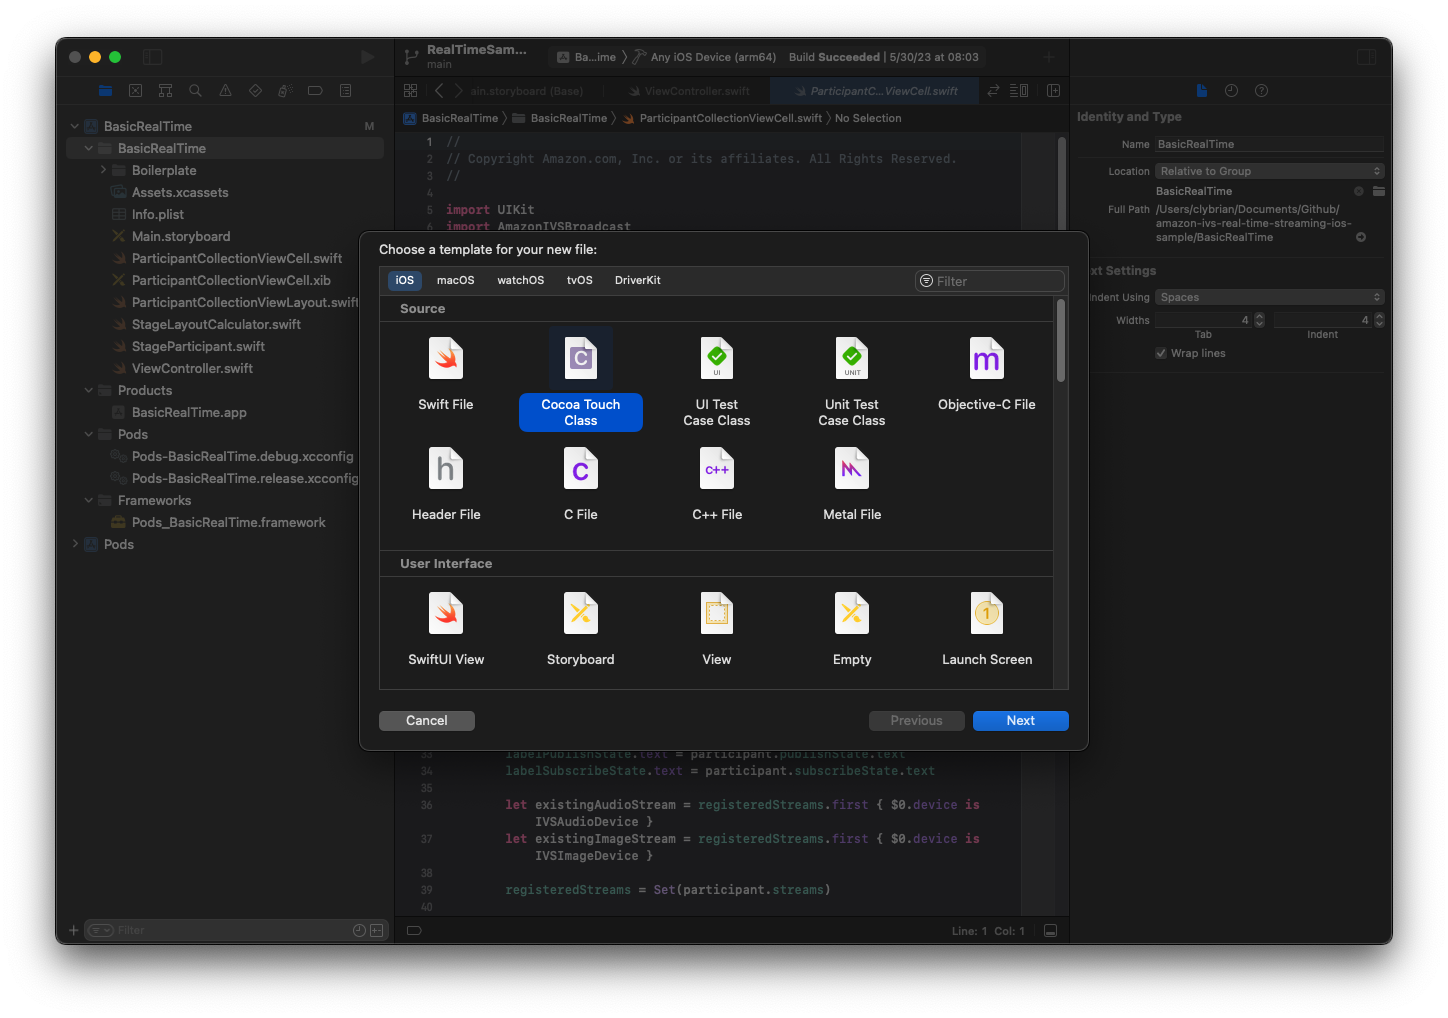
将其命名为 ParticipantUICollectionViewCell 并使其成为 Swift 中 UICollectionViewCell 的子类。再次从 Swift 文件开始,创建要链接的 @IBOutlets:
import AmazonIVSBroadcast

class ParticipantCollectionViewCell: UICollectionViewCell {

    @IBOutlet private var viewPreviewContainer: UIView!
    @IBOutlet private var labelParticipantId: UILabel!
    @IBOutlet private var labelSubscribeState: UILabel!
    @IBOutlet private var labelPublishState: UILabel!
    @IBOutlet private var labelVideoMuted: UILabel!
    @IBOutlet private var labelAudioMuted: UILabel!
    @IBOutlet private var labelAudioVolume: UILabel!
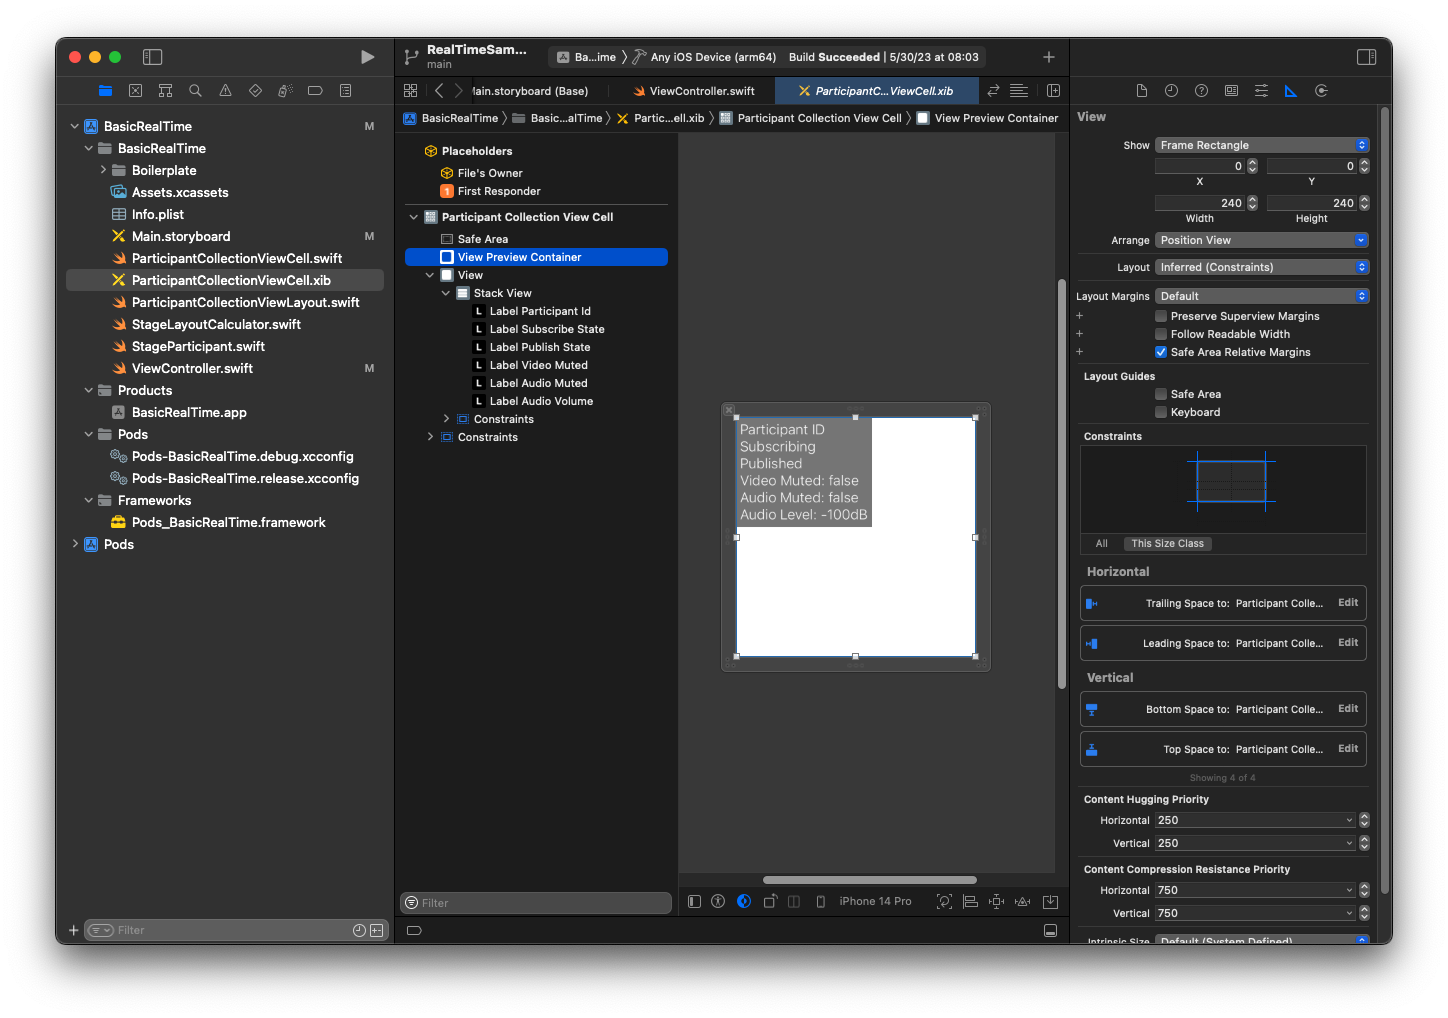
在关联的 XIB 文件中,创建此视图层次结构:
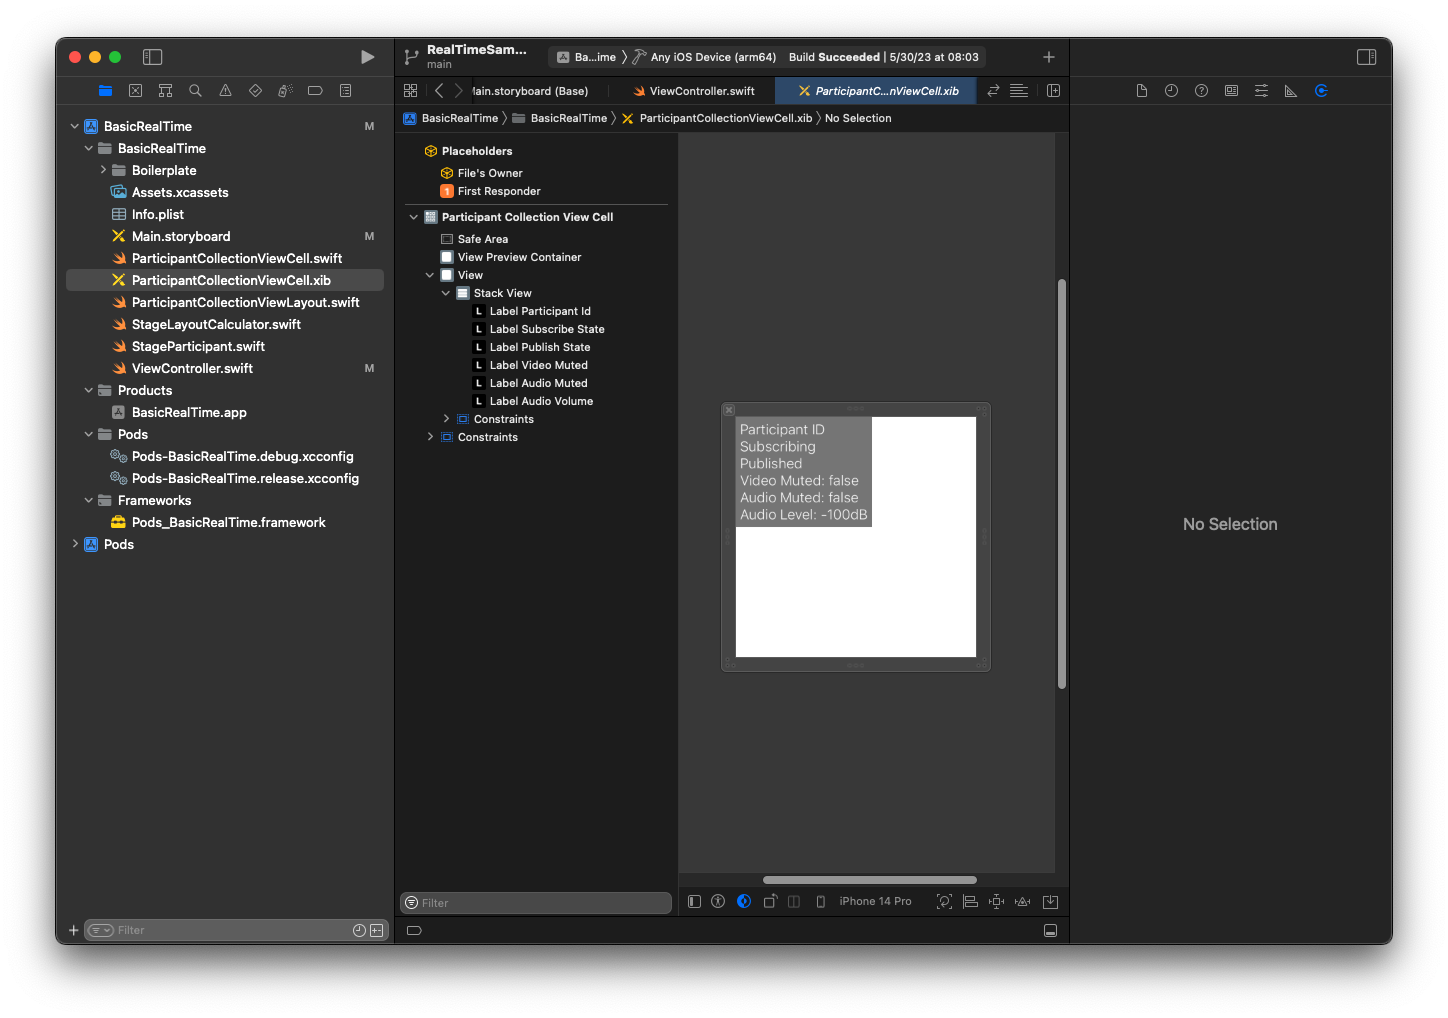
对于 AutoLayout,再次修改三个视图。第一个视图是视图预览容器。将结尾、开头、顶部和底部设置为参与者集合视图单元格。
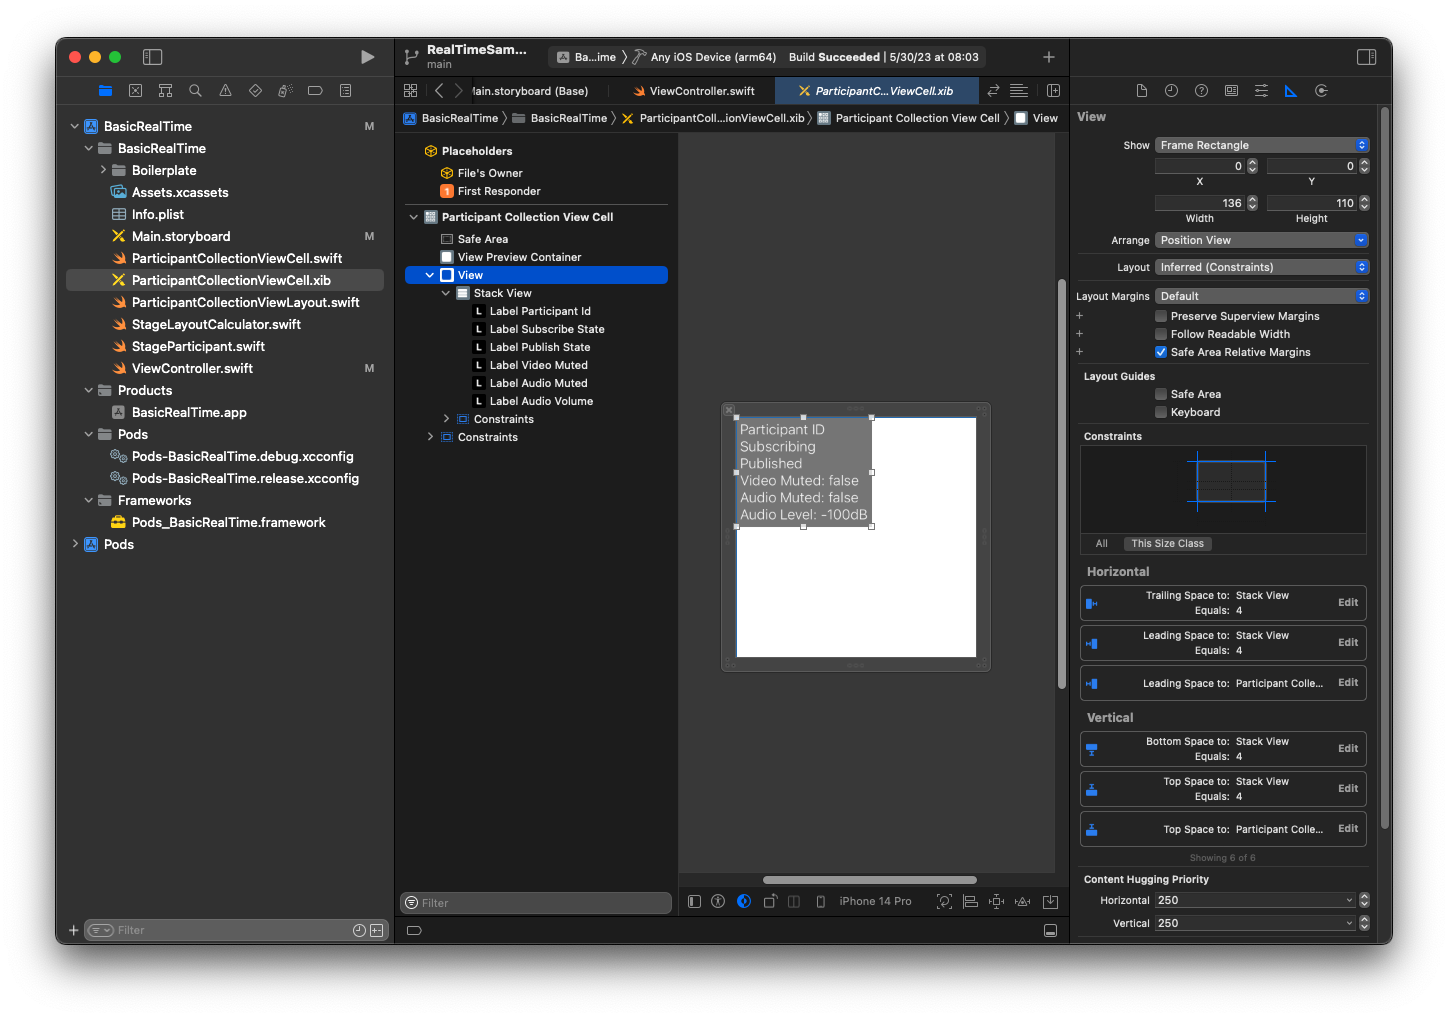
第二个视图是视图。将开头和顶部设置为参与者集合视图单元格并将值更改为 4。
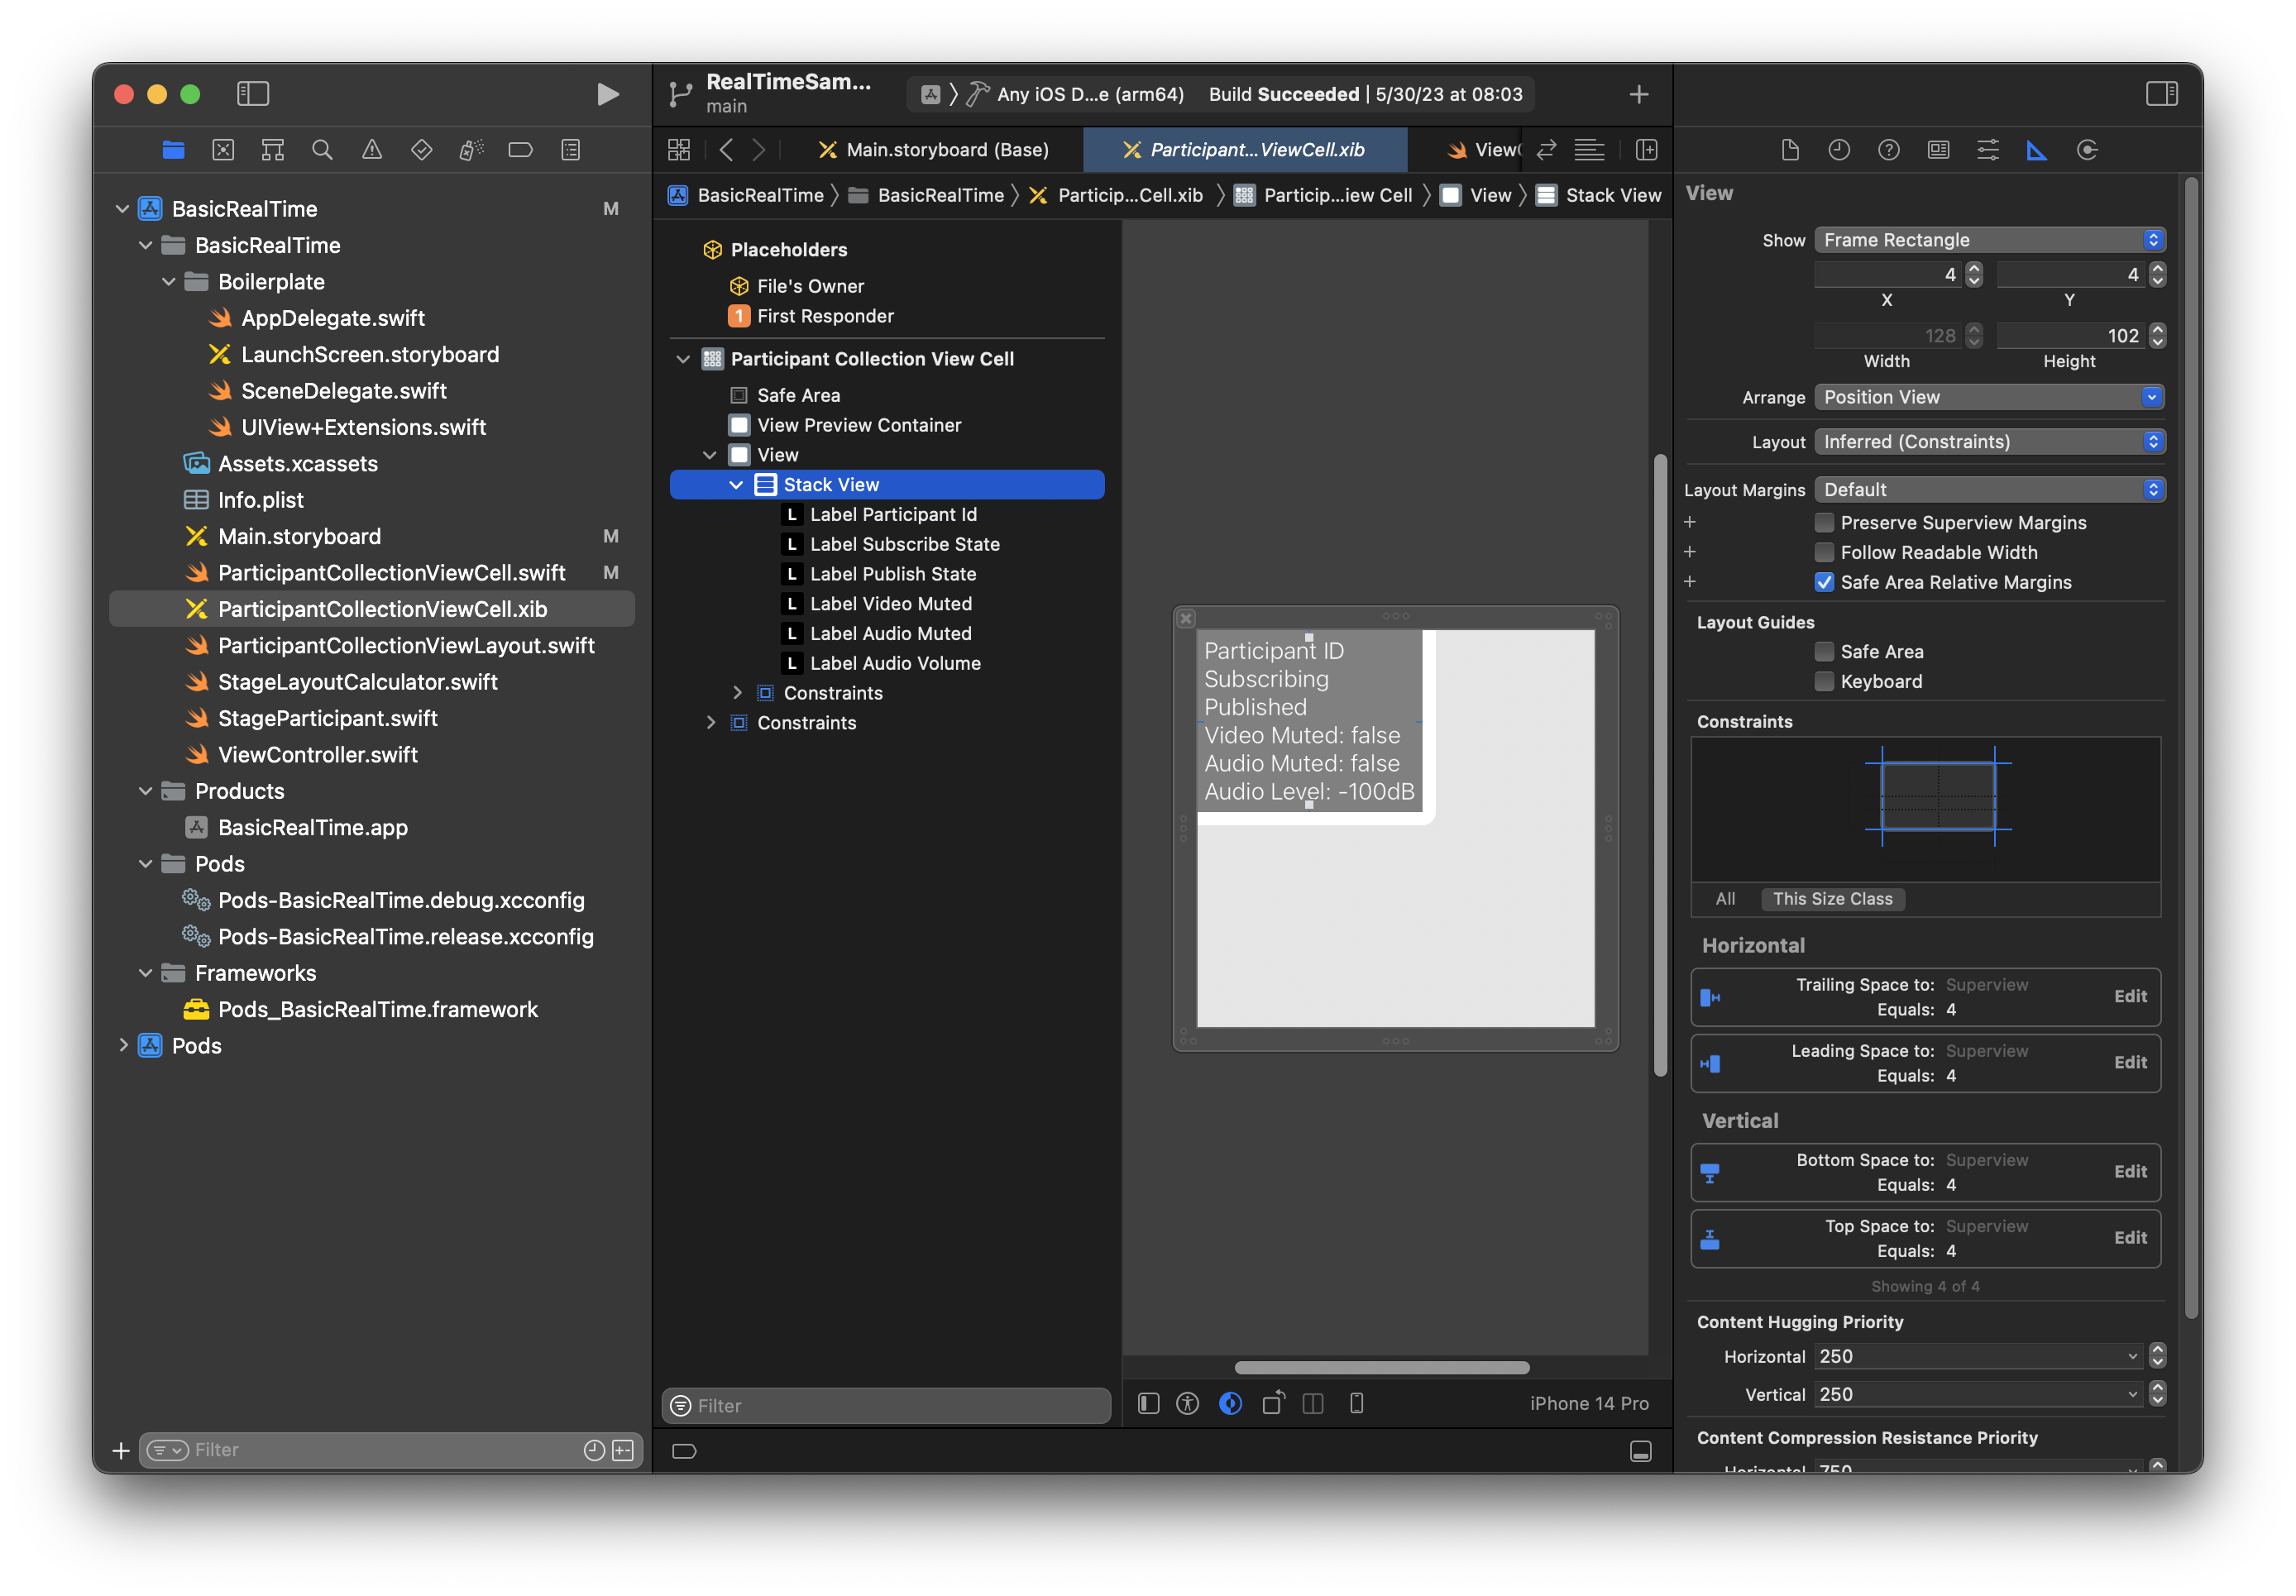
第三个视图是堆栈视图。将结尾、开头、顶部和底部设置为超级视图并将值更改为 4。
权限和空闲计时器
返回 ViewController,禁用系统空闲计时器,以防止设备在使用应用程序时进入睡眠状态:
override func viewDidAppear(_ animated: Bool) {
    super.viewDidAppear(animated)
    // Prevent the screen from turning off during a call.
    UIApplication.shared.isIdleTimerDisabled = true
}

override func viewDidDisappear(_ animated: Bool) {
    super.viewDidDisappear(animated)
    UIApplication.shared.isIdleTimerDisabled = false
}
接下来,向系统请求相机和麦克风权限:
private func checkPermissions() {
    checkOrGetPermission(for: .video) { [weak self] granted in
        guard granted else {
            print("Video permission denied")
            return
        }
        self?.checkOrGetPermission(for: .audio) { [weak self] granted in
            guard granted else {
                print("Audio permission denied")
                return
            }
            self?.setupLocalUser() // we will cover this later
        }
    }
}

private func checkOrGetPermission(for mediaType: AVMediaType, _ result: @escaping (Bool) -> Void) {
    func mainThreadResult(_ success: Bool) {
        DispatchQueue.main.async {
            result(success)
        }
    }
    switch AVCaptureDevice.authorizationStatus(for: mediaType) {
    case .authorized: mainThreadResult(true)
    case .notDetermined:
        AVCaptureDevice.requestAccess(for: mediaType) { granted in
            mainThreadResult(granted)
        }
    case .denied, .restricted: mainThreadResult(false)
    @unknown default: mainThreadResult(false)
    }
}
应用程序状态
需要使用之前创建的布局文件配置 collectionViewParticipants:
override func viewDidLoad() {
    super.viewDidLoad()
    // We render everything to exactly the frame, so don't allow scrolling.
    collectionViewParticipants.isScrollEnabled = false
    collectionViewParticipants.register(UINib(nibName: "ParticipantCollectionViewCell", bundle: .main), forCellWithReuseIdentifier: "ParticipantCollectionViewCell")
}
为了代表每个参与者,创建了一个名为 StageParticipant 的简单结构。这可以包含在 ViewController.swift 文件中,也可以创建一个新文件。
import Foundation
import AmazonIVSBroadcast

struct StageParticipant {
    let isLocal: Bool
    var participantId: String?
    var publishState: IVSParticipantPublishState = .notPublished
    var subscribeState: IVSParticipantSubscribeState = .notSubscribed
    var streams: [IVSStageStream] = []

    init(isLocal: Bool, participantId: String?) {
        self.isLocal = isLocal
        self.participantId = participantId
    }
}
为了追踪这些参与者,我们将他们的数组作为私有财产保留在 ViewController 中:
private var participants = [StageParticipant]()
此属性将用于为之前从故事情节链接的 UICollectionViewDataSource 提供支持:
extension ViewController: UICollectionViewDataSource {

    func collectionView(_ collectionView: UICollectionView, numberOfItemsInSection section: Int) -> Int {
        return participants.count
    }

    func collectionView(_ collectionView: UICollectionView, cellForItemAt indexPath: IndexPath) -> UICollectionViewCell {
        if let cell = collectionView.dequeueReusableCell(withReuseIdentifier: "ParticipantCollectionViewCell", for: indexPath) as? ParticipantCollectionViewCell {
            cell.set(participant: participants[indexPath.row])
            return cell
        } else {
            fatalError("Couldn't load custom cell type 'ParticipantCollectionViewCell'")
        }
    }

}
要在加入舞台之前查看自己的预览,立即创建本地参与者:
override func viewDidLoad() {
    /* existing UICollectionView code */
    participants.append(StageParticipant(isLocal: true, participantId: nil))
}
这会导致在应用程序运行后立即渲染代表本地参与者的参与者单元格。
用户希望在加入舞台之前能够看到自己,所以接下来要实施之前从权限处理代码中调用的 setupLocalUser() 方法。将相机和麦克风引用存储为 IVSLocalStageStream 对象。
private var streams = [IVSLocalStageStream]()
private let deviceDiscovery = IVSDeviceDiscovery()

private func setupLocalUser() {
    // Gather our camera and microphone once permissions have been granted
    let devices = deviceDiscovery.listLocalDevices()
    streams.removeAll()
    if let camera = devices.compactMap({ $0 as? IVSCamera }).first {
        streams.append(IVSLocalStageStream(device: camera))
        // Use a front camera if available.
        if let frontSource = camera.listAvailableInputSources().first(where: { $0.position == .front }) {
            camera.setPreferredInputSource(frontSource)
        }
    }
    if let mic = devices.compactMap({ $0 as? IVSMicrophone }).first {
        streams.append(IVSLocalStageStream(device: mic))
    }
    participants[0].streams = streams
    participantsChanged(index: 0, changeType: .updated)
}
在这里,通过 SDK 找到设备的相机和麦克风,并将它们存储在本地 streams 对象中,然后将第一个参与者(之前创建的本地参与者)的 streams 数组分配给 streams。最后使用 index 0 和 updated 的 changeType 调用 participantsChanged。此函数是一个帮助程序函数,用于使用精美的动画更新 UICollectionView。它看起来像这样:
private func participantsChanged(index: Int, changeType: ChangeType) {
    switch changeType {
    case .joined:
        collectionViewParticipants?.insertItems(at: [IndexPath(item: index, section: 0)])
    case .updated:
        // Instead of doing reloadItems, just grab the cell and update it ourselves. It saves a create/destroy of a cell
        // and more importantly fixes some UI flicker. We disable scrolling so the index path per cell
        // never changes.
        if let cell = collectionViewParticipants?.cellForItem(at: IndexPath(item: index, section: 0)) as? ParticipantCollectionViewCell {
            cell.set(participant: participants[index])
        }
    case .left:
        collectionViewParticipants?.deleteItems(at: [IndexPath(item: index, section: 0)])
    }
}
暂时不用担心 cell.set;稍后会讨论这个问题,但这就是我们将根据参与者渲染单元格内容的地方。
ChangeType 是简单的枚举:
enum ChangeType {
    case joined, updated, left
}
最后,要跟踪舞台是否已连接。我们使用简单的 bool 进行跟踪,其将在用户界面自行更新时自动更新。
private var connectingOrConnected = false {
    didSet {
        buttonJoin.setTitle(connectingOrConnected ? "Leave" : "Join", for: .normal)
        buttonJoin.tintColor = connectingOrConnected ? .systemRed : .systemBlue
    }
}
实施舞台 SDK
三个核心概念构成了实时功能的基础:舞台、策略和渲染器。设计目标是最大限度地减少构建有效产品所需的客户端逻辑量。
IVSStageStrategy
IVSStageStrategy 实施很简单:
extension ViewController: IVSStageStrategy {
    func stage(_ stage: IVSStage, streamsToPublishForParticipant participant: IVSParticipantInfo) -> [IVSLocalStageStream] {
        // Return the camera and microphone to be published.
        // This is only called if `shouldPublishParticipant` returns true.
        return streams
    }

    func stage(_ stage: IVSStage, shouldPublishParticipant participant: IVSParticipantInfo) -> Bool {
        // Our publish status is based directly on the UISwitch view
        return switchPublish.isOn
    }

    func stage(_ stage: IVSStage, shouldSubscribeToParticipant participant: IVSParticipantInfo) -> IVSStageSubscribeType {
        // Subscribe to both audio and video for all publishing participants.
        return .audioVideo
    }
}
总而言之,只有在发布开关处于“打开”位置时才会发布,如果要发布,将发布之前收集的流。最后,对于此示例,我们将始终订阅其他参与者并接收他们的音频和视频。
IVSStageRenderer
考虑到函数的数量,尽管 IVSStageRenderer 包含更多的代码,但是它实施起来也相当简单。此渲染器中的一般方法是,SDK 通知参与者发生更改时更新 participants 数组。在某些情况下,我们会以不同的方式处理本地参与者,因为我们决定自己管理这些参与者,这样他们就可以在加入舞台之前看到自己的相机预览。
extension ViewController: IVSStageRenderer {

    func stage(_ stage: IVSStage, didChange connectionState: IVSStageConnectionState, withError error: Error?) {
        labelState.text = connectionState.text
        connectingOrConnected = connectionState != .disconnected
    }

    func stage(_ stage: IVSStage, participantDidJoin participant: IVSParticipantInfo) {
        if participant.isLocal {
            // If this is the local participant joining the Stage, update the first participant in our array because we
            // manually added that participant when setting up our preview
            participants[0].participantId = participant.participantId
            participantsChanged(index: 0, changeType: .updated)
        } else {
            // If they are not local, add them to the array as a newly joined participant.
            participants.append(StageParticipant(isLocal: false, participantId: participant.participantId))
            participantsChanged(index: (participants.count - 1), changeType: .joined)
        }
    }

    func stage(_ stage: IVSStage, participantDidLeave participant: IVSParticipantInfo) {
        if participant.isLocal {
            // If this is the local participant leaving the Stage, update the first participant in our array because
            // we want to keep the camera preview active
            participants[0].participantId = nil
            participantsChanged(index: 0, changeType: .updated)
        } else {
            // If they are not local, find their index and remove them from the array.
            if let index = participants.firstIndex(where: { $0.participantId == participant.participantId }) {
                participants.remove(at: index)
                participantsChanged(index: index, changeType: .left)
            }
        }
    }

    func stage(_ stage: IVSStage, participant: IVSParticipantInfo, didChange publishState: IVSParticipantPublishState) {
        // Update the publishing state of this participant
        mutatingParticipant(participant.participantId) { data in
            data.publishState = publishState
        }
    }

    func stage(_ stage: IVSStage, participant: IVSParticipantInfo, didChange subscribeState: IVSParticipantSubscribeState) {
        // Update the subscribe state of this participant
        mutatingParticipant(participant.participantId) { data in
            data.subscribeState = subscribeState
        }
    }

    func stage(_ stage: IVSStage, participant: IVSParticipantInfo, didChangeMutedStreams streams: [IVSStageStream]) {
        // We don't want to take any action for the local participant because we track those streams locally
        if participant.isLocal { return }
        // For remote participants, notify the UICollectionView that they have updated. There is no need to modify
        // the `streams` property on the `StageParticipant` because it is the same `IVSStageStream` instance. Just
        // query the `isMuted` property again.
        if let index = participants.firstIndex(where: { $0.participantId == participant.participantId }) {
            participantsChanged(index: index, changeType: .updated)
        }
    }

    func stage(_ stage: IVSStage, participant: IVSParticipantInfo, didAdd streams: [IVSStageStream]) {
        // We don't want to take any action for the local participant because we track those streams locally
        if participant.isLocal { return }
        // For remote participants, add these new streams to that participant's streams array.
        mutatingParticipant(participant.participantId) { data in
            data.streams.append(contentsOf: streams)
        }
    }

    func stage(_ stage: IVSStage, participant: IVSParticipantInfo, didRemove streams: [IVSStageStream]) {
        // We don't want to take any action for the local participant because we track those streams locally
        if participant.isLocal { return }
        // For remote participants, remove these streams from that participant's streams array.
        mutatingParticipant(participant.participantId) { data in
            let oldUrns = streams.map { $0.device.descriptor().urn }
            data.streams.removeAll(where: { stream in
                return oldUrns.contains(stream.device.descriptor().urn)
            })
        }
    }

    // A helper function to find a participant by its ID, mutate that participant, and then update the UICollectionView accordingly.
    private func mutatingParticipant(_ participantId: String?, modifier: (inout StageParticipant) -> Void) {
        guard let index = participants.firstIndex(where: { $0.participantId == participantId }) else {
            fatalError("Something is out of sync, investigate if this was a sample app or SDK issue.")
        }

        var participant = participants[index]
        modifier(&participant)
        participants[index] = participant
        participantsChanged(index: index, changeType: .updated)
    }
}
此代码使用扩展将连接状态转换为用户友好文本:
extension IVSStageConnectionState {
    var text: String {
        switch self {
        case .disconnected: return "Disconnected"
        case .connecting: return "Connecting"
        case .connected: return "Connected"
        @unknown default: fatalError()
        }
    }
}
实施自定义 UICollectionViewLayout
安排不同数量的参与者可能很复杂。您希望参与者占据整个父视图的框架,但是不想单独处理每个参与者配置。为了简单起见,将逐步实施 UICollectionViewLayout。
创建另一个新文件 ParticipantCollectionViewLayout.swift,它应该扩展 UICollectionViewLayout。此类将使用另一个名为 StageLayoutCalculator 的类,我们很快就会介绍它。类接收每个参与者的计算框架值,然后生成必要的 UICollectionViewLayoutAttributes 对象。
import Foundation
import UIKit

/**
 Code modified from https://developer.apple.com/documentation/uikit/views_and_controls/collection_views/layouts/customizing_collection_view_layouts?language=objc
 */
class ParticipantCollectionViewLayout: UICollectionViewLayout {

    private let layoutCalculator = StageLayoutCalculator()

    private var contentBounds = CGRect.zero
    private var cachedAttributes = [UICollectionViewLayoutAttributes]()

    override func prepare() {
        super.prepare()

        guard let collectionView = collectionView else { return }

        cachedAttributes.removeAll()
        contentBounds = CGRect(origin: .zero, size: collectionView.bounds.size)

        layoutCalculator.calculateFrames(participantCount: collectionView.numberOfItems(inSection: 0),
                                         width: collectionView.bounds.size.width,
                                         height: collectionView.bounds.size.height,
                                         padding: 4)
        .enumerated()
        .forEach { (index, frame) in
            let attributes = UICollectionViewLayoutAttributes(forCellWith: IndexPath(item: index, section: 0))
            attributes.frame = frame
            cachedAttributes.append(attributes)
            contentBounds = contentBounds.union(frame)
        }
    }

    override var collectionViewContentSize: CGSize {
        return contentBounds.size
    }

    override func shouldInvalidateLayout(forBoundsChange newBounds: CGRect) -> Bool {
        guard let collectionView = collectionView else { return false }
        return !newBounds.size.equalTo(collectionView.bounds.size)
    }

    override func layoutAttributesForItem(at indexPath: IndexPath) -> UICollectionViewLayoutAttributes? {
        return cachedAttributes[indexPath.item]
    }

    override func layoutAttributesForElements(in rect: CGRect) -> [UICollectionViewLayoutAttributes]? {
        var attributesArray = [UICollectionViewLayoutAttributes]()

        // Find any cell that sits within the query rect.
        guard let lastIndex = cachedAttributes.indices.last, let firstMatchIndex = binSearch(rect, start: 0, end: lastIndex) else {
            return attributesArray
        }

        // Starting from the match, loop up and down through the array until all the attributes
        // have been added within the query rect.
        for attributes in cachedAttributes[..<firstMatchIndex].reversed() {
            guard attributes.frame.maxY >= rect.minY else { break }
            attributesArray.append(attributes)
        }

        for attributes in cachedAttributes[firstMatchIndex...] {
            guard attributes.frame.minY <= rect.maxY else { break }
            attributesArray.append(attributes)
        }

        return attributesArray
    }

    // Perform a binary search on the cached attributes array.
    func binSearch(_ rect: CGRect, start: Int, end: Int) -> Int? {
        if end < start { return nil }

        let mid = (start + end) / 2
        let attr = cachedAttributes[mid]

        if attr.frame.intersects(rect) {
            return mid
        } else {
            if attr.frame.maxY < rect.minY {
                return binSearch(rect, start: (mid + 1), end: end)
            } else {
                return binSearch(rect, start: start, end: (mid - 1))
            }
        }
    }
}
更重要的是 StageLayoutCalculator.swift 类。此类旨在根据基于流的行/列布局中的参与者数量计算每个参与者的框架。每行的高度与其他行相同,但每行列的宽度各不相同。有关如何自定义该行为的说明,请参阅 layouts 变量上方的代码注释。
import Foundation
import UIKit

class StageLayoutCalculator {

    /// This 2D array contains the description of how the grid of participants should be rendered
    /// The index of the 1st dimension is the number of participants needed to active that configuration
    /// Meaning if there is 1 participant, index 0 will be used. If there are 5 participants, index 4 will be used.
    ///
    /// The 2nd dimension is a description of the layout. The length of the array is the number of rows that
    /// will exist, and then each number within that array is the number of columns in each row.
    ///
    /// See the code comments next to each index for concrete examples.
    ///
    /// This can be customized to fit any layout configuration needed.
    private let layouts: [[Int]] = [
        // 1 participant
        [ 1 ], // 1 row, full width
        // 2 participants
        [ 1, 1 ], // 2 rows, all columns are full width
        // 3 participants
        [ 1, 2 ], // 2 rows, first row's column is full width then 2nd row's columns are 1/2 width
        // 4 participants
        [ 2, 2 ], // 2 rows, all columns are 1/2 width
        // 5 participants
        [ 1, 2, 2 ], // 3 rows, first row's column is full width, 2nd and 3rd row's columns are 1/2 width
        // 6 participants
        [ 2, 2, 2 ], // 3 rows, all column are 1/2 width
        // 7 participants
        [ 2, 2, 3 ], // 3 rows, 1st and 2nd row's columns are 1/2 width, 3rd row's columns are 1/3rd width
        // 8 participants
        [ 2, 3, 3 ],
        // 9 participants
        [ 3, 3, 3 ],
        // 10 participants
        [ 2, 3, 2, 3 ],
        // 11 participants
        [ 2, 3, 3, 3 ],
        // 12 participants
        [ 3, 3, 3, 3 ],
    ]

    // Given a frame (this could be for a UICollectionView, or a Broadcast Mixer's canvas), calculate the frames for each
    // participant, with optional padding.
    func calculateFrames(participantCount: Int, width: CGFloat, height: CGFloat, padding: CGFloat) -> [CGRect] {
        if participantCount > layouts.count {
            fatalError("Only \(layouts.count) participants are supported at this time")
        }
        if participantCount == 0 {
            return []
        }
        var currentIndex = 0
        var lastFrame: CGRect = .zero

        // If the height is less than the width, the rows and columns will be flipped.
        // Meaning for 6 participants, there will be 2 rows of 3 columns each.
        let isVertical = height > width

        let halfPadding = padding / 2.0

        let layout = layouts[participantCount - 1] // 1 participant is in index 0, so `-1`.
        let rowHeight = (isVertical ? height : width) / CGFloat(layout.count)

        var frames = [CGRect]()
        for row in 0 ..< layout.count {
            // layout[row] is the number of columns in a layout
            let itemWidth = (isVertical ? width : height) / CGFloat(layout[row])
            let segmentFrame = CGRect(x: (isVertical ? 0 : lastFrame.maxX) + halfPadding,
                                      y: (isVertical ? lastFrame.maxY : 0) + halfPadding,
                                      width: (isVertical ? itemWidth : rowHeight) - padding,
                                      height: (isVertical ? rowHeight : itemWidth) - padding)

            for column in 0 ..< layout[row] {
                var frame = segmentFrame
                if isVertical {
                    frame.origin.x = (itemWidth * CGFloat(column)) + halfPadding
                } else {
                    frame.origin.y = (itemWidth * CGFloat(column)) + halfPadding
                }
                frames.append(frame)
                currentIndex += 1
            }

            lastFrame = segmentFrame
            lastFrame.origin.x += halfPadding
            lastFrame.origin.y += halfPadding
        }
        return frames
    }

}
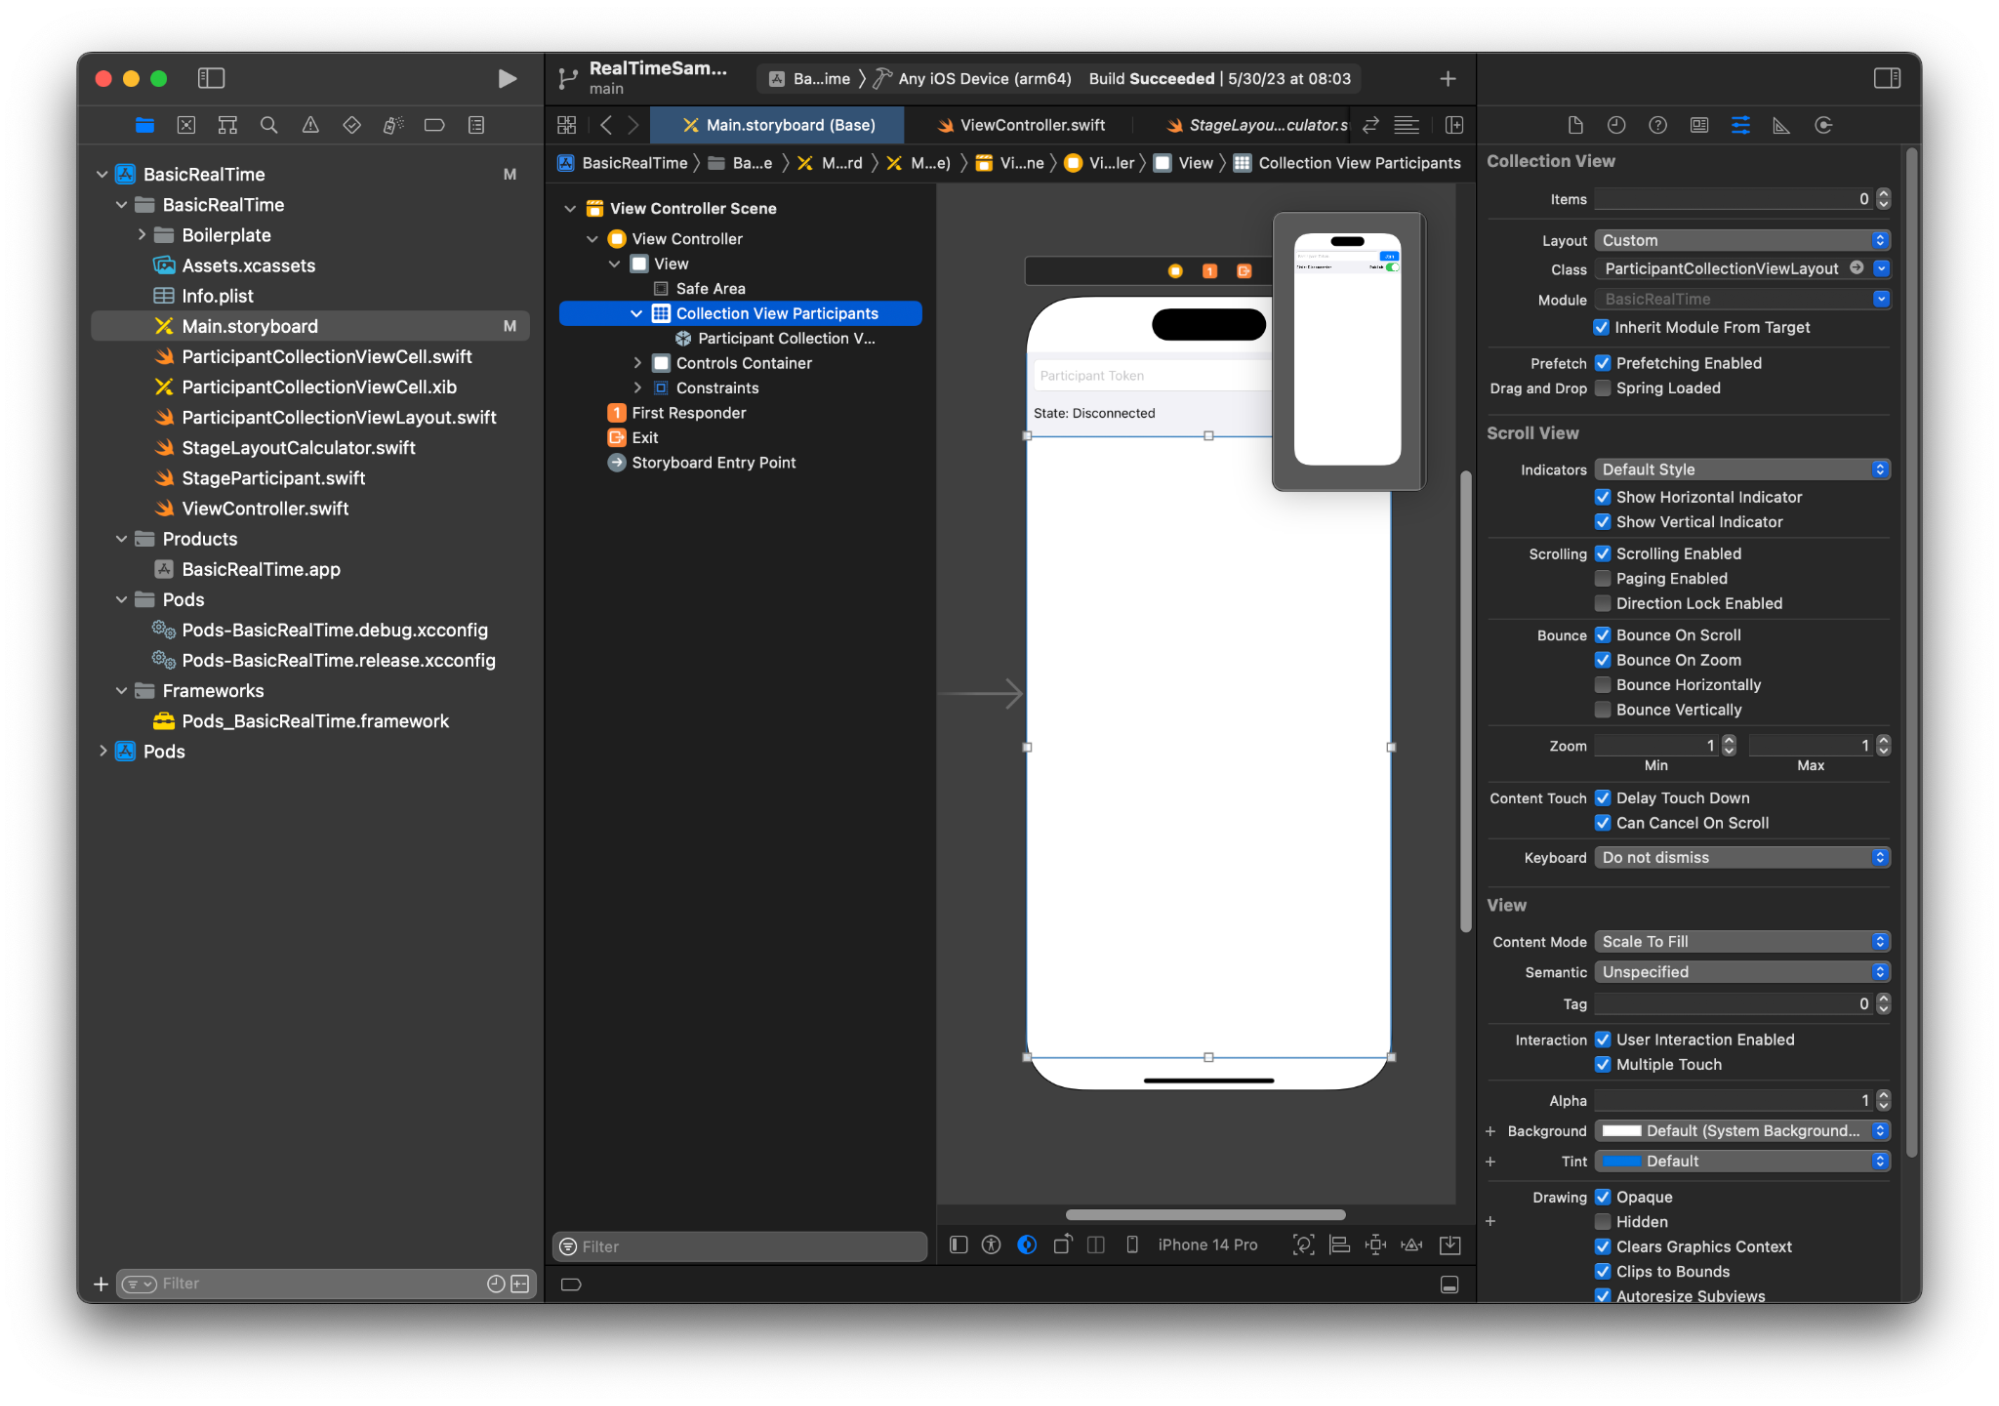
返回 Main.storyboard,确保将 UICollectionView 的布局类设置为刚刚创建的类:
挂接 UI 操作
即将完成所有操作,还需要创建几个 IBActions。
首先处理加入按钮。它根据 connectingOrConnected 的值做出不同响应。已连接时,它就会离开舞台。如果断开连接,它会从令牌 UITextField 中读取文本,并使用此 IVSStage 文本创建一个新文本。然后,添加 ViewController 作为 strategy、errorDelegate 和 IVSStage 的渲染器,最后异步加入舞台。
@IBAction private func joinTapped(_ sender: UIButton) {
    if connectingOrConnected {
        // If we're already connected to a Stage, leave it.
        stage?.leave()
    } else {
        guard let token = textFieldToken.text else {
            print("No token")
            return
        }
        // Hide the keyboard after tapping Join
        textFieldToken.resignFirstResponder()
        do {
            // Destroy the old Stage first before creating a new one.
            self.stage = nil
            let stage = try IVSStage(token: token, strategy: self)
            stage.errorDelegate = self
            stage.addRenderer(self)
            try stage.join()
            self.stage = stage
        } catch {
            print("Failed to join stage - \(error)")
        }
    }
}
需要挂接的另一个 UI 操作是发布开关:
@IBAction private func publishToggled(_ sender: UISwitch) {
    // Because the strategy returns the value of `switchPublish.isOn`, just call `refreshStrategy`.
    stage?.refreshStrategy()
}
渲染参与者
最后,需要将从 SDK 收到的数据渲染到之前创建的参与者单元格上。我们已经完成了 UICollectionView 逻辑,所以只需要在 ParticipantCollectionViewCell.swift 中实施 set API。
首先添加 empty 函数,然后逐步进行操作:
func set(participant: StageParticipant) {

}
首先,处理简易状态、参与者 ID、发布状态和订阅状态。对于这些,直接更新 UILabels:
labelParticipantId.text = participant.isLocal ? "You (\(participant.participantId ?? "Disconnected"))" : participant.participantId
labelPublishState.text = participant.publishState.text
labelSubscribeState.text = participant.subscribeState.text
发布和订阅枚举的文本属性来自本地扩展:
extension IVSParticipantPublishState {
    var text: String {
        switch self {
        case .notPublished: return "Not Published"
        case .attemptingPublish: return "Attempting to Publish"
        case .published: return "Published"
        @unknown default: fatalError()
        }
    }
}

extension IVSParticipantSubscribeState {
    var text: String {
        switch self {
        case .notSubscribed: return "Not Subscribed"
        case .attemptingSubscribe: return "Attempting to Subscribe"
        case .subscribed: return "Subscribed"
        @unknown default: fatalError()
        }
    }
}
接下来,更新音频和视频的静音状态。要进入静音状态,需要找到来自 streams 数组的 IVSImageDevice 和 IVSAudioDevice。要优化性能,需要记住最后连接的设备。
// This belongs outside `set(participant:)`
private var registeredStreams: Set<IVSStageStream> = []
private var imageDevice: IVSImageDevice? {
    return registeredStreams.lazy.compactMap { $0.device as? IVSImageDevice }.first
}
private var audioDevice: IVSAudioDevice? {
    return registeredStreams.lazy.compactMap { $0.device as? IVSAudioDevice }.first
}

// This belongs inside `set(participant:)`
let existingAudioStream = registeredStreams.first { $0.device is IVSAudioDevice }
let existingImageStream = registeredStreams.first { $0.device is IVSImageDevice }

registeredStreams = Set(participant.streams)

let newAudioStream = participant.streams.first { $0.device is IVSAudioDevice }
let newImageStream = participant.streams.first { $0.device is IVSImageDevice }

// `isMuted != false` covers the stream not existing, as well as being muted.
labelVideoMuted.text = "Video Muted: \(newImageStream?.isMuted != false)"
labelAudioMuted.text = "Audio Muted: \(newAudioStream?.isMuted != false)"
最后,要渲染 imageDevice 的预览并显示 audioDevice 的音频统计数据:
if existingImageStream !== newImageStream {
    // The image stream has changed
    updatePreview() // We’ll cover this next
}

if existingAudioStream !== newAudioStream {
    (existingAudioStream?.device as? IVSAudioDevice)?.setStatsCallback(nil)
    audioDevice?.setStatsCallback( { [weak self] stats in
        self?.labelAudioVolume.text = String(format: "Audio Level: %.0f dB", stats.rms)
    })
    // When the audio stream changes, it will take some time to receive new stats. Reset the value temporarily.
    self.labelAudioVolume.text = "Audio Level: -100 dB"
}
要创建的最后一个函数是 updatePreview(),它将参与者的预览添加到视图中:
private func updatePreview() {
    // Remove any old previews from the preview container
    viewPreviewContainer.subviews.forEach { $0.removeFromSuperview() }
    if let imageDevice = self.imageDevice {
        if let preview = try? imageDevice.previewView(with: .fit) {
            viewPreviewContainer.addSubviewMatchFrame(preview)
        }
    }
}
上面的步骤在 UIView 上使用了帮助程序函数来让嵌入子视图变得更易于操作:
extension UIView {
    func addSubviewMatchFrame(_ view: UIView) {
        view.translatesAutoresizingMaskIntoConstraints = false
        self.addSubview(view)
        NSLayoutConstraint.activate([
            view.topAnchor.constraint(equalTo: self.topAnchor, constant: 0),
            view.bottomAnchor.constraint(equalTo: self.bottomAnchor, constant: 0),
            view.leadingAnchor.constraint(equalTo: self.leadingAnchor, constant: 0),
            view.trailingAnchor.constraint(equalTo: self.trailingAnchor, constant: 0),
        ])
    }
}