实时推理 - Amazon SageMaker

本文属于机器翻译版本。若本译文内容与英语原文存在差异,则一律以英文原文为准。

实时推理

实时推理非常适合有实时、交互式、低延迟要求的推理工作负载。此部分演示如何使用实时推理,以交互方式从模型获取预测。

要部署在 Autopilot 实验中生成最佳验证指标的模型,您有多种选择。例如,在 SageMaker Studio Classic 中使用自动驾驶仪时,您可以自动或手动部署模型。您也可以 SageMaker APIs使用手动部署自动驾驶模型。

以下选项卡显示了用于部署模型的三个选项。这些说明假定您已在 Autopilot 中创建了模型。如果您还没有模型,请参阅 使用 AutoML 为表格数据创建回归或分类作业 API。要查看每个选项的示例,请打开各个选项卡。

Autopilot UI 包含有用的下拉菜单、切换开关、工具提示等,可帮助您浏览模型部署。您可以使用以下过程之一进行部署:自动或手动。

  • 自动部署:自动将 Autopilot 实验中的最佳模型部署到端点

    1. 在 SageMaker Studio 经典版中@@ 创建实验

    2. 自动部署值切换为

      注意

      如果区域中端点实例的默认资源配额或您的客户配额过于有限,则自动部署会失败。在超参数优化 (HPO) 模式下,你需要至少有两个 ml.m5.2xlarge 实例。在组合模式下,您需要至少一个 ml.m5.12xlarge 实例。如果您遇到与配额相关的故障,可以请求提高 SageMaker 终端节点实例的服务限制

  • 手动部署:手动将 Autopilot 实验得到的最佳模型部署到端点

    1. 在 SageMaker Studio 经典版中@@ 创建实验

    2. 自动部署值切换为

    3. 模型名称下选择要部署的模型。

    4. 选择排行榜右侧的橙色部署和高级设置按钮。这将打开一个新选项卡。

    5. 配置端点名称、实例类型和其他可选信息。

    6. 选择橙色的部署模型以部署到端点。

    7. https://console.aws.amazon.com/sagemaker/
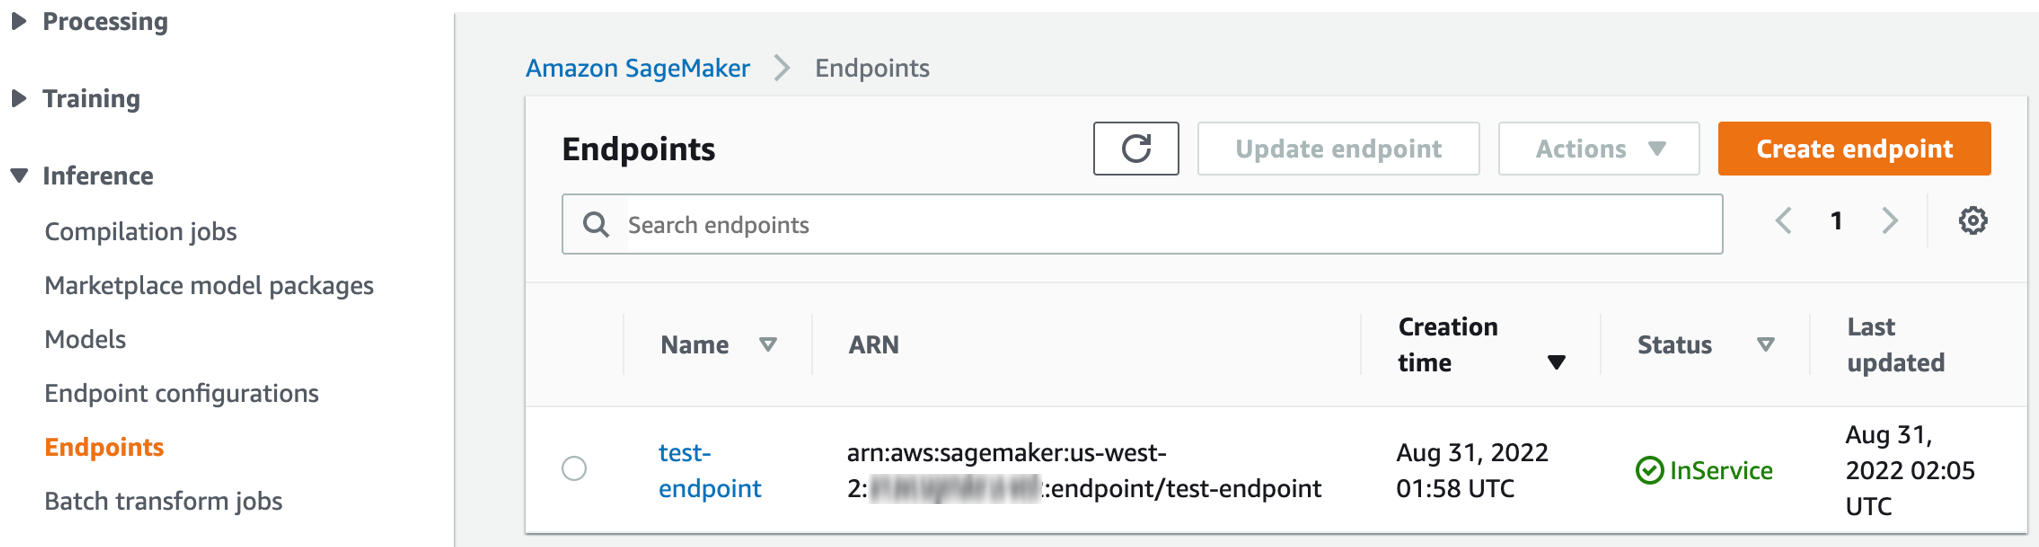
通过导航到终端节点部分,查看终端节点创建过程的进度。该部分位于导航面板的推理下拉菜单中。

    8. 在终端节点状态从 “创建中” 更改为(如下所示)后 InService,返回 Studio Classic 并调用该终端节点。

      SageMaker 控制台:终端节点页面,用于创建终端节点或检查终端节点状态。

您还可以通过使用API调用部署模型来获得实时推理。本节使用以下方法显示此过程的五个步骤 AWS Command Line Interface (AWS CLI) 代码片段。

有关两者的完整代码示例 AWS CLI 命令和 AWS SDK对于 Python (boto3),请按照以下步骤直接打开选项卡。

  1. 获取候选项定义

    从中获取候选容器定义InferenceContainers。这些候选定义用于创建 SageMaker 模型。

    以下示例使用DescribeAutoMLJobAPI来获取最佳模型候选模型的候选定义。请参阅以下信息 AWS CLI 以命令为例。

    aws sagemaker describe-auto-ml-job --auto-ml-job-name <job-name> --region <region>
  2. 列出候选项

    以下示例使用列ListCandidatesForAutoMLJobAPI出所有候选对象。请参阅以下信息 AWS CLI 以命令为例。

    aws sagemaker list-candidates-for-auto-ml-job --auto-ml-job-name <job-name> --region <region>
  3. 创建 SageMaker 模型

    使用前面步骤中的容器定义通过使用创建 SageMaker 模型CreateModelAPI。请参阅以下信息 AWS CLI 以命令为例。

    aws sagemaker create-model --model-name '<your-custom-model-name>' \ --containers ['<container-definition1>, <container-definition2>, <container-definition3>]' \ --execution-role-arn '<execution-role-arn>' --region '<region>
  4. 创建端点配置

    以下示例使用创建CreateEndpointConfigAPI终端节点配置。请参阅以下信息 AWS CLI 以命令为例。

    aws sagemaker create-endpoint-config --endpoint-config-name '<your-custom-endpoint-config-name>' \ --production-variants '<list-of-production-variants>' \ --region '<region>'
  5. 创建端点

    以下 AWS CLI 示例使用创建CreateEndpointAPI终端节点。

    aws sagemaker create-endpoint --endpoint-name '<your-custom-endpoint-name>' \ --endpoint-config-name '<endpoint-config-name-you-just-created>' \ --region '<region>'

    使用查看终端节点部署的进度DescribeEndpointAPI。请参阅以下信息 AWS CLI 以命令为例。

    aws sagemaker describe-endpoint —endpoint-name '<endpoint-name>' —region <region>

    EndpointStatus 更改为 InService 后,端点即可用于实时推理。

  6. 调用端点

    以下命令结构调用端点以进行实时推理。

    aws sagemaker invoke-endpoint --endpoint-name '<endpoint-name>' \ --region '<region>' --body '<your-data>' [--content-type] '<content-type>' <outfile>

以下选项卡包含用于部署模型的完整代码示例 AWS SDK适用于 Python (boto3) 或 AWS CLI.

AWS SDK for Python (boto3)
  1. 使用以下代码示例可获取候选项定义

    import sagemaker import boto3 session = sagemaker.session.Session() sagemaker_client = boto3.client('sagemaker', region_name='us-west-2') job_name = 'test-auto-ml-job' describe_response = sm_client.describe_auto_ml_job(AutoMLJobName=job_name) # extract the best candidate definition from DescribeAutoMLJob response best_candidate = describe_response['BestCandidate'] # extract the InferenceContainers definition from the caandidate definition inference_containers = best_candidate['InferenceContainers']
  2. 使用以下代码示例可创建模型

    # Create Model model_name = 'test-model' sagemaker_role = 'arn:aws:iam:444455556666:role/sagemaker-execution-role' create_model_response = sagemaker_client.create_model( ModelName = model_name, ExecutionRoleArn = sagemaker_role, Containers = inference_containers )
  3. 使用以下代码示例可创建端点配置

    endpoint_config_name = 'test-endpoint-config' instance_type = 'ml.m5.2xlarge' # for all supported instance types, see # https://docs.aws.amazon.com/sagemaker/latest/APIReference/API_ProductionVariant.html#sagemaker-Type-ProductionVariant-InstanceType # Create endpoint config endpoint_config_response = sagemaker_client.create_endpoint_config( EndpointConfigName=endpoint_config_name, ProductionVariants=[ { "VariantName": "variant1", "ModelName": model_name, "InstanceType": instance_type, "InitialInstanceCount": 1 } ] ) print(f"Created EndpointConfig: {endpoint_config_response['EndpointConfigArn']}")
  4. 使用以下代码示例可创建端点并部署模型。

    # create endpoint and deploy the model endpoint_name = 'test-endpoint' create_endpoint_response = sagemaker_client.create_endpoint( EndpointName=endpoint_name, EndpointConfigName=endpoint_config_name) print(create_endpoint_response)

    使用以下代码示例可检查端点创建状态

    # describe endpoint creation status status = sagemaker_client.describe_endpoint(EndpointName=endpoint_name)["EndpointStatus"]
  5. 使用以下命令结构可调用端点进行实时推理。

    # once endpoint status is InService, you can invoke the endpoint for inferencing if status == "InService": sm_runtime = boto3.Session().client('sagemaker-runtime') inference_result = sm_runtime.invoke_endpoint(EndpointName='test-endpoint', ContentType='text/csv', Body='1,2,3,4,class')
AWS Command Line Interface (AWS CLI)
  1. 使用以下代码示例可获取候选项定义

    aws sagemaker describe-auto-ml-job --auto-ml-job-name 'test-automl-job' --region us-west-2
  2. 使用以下代码示例可创建模型

    aws sagemaker create-model --model-name 'test-sagemaker-model' --containers '[{ "Image": "348316444620.dkr.ecr.us-west-2.amazonaws.com/sagemaker-sklearn-automl:2.5-1-cpu-py3", amzn-s3-demo-bucket1 "ModelDataUrl": "s3://amzn-s3-demo-bucket/output/model.tar.gz", "Environment": { "AUTOML_SPARSE_ENCODE_RECORDIO_PROTOBUF": "1", "AUTOML_TRANSFORM_MODE": "feature-transform", "SAGEMAKER_DEFAULT_INVOCATIONS_ACCEPT": "application/x-recordio-protobuf", "SAGEMAKER_PROGRAM": "sagemaker_serve", "SAGEMAKER_SUBMIT_DIRECTORY": "/opt/ml/model/code" } }, { "Image": "348316444620.dkr.ecr.us-west-2.amazonaws.com/sagemaker-xgboost:1.3-1-cpu-py3", "ModelDataUrl": "s3://amzn-s3-demo-bucket/output/model.tar.gz", "Environment": { "MAX_CONTENT_LENGTH": "20971520", "SAGEMAKER_DEFAULT_INVOCATIONS_ACCEPT": "text/csv", "SAGEMAKER_INFERENCE_OUTPUT": "predicted_label", "SAGEMAKER_INFERENCE_SUPPORTED": "predicted_label,probability,probabilities" } }, { "Image": "348316444620.dkr.ecr.us-west-2.amazonaws.com/sagemaker-sklearn-automl:2.5-1-cpu-py3", aws-region "ModelDataUrl": "s3://amzn-s3-demo-bucket/output/model.tar.gz", "Environment": { "AUTOML_TRANSFORM_MODE": "inverse-label-transform", "SAGEMAKER_DEFAULT_INVOCATIONS_ACCEPT": "text/csv", "SAGEMAKER_INFERENCE_INPUT": "predicted_label", "SAGEMAKER_INFERENCE_OUTPUT": "predicted_label", "SAGEMAKER_INFERENCE_SUPPORTED": "predicted_label,probability,labels,probabilities", "SAGEMAKER_PROGRAM": "sagemaker_serve", "SAGEMAKER_SUBMIT_DIRECTORY": "/opt/ml/model/code" } }]' \ --execution-role-arn 'arn:aws:iam::1234567890:role/sagemaker-execution-role' \ --region 'us-west-2'

    有关详细信息,请参阅创建模型

    create model 命令会返回类似以下格式的响应:

    { "ModelArn": "arn:aws:sagemaker:us-west-2:1234567890:model/test-sagemaker-model" }
  3. 使用以下代码示例可创建端点配置

    aws sagemaker create-endpoint-config --endpoint-config-name 'test-endpoint-config' \ --production-variants '[{"VariantName": "variant1", "ModelName": "test-sagemaker-model", "InitialInstanceCount": 1, "InstanceType": "ml.m5.2xlarge" }]' \ --region us-west-2

    create endpoint 配置命令会返回类似以下格式的响应:

    { "EndpointConfigArn": "arn:aws:sagemaker:us-west-2:1234567890:endpoint-config/test-endpoint-config" }
  4. 使用以下代码示例创建端点

    aws sagemaker create-endpoint --endpoint-name 'test-endpoint' \ --endpoint-config-name 'test-endpoint-config' \ --region us-west-2

    create endpoint 命令会返回类似以下格式的响应:

    { "EndpointArn": "arn:aws:sagemaker:us-west-2:1234567890:endpoint/test-endpoint" }

    使用以下描述CLI端点代码示例检查端点部署的进度。

    aws sagemaker describe-endpoint --endpoint-name 'test-endpoint' --region us-west-2

    上面的进度检查将返回以下格式的响应。

    { "EndpointName": "test-endpoint", "EndpointArn": "arn:aws:sagemaker:us-west-2:1234567890:endpoint/test-endpoint", "EndpointConfigName": "test-endpoint-config", "EndpointStatus": "Creating", "CreationTime": 1660251167.595, "LastModifiedTime": 1660251167.595 }

    EndpointStatus 更改为 InService 后,端点即可用于实时推理。

  5. 使用以下命令结构可调用端点进行实时推理。

    aws sagemaker-runtime invoke-endpoint --endpoint-name 'test-endpoint' \ --region 'us-west-2' \ --body '1,51,3.5,1.4,0.2' \ --content-type 'text/csv' \ '/tmp/inference_output'

    有关更多选项,请参阅调用端点

您可以从生成模型的原始账户之外的其他账户部署 Autopilot 模型。对于实施跨账户模型部署,本节介绍如何执行以下操作:

  1. 向部署账户授予权限

    要代入生成账户中的角色,您必须向部署账户授予权限。这允许部署账户描述生成账户中的 Autopilot 作业。

    以下示例将生成账户与可信 sagemaker-role 实体结合使用。示例说明如何向 ID 为 111122223333 的部署账户授予,以便代入生成账户角色。

    "Statement": [ { "Effect": "Allow", "Principal": { "Service": [ "sagemaker.amazonaws.com" ], "AWS": [ "111122223333"] }, "Action": "sts:AssumeRole" }

    ID 为 111122223333 的新账户现在可以代入生成账户的角色。

    接下来,DescribeAutoMLJobAPI从部署账户调用,以获取生成账户创建的任务的描述。

    以下代码示例描述了部署账户中的模型。

    import sagemaker import boto3 session = sagemaker.session.Session() sts_client = boto3.client('sts') sts_client.assume_role role = 'arn:aws:iam::111122223333:role/sagemaker-role' role_session_name = "role-session-name" _assumed_role = sts_client.assume_role(RoleArn=role, RoleSessionName=role_session_name) credentials = _assumed_role["Credentials"] access_key = credentials["AccessKeyId"] secret_key = credentials["SecretAccessKey"] session_token = credentials["SessionToken"] session = boto3.session.Session() sm_client = session.client('sagemaker', region_name='us-west-2', aws_access_key_id=access_key, aws_secret_access_key=secret_key, aws_session_token=session_token) # now you can call describe automl job created in account A job_name = "test-job" response= sm_client.describe_auto_ml_job(AutoMLJobName=job_name)
  2. 向部署账户授予访问权限,以访问生成账户中的模型构件。

    部署账户只需要访问生成账户中的模型构件以便进行部署。它们位于模型生成期间在原始CreateAutoMLJobAPI调用中指定的 S3 OutputPath 中。

    要向部署账户提供对模型构件的访问权限,请选择以下选项之一:

    1. 从生成账户向部署账户授予访问权限以访问 ModelDataUrl

      接下来,您需要向部署账户授予代入角色的权限。请按照实时推理步骤中的说明进行部署。

    2. 将模型工件从生成账户的原始 S3 复制OutputPath到生成账户。

      要授予对模型构件的访问权限,您必须定义 best_candidate 模型并将模型容器重新分配给新账户。

      以下示例说明如何定义 best_candidate 模型并重新分配 ModelDataUrl

      best_candidate = automl.describe_auto_ml_job()['BestCandidate'] # reassigning ModelDataUrl for best_candidate containers below new_model_locations = ['new-container-1-ModelDataUrl', 'new-container-2-ModelDataUrl', 'new-container-3-ModelDataUrl'] new_model_locations_index = 0 for container in best_candidate['InferenceContainers']: container['ModelDataUrl'] = new_model_locations[new_model_locations_index++]

      分配完容器后,请按照使用部署 SageMaker APIs中的步骤进行部署。

要在实时推理中构建负载,请参阅笔记本示例来定义测试负载。要从CSV文件创建有效负载并调用端点,请参阅自动创建机器学习模型中的使用您的模型预测部分。