本文属于机器翻译版本。若本译文内容与英语原文存在差异,则一律以英文原文为准。
注册模型版本
您可以通过创建指定模型组的模型版本来注册 SageMaker Amazon AI 模型。模型版本必须同时包含模型构件(模型的训练权重)和模型的推理代码。
推理管道是一种由两到十五个容器组成的线性序列组成的 SageMaker AI 模型,用于处理推理请求。您可以通过指定容器和关联的环境变量来注册推理管道。有关推理管道的更多信息,请参阅亚马逊 A SageMaker I 中的推理管道。
您可以通过指定容器和关联的环境变量来注册带有推理管道的模型。要使用 Amazon SageMaker Studio 控制台或在 A SageMaker I 模型构建管道中创建步骤来创建带有推理管道的模型版本,请使用以下步骤。 AWS SDK for Python (Boto3)
注册模型版本(SageMaker AI 管道)
要使用 SageMaker AI 模型构建管道注册模型版本,请在管道中创建一个RegisterModel步骤。有关作为管道的一部分创建 RegisterModel 步骤的信息,请参阅步骤 8:定义创建模型包的 RegisterModel 步骤。
注册模型版本 (Boto3)
要使用 Boto3 注册模型版本,请调用 create_model_package API 操作。
首先,设置要传递给 create_model_package API 操作的参数字典。
# Specify the model source model_url = "s3://your-bucket-name/model.tar.gz" modelpackage_inference_specification = { "InferenceSpecification": { "Containers": [ { "Image":image_uri, "ModelDataUrl":model_url} ], "SupportedContentTypes": [ "text/csv" ], "SupportedResponseMIMETypes": [ "text/csv" ], } } # Alternatively, you can specify the model source like this: # modelpackage_inference_specification["InferenceSpecification"]["Containers"][0]["ModelDataUrl"]=model_url create_model_package_input_dict = { "ModelPackageGroupName" : model_package_group_name, "ModelPackageDescription" : "Model to detect 3 different types of irises (Setosa, Versicolour, and Virginica)", "ModelApprovalStatus" : "PendingManualApproval" } create_model_package_input_dict.update(modelpackage_inference_specification)
然后调用 create_model_package API 操作,传入刚刚设置的参数字典。
create_model_package_response = sm_client.create_model_package(**create_model_package_input_dict)
model_package_arn = create_model_package_response["ModelPackageArn"]
print('ModelPackage Version ARN : {}'.format(model_package_arn))
注册模型版本(Studio 或 Studio Classic)
要在 Amazon SageMaker Studio 控制台中注册模型版本,请根据您使用的是 Studio 还是 Studio Classic 完成以下步骤。
从其他账户注册模型版本
要向由其他 AWS 账户创建的模型组注册模型版本,必须添加跨账户 AWS Identity and Access Management 资源策略才能启用该账户。例如,组织中的一个 AWS 账户负责训练模型,另一个账户负责管理、部署和更新模型。您可以创建 IAM 资源策略,并将这些策略应用于您要针对此使用案例授予访问权限的特定账户资源。有关跨账户资源策略的更多信息 AWS,请参阅AWS Identity and Access Management 用户指南中的跨账户策略评估逻辑。
注意
在跨账户模型部署训练期间,您还必须使用 KMS 密钥对输出数据配置操作进行加密。
要在 SageMaker AI 中启用跨账户模型注册表,您必须为包含模型版本的模型组提供跨账户资源策略。以下是为模型组创建跨账户策略并将这些策略应用于该特定资源的示例。
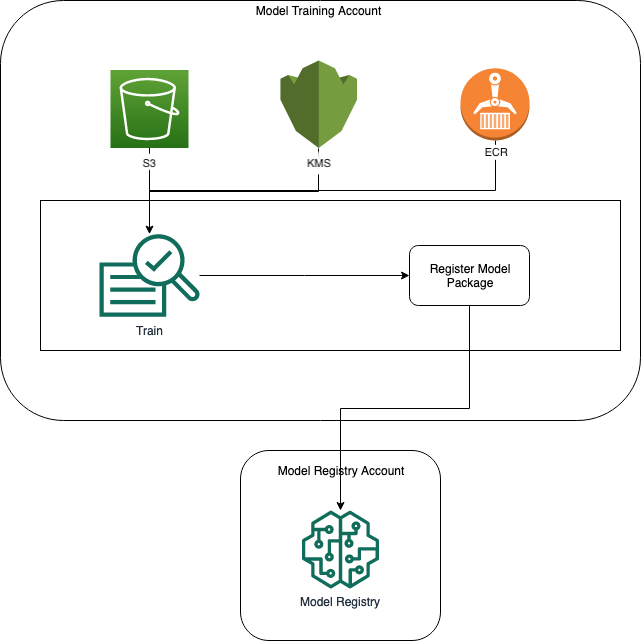
必须在源账户中设置以下配置,该账户在模型组中跨账户注册模型。在此示例中,源账户是模型训练账户,它将训练模型跨账户,然后跨账户将模型注册到模型注册表账户的模型注册表中。
该示例假设您之前定义了以下变量:
-
sm_client— SageMaker 人工智能 Boto3 客户端。 -
model_package_group_name:要授予访问权限的模型组。 -
model_package_group_arn:要授予跨账户访问权限的模型组 ARN。 -
bucket:存储模型训练构件的 Amazon S3 存储桶。
为了能够部署在其他账户中创建的模型,用户必须拥有有权访问 SageMaker AI 操作的角色,例如具有AmazonSageMakerFullAccess托管策略的角色。有关 SageMaker AI 托管策略的信息,请参阅AWS 亚马逊 A SageMaker I 的托管策略。
必需的 IAM 资源策略
下图显示了允许跨账户模型注册所需的策略。如图所示,这些策略需要在模型训练期间处于活动状态,才能将模型正确注册到模型注册表账户中。

以下代码示例演示了 Amazon ECR、Amazon S3 和 AWS KMS 政策。
Amazon ECR 策略示例
{
  "Version": "2012-10-17",
  "Statement": [
    {
      "Sid": "AddPerm",
      "Effect": "Allow",
      "Principal": {
        "AWS": "arn:aws:iam::{model_registry_account}:root"
      },
      "Action": [
        "ecr:BatchGetImage",
        "ecr:Describe*"
      ]
    }
  ]
}
Amazon S3 策略示例
{
  "Version": "2012-10-17",
  "Statement": [
    {
      "Sid": "AddPerm",
      "Effect": "Allow",
      "Principal": {
        "AWS": "arn:aws:iam::{model_registry_account}:root"
      },
      "Action": [
        "s3:GetObject",
        "s3:GetBucketAcl",
        "s3:GetObjectAcl"
      ],
      "Resource": "arn:aws:s3:::{bucket}/*"
    }
  ]
}
AWS KMS 政策示例
{
  "Version": "2012-10-17",
  "Statement": [
    {
      "Sid": "AddPerm",
      "Effect": "Allow",
      "Principal": {
        "AWS": "arn:aws:iam::{model_registry_account}:root"
      },
      "Action": [
        "kms:Decrypt",
        "kms:GenerateDataKey*"
      ],
      "Resource": "*"
    }
  ]
}
将资源策略应用于账户
以下策略配置应用了上一节中讨论的策略,必须放入模型训练账户。
import json # The Model Registry account id of the Model Group model_registry_account = "111111111111" # The model training account id where training happens model_training_account = "222222222222" # 1. Create a policy for access to the ECR repository # in the model training account for the Model Registry account Model Group ecr_repository_policy = {"Version": "2012-10-17", "Statement": [{"Sid": "AddPerm", "Effect": "Allow", "Principal": { "AWS": f"arn:aws:iam::{model_registry_account}:root" }, "Action": [ "ecr:BatchGetImage", "ecr:Describe*" ] }] } # Convert the ECR policy from JSON dict to string ecr_repository_policy = json.dumps(ecr_repository_policy) # Set the new ECR policy ecr = boto3.client('ecr') response = ecr.set_repository_policy( registryId = model_training_account, repositoryName = "decision-trees-sample", policyText = ecr_repository_policy ) # 2. Create a policy in the model training account for access to the S3 bucket # where the model is present in the Model Registry account Model Group bucket_policy = {"Version": "2012-10-17", "Statement": [{"Sid": "AddPerm", "Effect": "Allow", "Principal": {"AWS": f"arn:aws:iam::{model_registry_account}:root" }, "Action": [ "s3:GetObject", "s3:GetBucketAcl", "s3:GetObjectAcl" ], "Resource": [ "arn:aws:s3:::{bucket}/*", "Resource: arn:aws:s3:::{bucket}" ] }] } # Convert the S3 policy from JSON dict to string bucket_policy = json.dumps(bucket_policy) # Set the new bucket policy s3 = boto3.client("s3") response = s3.put_bucket_policy( Bucket =bucket, Policy = bucket_policy) # 3. Create the KMS grant for the key used during training for encryption # in the model training account to the Model Registry account Model Group client = boto3.client("kms") response = client.create_grant( GranteePrincipal=model_registry_account, KeyId=kms_key_id Operations=[ "Decrypt", "GenerateDataKey", ], )
需要将以下配置放入模型组所在的模型注册表账户。
# The Model Registry account id of the Model Group model_registry_account = "111111111111" # 1. Create policy to allow the model training account to access the ModelPackageGroup model_package_group_policy = {"Version": "2012-10-17", "Statement": [ { "Sid": "AddPermModelPackageVersion", "Effect": "Allow", "Principal": {"AWS": f"arn:aws:iam::{model_training_account}:root"}, "Action": ["sagemaker:CreateModelPackage"], "Resource": f"arn:aws:sagemaker:{region}:{model_registry_account}:model-package/{model_package_group_name}/*" } ] } # Convert the policy from JSON dict to string model_package_group_policy = json.dumps(model_package_group_policy) # Set the new policy response = sm_client.put_model_package_group_policy( ModelPackageGroupName =model_package_group_name, ResourcePolicy = model_package_group_policy)
最后,使用模型训练账户中的 create_model_package 操作跨账户注册模型包。
# Specify the model source model_url = "s3://{bucket}/model.tar.gz" #Set up the parameter dictionary to pass to the create_model_package API operation modelpackage_inference_specification = { "InferenceSpecification": { "Containers": [ { "Image": f"{model_training_account}.dkr.ecr.us-east-2.amazonaws.com/decision-trees-sample:latest", "ModelDataUrl": model_url } ], "SupportedContentTypes": [ "text/csv" ], "SupportedResponseMIMETypes": [ "text/csv" ], } } # Alternatively, you can specify the model source like this: # modelpackage_inference_specification["InferenceSpecification"]["Containers"][0]["ModelDataUrl"]=model_url create_model_package_input_dict = { "ModelPackageGroupName" :model_package_group_arn, "ModelPackageDescription" : "Model to detect 3 different types of irises (Setosa, Versicolour, and Virginica)", "ModelApprovalStatus" : "PendingManualApproval" } create_model_package_input_dict.update(modelpackage_inference_specification) # Create the model package in the Model Registry account create_model_package_response = sm_client.create_model_package(**create_model_package_input_dict) model_package_arn = create_model_package_response["ModelPackageArn"] print('ModelPackage Version ARN : {}'.format(model_package_arn))