本文属于机器翻译版本。若本译文内容与英语原文存在差异,则一律以英文原文为准。
使用边界框对图像对象进行分类
用于训练机器学习模型的图像通常包含多个对象。要对图像中的一个或多个对象进行分类和本地化,请使用 Amazon G SageMaker round Truth 边界框贴标任务类型。在这种情况下,本地化意味着边界框的像素位置。您可以使用亚马逊 SageMaker 控制台的 Ground Truth 部分或CreateLabelingJob操作来创建定界箱贴标任务。
重要
对于此任务类型,如果您创建自己的清单文件,请使用 "source-ref" 识别 Amazon S3 中您要标注的每个图像文件的位置。有关更多信息,请参阅 输入数据。
创建边界框标注作业(控制台)
您可以按照说明学习创建标注作业(控制台)如何在 SageMaker 控制台中创建边界框标签作业。在步骤 10 中,从任务类别下拉菜单中选择图像,然后选择边界框作为任务类型。
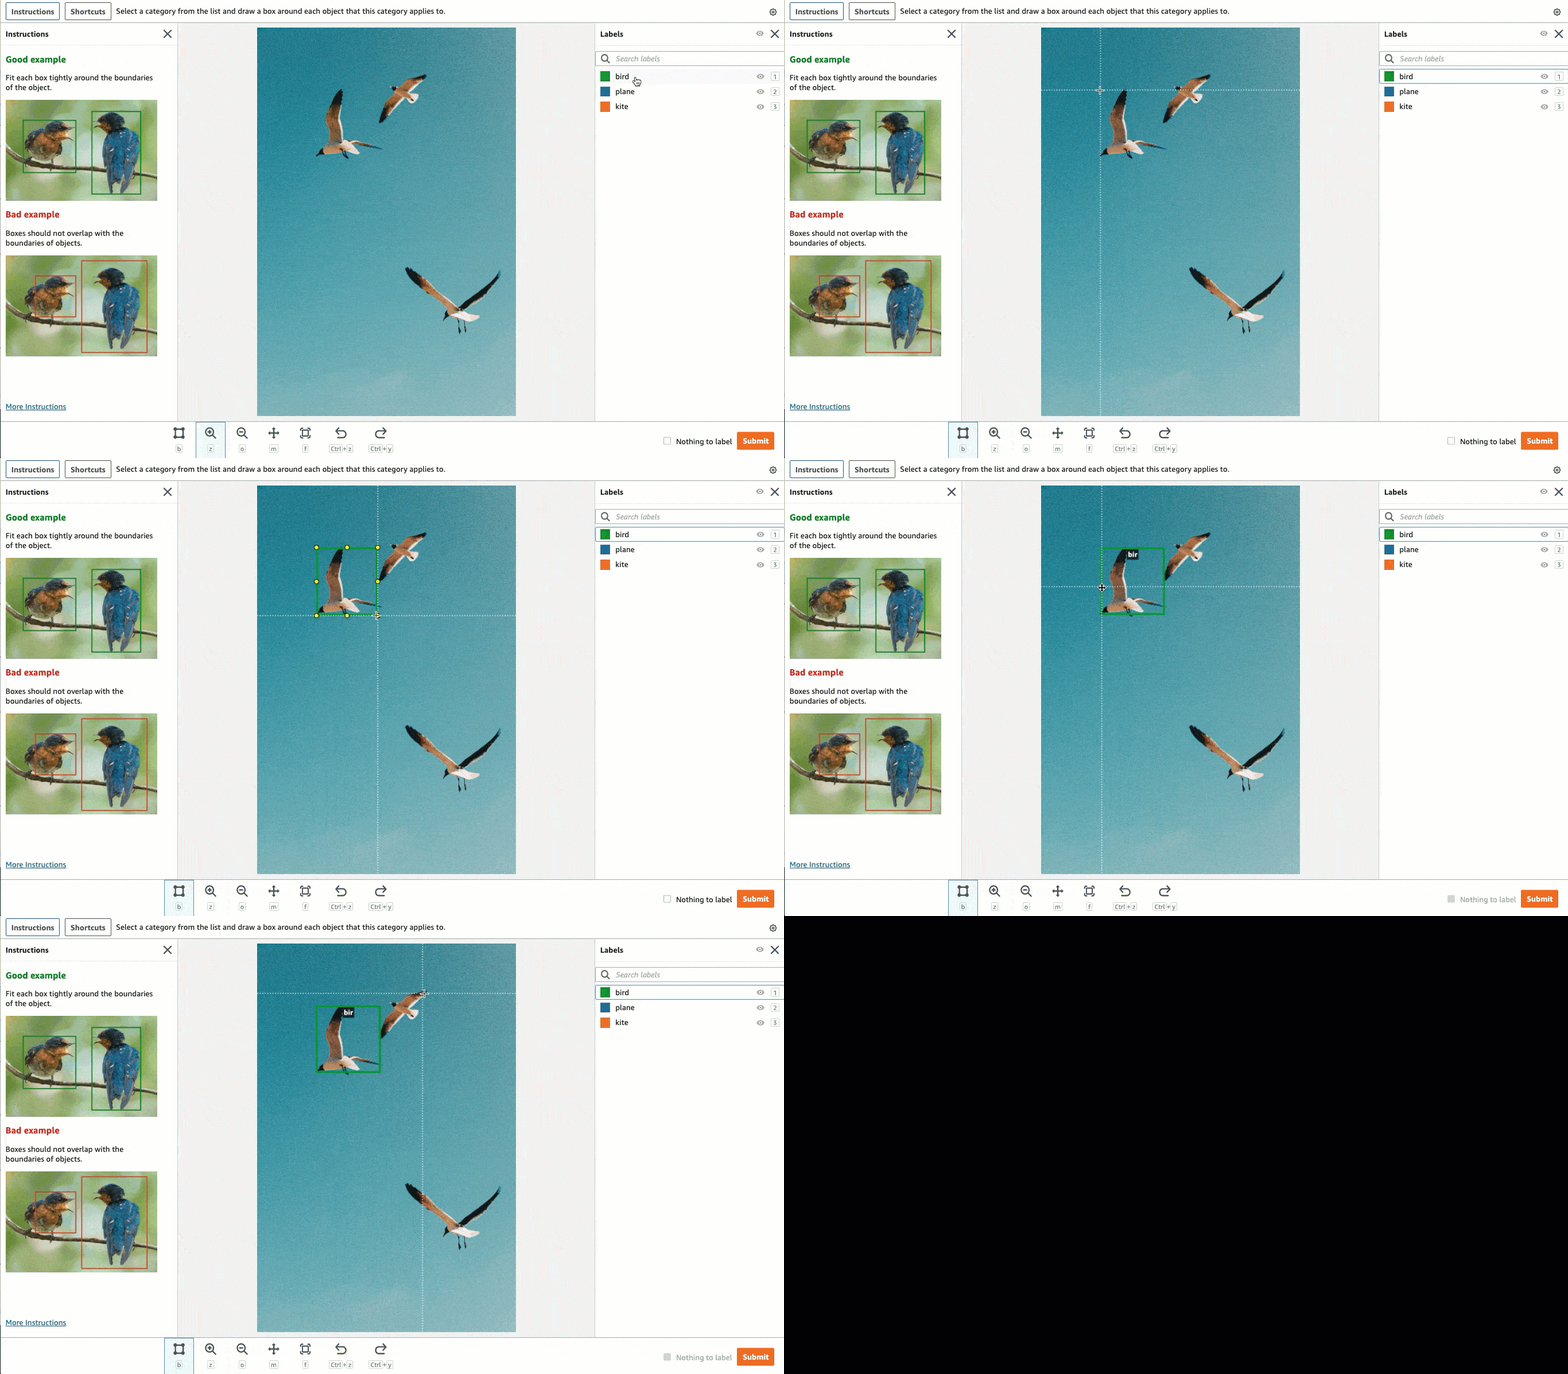
Ground Truth 为标注任务提供类似于以下内容的工作人员 UI。使用控制台创建标注作业时,需要指定有助于工作人员完成作业的说明,以及工作人员最多可以选择的 50 个标签。

创建边界框标注 Job () API
要创建定界框标注作业,请使用 SageMaker API操作CreateLabelingJob。这为所有人API定义了此操作 AWS SDKs。要查看此操作SDKs支持的特定语言列表,请查看的 “另请参阅” 部分。CreateLabelingJob
请按照创建标注作业 (API)中的说明进行操作,并在配置请求时执行以下操作:
-
此任务类型的注释前 Lambda 函数以
PRE-BoundingBox结尾。要查找您所在地区的预注释 ARN Lambda,请参阅。PreHumanTaskLambdaArn -
此任务类型的注释合并 Lambda 函数以
ACS-BoundingBox结尾。要查找您所在地区的注释合并 Lambd ARN a,请参阅。AnnotationConsolidationLambdaArn
以下是在美国东部 SDK(弗吉尼亚北部)地区创建标签任务的AWS Python (Boto3) 请求
response = client.create_labeling_job( LabelingJobName='example-bounding-box-labeling-job, LabelAttributeName='label', InputConfig={ 'DataSource': { 'S3DataSource': { 'ManifestS3Uri':'s3://bucket/path/manifest-with-input-data.json'} }, 'DataAttributes': { 'ContentClassifiers': ['FreeOfPersonallyIdentifiableInformation'|'FreeOfAdultContent', ] } }, OutputConfig={ 'S3OutputPath':'s3://bucket/path/file-to-store-output-data', 'KmsKeyId':'string'}, RoleArn='arn:aws:iam::*:role/*, LabelCategoryConfigS3Uri='s3://bucket/path/label-categories.json', StoppingConditions={ 'MaxHumanLabeledObjectCount':123, 'MaxPercentageOfInputDatasetLabeled':123}, HumanTaskConfig={ 'WorkteamArn':'arn:aws:sagemaker:region:*:workteam/private-crowd/*', 'UiConfig': { 'UiTemplateS3Uri':'s3://bucket/path/worker-task-template.html'}, 'PreHumanTaskLambdaArn': 'arn:aws:lambda:us-east-1:432418664414:function:PRE-BoundingBox', 'TaskKeywords': ['Bounding Box', ], 'TaskTitle':'Bounding Box task', 'TaskDescription':'Draw bounding boxes around objects in an image', 'NumberOfHumanWorkersPerDataObject':123, 'TaskTimeLimitInSeconds':123, 'TaskAvailabilityLifetimeInSeconds':123, 'MaxConcurrentTaskCount':123, 'AnnotationConsolidationConfig': { 'AnnotationConsolidationLambdaArn': 'arn:aws:lambda:us-east-1:432418664414:function:ACS-BoundingBox' } }, Tags=[ { 'Key':'string', 'Value':'string'}, ] )
为边界框标注作业提供模板
如果您使用创建标签作业API,则必须在中提供工作人员任务模板UiTemplateS3Uri。复制并修改以下模板。仅修改 short-instructions、full-instructions 和 header。将此模板上传到 S3,并在中URI为该文件提供 S3 UiTemplateS3Uri。
<script src="https://assets.crowd.aws/crowd-html-elements.js"></script>
<crowd-form>
  <crowd-bounding-box
    name="boundingBox"
    src="{{ task.input.taskObject | grant_read_access }}"
    header="please draw box"
    labels="{{ task.input.labels | to_json | escape }}"
  >

    <full-instructions header="Bounding box instructions">
      <ol><li><strong>Inspect</strong> the image</li><li><strong>Determine</strong>
      if the specified label is/are visible in the picture.</li>
      <li><strong>Outline</strong> each instance of the specified label in the image using the provided “Box” tool.</li></ol>
      <ul><li>Boxes should fit tight around each object</li>
      <li>Do not include parts of the object are overlapping or that cannot be seen, even though you think you can interpolate the whole shape.</li>
      <li>Avoid including shadows.</li>
      <li>If the target is off screen, draw the box up to the edge of the image.</li>
    </full-instructions>

    <short-instructions>
      <h3><span style="color: rgb(0, 138, 0);">Good example</span></h3>
      <p>Enter description of a correct bounding box label and add images</p>
      <h3><span style="color: rgb(230, 0, 0);">Bad example</span></h3>
      <p>Enter description of an incorrect bounding box label and add images</p>
    </short-instructions>

  </crowd-bounding-box>
</crowd-form>
边界框输出数据
创建边界框标签任务后,您的输出数据将位于使用时S3OutputPath参数中指定的 Amazon S3 存储桶中,API或者位于控制台任务概述部分的输出数据集位置字段中。
例如,成功完成的单类边界框任务的输出清单文件将包含以下内容:
[
  {
    "boundingBox": {
      "boundingBoxes": [
        {
          "height": 2832,
          "label": "bird",
          "left": 681,
          "top": 599,
          "width": 1364
        }
      ],
      "inputImageProperties": {
        "height": 3726,
        "width": 2662
      }
    }
  }
]
boundingBoxes 参数标识围绕标识为“鸟”的对象绘制的边界框相对于图像左上角的位置,该位置被认为是 (0,0) 像素坐标。在上一个示例中,left 和 top 确定边界框左上角的像素相对于图像左上角的位置。边界框的尺寸使用 height 和 width 进行标识。inputImageProperties 参数给出原始输入图像的像素尺寸。
当您使用边界框任务类型时,您可以创建单类和多类边界框标注作业。成功完成的多类边界框的输出清单文件将包含以下内容:
[
  {
    "boundingBox": {
      "boundingBoxes": [
        {
          "height": 938,
          "label": "squirrel",
          "left": 316,
          "top": 218,
          "width": 785
        },
        {
          "height": 825,
          "label": "rabbit",
          "left": 1930,
          "top": 2265,
          "width": 540
        },
        {
          "height": 1174,
          "label": "bird",
          "left": 748,
          "top": 2113,
          "width": 927
        },
        {
          "height": 893,
          "label": "bird",
          "left": 1333,
          "top": 847,
          "width": 736
        }
      ],
      "inputImageProperties": {
        "height": 3726,
        "width": 2662
      }
    }
  }
]
要了解有关边界框标注作业产生的输出清单文件的更多信息,请参阅边界框任务输出。
要了解有关 Ground Truth 生成的输出清单文件以及 Ground Truth 用来存储输出数据的文件结构的更多信息,请参阅标注任务输出数据。