Setting up Amazon Q Business with IAM Identity Center as identity provider
Important
Starting April 30, 2024, all new applications will need to use IAM Identity Center directly to manage user access. No new applications can be created using the legacy identity management flow. All existing Amazon Q Business applications using legacy identity management will need to migrate to using IAM Identity Center for user management by July 29, 2024. We recommend you integrate any new application you're creating directly with IAM Identity Center.
The following steps show how to set up Amazon Q Business with AWS IAM Identity Center as your SAML 2.0-compliant identity provider (IdP). Integrating Amazon Q Business with IAM Identity Center requires that you switch between tasks on the Amazon Q Business console and the IAM Identity Center console.
Prerequisites
Before you start to integrate Amazon Q Business with IAM Identity Center, make sure that you have completed the following tasks:
-
Created an Amazon Q Business application, selected a retriever, added your desired data sources, and previewed an Amazon Q Business web experience.
-
Enabled an IAM Identity Center instance, provisioned at least one user, and provided each user with a valid email address. For more details, see Configure user access with the default IAM Identity Center directory.
Note
To deploy your web experience using IAM Identity Center as an identity provider, Amazon Q Business requires you to create a custom application. This is because Amazon Q Business is not an AWS managed application. However, IAM Identity Center account instances can't support custom IAM Identity Center applications. So, you need to use an IAM Identity Center organizations instance (which supports custom applications) to integrate IAM Identity Center with Amazon Q Business. For more information on IAM Identity Center instances, see IAM Identity Center capabilities.
To integrate Amazon Q Business with IAM Identity Center
-
In the Amazon Q Business console, choose the Amazon Q Business application you want to integrate with IAM Identity Center.
-
On the Applications page, from Applications, choose the application you want to deploy. Then, choose Deploy web experience.

-
On the Deploy web experience page, for Service access, choose to Create a use a new service role or Use an existing service role. If you choose to create a new service role, Amazon Q Business, will automatically create a name for it.

-
In the Configure your Identity provider section, do the following:
-
Copy the Assertion consumer service(ACS) URL displayed on the console to a text editor of your choice
-
Copy the Audience URI (SP EntityID) displayed on the console to a text editor of your choice.

You will use this information later in this procedure.
-
-
Then, switch to the IAM Identity Center console
. -
From the IAM Identity Center console, from the left navigation pane, expand Application assignments and choose Applications.

-
On the Applications page, from Customer managed, choose Add application.

-
On the Select application type page, for the Setup preference, choose I have an application I want to set up.

-
In the Application type section, choose SAML 2.0 and choose Next.

-
On the Configure application page, in Display name enter a name for your application. Optionally, enter a description in Description.

-
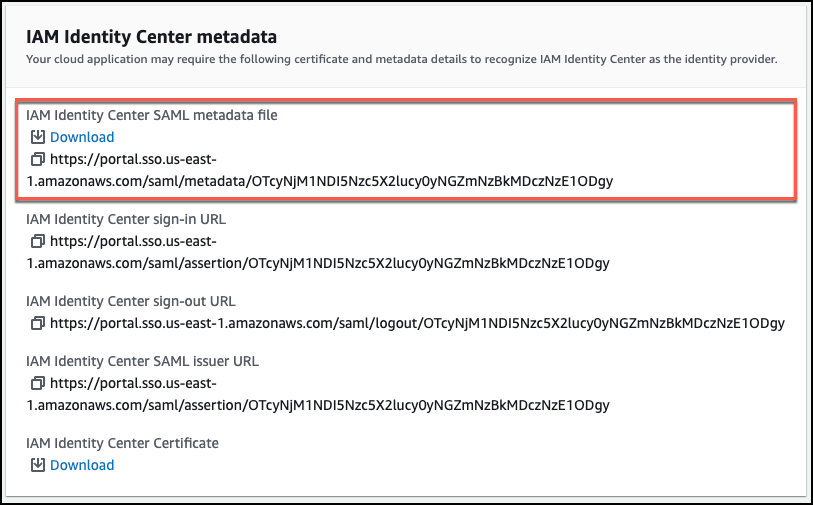
In the IAM Identity Center metadata section, choose Download to download the IAM Identity Center SAML metadata file. You will need this when you return to the Amazon Q Business console.
-
In Application properties, (if you're configuring access to the Amazon Q Business application directly from your IdP's application portal instead of using the deployed Amazon Q Business web experience), you must choose to specify the deployed experience URL from the Amazon Q Business console as the Application start URL.
-
Scroll down to the Application metadata section, and choose Manually type your metadata values.
-
Then, do the following:
-
For Application (ACS) URL – Enter the Assertion consumer service(ACS) URL value you copied from the Amazon Q Business console.
-
Application SAML audience URI – Enter the Audience URI (SP EntityID) value you copied from the Amazon Q Business console.
Then, choose Submit.

-
-
On the Custom SAML 2.0 application application page, scroll down to the Assigned users and groups section and choose Assign users and groups.

-
On the Assign users to Custom SAML 2.0 application table, select one or more users for your application and then choose Assign users to finish assigning users.

-
From the Details pane, choose Actions and then choose Edit attribute mappings.

-
On the Attribute mappings for Custom SAML 2.0 application page, do the following:
-
Leave the User attribute in the application column set to the default attribute name Subject.
-
For Maps to this string value or user attribute in IAM Identity Center – Map the Subject to the email attribute, for example,
${user:email}. Make sure that the attribute you provide is included in Supported IAM Identity Center attributes. -
Set the Format to unspecified.

-
Choose Add new attribute mapping.
-
-
Then, on the Attribute mappings for Custom SAML 2.0 application page, add another attribute mapping by completing the following steps:
-
For User attribute in the application, enter a name for the attribute, for example,
Email. Make a note of this attribute name for use later. -
For Maps to this string value or user attribute in IAM Identity Center – Enter an attribute or a value that you want to map to the attribute name.
For example, you might want to map the attribute name
Emailwith the users email attribute${user:email}.Make sure that the attribute you provide is included in Supported IAM Identity Center attributes.
-
Set the Format to unspecified.
-
Choose Save changes.

-
-
Go back to the Amazon Q Business console, and make sure you're on the Deploy web experience page.
-
Scroll down to the Provide metadata from your IdP section. To upload the metadata XML file that you saved in your previous steps, choose Import from XML.

-
In the Configure user and group mapping section, do the following:
-
For Email attribute of SAML assertion – Enter the attribute name that you provided in the IAM Identity Center console. For example, Email could be an attribute name.

Note
Make sure there are no spaces at the end of
Email. -
For User group field attribute of SAML assertion - optional – Enter an optional user group attribute.
-
-
Choose Deploy.
-
Once deployment finishes, a URL should appear on your Amazon Q Business application page under Deployed URL.
-
Choose the URL to open your Amazon Q Business web experience and enter credentials for a user that has access to the web experience.
If you encounter HTTP status code 403 (Forbidden) errors , see Troubleshooting Amazon Q Business and identity provider integration.
