本文為英文版的機器翻譯版本,如內容有任何歧義或不一致之處,概以英文版為準。
使用 Amazon S3 事件通知加速網路爬取
您可以將爬蟲程式設定為使用 Amazon S3 事件來尋找任何變更,而不是從 Amazon S3 或 Data Catalog 目標列出物件。此功能可使用 Amazon S3 事件識別兩個編目之間的變更,方法是列出觸發事件的子資料夾中的所有檔案,而不是列出完整的 Amazon S3 或 Data Catalog 目標,藉此改善重新編目時間。
第一個編目會列出目標中的所有 Amazon S3 物件。第一次成功編目之後,您可以選擇手動或按設定的排程重新編目。爬蟲程式將僅列出這些事件中的物件,而不是列出所有物件。
移動到基於 Amazon S3 事件的爬蟲程式的優點是:
因為不需要列出目標中的所有物件,而是在新增或刪除物件的位置完成特定資料夾清單,從而更快速地重新編目。
減少整體編目成本,因為會在新增或刪除物件的位置完成特定資料夾清單。
Amazon S3 事件編目會根據爬行者程式排程從SQS佇列中使用 Amazon S3 事件來執行。如果佇列中沒有事件,則不會產生任何費用。Amazon S3 事件可以設定為直接進入SQS佇列,或者在多個消費者需要相同事件的情況下,結合SNS和SQS。如需詳細資訊,請參閱為 Amazon S3 事件通知設定您的帳戶。
在事件模式下建立並設定爬蟲程式之後,第一次編目會執行完整的 Amazon S3 或 Data Catalog 目標清單,藉此以清單模式執行。下列日誌會在第一次成功編目之後使用 Amazon S3 事件來確認編目的操作:「透過使用 Amazon S3 事件來執行編目。」
在建立 Amazon S3 事件編目並更新可能會影響編目的爬蟲程式屬性之後,編目會以清單模式運作,並新增下列日誌:「編目未在 S3 事件模式下執行」。
注意
每個編目可使用的訊息數目上限為 10,000 封郵件。
Catalog 目標
當目標為 Data Catalog 時,爬蟲程式會使用變更來更新 Data Catalog 中的現有資料表 (例如,資料表中的額外分割區)。
為 Amazon S3 事件通知設定您的帳戶
本節說明如何為 Amazon S3 事件通知設定帳戶,並提供使用指令碼或 AWS Glue 主控台執行此操作的指示。
必要條件
完成下列設定任務。請注意括號中的值會參考指令碼中的可設定項。
建立 Amazon S3 儲存貯體 (
s3_bucket_name)識別爬蟲程式目標 (
folder_name,例如 "test1"),它是已識別儲存貯體中的路徑。準備爬蟲程式名稱 (
crawler_name)準備一個SNS主題名稱(
sns_topic_name),該名稱可能與爬行者程序名稱相同。準備要執行爬行程式且 S3 儲存貯體存在的 AWS 區域 (
region)。如果使用電子郵件來取得 Amazon S3 事件 (
subscribing_email),則可選擇性地準備電子郵件地址。
您也可以使用 CloudFormation 堆疊來建立資源。請完成下列步驟:
-
在美國東部 (維吉尼亞北部) 啟動
您的 CloudFormation 堆疊: 在「參數」下,輸入 Amazon S3 儲存貯體的名稱 (包括帳號)。
選取
I acknowledge that AWS CloudFormation might create IAM resources with custom names。選擇
Create stack。
限制:
無論是 Amazon S3 目標還是 Data Catalog 目標,爬蟲程式只支援單一目標。
SQS不支VPC持私人。
不支援 Amazon S3 取樣。
爬蟲程式目標應該是 Amazon S3 目標的資料夾,或是 Data Catalog 目標的一個或多個 AWS Glue Data Catalog 資料表。
不支援「所有」路徑萬用字元:s3://%
對於 Data Catalog 目標,所有目錄資料表都應指向 Amazon S3 事件模式的相同 Amazon S3 儲存貯體。
對於 Data Catalog 目標,目錄資料表不應指向 Delta Lake 格式的 Amazon S3 位置 (包含 _symlink 資料夾或檢查目錄資料表的
InputFormat)。
若要使用 Amazon S3 事件型爬蟲,您應該在 S3 儲存貯體上啟用事件通知,其中包含從前綴篩選的事件,該事件與 S3 目標相同並存放在中SQS。您可以透過主控台設定SQS和事件通知,方法是按照逐步解說:設定值區以取得通知或使用用於從目標產生SQS和設定 Amazon S3 事件的指令碼.
SQS政策
新增下列必須附加至爬行者程式使用之角色的SQS原則。
{
    "Version": "2012-10-17",
    "Statement": [
        {
            "Sid": "VisualEditor0",
            "Effect": "Allow",
            "Action": [
                "sqs:DeleteMessage",
                "sqs:GetQueueUrl",
                "sqs:ListDeadLetterSourceQueues",
                "sqs:ReceiveMessage",
                "sqs:GetQueueAttributes",
                "sqs:ListQueueTags",
                "sqs:SetQueueAttributes",
                "sqs:PurgeQueue"
            ],
            "Resource": "arn:aws:sqs:{region}:{accountID}:cfn-sqs-queue"
        }
    ]
}
用於從目標產生SQS和設定 Amazon S3 事件的指令碼
確定符合先決條件之後,您可以執行下列 Python 指令碼來建立SQS. 以根據先決條件準備的名稱取代「可設定項」。
注意
運行腳本後,登錄到SQS控制台以查找SQS創建ARN的。
Amazon SQS 設置了一個可見性超時,在此期間,Amazon SQS 阻止其他消費者接收和處理消息。設定可見性逾時大致等於編目執行時間。
#!venv/bin/python
import boto3
import botocore

#---------Start : READ ME FIRST ----------------------#
# 1. Purpose of this script is to create the SQS, SNS and enable S3 bucket notification.
#     The following are the operations performed by the scripts:
#      a. Enable S3 bucket notification to trigger 's3:ObjectCreated:' and 's3:ObjectRemoved:' events.
#      b. Create SNS topic for fan out.
#      c. Create SQS queue for saving events which will be consumed by the crawler.
#          SQS Event Queue ARN will be used to create the crawler after running the script.
# 2. This script does not create the crawler.
# 3. SNS topic is created to support FAN out of S3 events. If S3 event is also used by another
#    purpose, SNS topic created by the script can be used.
# 1. Creation of bucket is an optional step.
#    To create a bucket set create_bucket variable to true.
# 2. The purpose of crawler_name is to easily locate the SQS/SNS.
#     crawler_name is used to create SQS and SNS with the same name as crawler.
# 3. 'folder_name' is the target of crawl inside the specified bucket 's3_bucket_name'
#
#---------End : READ ME FIRST ------------------------#


#--------------------------------#
# Start : Configurable settings  #
#--------------------------------#

#Create
region = 'us-west-2'
s3_bucket_name = 's3eventtestuswest2'
folder_name = "test"
crawler_name = "test33S3Event"
sns_topic_name = crawler_name
sqs_queue_name = sns_topic_name
create_bucket = False

#-------------------------------#
# End : Configurable settings   #
#-------------------------------#

# Define aws clients
dev = boto3.session.Session(profile_name='myprofile')
boto3.setup_default_session(profile_name='myprofile')
s3 = boto3.resource('s3', region_name=region)
sns = boto3.client('sns', region_name=region)
sqs = boto3.client('sqs', region_name=region)
client = boto3.client("sts")
account_id = client.get_caller_identity()["Account"]
queue_arn = ""


def print_error(e):
    print(e.message + ' RequestId: ' + e.response['ResponseMetadata']['RequestId'])

def create_s3_bucket(bucket_name, client):
    bucket = client.Bucket(bucket_name)
    try:
        if not create_bucket:
            return True
        response = bucket.create(
            ACL='private',
            CreateBucketConfiguration={
                'LocationConstraint': region
            },
        )
        return True
    except botocore.exceptions.ClientError as e:
        print_error(e)
        if 'BucketAlreadyOwnedByYou' in e.message:  # we own this bucket so continue
            print('We own the bucket already. Lets continue...')
            return True
    return False

def create_s3_bucket_folder(bucket_name, client, directory_name):
    s3.put_object(Bucket=bucket_name, Key=(directory_name + '/'))

def set_s3_notification_sns(bucket_name, client, topic_arn):
    bucket_notification = client.BucketNotification(bucket_name)
    try:

        response = bucket_notification.put(
            NotificationConfiguration={
                'TopicConfigurations': [
                    {
                        'Id' : crawler_name,
                        'TopicArn': topic_arn,
                        'Events': [
                            's3:ObjectCreated:*',
                            's3:ObjectRemoved:*',

                        ],
                        'Filter' :  {'Key': {'FilterRules': [{'Name': 'prefix', 'Value': folder_name}]}}
                    },
                ]
            }
        )
        return True
    except botocore.exceptions.ClientError as e:
        print_error(e)
    return False


def create_sns_topic(topic_name, client):
    try:
        response = client.create_topic(
            Name=topic_name
        )
        return response['TopicArn']
    except botocore.exceptions.ClientError as e:
        print_error(e)
    return None

def set_sns_topic_policy(topic_arn, client, bucket_name):
    try:
        response = client.set_topic_attributes(
            TopicArn=topic_arn,
            AttributeName='Policy',
            AttributeValue='''{
              "Version": "2008-10-17",
              "Id": "s3-publish-to-sns",
              "Statement": [{
                  "Effect": "Allow",
                  "Principal": { "AWS" : "*" },
                  "Action": [ "SNS:Publish" ],
                  "Resource": "%s",
                  "Condition": {
                    "StringEquals": {
                        "AWS:SourceAccount": "%s"
                      },
                      "ArnLike": {
                          "aws:SourceArn": "arn:aws:s3:*:*:%s"
                      }
                  }
              }]
  }''' % (topic_arn, account_id, bucket_name)
        )
        return True
    except botocore.exceptions.ClientError as e:
        print_error(e)

    return False


def subscribe_to_sns_topic(topic_arn, client, protocol, endpoint):
    try:
        response = client.subscribe(
            TopicArn=topic_arn,
            Protocol=protocol,
            Endpoint=endpoint
        )
        return response['SubscriptionArn']
    except botocore.exceptions.ClientError as e:
        print_error(e)
    return None


def create_sqs_queue(queue_name, client):
    try:
        response = client.create_queue(
            QueueName=queue_name,
        )
        return response['QueueUrl']
    except botocore.exceptions.ClientError as e:
        print_error(e)
    return None


def get_sqs_queue_arn(queue_url, client):
    try:
        response = client.get_queue_attributes(
            QueueUrl=queue_url,
            AttributeNames=[
                'QueueArn',
            ]
        )
        return response['Attributes']['QueueArn']
    except botocore.exceptions.ClientError as e:
        print_error(e)
    return None

def set_sqs_policy(queue_url, queue_arn, client, topic_arn):
    try:
        response = client.set_queue_attributes(
            QueueUrl=queue_url,
            Attributes={
                'Policy': '''{
                  "Version": "2012-10-17",
                  "Id": "AllowSNSPublish",
                  "Statement": [
                    {
                      "Sid": "AllowSNSPublish01",
                      "Effect": "Allow",
                      "Principal": "*",
                      "Action": "SQS:SendMessage",
                      "Resource": "%s",
                      "Condition": {
                        "ArnEquals": {
                          "aws:SourceArn": "%s"
                        }
                      }
                    }
                  ]
}''' % (queue_arn, topic_arn)
            }
        )
        return True
    except botocore.exceptions.ClientError as e:
        print_error(e)
    return False


if __name__ == "__main__":
    print('Creating S3 bucket %s.' % s3_bucket_name)
    if create_s3_bucket(s3_bucket_name, s3):
        print('\nCreating SNS topic %s.' % sns_topic_name)
        topic_arn = create_sns_topic(sns_topic_name, sns)
        if topic_arn:
            print('SNS topic created successfully: %s' % topic_arn)

            print('Creating SQS queue %s' % sqs_queue_name)
            queue_url = create_sqs_queue(sqs_queue_name, sqs)
            if queue_url is not None:
                print('Subscribing sqs queue with sns.')
                queue_arn = get_sqs_queue_arn(queue_url, sqs)
                if queue_arn is not None:
                    if set_sqs_policy(queue_url, queue_arn, sqs, topic_arn):
                        print('Successfully configured queue policy.')
                        subscription_arn = subscribe_to_sns_topic(topic_arn, sns, 'sqs', queue_arn)
                        if subscription_arn is not None:
                            if 'pending confirmation' in subscription_arn:
                                print('Please confirm SNS subscription by visiting the subscribe URL.')
                            else:
                                print('Successfully subscribed SQS queue: ' + queue_arn)
                        else:
                            print('Failed to subscribe SNS')
                    else:
                        print('Failed to set queue policy.')
                else:
                    print("Failed to get queue arn for %s" % queue_url)
            # ------------ End subscriptions to SNS topic -----------------

            print('\nSetting topic policy to allow s3 bucket %s to publish.' % s3_bucket_name)
            if set_sns_topic_policy(topic_arn, sns, s3_bucket_name):
                print('SNS topic policy added successfully.')
                if set_s3_notification_sns(s3_bucket_name, s3, topic_arn):
                    print('Successfully configured event for S3 bucket %s' % s3_bucket_name)
                    print('Create S3 Event Crawler using SQS ARN %s' % queue_arn)
                else:
                    print('Failed to configure S3 bucket notification.')
            else:
                print('Failed to add SNS topic policy.')
        else:
            print('Failed to create SNS topic.')
使用主控台為 Amazon S3 事件通知設定爬蟲程式 (Amazon S3 目標)
若要使用 AWS Glue 主控台為 Amazon S3 目標的 Amazon S3 事件通知設定爬蟲程式:
-
設定爬蟲程式屬性。如需詳細資訊,請參閱在 AWS Glue 主控台上設定爬蟲程式組態選項。
-
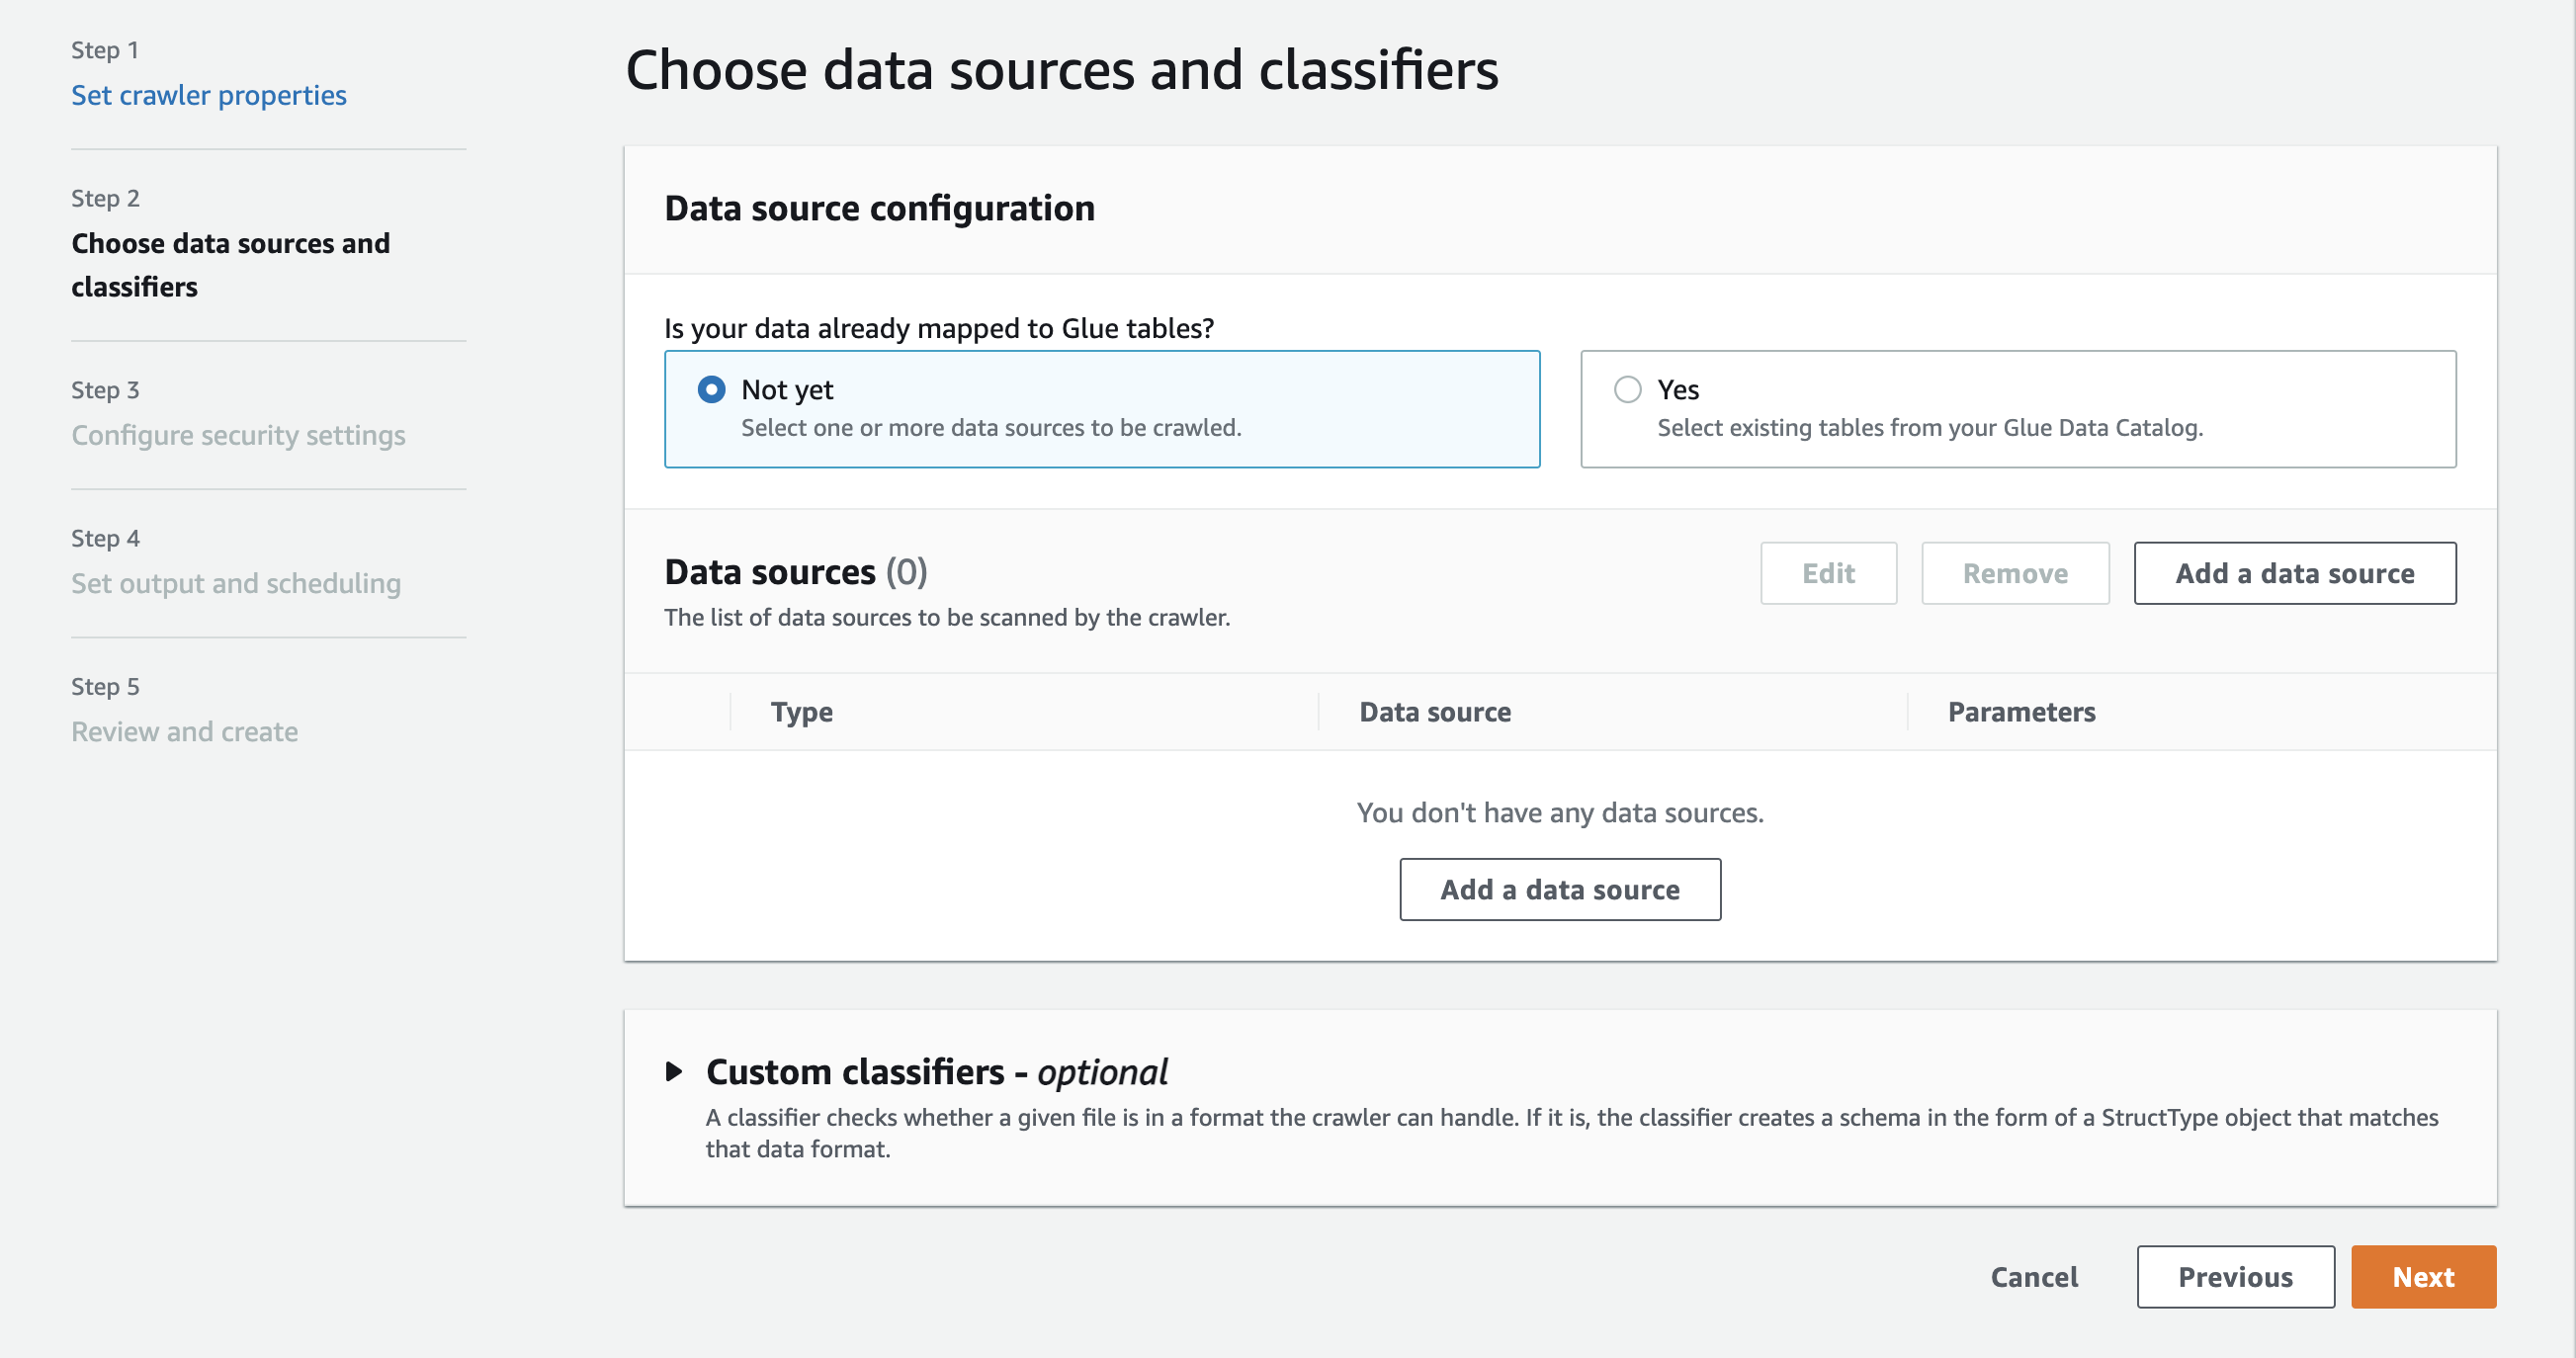
在 Data source configuration (資料來源組態) 區段中,您被問到 Is your data already mapped to AWS Glue tables? (您的資料是否已對應至 GLU 資料表?)
依預設已選取 Not yet (尚未)。將其保留為預設值,因為您使用的是 Amazon S3 資料來源,且資料尚未映射至 AWS Glue 資料表。
-
在 Data sources (資料來源) 區段中,選擇 Add a data source (新增資料來源)。
-
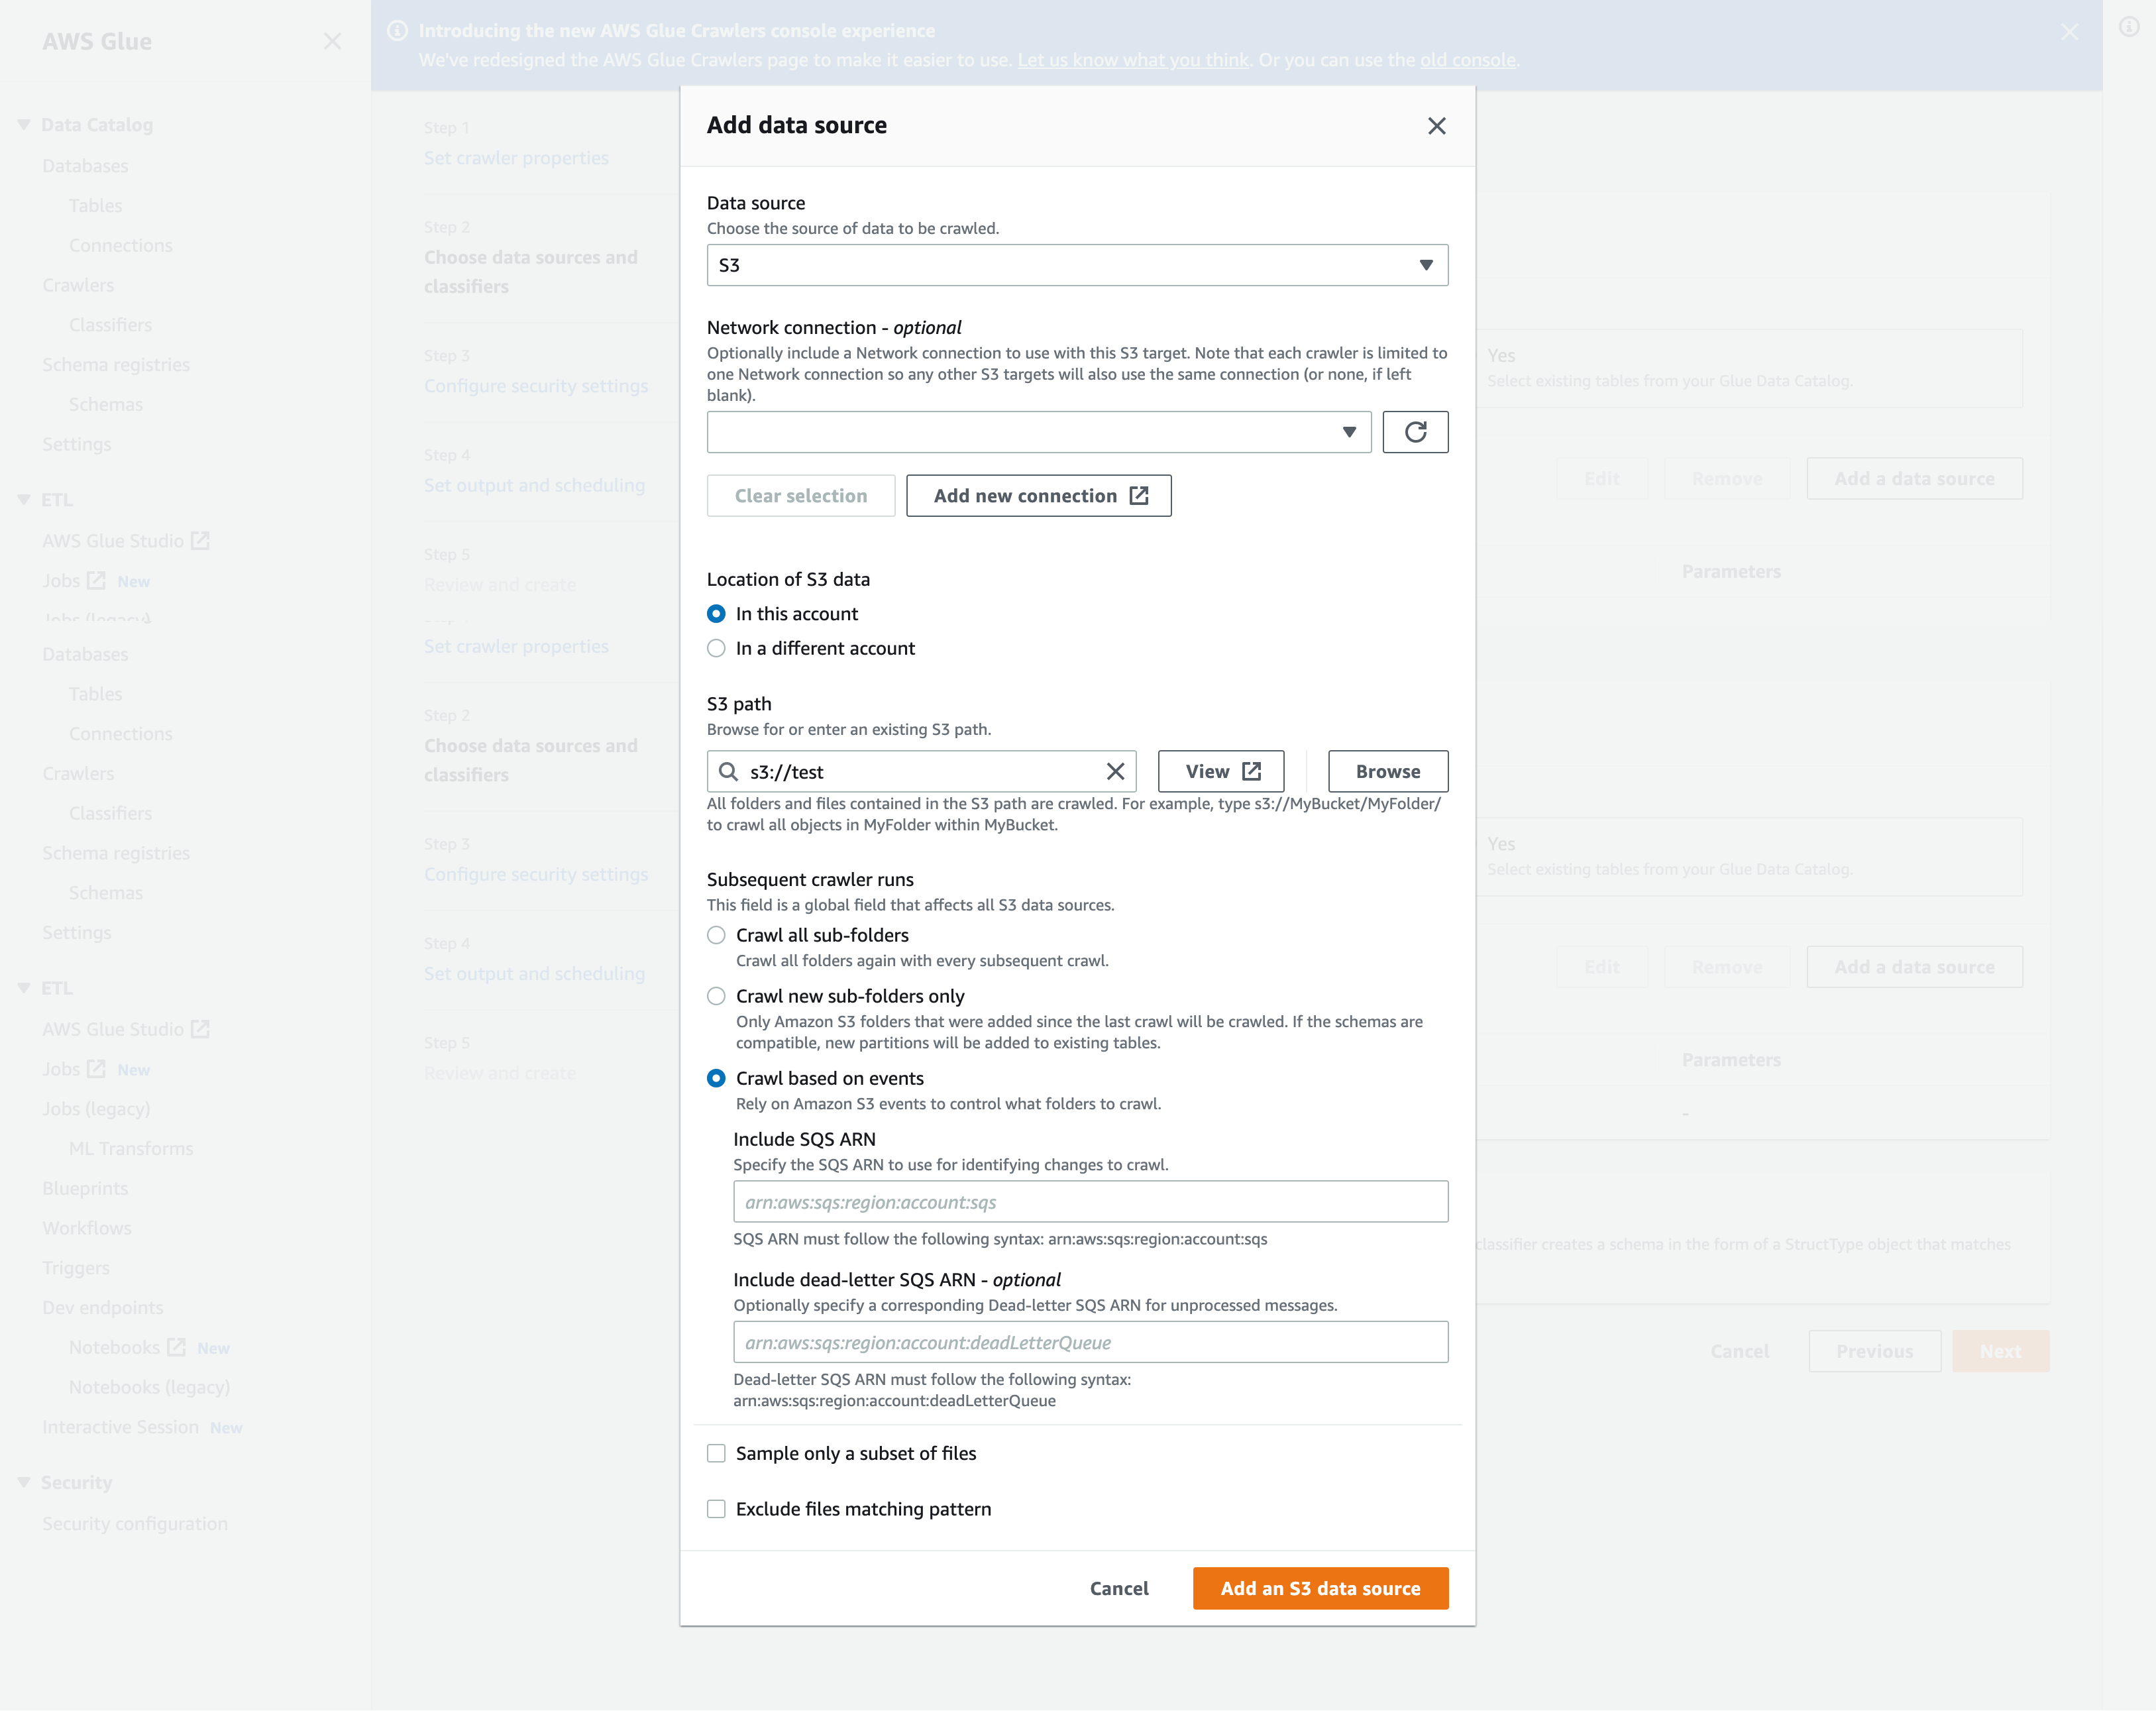
在 Add data source (新增資料來源) 強制回應視窗中,設定 Amazon S3 資料來源:
-
Data source (資料來源):依預設,已選取 Amazon S3。
-
Network connection (網路連線) (選用):選擇 Add new connection (新增連線)。
-
Location of Amazon S3 data (Amazon S3 資料的位置):依預設,已選取 In this account (在此帳戶中)。
-
Amazon S3 path (Amazon S3 路徑):指定在其中網路爬取資料夾和檔案的 Amazon S3 路徑。
-
Subsequent crawler runs (後續爬蟲程式執行):選擇 Crawl based on events (根據事件進行網路爬取) 以針對爬蟲程式使用 Amazon S3 事件通知。
-
包括 SQS ARN:指定包括有效的資料倉庫參數SQSARN。(例如
arn:aws:sqs:region:account:sqs)。 -
包含無效字母 SQS ARN (選擇性): 指定有效的 Amazon 無效信件。SQS ARN(例如
arn:aws:sqs:region:account:deadLetterQueue)。 -
選擇 Add an Amazon S3 data source (新增 Amazon S3 資料來源)。
-
使用設定 Amazon S3 事件通知的爬蟲程式 AWS CLI
以下是在 Amazon S3 目標儲存貯體上建立SQS佇列和設定事件通知的 Amazon S3 AWS CLI 呼叫範例。
S3 Event AWS CLI
aws sqs create-queue --queue-name MyQueue --attributes file://create-queue.json
create-queue.json
```
{
    "Policy": {
        "Version": "2012-10-17",
        "Id": "example-ID",
        "Statement": [
            {
                "Sid": "example-statement-ID",
                "Effect": "Allow",
                "Principal": {
                    "Service": "s3.amazonaws.com"
                },
                "Action": [
                    "SQS:SendMessage"
                ],
                "Resource": "SQS-queue-ARN",
                "Condition": {
                    "ArnLike": {
                        "aws:SourceArn": "arn:aws:s3:*:*:awsexamplebucket1"
                    },
                    "StringEquals": {
                        "aws:SourceAccount": "bucket-owner-account-id"
                    }
                }
            }
        ]
    }
}
```
aws s3api put-bucket-notification-configuration --bucket customer-data-pdx --notification-configuration file://s3-event-config.json
s3-event-config.json
```
{
    "QueueConfigurations": [
        {
          "Id": "s3event-sqs-queue",
          "QueueArn": "arn:aws:sqs:{region}:{account}:queuename",
          "Events": [
                "s3:ObjectCreated:*",
                "s3:ObjectRemoved:*"
          ],
          "Filter": {
              "Key": {
                  "FilterRules": [
                      {
                          "Name": "Prefix",
                          "Value": "/json"
                      }
                  ]
              }
          }
        }
    ]
}
```
Create Crawler:
使用主控台為 Amazon S3 事件通知設定爬蟲程式 (Data Catalog 目標)
當您擁有目錄目標時,使用 AWS Glue 主控台對 Amazon S3 事件通知設定爬蟲程式:
-
設定爬蟲程式屬性。如需詳細資訊,請參閱在 AWS Glue 主控台上設定爬蟲程式組態選項。
-
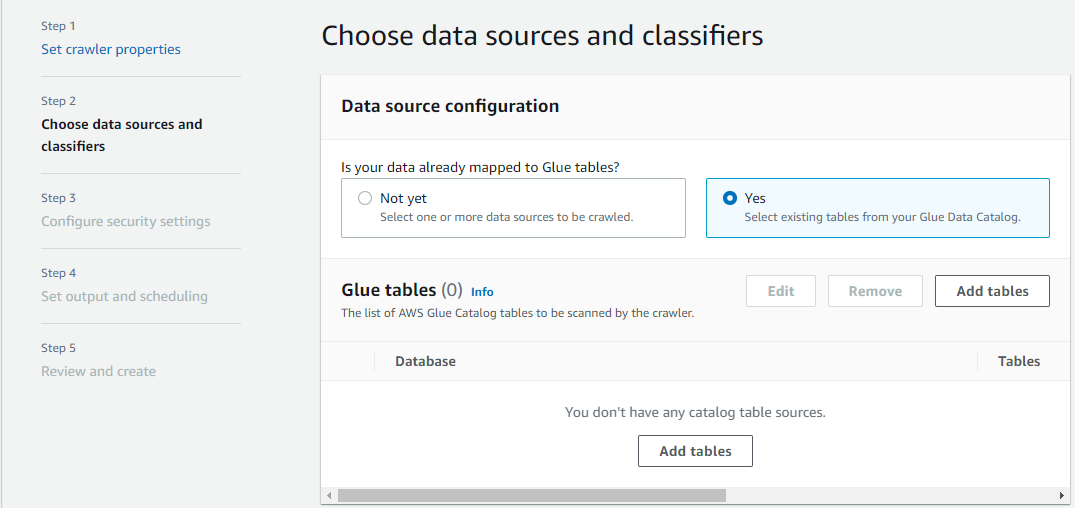
在 Data source configuration (資料來源組態) 區段中,您被問到 Is your data already mapped to AWS Glue tables? (您的資料是否已對應至 GLU 資料表?)
選取 Yes (是),從 Data Catalog 中選取現有資料表作為資料來源。
-
在 Glue tables (Glue 資料表) 區段中,選擇 Add tables (新增資料表)。
-
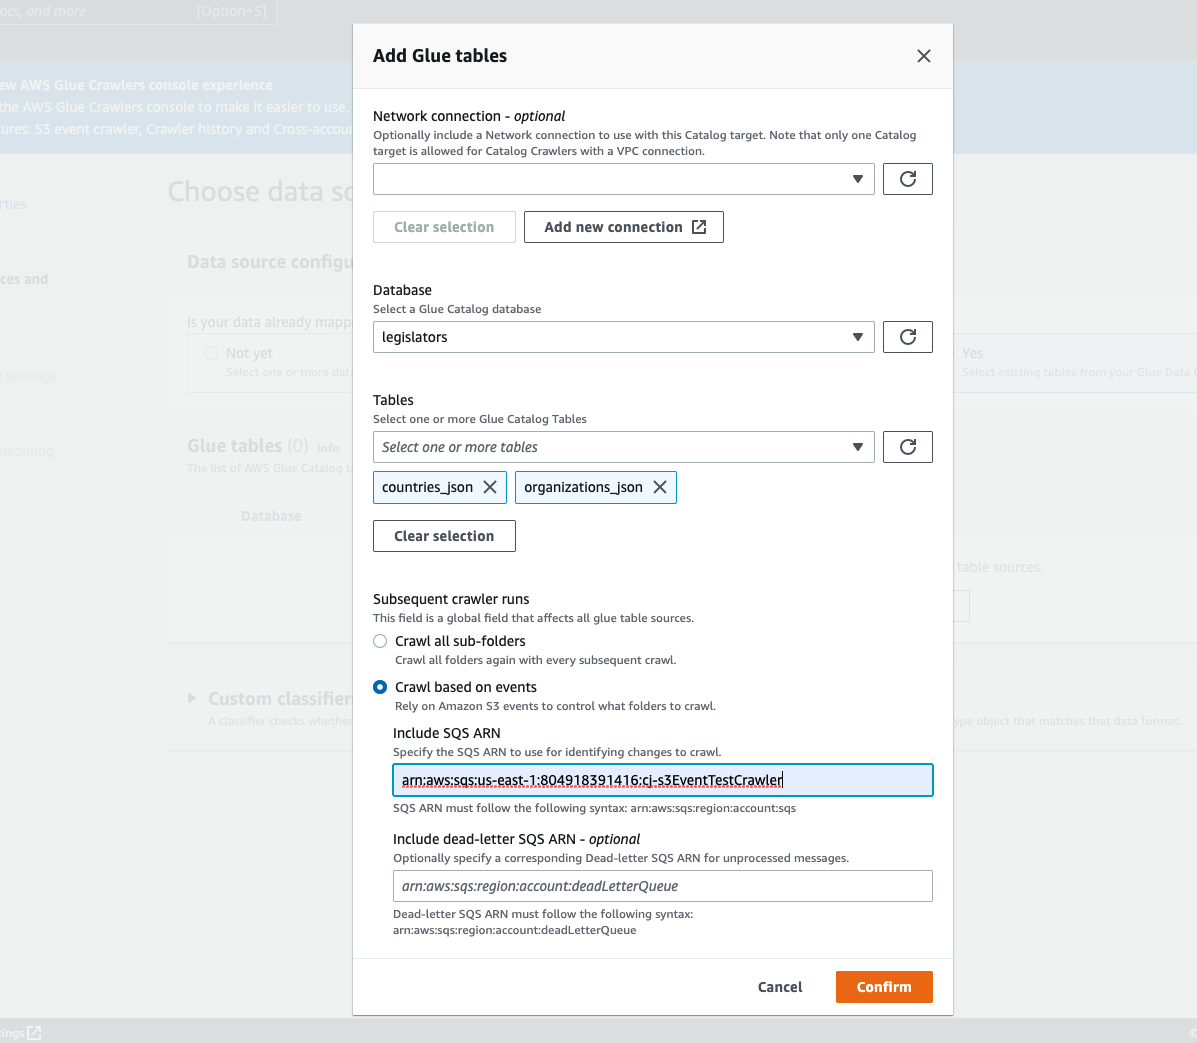
在 Add table (新增資料表) 模式中,設定資料庫和資料表:
-
Network connection (網路連線) (選用):選擇 Add new connection (新增連線)。
-
Database (資料庫):在 Data Catalog 中選取資料庫。
-
Tables (資料表):從 Data Catalog 的資料庫中選取一個或多個資料表。
-
Subsequent crawler runs (後續爬蟲程式執行):選擇 Crawl based on events (根據事件進行網路爬取) 以針對爬蟲程式使用 Amazon S3 事件通知。
-
包括 SQS ARN:指定包括有效的資料倉庫參數SQSARN。(例如
arn:aws:sqs:region:account:sqs)。 -
包含無效字母 SQS ARN (選擇性): 指定有效的 Amazon 無效信件。SQS ARN(例如
arn:aws:sqs:region:account:deadLetterQueue)。 -
選擇確認。
-
