適用於 JavaScript 的 AWS SDK V3 API 參考指南詳細說明 第 3 版 適用於 JavaScript 的 AWS SDK (V3) 的所有 API 操作。
本文為英文版的機器翻譯版本,如內容有任何歧義或不一致之處,概以英文版為準。
建置 Amazon Lex 聊天機器人
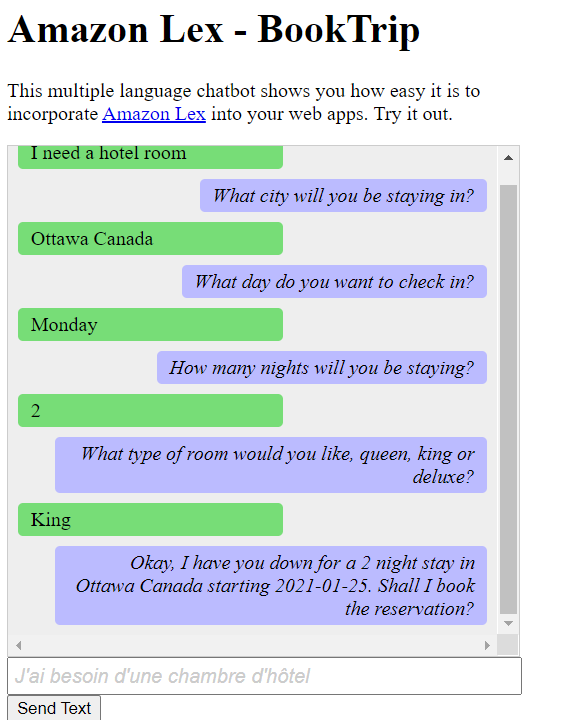
您可以在 Web 應用程式中建立 Amazon Lex 聊天機器人,以吸引網站訪客。Amazon Lex 聊天機器人是與使用者進行線上聊天對話的功能,無需直接聯絡人員。例如,下圖顯示 Amazon Lex 聊天機器人,該聊天機器人會邀請使用者預訂飯店房間。

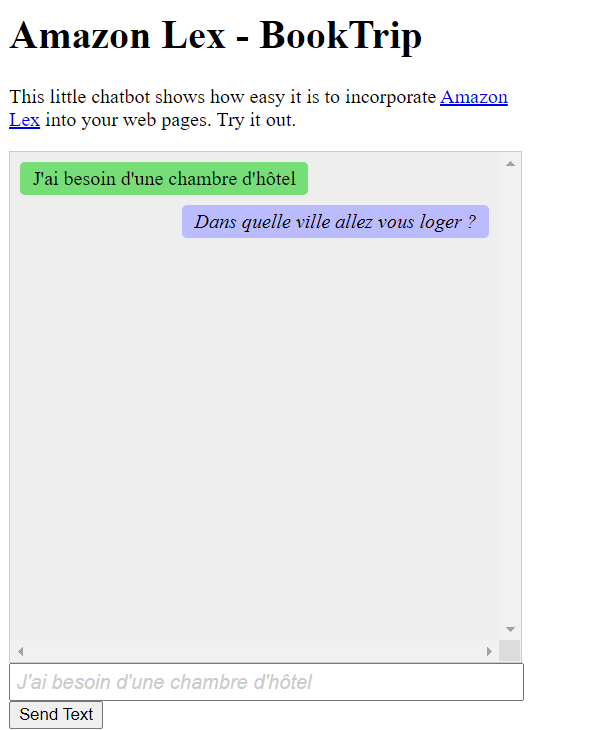
在本 AWS 教學課程中建立的 Amazon Lex 聊天機器人能夠處理多種語言。例如,說法文的使用者可以輸入法文,並以法文傳回回應。

同樣地,使用者可以使用義大利文與 Amazon Lex 聊天機器人通訊。

本 AWS 教學課程會引導您建立 Amazon Lex 聊天機器人,並將其整合到 Node.js Web 應用程式。 適用於 JavaScript 的 AWS SDK (v3) 用於叫用 AWS 這些服務:
-
Amazon Lex
-
Amazon Comprehend
-
Amazon Translate
完成成本:本文件中包含 AWS 的服務包含在 AWS 免費方案
注意:請務必在進行本教學課程時終止您建立的所有資源,以確保您不會付費。
先決條件
若要設定和執行此範例,您必須先完成這些任務:
-
設定專案環境以執行這些 Node TypeScript 範例,並安裝必要的 適用於 JavaScript 的 AWS SDK 和第三方模組。遵循 GitHub
上的指示。 -
透過使用者登入資料建立共用組態檔。如需提供共用登入資料檔案的詳細資訊,請參閱 AWS SDKs 和工具參考指南中的共用組態和登入資料檔案。
重要
此範例使用 ECMAScript6 (ES6)。這需要 Node.js 13.x 版或更新版本。若要下載並安裝最新版本的 Node.js,請參閱 Node.js 下載。
不過,如果您偏好使用 CommonJS 語法,請參閱 JavaScript ES6/CommonJS 語法。
建立 AWS 資源
本教學課程需要下列資源。
-
未驗證的 IAM 角色,其已附加許可至:
Amazon Comprehend
Amazon Translate
Amazon Lex
您可以手動建立此資源,但建議您使用 佈建這些資源, AWS CloudFormation 如本教學所述。
使用 建立 AWS 資源 AWS CloudFormation
AWS CloudFormation 可讓您以可預測且重複的方式建立和佈建 AWS 基礎設施部署。如需 的詳細資訊 AWS CloudFormation,請參閱AWS CloudFormation 《 使用者指南》。
若要使用 建立 AWS CloudFormation 堆疊 AWS CLI:
AWS CLI 依照 AWS CLI 使用者指南中的說明安裝和設定 。
在專案資料夾的
setup.yaml根目錄中建立名為 的檔案,並將 GitHub 上的此處內容複製到其中。 注意
AWS CloudFormation 範本是使用 GitHub 上此處
提供的 AWS CDK 產生。如需 的詳細資訊 AWS CDK,請參閱 AWS Cloud Development Kit (AWS CDK) 開發人員指南。 從命令列執行下列命令,將
STACK_NAME取代為堆疊的唯一名稱。重要
堆疊名稱在 AWS 區域和 AWS 帳戶中必須是唯一的。您最多可以指定 128 個字元,且允許數字和連字號。
aws cloudformation create-stack --stack-name STACK_NAME --template-body file://setup.yaml --capabilities CAPABILITY_IAM如需
create-stack命令參數的詳細資訊,請參閱 AWS CLI 命令參考指南和 AWS CloudFormation 使用者指南。若要檢視建立的資源,請開啟 Amazon Lex 主控台,選擇堆疊,然後選取資源索引標籤。
建立 Amazon Lex 機器人
重要
使用 Amazon Lex 主控台的 V1 來建立機器人。此範例不適用於使用 V2 建立的機器人。
第一步是使用 Amazon Web Services 管理主控台建立 Amazon Lex 聊天機器人。在此範例中,使用 Amazon Lex BookTrip 範例。如需詳細資訊,請參閱預訂行程。
-
登入 Amazon Web Services 管理主控台,並在 Amazon Web Services 主控台開啟 Amazon Lex 主控台
。 -
在機器人頁面上,選擇建立。
-
選擇 BookTrip 藍圖 (保留預設機器人名稱 BookTrip)。

-
填寫預設設定,然後選擇建立 (主控台會顯示 BookTrip 機器人)。在編輯器索引標籤上,檢閱預先設定意圖的詳細資訊。
-
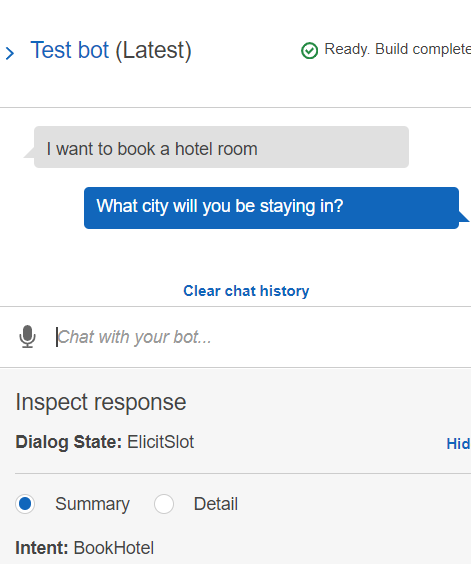
在測試視窗中測試機器人。輸入我想要預訂飯店房間來開始測試。

-
選擇發佈並指定別名名稱 (使用 時需要此值 適用於 JavaScript 的 AWS SDK)。
注意
您需要在 JavaScript 程式碼中參考機器人名稱和機器人別名。
建立 HTML
建立名為 index.html 的檔案。將下面的程式碼複製並貼到 。 index.html此 HTML 參考 main.js。這是 index.js 的套件版本,其中包含必要的 適用於 JavaScript 的 AWS SDK 模組。您將在 中建立此檔案建立 HTML。 index.html也參考 style.css,這會新增樣式。
<!doctype html>
<head>
  <title>Amazon Lex - Sample Application (BookTrip)</title>
  <link type="text/css" rel="stylesheet" href="style.css" />
</head>

<body>
  <h1 id="title">Amazon Lex - BookTrip</h1>
  <p id="intro">
    This multiple language chatbot shows you how easy it is to incorporate
    <a
      href="https://aws.amazon.com/lex/"
      title="Amazon Lex (product)"
      target="_new"
      >Amazon Lex</a
    >
    into your web apps. Try it out.
  </p>
  <div id="conversation"></div>
  <input
    type="text"
    id="wisdom"
    size="80"
    value=""
    placeholder="J'ai besoin d'une chambre d'hôtel"
  />
  <br />
  <button onclick="createResponse()">Send Text</button>
  <script type="text/javascript" src="./main.js"></script>
</body>
此程式碼也可在 GitHub 上取得
建立瀏覽器指令碼
建立名為 index.js 的檔案。將下面的程式碼複製並貼到 中index.js。匯入必要的 適用於 JavaScript 的 AWS SDK 模組和命令。為 Amazon Lex、Amazon Comprehend 和 Amazon Translate 建立用戶端。將 REGION 取代為 AWS 區域,並將 IDENTITY_POOL_ID 取代為您在 中建立的身分集區的 ID建立 AWS 資源 。若要擷取此身分集區 ID,請在 Amazon Cognito 主控台中開啟身分集區,選擇編輯身分集區,然後在側邊功能表中選擇範例程式碼。身分集區 ID 在主控台中以紅色文字顯示。
首先,建立libs目錄建立所需的服務用戶端物件,方法是建立三個檔案 comprehendClient.js、 lexClient.js和 translateClient.js。將以下適當的程式碼貼到每個檔案中,並取代每個檔案中的 REGION 和 IDENTITY_POOL_ID。
注意
使用您在 中建立的 Amazon Cognito 身分集區的 ID使用 建立 AWS 資源 AWS CloudFormation。
import { CognitoIdentityClient } from "@aws-sdk/client-cognito-identity";
import { fromCognitoIdentityPool } from "@aws-sdk/credential-provider-cognito-identity";
import { ComprehendClient } from "@aws-sdk/client-comprehend";

const REGION = "REGION";
const IDENTITY_POOL_ID = "IDENTITY_POOL_ID"; // An Amazon Cognito Identity Pool ID.

// Create an Amazon Comprehend service client object.
const comprehendClient = new ComprehendClient({
  region: REGION,
  credentials: fromCognitoIdentityPool({
    client: new CognitoIdentityClient({ region: REGION }),
    identityPoolId: IDENTITY_POOL_ID,
  }),
});

export { comprehendClient };
import { CognitoIdentityClient } from "@aws-sdk/client-cognito-identity";
import { fromCognitoIdentityPool } from "@aws-sdk/credential-provider-cognito-identity";
import { LexRuntimeServiceClient } from "@aws-sdk/client-lex-runtime-service";

const REGION = "REGION";
const IDENTITY_POOL_ID = "IDENTITY_POOL_ID"; // An Amazon Cognito Identity Pool ID.

// Create an Amazon Lex service client object.
const lexClient = new LexRuntimeServiceClient({
  region: REGION,
  credentials: fromCognitoIdentityPool({
    client: new CognitoIdentityClient({ region: REGION }),
    identityPoolId: IDENTITY_POOL_ID,
  }),
});

export { lexClient };
import { CognitoIdentityClient } from "@aws-sdk/client-cognito-identity";
import { fromCognitoIdentityPool } from "@aws-sdk/credential-provider-cognito-identity";
import { TranslateClient } from "@aws-sdk/client-translate";

const REGION = "REGION";
const IDENTITY_POOL_ID = "IDENTITY_POOL_ID"; // An Amazon Cognito Identity Pool ID.

// Create an Amazon Translate service client object.
const translateClient = new TranslateClient({
  region: REGION,
  credentials: fromCognitoIdentityPool({
    client: new CognitoIdentityClient({ region: REGION }),
    identityPoolId: IDENTITY_POOL_ID,
  }),
});

export { translateClient };
此程式碼可在 GitHub 上取得。
接著,建立 index.js 檔案,並將下面的程式碼貼到其中。
將 BOT_ALIAS 和 BOT_NAME 分別取代為 Amazon Lex 機器人的別名和名稱,並將 USER_ID 取代為使用者 ID。createResponse 非同步函數會執行下列動作:
將使用者輸入的文字帶入瀏覽器,並使用 Amazon Comprehend 來判斷其語言代碼。
使用語言代碼並使用 Amazon Translate 將文字翻譯為英文。
接受翻譯的文字,並使用 Amazon Lex 產生回應。
將回應發佈至瀏覽器頁面。
import { DetectDominantLanguageCommand } from "@aws-sdk/client-comprehend";
import { TranslateTextCommand } from "@aws-sdk/client-translate";
import { PostTextCommand } from "@aws-sdk/client-lex-runtime-service";
import { lexClient } from "./libs/lexClient.js";
import { translateClient } from "./libs/translateClient.js";
import { comprehendClient } from "./libs/comprehendClient.js";

let g_text = "";
// Set the focus to the input box.
document.getElementById("wisdom").focus();

function showRequest() {
  const conversationDiv = document.getElementById("conversation");
  const requestPara = document.createElement("P");
  requestPara.className = "userRequest";
  requestPara.appendChild(document.createTextNode(g_text));
  conversationDiv.appendChild(requestPara);
  conversationDiv.scrollTop = conversationDiv.scrollHeight;
}

function showResponse(lexResponse) {
  const conversationDiv = document.getElementById("conversation");
  const responsePara = document.createElement("P");
  responsePara.className = "lexResponse";

  const lexTextResponse = lexResponse;

  responsePara.appendChild(document.createTextNode(lexTextResponse));
  responsePara.appendChild(document.createElement("br"));
  conversationDiv.appendChild(responsePara);
  conversationDiv.scrollTop = conversationDiv.scrollHeight;
}

function handletext(text) {
  g_text = text;
  const xhr = new XMLHttpRequest();
  xhr.addEventListener("load", loadNewItems, false);
  xhr.open("POST", "../text", true); // A Spring MVC controller
  xhr.setRequestHeader("Content-type", "application/x-www-form-urlencoded"); //necessary
  xhr.send(`text=${text}`);
}

function loadNewItems() {
  showRequest();

  // Re-enable input.
  const wisdomText = document.getElementById("wisdom");
  wisdomText.value = "";
  wisdomText.locked = false;
}

// Respond to user's input.
const createResponse = async () => {
  // Confirm there is text to submit.
  const wisdomText = document.getElementById("wisdom");
  if (wisdomText?.value && wisdomText.value.trim().length > 0) {
    // Disable input to show it is being sent.
    const wisdom = wisdomText.value.trim();
    wisdomText.value = "...";
    wisdomText.locked = true;
    handletext(wisdom);

    const comprehendParams = {
      Text: wisdom,
    };
    try {
      const data = await comprehendClient.send(
        new DetectDominantLanguageCommand(comprehendParams),
      );
      console.log(
        "Success. The language code is: ",
        data.Languages[0].LanguageCode,
      );
      const translateParams = {
        SourceLanguageCode: data.Languages[0].LanguageCode,
        TargetLanguageCode: "en", // For example, "en" for English.
        Text: wisdom,
      };
      try {
        const data = await translateClient.send(
          new TranslateTextCommand(translateParams),
        );
        console.log("Success. Translated text: ", data.TranslatedText);
        const lexParams = {
          botName: "BookTrip",
          botAlias: "mynewalias",
          inputText: data.TranslatedText,
          userId: "chatbot", // For example, 'chatbot-demo'.
        };
        try {
          const data = await lexClient.send(new PostTextCommand(lexParams));
          console.log("Success. Response is: ", data.message);
          const msg = data.message;
          showResponse(msg);
        } catch (err) {
          console.log("Error responding to message. ", err);
        }
      } catch (err) {
        console.log("Error translating text. ", err);
      }
    } catch (err) {
      console.log("Error identifying language. ", err);
    }
  }
};
// Make the function available to the browser.
window.createResponse = createResponse;
此程式碼可在 GitHub 上取得。
現在使用 webpack 將 index.js和 適用於 JavaScript 的 AWS SDK 模組綁定到單一檔案 main.js。
如果您尚未安裝,請遵循此範例先決條件的 來安裝 Webpack。
注意
如需 Webpack 的詳細資訊,請參閱 使用 Webpack 綁定應用程式。
在命令列中執行下列命令,將此範例的 JavaScript 綁定到名為 的檔案
main.js:webpack index.js --mode development --target web --devtool false -o main.js
後續步驟
恭喜您!您已建立使用 Amazon Lex 建立互動式使用者體驗的 Node.js 應用程式。如本教學課程開頭所述,請務必在進行本教學課程時終止您建立的所有資源,以確保不會向您收費。您可以透過刪除在本教學建立 AWS 資源 課程中建立的 AWS CloudFormation 堆疊來執行此操作,如下所示:
在堆疊頁面上,選取堆疊。
選擇 刪除 。
如需更多 AWS 跨服務範例,請參閱適用於 JavaScript 的 AWS SDK 跨服務範例。