Using Amazon Aurora machine learning with Aurora PostgreSQL
By using Amazon Aurora machine learning with your Aurora PostgreSQL DB cluster, you can use Amazon Comprehend or Amazon SageMaker AI or Amazon Bedrock, depending on your needs. These services each support specific machine learning use cases.
Aurora machine learning is supported in certain AWS Regions and for specific versions of Aurora PostgreSQL only. Before trying to set up Aurora machine learning, check availability for your Aurora PostgreSQL version and your Region. For details, see Aurora machine learning with Aurora PostgreSQL.
Topics
Requirements for using Aurora machine learning with Aurora PostgreSQL
Supported features and limitations of Aurora machine learning with Aurora PostgreSQL
Setting up your Aurora PostgreSQL DB cluster to use Aurora machine learning
Using Amazon Comprehend with your Aurora PostgreSQL DB cluster
Exporting data to Amazon S3 for SageMaker AI model training (Advanced)
Performance considerations for using Aurora machine learning with Aurora PostgreSQL
Requirements for using Aurora machine learning with Aurora PostgreSQL
AWS machine learning services are managed services that are set up and run in their own production environments. Aurora machine learning supports integration with Amazon Comprehend, SageMaker AI, and Amazon Bedrock. Before trying to set up your Aurora PostgreSQL DB cluster to use Aurora machine learning, be sure you understand the following requirements and prerequisites.
The Amazon Comprehend, SageMaker AI, and Amazon Bedrock services must be running in the same AWS Region as your Aurora PostgreSQL DB cluster. You can't use Amazon Comprehend or SageMaker AI or Amazon Bedrock services from an Aurora PostgreSQL DB cluster in a different Region.
If your Aurora PostgreSQL DB cluster is in a different virtual public cloud (VPC) based on the Amazon VPC service than your Amazon Comprehend and SageMaker AI services, the VPC's Security group needs to allow outbound connections to the target Aurora machine learning service. For more information, see Enabling network communication from Amazon Aurora to other AWS services.
For SageMaker AI, the machine learning components that you want to use for inferences must be set up and ready to use. During the configuration process for your Aurora PostgreSQL DB cluster, you need to have the Amazon Resource Name (ARN) of the SageMaker AI endpoint available. The data scientists on your team are likely best able to handle working with SageMaker AI to prepare the models and handle the other such tasks. To get started with Amazon SageMaker AI, see Get Started with Amazon SageMaker AI. For more information about inferences and endpoints, see Real-time inference.
-
For Amazon Bedrock, you need to have the model ID of the Bedrock models that you want to use for inferences available during the configuration process of your Aurora PostgreSQL DB cluster. The data scientists on your team are likely best able to work with Bedrock to decide which models to use, fine tune them if needed and handle other such tasks. To get started with Amazon Bedrock, see How to setup Bedrock.
-
Amazon Bedrock users need to request access to models before they are available for use. If you want to add additional models for text, chat, and image generation, you need to request access to models in Amazon Bedrock. For more information, see Model access.
Supported features and limitations of Aurora machine learning with Aurora PostgreSQL
Aurora machine learning supports any SageMaker AI endpoint that can read and write the comma-separated
value (CSV) format through a ContentType value of text/csv. The
built-in SageMaker AI algorithms that currently accept this format are the following.
Linear Learner
Random Cut Forest
XGBoost
To learn more about these algorithms, see Choose an Algorithm in the Amazon SageMaker AI Developer Guide.
When using Amazon Bedrock with Aurora machine learning, the following limitations apply:
-
The user-defined functions (UDFs) provide a native way to interact with Amazon Bedrock. The UDFs don't have specific request or response requirements, so they can use any model.
-
You can use UDFs to build any work flow desired. For example, you can combine base primitives such as
pg_cronto run a query, fetch data, generate inferences, and write to tables to serve queries directly. -
UDFs don't support batched or parallel calls.
-
The Aurora Machine Learning extension doesn't support vector interfaces. As part of the extension, a function is available to output the embeddings of model’s response in the
float8[]format to store those embeddings in Aurora. For more information on the usage offloat8[], see Using Amazon Bedrock with your Aurora PostgreSQL DB cluster.
Setting up your Aurora PostgreSQL DB cluster to use Aurora machine learning
For Aurora machine learning to work with your Aurora PostgreSQL DB cluster, you need to create an AWS Identity and Access Management (IAM) role for each of the services that you want to use. The IAM role allows your Aurora PostgreSQL DB cluster to use the Aurora machine learning service on the cluster's behalf. You also need to install the Aurora machine learning extension. In the following topics, you can find setup procedures for each of these Aurora machine learning services.
Topics
Setting up Aurora PostgreSQL to use Amazon Bedrock
In the procedure following, you first create the IAM role and policy that gives your Aurora PostgreSQL permission to use Amazon Bedrock on the cluster's behalf. You then attach the policy to an IAM role that your Aurora PostgreSQL DB cluster uses to work with Amazon Bedrock. For simplicity's sake, this procedure uses the AWS Management Console to complete all tasks.
To set up your Aurora PostgreSQL DB cluster to use Amazon Bedrock
Sign in to the AWS Management Console and open the IAM console at https://console.aws.amazon.com/iam/
. Open the IAM console at https://console.aws.amazon.com/iam/
. Choose Policies (under Access management) on the AWS Identity and Access Management (IAM) Console menu.
Choose Create policy. In the Visual editor page, choose Service and then enter Bedrock in the Select a service field. Expand the Read access level. Choose InvokeModel from the Amazon Bedrock read settings.
Choose the Foundation/Provisioned model you want to grant read access via the policy.

Choose Next: Tags and define any tags (this is optional). Choose Next: Review. Enter a Name for the policy and description, as shown in the image.

Choose Create policy. The Console displays an alert when the policy has been saved. You can find it in the list of Policies.
Choose Roles (under Access management) on the IAM Console.
Choose Create role.
On the Select trusted entity page, choose the AWS service tile, and then choose RDS to open the selector.
Choose RDS – Add Role to Database.

Choose Next. On the Add permissions page, find the policy that you created in the previous step and choose it from among those listed. Choose Next.
Next: Review. Enter a name for the IAM role and a description.
Open the Amazon RDS console at https://console.aws.amazon.com/rds/
. Navigate to the AWS Region where your Aurora PostgreSQL DB cluster is located.
-
In the navigation pane, choose Databases, and then choose the Aurora PostgreSQL DB cluster that you want to use with Bedrock.
-
Choose the Connectivity & security tab and scroll to find the Manage IAM roles section of the page. From the Add IAM roles to this cluster selector, choose the role that you created in the previous steps. In the Feature selector, choose Bedrock, and then choose Add role.
The role (with its policy) are associated with the Aurora PostgreSQL DB cluster. When the process completes, the role is listed in the Current IAM roles for this cluster listing, as shown following.

The IAM setup for Amazon Bedrock is complete. Continue setting up your Aurora PostgreSQL to work with Aurora machine learning by installing the extension as detailed in Installing the Aurora machine learning extension
Setting up Aurora PostgreSQL to use Amazon Comprehend
In the procedure following, you first create the IAM role and policy that gives your Aurora PostgreSQL permission to use Amazon Comprehend on the cluster's behalf. You then attach the policy to an IAM role that your Aurora PostgreSQL DB cluster uses to work with Amazon Comprehend For simplicity's sake, this procedure uses the AWS Management Console to complete all tasks.
To set up your Aurora PostgreSQL DB cluster to use Amazon Comprehend
Sign in to the AWS Management Console and open the IAM console at https://console.aws.amazon.com/iam/
. Open the IAM console at https://console.aws.amazon.com/iam/
. Choose Policies (under Access management) on the AWS Identity and Access Management (IAM) Console menu.

Choose Create policy. In the Visual editor page, choose Service and then enter Comprehend in the Select a service field. Expand the Read access level. Choose BatchDetectSentiment and DetectSentiment from the Amazon Comprehend read settings.
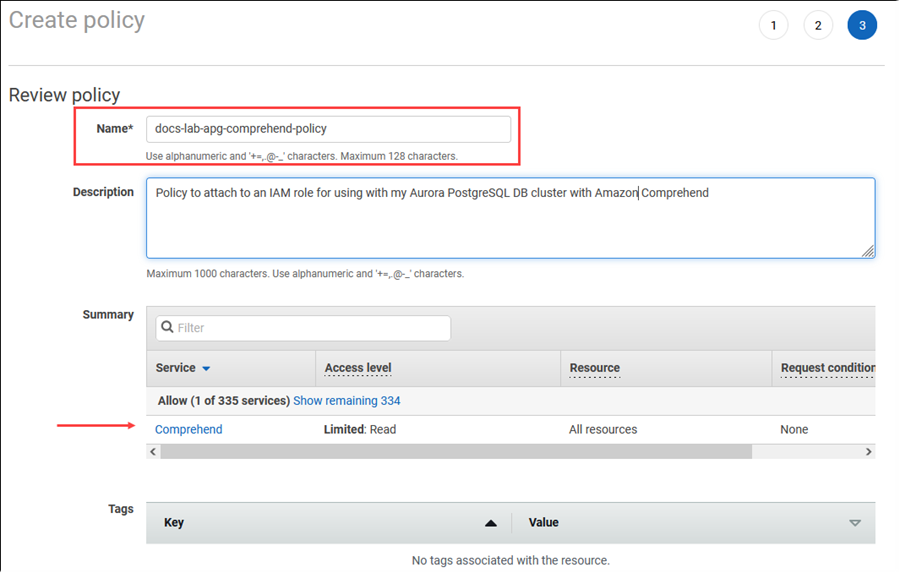
Choose Next: Tags and define any tags (this is optional). Choose Next: Review. Enter a Name for the policy and description, as shown in the image.
Choose Create policy. The Console displays an alert when the policy has been saved. You can find it in the list of Policies.
Choose Roles (under Access management) on the IAM Console.
Choose Create role.
On the Select trusted entity page, choose the AWS service tile, and then choose RDS to open the selector.
Choose RDS – Add Role to Database.

Choose Next. On the Add permissions page, find the policy that you created in the previous step and choose it from among those listed. Choose Next
Next: Review. Enter a name for the IAM role and a description.
Open the Amazon RDS console at https://console.aws.amazon.com/rds/
. Navigate to the AWS Region where your Aurora PostgreSQL DB cluster is located.
-
In the navigation pane, choose Databases, and then choose the Aurora PostgreSQL DB cluster that you want to use with Amazon Comprehend.
-
Choose the Connectivity & security tab and scroll to find the Manage IAM roles section of the page. From the Add IAM roles to this cluster selector, choose the role that you created in the previous steps. In the Feature selector, choose Comprehend, and then choose Add role.
The role (with its policy) are associated with the Aurora PostgreSQL DB cluster. When the process completes, the role is listed in the Current IAM roles for this cluster listing, as shown following.

The IAM setup for Amazon Comprehend is complete. Continue setting up your Aurora PostgreSQL to work with Aurora machine learning by installing the extension as detailed in Installing the Aurora machine learning extension
Setting up Aurora PostgreSQL to use Amazon SageMaker AI
Before you can create the IAM policy and role for your Aurora PostgreSQL DB cluster, you need to have your SageMaker AI model setup and your endpoint available.
To set up your Aurora PostgreSQL DB cluster to use SageMaker AI
Sign in to the AWS Management Console and open the IAM console at https://console.aws.amazon.com/iam/
. Choose Policies (under Access management) on the AWS Identity and Access Management (IAM) Console menu, and then choose Create policy. In the Visual editor, choose SageMaker for the Service. For Actions, open the Read selector (under Access level) and choose InvokeEndpoint. When you this, a warning icon displays.
Open the Resources selector and choose the Add ARN to restrict access link under the Specify endpoint resource ARN for the InvokeEndpoint action.
Enter the AWS Region of your SageMaker AI resources and the name of your endpoint. Your AWS account is prefilled.

Choose Add to save. Choose Next: Tags and Next: Review to get to the last page of the policy creation process.
Enter a Name and Description for this policy, and then choose Create policy. The policy is created and is added to the Policies list. You see an alert in the Console as this occurs.
On the IAM Console, choose Roles.
Choose Create role.
On the Select trusted entity page, choose the AWS service tile, and then choose RDS to open the selector.
Choose RDS – Add Role to Database.
Choose Next. On the Add permissions page, find the policy that you created in the previous step and choose it from among those listed. Choose Next
Next: Review. Enter a name for the IAM role and a description.
Open the Amazon RDS console at https://console.aws.amazon.com/rds/
. Navigate to the AWS Region where your Aurora PostgreSQL DB cluster is located.
-
In the navigation pane, choose Databases, and then choose the Aurora PostgreSQL DB cluster that you want to use with SageMaker AI.
-
Choose the Connectivity & security tab and scroll to find the Manage IAM roles section of the page. From the Add IAM roles to this cluster selector, choose the role that you created in the previous steps. In the Feature selector, choose SageMaker AI, and then choose Add role.
The role (with its policy) are associated with the Aurora PostgreSQL DB cluster. When the process completes, the role is listed in the Current IAM roles for this cluster listing.
The IAM setup for SageMaker AI is complete. Continue setting up your Aurora PostgreSQL to work with Aurora machine learning by installing the extension as detailed in Installing the Aurora machine learning extension.
Setting up Aurora PostgreSQL to use Amazon S3 for SageMaker AI (Advanced)
To use SageMaker AI with your own models rather than using the pre-built components provided by SageMaker AI, you need to set up an Amazon Simple Storage Service (Amazon S3) bucket for Aurora PostgreSQL DB cluster to use. This is an advanced topic, and isn't fully documented in this Amazon Aurora User Guide. The general process is the same as for integrating support for SageMaker AI, as follows.
Create the IAM policy and role for Amazon S3.
Add the IAM role and the Amazon S3 import or export as a feature on the Connectivity & security tab of your Aurora PostgreSQL DB cluster.
Add the ARN of the role to your custom DB cluster parameter group for your Aurora DB cluster.
For basic usage information, see Exporting data to Amazon S3 for SageMaker AI model training (Advanced).
Installing the Aurora machine learning extension
The Aurora machine learning extensions aws_ml 1.0 provides two functions that you can use to invoke Amazon Comprehend,
SageMaker AI services and aws_ml 2.0 provides two additional functions that you can use to invoke Amazon Bedrock services.
Installing these extensions on your Aurora PostgreSQL DB cluster also creates an administrative
role for the feature.
Note
Using these functions depends on having the IAM setup for the Aurora machine learning service (Amazon Comprehend, SageMaker AI, Amazon Bedrock) complete, as detailed in Setting up your Aurora PostgreSQL DB cluster to use Aurora machine learning.
aws_comprehend.detect_sentiment – You use this function to apply sentiment analysis to text stored in in the database on your Aurora PostgreSQL DB cluster.
aws_sagemaker.invoke_endpoint – You use this function in your SQL code to communicate with the SageMaker AI endpoint from your cluster.
aws_bedrock.invoke_model – You use this function in your SQL code to communicate with the Bedrock Models from your cluster. The response of this function will be in the format of a TEXT, so if a model responds in the format of a JSON body then the output of this function will be relayed in the format of a string to the end user.
aws_bedrock.invoke_model_get_embeddings – You use this function in your SQL code to invoke Bedrock Models that return output embeddings within a JSON response. This can be leveraged when you want to extract the embeddings directly associated with the json-key to streamline the response with any self-managed workflows.
To install the Aurora machine learning extension in your Aurora PostgreSQL DB cluster
Use
psqlto connect to the writer instance of your Aurora PostgreSQL DB cluster. Connect to the specific database in which to install theaws_mlextension.psql --host=cluster-instance-1.111122223333.aws-region.rds.amazonaws.com --port=5432 --username=postgres --password --dbname=labdb
labdb=>CREATE EXTENSION IF NOT EXISTS aws_ml CASCADE;NOTICE: installing required extension "aws_commons" CREATE EXTENSIONlabdb=>
Installing the aws_ml extensions also creates the aws_ml
administrative role and three new schemas, as follows.
aws_comprehend– Schema for the Amazon Comprehend service and source of thedetect_sentimentfunction (aws_comprehend.detect_sentiment).aws_sagemaker– Schema for the SageMaker AI service and source of theinvoke_endpointfunction (aws_sagemaker.invoke_endpoint).aws_bedrock– Schema for the Amazon Bedrock service and source of theinvoke_model(aws_bedrock.invoke_model)andinvoke_model_get_embeddings(aws_bedrock.invoke_model_get_embeddings)functions.
The rds_superuser role is granted the aws_ml administrative role and is made the
OWNER of these three Aurora machine learning schemas. To allow other database users to access
the Aurora machine learning functions, the rds_superuser needs to grant EXECUTE privileges
on the Aurora machine learning functions. By default, EXECUTE privileges are revoked from PUBLIC
on the functions in the two Aurora machine learning schemas.
In a multi-tenant database configuration, you can
prevent tenants from accessing Aurora machine learning functions by using REVOKE USAGE on
the specific Aurora machine learning schema that you want to protect.
Using Amazon Bedrock with your Aurora PostgreSQL DB cluster
For Aurora PostgreSQL, Aurora machine learning provides the following Amazon Bedrock function for working with your text data. This function
is available only after you install the aws_ml 2.0 extension and complete all setup procedures. For more information,
see Setting up your Aurora PostgreSQL DB cluster to use Aurora machine learning.
- aws_bedrock.invoke_model
-
This function takes text formatted in JSON as input and processes it for variety of models hosted on Amazon Bedrock and gets back the JSON text response from the model. This response could contain text, image, or embeddings. A summary of the function's documentation is as follows.
aws_bedrock.invoke_model(
   IN model_id      varchar,
   IN content_type  text,
   IN accept_type   text,
   IN model_input   text,
   OUT model_output varchar)
The inputs and outputs of this function are as follows.
-
model_id– Identifier of the model. content_type– The type of the request to Bedrock’s model.accept_type– The type of the response to expect from Bedrock’s model. Usually application/JSON for most of the models.model_input– Prompts; a specific set of inputs to the model in the format as specified by content_type. For more information on the request format/structure the model accepts, see Inference parameters for foundation models.model_output– The Bedrock model's output as text.
The following example shows how to invoke a Anthropic Claude 2 model for Bedrock using invoke_model.
Example: A simple query using Amazon Bedrock functions
SELECT aws_bedrock.invoke_model (
    model_id    := 'anthropic.claude-v2',
    content_type:= 'application/json',
    accept_type := 'application/json',
    model_input := '{"prompt": "\n\nHuman: You are a helpful assistant that answers questions directly and only using the information provided in the context below.\nDescribe the answer
    in detail.\n\nContext: %s \n\nQuestion: %s \n\nAssistant:","max_tokens_to_sample":4096,"temperature":0.5,"top_k":250,"top_p":0.5,"stop_sequences":[]}'
);
- aws_bedrock.invoke_model_get_embeddings
-
The model output can point to vector embeddings for some cases. Given the response varies per model, another function invoke_model_get_embeddings can be leveraged which works exactly like invoke_model but outputs the embeddings by specifying the appropriate json-key.
aws_bedrock.invoke_model_get_embeddings(
   IN model_id      varchar,
   IN content_type  text,
   IN json_key      text,
   IN model_input   text,
   OUT model_output float8[])
The inputs and outputs of this function are as follows.
-
model_id– Identifier of the model. content_type– The type of the request to Bedrock’s model. Here, the accept_type is set to default valueapplication/json.model_input– Prompts; a specific set of inputs to the Model in the format as specified by content_type. For more information on the request format/structure the Model accepts, see Inference parameters for foundation models.json_key– Reference to the field to extract the embedding from. This may vary if the embedding model changes.-
model_output– The Bedrock model's output as an array of embeddings having 16 bit decimals.
The following example shows how to generate an embedding using the Titan Embeddings G1 – Text embedding model for the phrase PostgreSQL I/O monitoring views.
Example: A simple query using Amazon Bedrock functions
SELECT aws_bedrock.invoke_model_get_embeddings(
   model_id      := 'amazon.titan-embed-text-v1',
   content_type  := 'application/json',
   json_key      := 'embedding',
   model_input   := '{ "inputText": "PostgreSQL I/O monitoring views"}') AS embedding;
Using Amazon Comprehend with your Aurora PostgreSQL DB cluster
For Aurora PostgreSQL, Aurora machine learning provides the following Amazon Comprehend function for working with your text data. This function
is available only after you install the aws_ml extension and complete all setup procedures. For more information,
see Setting up your Aurora PostgreSQL DB cluster to use Aurora machine learning.
- aws_comprehend.detect_sentiment
-
This function takes text as input and evaluates whether the text has a a positive, negative, neutral, or mixed emotional posture. It outputs this sentiment along with a confidence level for its evaluation. A summary of the function's documentation is as follows.
aws_comprehend.detect_sentiment(
   IN input_text varchar,
   IN language_code varchar,
   IN max_rows_per_batch int,
   OUT sentiment varchar,
   OUT confidence real)
The inputs and outputs of this function are as follows.
-
input_text– The text to evaluate and to assign sentiment (negative, positive, neutral, mixed). language_code– The language of theinput_textidentified using the 2-letter ISO 639-1 identifier with regional subtag (as needed) or the ISO 639-2 three-letter code, as appropriate. For example,enis the code for English,zhis the code for simplified Chinese. For more information, see Supported languages in the Amazon Comprehend Developer Guide.max_rows_per_batch– The maximum number of rows per batch for batch-mode processing. For more information, see Understanding batch mode and Aurora machine learning functions.sentiment– The sentiment of the input text, identified as POSITIVE, NEGATIVE, NEUTRAL, or MIXED.confidence– The degree of confidence in the accuracy of the specifiedsentiment. Values range from 0.0 to 1.0.
In the following, you can find examples of how to use this function.
Example: A simple query using Amazon Comprehend functions
Here's an example of a simple query that invokes this function to assess customer
satisfaction with your support team. Suppose you have a database table
(support) that stores customer feedback after each request for help. This
example query applies the aws_comprehend.detect_sentiment function to the text
in the feedback column of the table and outputs the sentiment and the
confidence level for that sentiment. This query also outputs results in descending order.
SELECT feedback, s.sentiment,s.confidence FROM support,aws_comprehend.detect_sentiment(feedback, 'en') s ORDER BY s.confidence DESC;feedback | sentiment | confidence ----------------------------------------------------------+-----------+------------ Thank you for the excellent customer support! | POSITIVE | 0.999771 The latest version of this product stinks! | NEGATIVE | 0.999184 Your support team is just awesome! I am blown away. | POSITIVE | 0.997774 Your product is too complex, but your support is great. | MIXED | 0.957958 Your support tech helped me in fifteen minutes. | POSITIVE | 0.949491 My problem was never resolved! | NEGATIVE | 0.920644 When will the new version of this product be released? | NEUTRAL | 0.902706 I cannot stand that chatbot. | NEGATIVE | 0.895219 Your support tech talked down to me. | NEGATIVE | 0.868598 It took me way too long to get a real person. | NEGATIVE | 0.481805 (10 rows)
To avoid being charged for sentiment detection more than once per table row, you can
materialize the results. Do this on the rows of interest. For example,
the clinician's notes are being updated so that only those in French (fr) use
the sentiment detection function.
UPDATE clinician_notes
SET sentiment = (aws_comprehend.detect_sentiment (french_notes, 'fr')).sentiment,
    confidence = (aws_comprehend.detect_sentiment (french_notes, 'fr')).confidence
WHERE
    clinician_notes.french_notes IS NOT NULL AND
    LENGTH(TRIM(clinician_notes.french_notes)) > 0 AND
    clinician_notes.sentiment IS NULL;
For more information on optimizing your function calls, see Performance considerations for using Aurora machine learning with Aurora PostgreSQL.
Using SageMaker AI with your Aurora PostgreSQL DB cluster
After setting up your SageMaker AI environment and integrating with Aurora PostgreSQL as outlined in
Setting up Aurora PostgreSQL to use Amazon SageMaker AI,
you can invoke operations by using the aws_sagemaker.invoke_endpoint function.
The aws_sagemaker.invoke_endpoint function connects only to a model
endpoint in the same AWS Region. If your database instance has replicas in multiple AWS Regions
be sure that you setup and deploy each SageMaker AI model to every AWS Region.
Calls to aws_sagemaker.invoke_endpoint are authenticated using the IAM
role that you set up to associated your Aurora PostgreSQL DB cluster with the SageMaker AI service and the endpoint
that you provided during the setup process. SageMaker AI model endpoints are scoped to an individual account and are not public. The
endpoint_name URL doesn't contain the account ID. SageMaker AI determines the
account ID from the authentication token that is supplied by the SageMaker AI IAM role of the
database instance.
- aws_sagemaker.invoke_endpoint
This function takes the SageMaker AI endpoint as input and the number of rows that should be processed as a batch. It also takes as input the various parameters expected by the SageMaker AI model endpoint. This function's reference documentation is as follows.
aws_sagemaker.invoke_endpoint(
  IN endpoint_name varchar,
  IN max_rows_per_batch int,
  VARIADIC model_input "any",
  OUT model_output varchar
  )
The inputs and outputs of this function are as follows.
endpoint_name– An endpoint URL that is AWS Region–independent.max_rows_per_batch– The maximum number of rows per batch for batch-mode processing. For more information, see Understanding batch mode and Aurora machine learning functions.model_input– One or more input parameters for the model. These can be any data type needed by the SageMaker AI model. PostgreSQL allows you to specify up to 100 input parameters for a function. Array data types must be one-dimensional, but can contain as many elements as are expected by the SageMaker AI model. The number of inputs to a SageMaker AI model is limited only by the SageMaker AI 6 MB message size limit.model_output– The SageMaker AI model's output as text.
Creating a user-defined function to invoke a SageMaker AI model
Create a separate user-defined function to call
aws_sagemaker.invoke_endpoint for each of your SageMaker AI models. Your
user-defined function represents the SageMaker AI endpoint hosting the model. The
aws_sagemaker.invoke_endpoint function runs within the user-defined function.
User-defined functions provide many advantages:
-
You can give your SageMaker AI model its own name instead of only calling
aws_sagemaker.invoke_endpointfor all of your SageMaker AI models. -
You can specify the model endpoint URL in just one place in your SQL application code.
-
You can control
EXECUTEprivileges to each Aurora machine learning function independently. -
You can declare the model input and output types using SQL types. SQL enforces the number and type of arguments passed to your SageMaker AI model and performs type conversion if necessary. Using SQL types will also translate
SQL NULLto the appropriate default value expected by your SageMaker AI model. -
You can reduce the maximum batch size if you want to return the first few rows a little faster.
To specify a user-defined function, use the SQL data definition language (DDL) statement
CREATE FUNCTION. When you define the function, you specify the
following:
-
The input parameters to the model.
-
The specific SageMaker AI endpoint to invoke.
-
The return type.
The user-defined function returns the inference computed by the SageMaker AI endpoint after running the model on the input parameters. The following example creates a user-defined function for an SageMaker AI model with two input parameters.
CREATE FUNCTION classify_event (IN arg1 INT, IN arg2 DATE, OUT category INT)
AS $$
    SELECT aws_sagemaker.invoke_endpoint (
        'sagemaker_model_endpoint_name', NULL,
        arg1, arg2                        -- model inputs are separate arguments
        )::INT                            -- cast the output to INT
$$ LANGUAGE SQL PARALLEL SAFE COST 5000;
Note the following:
-
The
aws_sagemaker.invoke_endpointfunction input can be one or more parameters of any data type. -
This example uses an INT output type. If you cast the output from a
varchartype to a different type, then it must be cast to a PostgreSQL builtin scalar type such asINTEGER,REAL,FLOAT, orNUMERIC. For more information about these types, see Data typesin the PostgreSQL documentation. -
Specify
PARALLEL SAFEto enable parallel query processing. For more information, see Improving response times with parallel query processing. -
Specify
COST 5000to estimate the cost of running the function. Use a positive number giving the estimated run cost for the function, in units ofcpu_operator_cost.
Passing an array as input to a SageMaker AI model
The aws_sagemaker.invoke_endpoint function can have up to 100 input
parameters, which is the limit for PostgreSQL functions. If the SageMaker AI model requires more
than 100 parameters of the same type, pass the model parameters as an array.
The following example defines a function that passes an array as input to
the SageMaker AI regression model. The output is cast to a REAL value.
CREATE FUNCTION regression_model (params REAL[], OUT estimate REAL)
AS $$
    SELECT aws_sagemaker.invoke_endpoint (
      'sagemaker_model_endpoint_name',
      NULL,
      params
      )::REAL
$$ LANGUAGE SQL PARALLEL SAFE COST 5000;
Specifying batch size when invoking a SageMaker AI model
The following example creates a user-defined function for a SageMaker AI model that sets the batch size default to NULL. The function also allows you to provide a different batch size when you invoke it.
CREATE FUNCTION classify_event (
    IN event_type INT, IN event_day DATE, IN amount REAL, -- model inputs
    max_rows_per_batch INT DEFAULT NULL,  -- optional batch size limit
    OUT category INT)                     -- model output
AS $$
    SELECT aws_sagemaker.invoke_endpoint (
        'sagemaker_model_endpoint_name', max_rows_per_batch,
        event_type, event_day, COALESCE(amount, 0.0)
        )::INT              -- casts output to type INT
$$ LANGUAGE SQL PARALLEL SAFE COST 5000;
Note the following:
-
Use the optional
max_rows_per_batchparameter to provide control of the number of rows for a batch-mode function invocation. If you use a value of NULL, then the query optimizer automatically chooses the maximum batch size. For more information, see Understanding batch mode and Aurora machine learning functions. -
By default, passing NULL as a parameter's value is translated to an empty string before passing to SageMaker AI. For this example the inputs have different types.
-
If you have a non-text input, or text input that needs to default to some value other than an empty string, use the
COALESCEstatement. UseCOALESCEto translate NULL to the desired null replacement value in the call toaws_sagemaker.invoke_endpoint. For theamountparameter in this example, a NULL value is converted to 0.0.
Invoking a SageMaker AI model that has multiple outputs
The following example creates a user-defined function for a SageMaker AI model that returns
multiple outputs. Your function needs to cast the output of the
aws_sagemaker.invoke_endpoint function to a corresponding data type. For
example, you could use the built-in PostgreSQL point type for (x,y) pairs or a user-defined
composite type.
This user-defined function returns values from a model that returns multiple outputs by using a composite type for the outputs.
CREATE TYPE company_forecasts AS (
    six_month_estimated_return real,
    one_year_bankruptcy_probability float);
CREATE FUNCTION analyze_company (
    IN free_cash_flow NUMERIC(18, 6),
    IN debt NUMERIC(18,6),
    IN max_rows_per_batch INT DEFAULT NULL,
    OUT prediction company_forecasts)
AS $$
    SELECT (aws_sagemaker.invoke_endpoint('endpt_name',
       max_rows_per_batch,free_cash_flow, debt))::company_forecasts;
$$ LANGUAGE SQL PARALLEL SAFE COST 5000;
For the composite type, use fields in the same order as they appear in the model output
and cast the output of aws_sagemaker.invoke_endpoint to your composite type.
The caller can extract the individual fields either by name or with PostgreSQL ".*"
notation.
Exporting data to Amazon S3 for SageMaker AI model training (Advanced)
We recommend that you become familiar with Aurora machine learning and SageMaker AI by using the provided algorithms and examples rather than trying to train your own models. For more information, see Get Started with Amazon SageMaker AI
To train SageMaker AI models, you export data to an Amazon S3 bucket. The Amazon S3 bucket is used by SageMaker AI to train your model before it is deployed. You can query data from an Aurora PostgreSQL DB cluster and save it directly into text files stored in an Amazon S3 bucket. Then SageMaker AI consumes the data from the Amazon S3 bucket for training. For more about SageMaker AI model training, see Train a model with Amazon SageMaker AI.
Note
When you create an Amazon S3 bucket for SageMaker AI model training or batch scoring, use
sagemaker in the Amazon S3 bucket name. For more information,
see Specify
a Amazon S3 Bucket to Upload Training Datasets and Store Output Data in the
Amazon SageMaker AI Developer Guide.
For more information about exporting your data, see Exporting data from an Aurora PostgreSQL DB cluster to Amazon S3.
Performance considerations for using Aurora machine learning with Aurora PostgreSQL
The Amazon Comprehend and SageMaker AI services do most of the work when invoked by an Aurora machine learning function. That means that you can scale those resources as needed, independently. For your Aurora PostgreSQL DB cluster, you can make your function calls as efficient as possible. Following, you can find some performance considerations to note when working with Aurora machine learning from Aurora PostgreSQL.
Topics
Understanding batch mode and Aurora machine learning functions
Typically, PostgreSQL runs functions one row at a time. Aurora machine learning can reduce this overhead by combining the calls to the external Aurora machine learning service for many rows into batches with an approach called batch-mode execution. In batch mode, Aurora machine learning receives the responses for a batch of input rows, and then delivers the responses back to the running query one row at a time. This optimization improves the throughput of your Aurora queries without limiting the PostgreSQL query optimizer.
Aurora automatically uses batch mode if the function is referenced from the
SELECT list, a WHERE clause, or a HAVING clause.
Note that top-level simple CASE expressions are eligible for batch-mode
execution. Top-level searched CASE expressions are also eligible for batch-mode
execution provided that the first WHEN clause is a simple predicate with a
batch-mode function call.
Your user-defined function must be a LANGUAGE SQL function and should
specify PARALLEL SAFE and COST 5000.
Function migration from the SELECT statement to the FROM clause
Usually, an aws_ml function that is eligible for batch-mode execution is
automatically migrated by Aurora to the FROM clause.
The migration of eligible batch-mode functions to the FROM clause can be examined
manually on a per-query level. To do this, you use EXPLAIN statements (and ANALYZE and
VERBOSE) and find the "Batch Processing" information below each batch-mode
Function Scan. You can also use EXPLAIN (with VERBOSE) without running the
query. You then observe whether the calls to the function appear as a Function
Scan under a nested loop join that was not specified in the original statement.
In the following example, the nested loop join operator in the plan
shows that Aurora migrated the anomaly_score function. It migrated this
function from the SELECT list to the FROM clause, where it's eligible for batch-mode
execution.
EXPLAIN (VERBOSE, COSTS false)
SELECT anomaly_score(ts.R.description) from ts.R;
                         QUERY PLAN
-------------------------------------------------------------
 Nested Loop
   Output: anomaly_score((r.description)::text)
   ->  Seq Scan on ts.r
         Output: r.id, r.description, r.score
   ->  Function Scan on public.anomaly_score
         Output: anomaly_score.anomaly_score
         Function Call: anomaly_score((r.description)::text)
To disable batch-mode execution, set the apg_enable_function_migration
parameter to false. This prevents the migration of aws_ml
functions from the SELECT to the FROM clause. The following shows how.
SET apg_enable_function_migration = false;The apg_enable_function_migration parameter is a Grand Unified
Configuration (GUC) parameter that is recognized by the Aurora PostgreSQL
apg_plan_mgmt extension for query plan management. To disable function
migration in a session, use query plan management to save the resulting plan as an
approved plan. At runtime, query plan management enforces the
approved plan with its apg_enable_function_migration setting.
This enforcement occurs regardless of the apg_enable_function_migration GUC
parameter setting. For more information, see Managing query execution plans for Aurora PostgreSQL.
Using the max_rows_per_batch parameter
Both the aws_comprehend.detect_sentiment and the
aws_sagemaker.invoke_endpoint functions have
a max_rows_per_batch parameter. This parameter
specifies the number of rows that can be sent to the Aurora machine learning service.
The larger the dataset processed by your function, the larger you can make the batch size.
Batch-mode functions improve efficiency by building batches of rows that spread the
cost of the Aurora machine learning function calls over a large number of rows. However, if a
SELECT statement finishes early due to a LIMIT clause, then
the batch can be constructed over more rows than the query uses. This approach can result
in additional charges to your AWS account. To gain the benefits of batch-mode execution
but avoid building batches that are too large, use a smaller value for the
max_rows_per_batch parameter in your function calls.
If you do an EXPLAIN (VERBOSE, ANALYZE) of a
query that uses batch-mode execution, you see a FunctionScan operator that is
below a nested loop join. The number of loops reported by EXPLAIN equals
the number of times a row was fetched from the FunctionScan operator. If a
statement uses a LIMIT clause, the number of fetches is consistent. To optimize the size
of the batch, set the max_rows_per_batch parameter to this value. However, if
the batch-mode function is referenced in a predicate in the WHERE clause or
HAVING clause, then you probably can't know the number of fetches in
advance. In this case, use the loops as a guideline and experiment with
max_rows_per_batch to find a setting that optimizes performance.
Verifying batch-mode execution
To see if a function ran in batch mode, use EXPLAIN ANALYZE. If
batch-mode execution was used, then the query plan will include the information in a
"Batch Processing" section.
EXPLAIN ANALYZE SELECT user-defined-function();
 Batch Processing: num batches=1 avg/min/max batch size=3333.000/3333.000/3333.000
                                avg/min/max batch call time=146.273/146.273/146.273
In this example, there was 1 batch that contained 3,333 rows, which took 146.273 ms to process. The "Batch Processing" section shows the following:
-
How many batches there were for this function scan operation
-
The batch size average, minimum, and maximum
-
The batch execution time average, minimum, and maximum
Typically the final batch is smaller than the rest, which often results in a minimum batch size that is much smaller than the average.
To return the first few rows more quickly, set the max_rows_per_batch
parameter to a smaller value.
To reduce the number of batch mode calls to the ML service when you use a
LIMIT in your user-defined function, set the
max_rows_per_batch parameter to a smaller value.
Improving response times with parallel query processing
To get results as fast as possible from a large number of rows, you can
combine parallel query processing with batch mode processing. You can use parallel query
processing for SELECT, CREATE TABLE AS SELECT, and CREATE
MATERIALIZED VIEW statements.
Note
PostgreSQL doesn't yet support parallel query for data manipulation language (DML) statements.
Parallel query processing occurs both within the database and within the ML service. The number of cores in the instance class of the database limits the degree of parallelism that can be used when running a query. The database server can construct a parallel query execution plan that partitions the task among a set of parallel workers. Then each of these workers can build batched requests containing tens of thousands of rows (or as many as are allowed by each service).
The batched requests from all of the parallel workers are sent to the SageMaker AI endpoint. The degree of parallelism that the endpoint can support is constrained by the number and type of instances that support it. For K degrees of parallelism, you need a database instance class that has at least K cores. You also need to configure the SageMaker AI endpoint for your model to have K initial instances of a sufficiently high-performing instance class.
To use parallel query processing, you can set the parallel_workers
storage parameter of the table that contains the data that you plan to pass. You set
parallel_workers to a batch-mode function such as
aws_comprehend.detect_sentiment. If the optimizer chooses a parallel query
plan, the AWS ML services can be called both in batch and in parallel.
You can use the following parameters with the aws_comprehend.detect_sentiment function to get a
plan with four-way parallelism. If you change either of the following two parameters, you must restart
the database instance for the changes to take effect
-- SET max_worker_processes to 8;  -- default value is 8
-- SET max_parallel_workers to 8;  -- not greater than max_worker_processes
SET max_parallel_workers_per_gather to 4;  -- not greater than max_parallel_workers

-- You can set the parallel_workers storage parameter on the table that the data
-- for the Aurora machine learning function is coming from in order to manually override the degree of
-- parallelism that would otherwise be chosen by the query optimizer
--
ALTER TABLE yourTable SET (parallel_workers = 4);

-- Example query to exploit both batch-mode execution and parallel query
EXPLAIN (verbose, analyze, buffers, hashes)
SELECT aws_comprehend.detect_sentiment(description, 'en')).*
FROM yourTable
WHERE id < 100;
For more information about controlling parallel query, see Parallel plans
Using materialized views and materialized columns
When you invoke an AWS service such as SageMaker AI or Amazon Comprehend from your database, your account is
charged according to the pricing policy of that service. To minimize charges to your
account, you can materialize the result of calling the AWS service into a materialized
column so that the AWS service is not called more than once per input row. If desired, you
can add a materializedAt timestamp column to record the time at which the
columns were materialized.
The latency of an ordinary single-row INSERT statement is typically much
less than the latency of calling a batch-mode function. Thus, you might not be able to meet
the latency requirements of your application if you invoke the batch-mode function for every
single-row INSERT that your application performs. To materialize the result of
calling an AWS service into a materialized column, high-performance applications generally
need to populate the materialized columns. To do this, they periodically issue an
UPDATE statement that operates on a large batch of rows at the same
time.
UPDATE takes a row-level lock that can impact a running application. So you
might need to use SELECT ... FOR UPDATE SKIP LOCKED, or use MATERIALIZED
VIEW.
Analytic queries that operate on a large number of rows in real time can combine
batch-mode materialization with real-time processing. To do this, these queries assemble a
UNION ALL of the pre-materialized results with a query over the rows that
don't yet have materialized results. In some cases, such a UNION ALL is
needed in multiple places, or the query is generated by a third-party application. If so,
you can create a VIEW to encapsulate the UNION ALL operation so
this detail isn't exposed to the rest of the SQL application.
You can use a materialized view to materialize the results of an arbitrary
SELECT statement at a snapshot in time. You can also use it to refresh the
materialized view at any time in the future. Currently PostgreSQL doesn't support
incremental refresh, so each time the materialized view is refreshed the materialized view
is fully recomputed.
You can refresh materialized views with the CONCURRENTLY option, which
updates the contents of the materialized view without taking an exclusive lock. Doing this
allows a SQL application to read from the materialized view while it's being
refreshed.
Monitoring Aurora machine learning
You can monitor the aws_ml functions by setting the track_functions parameter
in your custom DB cluster parameter group to all. By default, this parameter is set to pl which
means that only procedure-language functions are tracked. By changing this to all, the aws_ml
functions are also tracked. For more information, see Run-time Statistics
For information about monitoring the performance of the SageMaker AI operations called from Aurora machine learning functions, see Monitor Amazon SageMaker AI in the Amazon SageMaker AI Developer Guide.
With track_functions set to all, you can query the pg_stat_user_functions
view to get statistics about the functions that you define and use to invoke Aurora machine learning services.
For each function, the view provides the number of calls, total_time,
and self_time.
To view the statistics for the aws_sagemaker.invoke_endpoint and the
aws_comprehend.detect_sentiment functions, you can filter results by schema name
using the following query.
SELECT * FROM pg_stat_user_functions
    WHERE schemaname
    LIKE 'aws_%';
To clear the statistics, do as follows.
SELECT pg_stat_reset();
You can get the names of your SQL functions that call the aws_sagemaker.invoke_endpoint
function by querying the PostgreSQL pg_proc system catalog. This catalog stores information
about functions, procedures, and more. For more information, see pg_procproname)
whose source (prosrc) includes the text invoke_endpoint.
SELECT proname FROM pg_proc WHERE prosrc LIKE '%invoke_endpoint%';
