Create a connection to GitHub Enterprise Server (console)
To create a GitHub Enterprise Server connection, you provide information for where your GitHub Enterprise Server is installed and authorize the connection creation with your GitHub Enterprise credentials.
Note
Beginning July 1, 2024, the console creates connections with codeconnections in the resource ARN. Resources with both service prefixes will continue to display in the console.
Create your GitHub Enterprise Server connection (console)
To create a connection to GitHub Enterprise Server, have your server URL and GitHub Enterprise credentials ready.
To create a host
-
Sign in to the AWS Management Console, and open the AWS Developer Tools console at https://console.aws.amazon.com/codesuite/settings/connections
. -
On the Hosts tab, choose Create host.
-
In Host name, enter the name you want to use for your host.
-
In Select a provider, choose one of the following:
-
GitHub Enterprise Server
-
GitLab self-managed
-
-
In URL, enter the endpoint for the infrastructure where your provider is installed.
-
If your server is configured within an Amazon VPC and you want to connect with your VPC, choose Use a VPC. Otherwise, choose No VPC.
-
If you have launched your instance into an Amazon VPC and you want to connect with your VPC, choose Use a VPC and complete the following.
-
In VPC ID, choose your VPC ID. Make sure to choose the VPC for the infrastructure where your instance is installed or a VPC with access to your instance through VPN or Direct Connect.
-
If you have a private VPC configured, and you have configured your instance to perform TLS validation using a non-public certificate authority, in TLS certificate, enter your certificate ID. The TLS Certificate value is the public key of the certificate.
-
-
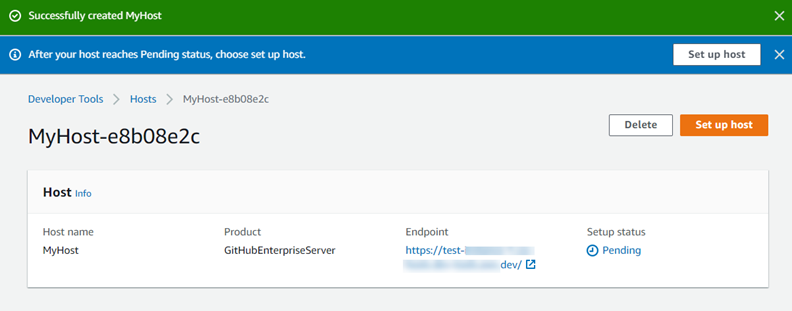
Choose Create host.
-
After the host details page displays, the host status changes as the host is created.
Note
If your host setup includes a VPC configuration, allow several minutes for provisioning of host network components.
Wait for your host to reach a Pending status, and then complete the setup. For more information, see Set up a pending host.
Step 2: Create your connection to GitHub Enterprise Server (console)
-
Sign in to the AWS Management Console and open the Developer Tools console at https://console.aws.amazon.com/codesuite/settings/connections
. -
Choose Settings > Connections, and then choose Create connection.
-
To create a connection to an installed GitHub Enterprise Server repository, choose GitHub Enterprise Server.
Connect to GitHub Enterprise Server
-
In Connection name, enter the name for your connection.

-
In URL, enter the endpoint for your server.
Note
If the provided URL has already been used to set up a GitHub Enterprise Server for a connection, you will be prompted to choose the host resource ARN that was created previously for that endpoint.
-
(Optional) If you have launched your server into an Amazon VPC and you want to connect with your VPC, choose Use a VPC and complete the following.
Note
For organizations in GitHub Enterprise Server or GitLab self-managed, you don’t pass an available host. You create a new host for each connection in your organization, and you must be sure to enter the same information in the network fields (VPC ID, Subnet IDs, and Security Group IDs) for the host. For more information, see Connection and host setup for installed providers supporting organizations.
-
In VPC ID, choose your VPC ID. Make sure to choose the VPC for the infrastructure where your GitHub Enterprise Server instance is installed or a VPC with access to your GitHub Enterprise Server instance through VPN or Direct Connect.
-
Under Subnet ID, choose Add. In the field, choose the subnet ID you want to use for your host. You can choose up to 10 subnets.
Make sure to choose the subnet for the infrastructure where your GitHub Enterprise Server instance is installed or a subnet with access to your installed GitHub Enterprise Server instance through VPN or Direct Connect.
-
Under Security group IDs, choose Add. In the field, choose the security group you want to use for your host. You can choose up to 10 security groups.
Make sure to choose the security group for the infrastructure where your GitHub Enterprise Server instance is installed or a security group with access to your installed GitHub Enterprise Server instance through VPN or Direct Connect.
-
If you have a private VPC configured, and you have configured your GitHub Enterprise Server instance to perform TLS validation using a non-public certificate authority, in TLS certificate, enter your certificate ID. The TLS Certificate value should be the public key of the certificate.

-
-
Choose Connect to GitHub Enterprise Server. The created connection is shown with a Pending status. A host resource is created for the connection with the server information you provided. For the host name, the URL is used.
-
Choose Update pending connection.

-
If prompted, on the GitHub Enterprise login page, sign in with your GitHub Enterprise credentials.
-
On the Create GitHub App page, choose a name for your app.

-
On the GitHub authorization page, choose Authorize <app-name>.

-
On the app installation page, a message shows that the connector app is ready to be installed. If you have multiple organizations, you might be prompted to choose the organization where you want to install the app.
Choose the repository settings where you want to install the app. Choose Install.

-
The connection page shows the created connection in an Available status.
