Help improve this page
To contribute to this user guide, choose the Edit this page on GitHub link that is located in the right pane of every page.
Create a GPU NodePool using CLIs
Tip
Register
This section walks you through creating a GPU NodePool on the EKS cluster you set up in Set up Amazon EKS cluster for AI/ML workloads using CLIs, testing it with a sample Pod, and optionally adding reserved capacity. Choose the same path (EKS Auto Mode or self-managed Karpenter) that you used to create your cluster.
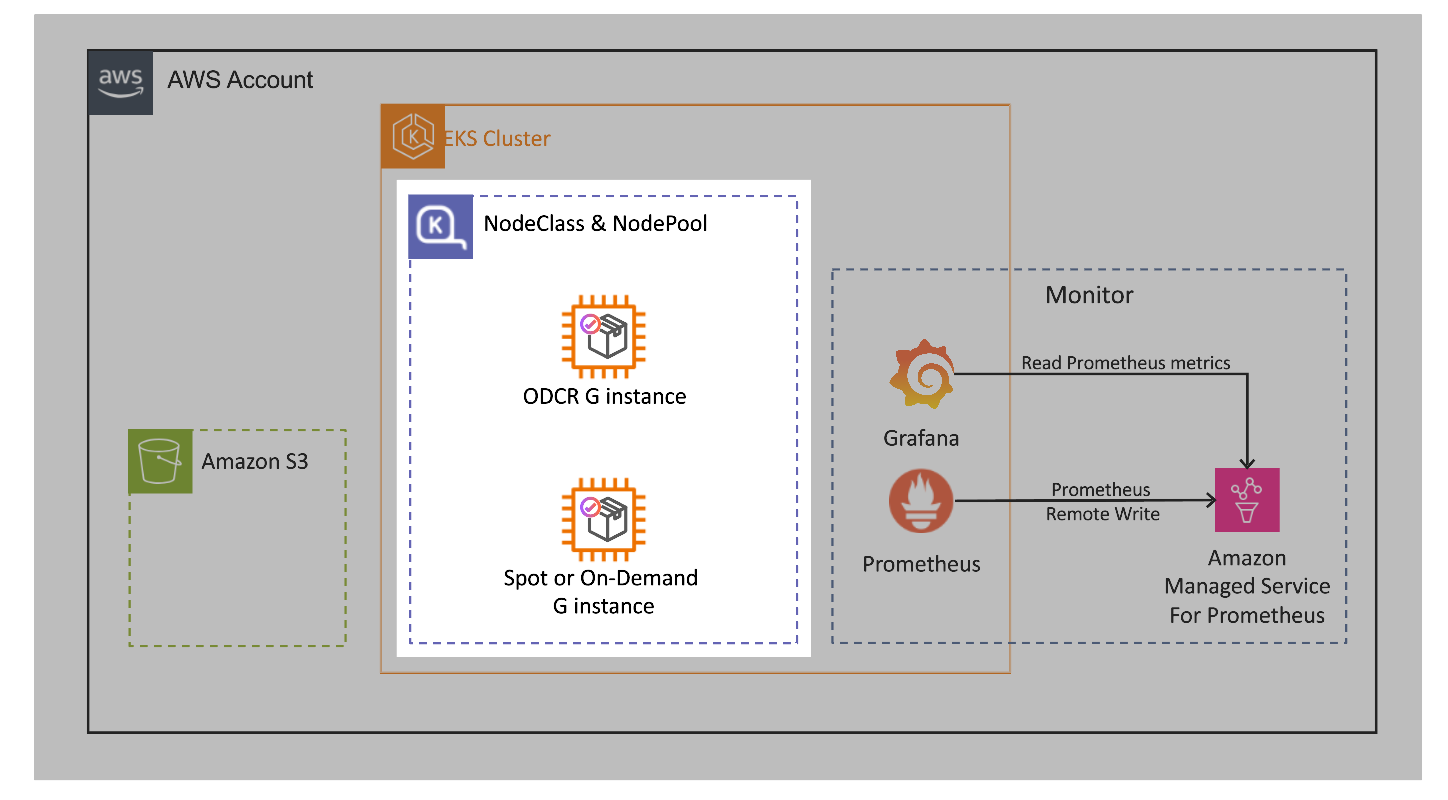
The highlighted area of the following diagram shows the NodeClass and NodePool that you configure in this section. The NodePool defines which GPU instances EKS Auto Mode or Karpenter can launch, and the NodeClass defines the node configuration, such as the AMI. The NodePool provisions an On-Demand Capacity Reservation (ODCR) G-family instance and a Spot or On-Demand G-family instance. The monitoring stack and the Amazon S3 bucket are shown for context.
Prerequisites
Important
The GPU instances this section provisions incur charges, and an On-Demand Capacity Reservation bills from the moment you create it, whether or not an instance occupies it. Complete Clean up the GPU NodePool when you finish to avoid ongoing charges.
-
An EKS cluster created following the steps in Set up Amazon EKS cluster for AI/ML workloads using CLIs.
-
kubectl, configured for the cluster and within one minor version of your cluster’s Kubernetes version. For setup instructions, see Set up kubectl and eksctl. -
AWS CLI >= 2.27, for setup instructions, see Installing.
Set the cluster name and AWS Region of the cluster you are adding the NodePool to. The steps in this section use both, so set them in every terminal you run these commands from. The following values are the defaults from Set up Amazon EKS cluster for AI/ML workloads using CLIs, so replace them if you created your cluster with different ones:
export CLUSTER_NAME=ai-eks-docs
export AWS_REGION=us-east-2
Confirm the variables resolve to a cluster that exists, that kubectl points at that same cluster, and that the cluster can provision nodes:
aws eks describe-cluster --name ${CLUSTER_NAME} --region ${AWS_REGION} --query 'cluster.status' --output text

kubectl config current-context

kubectl get nodes
The cluster status is ACTIVE, and kubectl get nodes shows the nodes that run the cluster add-ons. If describe-cluster reports that the cluster does not exist, kubectl get nodes returns no nodes, or the context names a different cluster, correct the variables or reconfigure your kubeconfig before you continue.
Step 1: Create a dynamic GPU NodePool
Define a NodePool that dynamically provisions G-family GPU instances with a generation greater than 4, using Spot capacity with On-Demand as a fallback. The EKS Auto Mode and Karpenter paths both use the same NodePool API with the only difference being the NodeClass it points to. In EKS Auto Mode, the bundled default NodeClass already selects the right AMI and configures SOCI parallel pull, so the NodePool is the only object you create. In self-managed Karpenter, you also need a custom EC2NodeClass that pins the AMI and tunes SOCI. Because the two paths use different AMIs, the instance constraints differ between them, as noted in each path.
Unlike the EKS Auto Mode path, this NodePool does not cap the instance generation, because the EKS-optimized AL2023 NVIDIA AMI includes a driver version that supports g7 instances. The EKS AL2023 AMI currently uses NVIDIA driver 580 on all EC2 instances except g7, which uses NVIDIA driver 595. For more information, see EKS-optimized NVIDIA AMIs.
Validate the NodePool was created:
kubectl get nodepool gpu-inf
Expected output:
NAME      NODECLASS   NODES   READY   AGE
gpu-inf   default     0       True    8s
On the self-managed Karpenter path, the NODECLASS column shows gpu-inf instead of default.
Step 2: Test with a sample Pod
Test your GPU NodePool setup with an nvidia-smi Pod.
cat << EOF | kubectl apply -f -
apiVersion: v1
kind: Pod
metadata:
  name: nvidia-smi
  labels:
    guide: ai-eks-docs
spec:
  tolerations:
    - key: "nvidia.com/gpu"
      operator: "Exists"
      effect: "NoSchedule"
  containers:
    - name: nvidia-smi
      image: public.ecr.aws/amazonlinux/amazonlinux:2023-minimal
      command: ["sh", "-c", "nvidia-smi && sleep 300"]
      resources:
        limits:
          nvidia.com/gpu: 1
  restartPolicy: OnFailure
EOF
Verify the Pod is scheduled and running.
kubectl get pods
Expected output:
NAME         READY   STATUS      RESTARTS   AGE
nvidia-smi   1/1     Running     0          67s
The Pod runs nvidia-smi and then sleeps for 5 minutes. This keeps the Pod, and the node it runs on, available long enough for you to retrieve the logs. If the Pod completes, Karpenter can consolidate the empty node before you read the logs. Check the Pod logs to see the GPU detected by the node.
kubectl logs nvidia-smi
Expected output:
Fri Oct  9 22:11:00 2026
+-----------------------------------------------------------------------------------------+
| NVIDIA-SMI 580.178.04             Driver Version: 580.178.04     CUDA Version: 13.0     |
+-----------------------------------------+------------------------+----------------------+
| GPU  Name                 Persistence-M | Bus-Id          Disp.A | Volatile Uncorr. ECC |
| Fan  Temp   Perf          Pwr:Usage/Cap |           Memory-Usage | GPU-Util  Compute M. |
|                                         |                        |               MIG M. |
|=========================================+========================+======================|
|   0  NVIDIA L4                      On  |   00000000:31:00.0 Off |                    0 |
| N/A   42C    P8             17W /   72W |       0MiB /  23034MiB |      0%      Default |
|                                         |                        |                  N/A |
+-----------------------------------------+------------------------+----------------------+

+-----------------------------------------------------------------------------------------+
| Processes:                                                                              |
|  GPU   GI   CI              PID   Type   Process name                        GPU Memory |
|        ID   ID                                                               Usage      |
|=========================================================================================|
|  No running processes found                                                             |
+-----------------------------------------------------------------------------------------+
The output shows the GPU model, driver version, CUDA version, and available memory. In this example, Karpenter provisioned a G6 instance which has an NVIDIA L4 GPU with 24 GB of memory. The 42C is the current GPU temperature and P8 is a low-power idle state, which is expected because no workload is using the GPU. The 17W / 72W shows current power draw compared to max power capacity, and 0MiB / 23034MiB shows current GPU memory used compared to total available. The container only ran nvidia-smi and is now sleeping, so no process is using the GPU, memory is at 0, and power is at idle, as the empty Processes table confirms. Both the driver version (580.178.04) and the CUDA version (13.0) come from the AMI: nvidia-smi reports the highest CUDA version the installed driver supports, not a CUDA runtime inside the container image. On the EKS Auto Mode path the driver comes from the Bottlerocket NVIDIA AMI, and on the self-managed Karpenter path it comes from the EKS-optimized AL2023 NVIDIA AMI. The GPU model and memory will vary depending on the instance type Karpenter selects. G5 instances have NVIDIA A10G GPUs (24 GB), G6 instances have NVIDIA L4 GPUs (24 GB), and G6e instances have NVIDIA L40S GPUs (48 GB).
To understand how Karpenter and the Kubernetes scheduler coordinated to provision a node and place the Pod, check the Pod’s lifecycle events:
kubectl describe po nvidia-smi
Expected output:
Events:
  Type     Reason                  Age   From                   Message
  ----     ------                  ----  ----                   -------
  Warning  FailedScheduling        60s   default-scheduler      0/2 nodes are available: 2 node(s) had untolerated taint(s). no new claims to deallocate, preemption: 0/2 nodes are available: 2 Preemption is not helpful for scheduling.
  Normal   Nominated               59s   eks-auto-mode/compute  Pod should schedule on: nodeclaim/gpu-inf-vxcnj
  Warning  FailedScheduling        30s   eks-auto-mode/compute  Failed to schedule pod, would schedule against uninitialized nodeclaim/gpu-inf-vxcnj
  Normal   Scheduled               24s   default-scheduler      Successfully assigned default/nvidia-smi to i-0fb17a09bc4203164
  Warning  FailedCreatePodSandBox  21s   kubelet                Failed to create pod sandbox: rpc error: code = Unknown desc = failed to setup network for sandbox "7f85e25b220c8fb245187758dbbbc8efb3d40f3e49e13054404880daf4c3b2f0": plugin type="aws-cni" name="aws-cni" failed (add): add cmd: failed to setup network policy
  Normal   Pulling                  7s   kubelet                spec.containers{nvidia-smi}: Pulling image "public.ecr.aws/amazonlinux/amazonlinux:2023-minimal"
  Normal   Pulled                   5s   kubelet                spec.containers{nvidia-smi}: Successfully pulled image "public.ecr.aws/amazonlinux/amazonlinux:2023-minimal" in 1.237s (1.237s including waiting). Image size: 37442701 bytes.
  Normal   Created                  5s   kubelet                spec.containers{nvidia-smi}: Container created
  Normal   Started                  5s   kubelet                spec.containers{nvidia-smi}: Container started
These events show the Pod scheduling sequence: the Pod initially fails to schedule because no GPU nodes exist (FailedScheduling), Karpenter nominates a new NodeClaim (Nominated), the scheduler retries while the nominated node is still booting (the second FailedScheduling, which names the uninitialized NodeClaim), the scheduler assigns the Pod after the node is ready (Scheduled), and then the container image is pulled and started. EKS Auto Mode comes with SOCI (Seekable OCI) parallel pull installed and configured out of the box on G, P, and Trn instances. Notice because of SOCI parallel pull, the container image was pulled from ECR in under 2 seconds (1.237s).
Note
The preceding output is from the EKS Auto Mode path. On the self-managed Karpenter path, the Nominated event comes From
karpenter instead of eks-auto-mode/compute, the Scheduled event names the node by its private DNS name instead of its instance ID, and the first FailedScheduling message reports Insufficient nvidia.com/gpu rather than an untolerated taint, because the system managed node group nodes are not tainted.
A NodeClaim is a request Karpenter creates to provision a specific node. It shows the instance type, capacity type, AZ, and whether the node is ready.
kubectl get nodeclaims
Expected NodeClaim output:
NAME            TYPE         CAPACITY   ZONE         NODE                  READY   AGE
gpu-inf-vxcnj   g6.4xlarge   spot       us-east-2c   i-0fb17a09bc4203164   True    51s
The instance type, capacity type, and Availability Zone vary. Any G-family instance that satisfies your NodePool’s generation constraint is eligible: greater than 4 for both paths, with the g7 family excluded on the EKS Auto Mode path. Because the NodePool allows both spot and on-demand, the CAPACITY column shows on-demand instead of the spot shown here whenever that is the cheapest available offering.
The FailedCreatePodSandBox warning in kubectl describe pod nvidia-smi is transient and expected. The VPC CNI initializes asynchronously after the node joins, and the kubelet retries automatically. If the Pod stays in ContainerCreating, check node events with kubectl describe node <node-name>.
Tip
If no node appears, check for Insufficient Capacity Errors:
kubectl get events | grep InsufficientCapacityError
Karpenter caches unavailable offerings for 3 minutes. Widening the allowed instance types and AZs in your NodePool increases the chances of landing capacity.
Note
Spot instances launched by Karpenter will not appear in the EC2 Spot Requests console. Karpenter uses the EC2 CreateFleet API with type: instant. The instances appear in the EC2 Instances console with a spot lifecycle.
Step 3: Add reserved capacity to the NodePool (optional)
To use reserved capacity first with Spot or On-Demand fallback, create an ODCR and attach it to your NodeClass. Then update the dynamic NodePool from Step 1 to also allow reserved capacity. The reservation API call is the same for both paths; the NodeClass attachment differs because EKS Auto Mode and self-managed Karpenter use different NodeClass kinds.
Warning
The following command results in a charge for the reserved instance type until you cancel it with aws ec2 cancel-capacity-reservation --capacity-reservation-id <id>.
Create the capacity reservation:
CR_AZ="us-east-2a"
INSTANCE_TYPE="g6e.4xlarge"

aws ec2 create-capacity-reservation \
  --instance-type $INSTANCE_TYPE \
  --instance-platform Linux/UNIX \
  --availability-zone "$CR_AZ" \
  --instance-count 1 \
  --instance-match-criteria open \
  --end-date-type unlimited \
  --region ${AWS_REGION}
GPU capacity for reservations is often constrained, so expect to retry. If you get an InsufficientInstanceCapacity error, first change CR_AZ to each of the other AZs in your Region. If every AZ fails, reserve a different instance type by changing INSTANCE_TYPE: a smaller size of the same family (such as g6e.xlarge instead of g6e.4xlarge) or another G-family generation greater than 4 (such as g6.4xlarge or g5.2xlarge). Any instance type your NodePool allows works for the rest of this step.
The command prints the reservation. Store its ID in a shell variable for the following steps, replacing cr-1234567890abcdef0 with the CapacityReservationId from the output:
CAPACITY_RESERVATION_ID=cr-1234567890abcdef0
echo "Capacity reservation ID: ${CAPACITY_RESERVATION_ID}"
Note
Take the ID from the create-capacity-reservation output rather than looking it up by instance type. A lookup that filters only on state and instance type returns every matching reservation in the Region, including ones created for other clusters, and can select the wrong reservation.
Confirm the reservation reached the active state before you continue. A reservation that AWS cannot fulfill is still created, but it lands in the failed state and never provides capacity:
aws ec2 describe-capacity-reservations \
  --capacity-reservation-ids ${CAPACITY_RESERVATION_ID} \
  --query 'CapacityReservations[0].State' \
  --output text \
  --region ${AWS_REGION}
If the state is failed, cancel the reservation and create a new one in a different Availability Zone or with a different instance type.
Then apply the NodeClass and NodePool changes for your path:
Karpenter treats reserved as the most cost-efficient option and launches it first. After the reservation is full, it falls back to Spot or On-Demand.
After applying the changes, validate that Karpenter prioritizes reserved capacity and falls back to Spot or On-Demand. Deploy a 2-replica Deployment that requests 1 GPU per Pod. The ODCR is for 1 instance, so the first Pod triggers Karpenter to launch a reserved node. The nodeSelector restricts the Pods to single-GPU instance types, so the second Pod cannot fit on the reserved node and triggers Karpenter to launch another node from Spot or On-Demand capacity.
cat << 'EOF' | kubectl apply -f -
apiVersion: apps/v1
kind: Deployment
metadata:
  name: gpu-overflow-test
  labels:
    guide: ai-eks-docs
spec:
  replicas: 2
  selector:
    matchLabels:
      app: gpu-overflow-test
  template:
    metadata:
      labels:
        app: gpu-overflow-test
        guide: ai-eks-docs
    spec:
      nodeSelector:
        karpenter.k8s.aws/instance-gpu-count: "1"
      tolerations:
        - key: nvidia.com/gpu
          operator: Exists
          effect: NoSchedule
      containers:
        - name: nvidia-smi
          image: public.ecr.aws/amazonlinux/amazonlinux:2023-minimal
          command: ["sh", "-c", "nvidia-smi && sleep infinity"]
          resources:
            limits:
              nvidia.com/gpu: 1
EOF
Unlike the nvidia-smi test Pod from Step 2, which exits after 5 minutes, this Deployment keeps the Pods running (sleep infinity) so they hold the GPU and don’t release the node.
Important
The nodeSelector is what makes this validation deterministic. The NodePool allows any G-family instance with a generation greater than 4, and several of those instance types have more than one GPU. Without the nodeSelector, Karpenter can satisfy both replicas with a single multi-GPU Spot instance, which leaves the reserved node empty, lets consolidation terminate it, and shows two Pods on one Spot node instead of the reserved and Spot split described here. On the EKS Auto Mode path, use eks.amazonaws.com/instance-gpu-count as the nodeSelector key instead.
A reserved node that no Pod occupies still holds the reservation. The ODCR keeps billing either way, so complete Clean up the GPU NodePool when you finish.
Verify the Pods scheduled on different nodes:
kubectl get pods -l app=gpu-overflow-test -o wide
Expected output:
NAME                                 READY   STATUS    RESTARTS   AGE     IP                NODE                  NOMINATED NODE   READINESS GATES
gpu-overflow-test-59b97944fb-lq56c   1/1     Running   0          2m42s   192.168.186.240   i-057692590480155da   <none>           <none>
gpu-overflow-test-59b97944fb-z4zcx   1/1     Running   0          2m42s   192.168.130.64    i-0521ecd1849fa0578   <none>           <none>
The two pods are running, each on a different node.
Check the NodeClaims to see the capacity types:
kubectl get nodeclaims
Expected output:
NAME            TYPE          CAPACITY    ZONE         NODE                  READY   AGE
gpu-inf-shg5w   g6e.xlarge    reserved    us-east-2a   i-0ea91fdeef65b8cb6   True    2m2s
gpu-inf-ssnqf   g6e.2xlarge   spot        us-east-2b   i-00ccf7ce65cf3f6ca   True    112s
The reserved node launched first, followed by a Spot or On-Demand node after the reservation was full.
Clean up the test deployment:
kubectl delete deployment gpu-overflow-test
Next steps
With your GPU NodePool ready, you can proceed to Load & Serve Models to deploy a large language model and interact with the inference endpoint.
Clean up the GPU NodePool
Tip
If you plan to continue with the next sections of this guide, skip this cleanup. Only run it when you are done with the GPU NodePool. To tear down the whole cluster, see the cleanup steps in Set up Amazon EKS cluster for AI/ML workloads using CLIs.
If you opened a new terminal, set the cluster name and AWS Region again:
export CLUSTER_NAME=ai-eks-docs
export AWS_REGION=us-east-2
Remove the test workloads created on this page:
kubectl delete pod nvidia-smi --ignore-not-found
kubectl delete deployment gpu-overflow-test --ignore-not-found
Next, delete the GPU NodePool and the NodeClass object for your path. Each path has only one of the two NodeClass kinds, so running the command for the other path returns the server doesn’t have a resource type instead of deleting anything.
Deleting the NodePool drains and terminates its nodes, which takes a few minutes. Confirm the GPU NodeClaims are gone before you move on, so no GPU instance keeps running:
kubectl get nodeclaims
No gpu-inf NodeClaim should appear in the output. While termination is in progress, the gpu-inf nodes show as NotReady in kubectl get nodes. If a NodeClaim is still listed after several minutes, check its status with kubectl describe nodeclaim .nodeclaim-name
If you created an ODCR in Step 3, cancel it after the GPU NodeClaims are gone. Deleting the NodePool first drains and terminates the reserved node, because cancelling a reservation leaves any instance running on it.
List every active reservation in the Region with its instance type, so you cancel the right one even if you reserved an instance type other than the g6e.4xlarge default in Step 3:
aws ec2 describe-capacity-reservations \
  --filters "Name=state,Values=active" \
  --query 'CapacityReservations[].[CapacityReservationId,InstanceType,AvailabilityZone,AvailableInstanceCount]' \
  --output table \
  --region ${AWS_REGION}
Cancel the reservation, replacing cr-1234567890abcdef0 with the ID from the preceding output:
aws ec2 cancel-capacity-reservation \
  --capacity-reservation-id cr-1234567890abcdef0 \
  --region ${AWS_REGION}
Confirm no active reservation remains. An empty result means no further reservation charges apply:
aws ec2 describe-capacity-reservations \
  --filters "Name=state,Values=active" \
  --query 'CapacityReservations[].CapacityReservationId' \
  --output text \
  --region ${AWS_REGION}
Important
Cancelling a reservation does not terminate running instances. They continue at standard On-Demand rates until terminated. If you cancelled the reservation before the reserved node drained, confirm in the Amazon EC2 console that no GPU instance is still running.
Also cancel any reservation that reached the failed state while you retried Step 3. A failed reservation does not incur charges, but it stays in your account until you cancel it. Drop the state filter from the preceding describe-capacity-reservations command to list those as well:
aws ec2 describe-capacity-reservations \
  --query 'CapacityReservations[?State!=`cancelled` && State!=`expired`].[CapacityReservationId,InstanceType,AvailabilityZone,State]' \
  --output table \
  --region ${AWS_REGION}
