Terjemahan disediakan oleh mesin penerjemah. Jika konten terjemahan yang diberikan bertentangan dengan versi bahasa Inggris aslinya, utamakan versi bahasa Inggris.
Publikasikan & Berlangganan dengan Siaran IVS iOS SDK
Bagian ini akan membawa Anda melalui langkah-langkah yang terlibat dalam penerbitan dan berlangganan ke panggung menggunakan aplikasi iOS Anda.
Buat Tampilan
Kami mulai dengan menggunakan ViewController.swift file yang dibuat secara otomatis untuk mengimpor AmazonIVSBroadcast dan kemudian menambahkan beberapa @IBOutlets ke tautan:
import AmazonIVSBroadcast

class ViewController: UIViewController {

    @IBOutlet private var textFieldToken: UITextField!
    @IBOutlet private var buttonJoin: UIButton!
    @IBOutlet private var labelState: UILabel!
    @IBOutlet private var switchPublish: UISwitch!
    @IBOutlet private var collectionViewParticipants: UICollectionView!
Sekarang kita membuat pandangan itu dan menghubungkannyaMain.storyboard. Berikut adalah struktur tampilan yang akan kita gunakan:
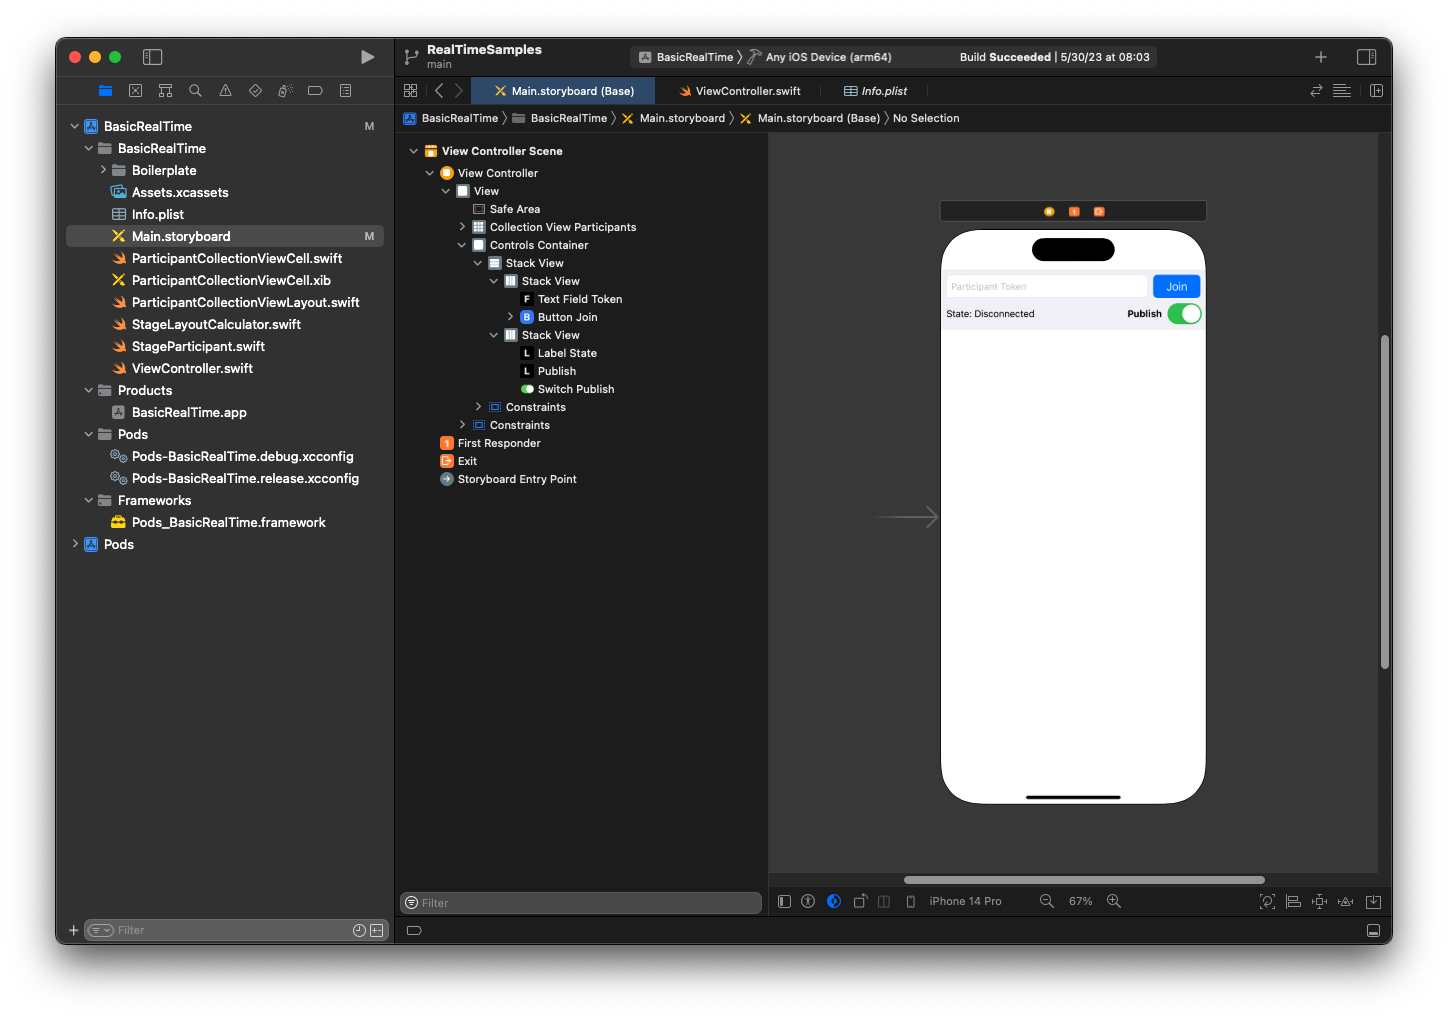
Untuk AutoLayout konfigurasi, kita perlu menyesuaikan tiga tampilan. Tampilan pertama adalah Collection View Partisipan (aUICollectionView). Terikat Memimpin, Mengikuti, dan Bawah ke Area Aman. Juga terikat Atas ke Controls Container.
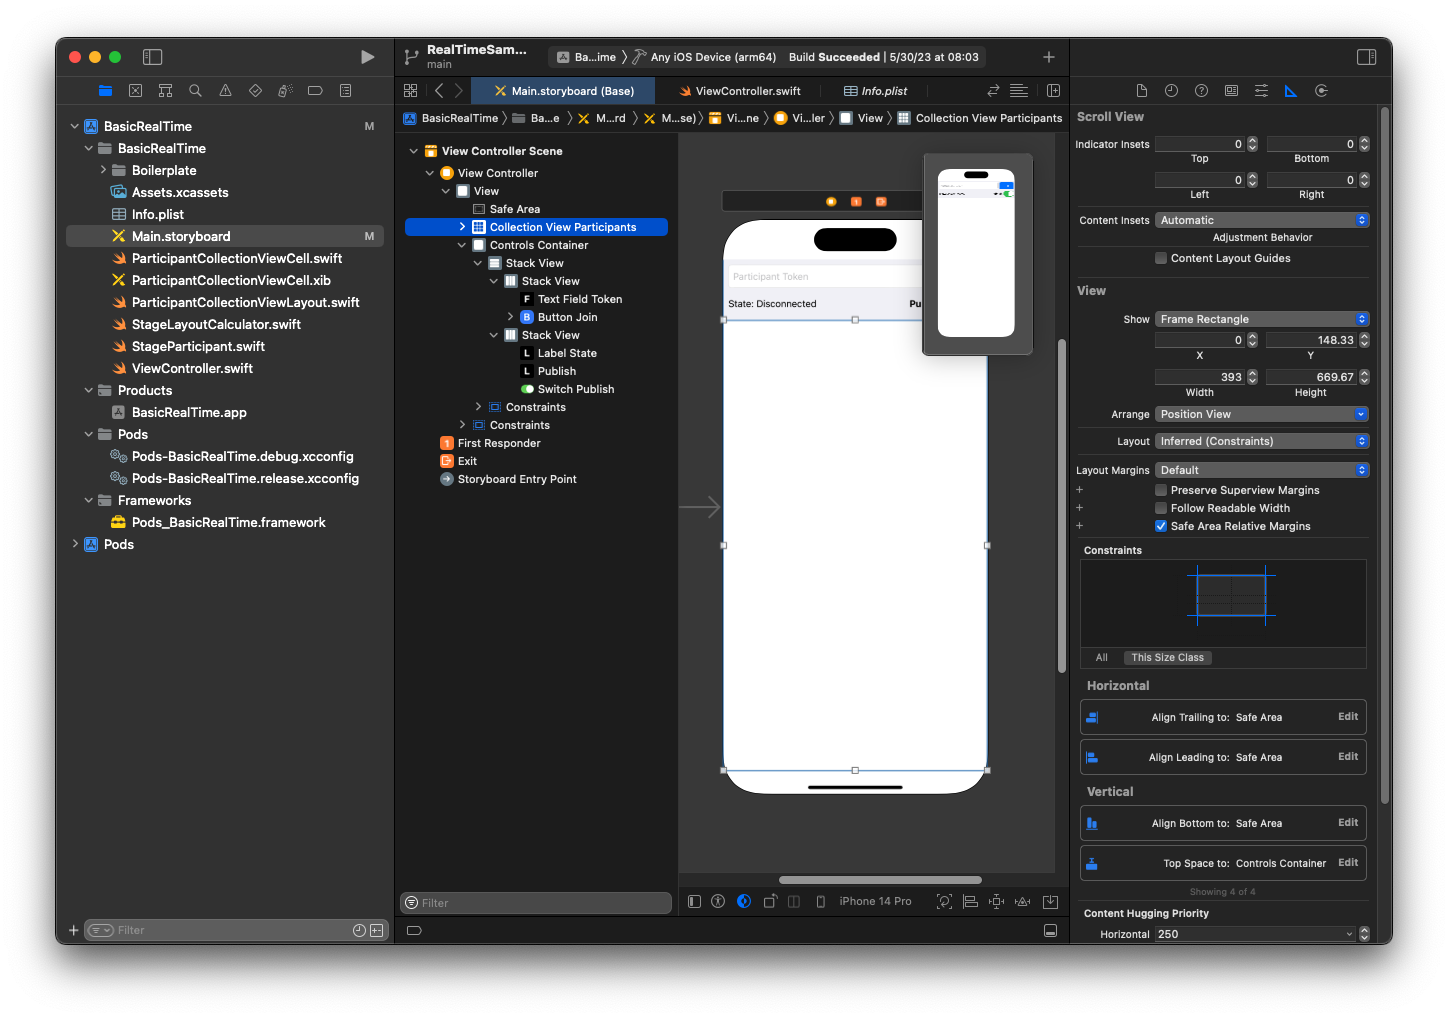
Tampilan kedua adalah Controls Container. Terikat Memimpin, Melintasi, dan Atas ke Area Aman:
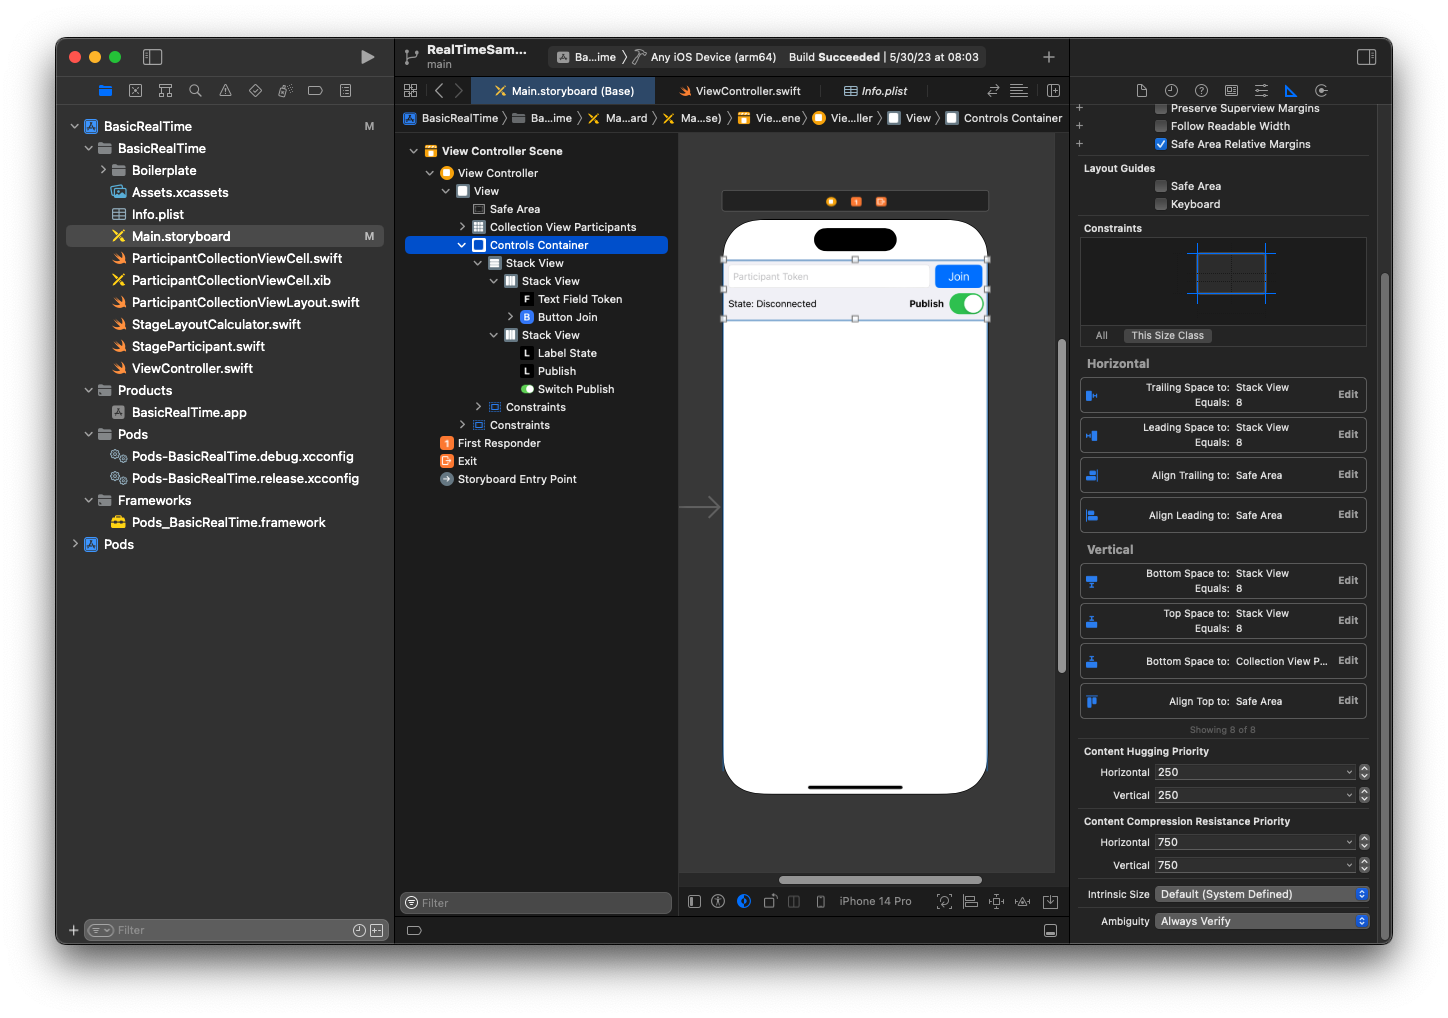
Tampilan ketiga dan terakhir adalah Vertical Stack View. Bound Top, Leading, Trailing, dan Bottom ke Superview. Untuk penataan, atur spasi ke 8, bukan 0.
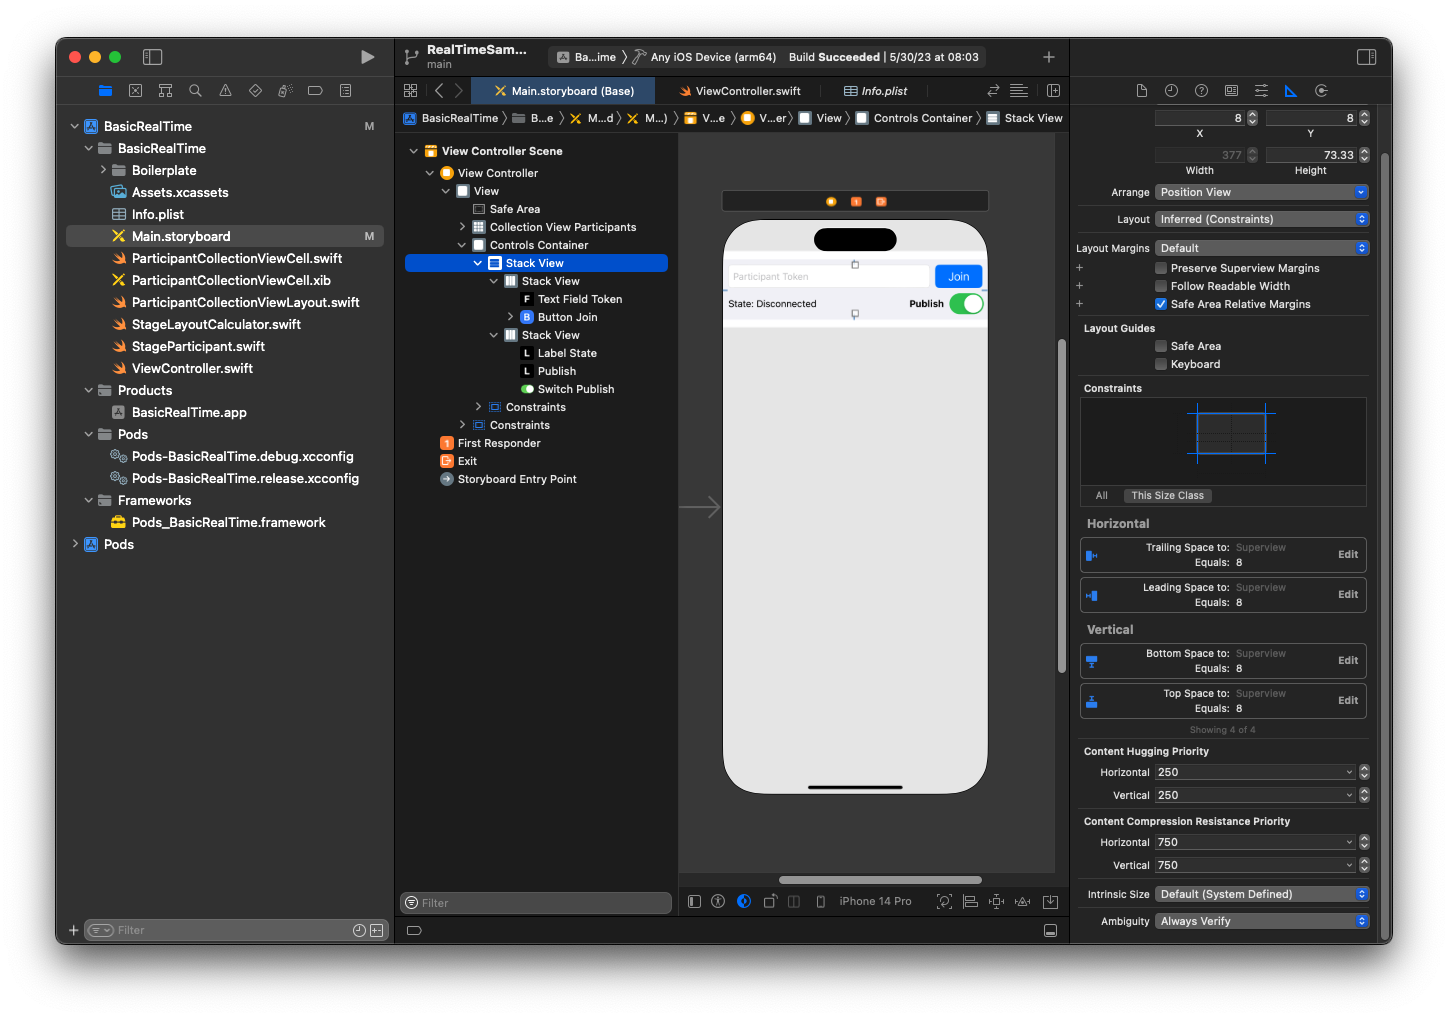
UIStackViewsAkan menangani tata letak tampilan yang tersisa. Untuk ketiganya UIStackViews, gunakan Fill sebagai Alignment and Distribution.
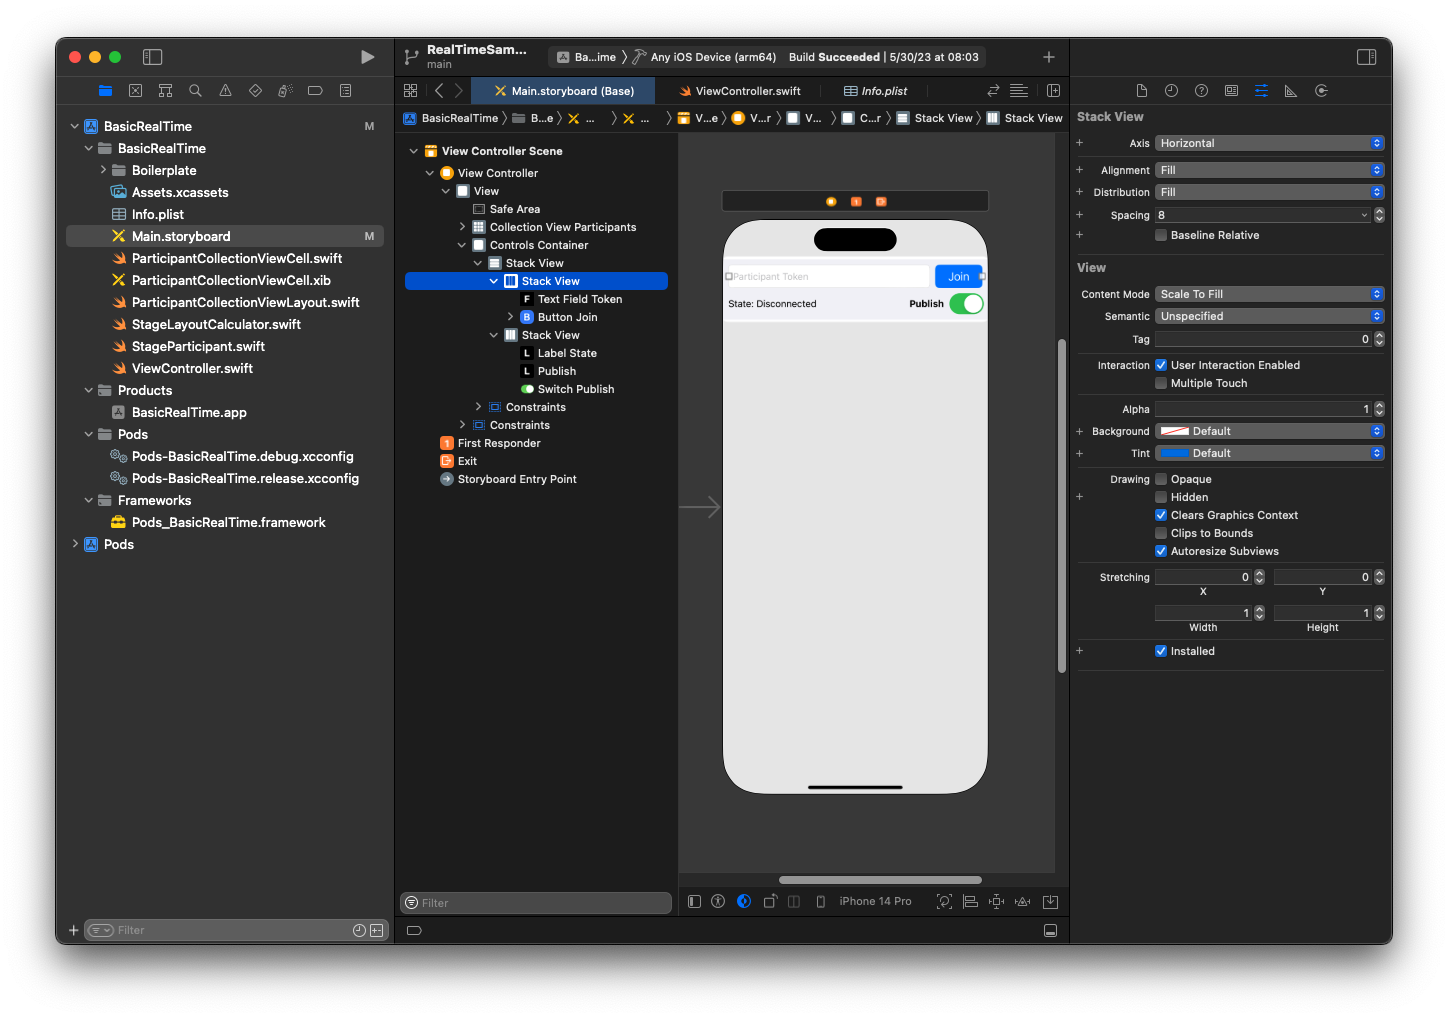
Akhirnya, mari kita tautkan pandangan ini ke pandangan kitaViewController. Dari atas, petakan tampilan berikut:
-
Bidang Teks Gabung mengikat ke
textFieldToken. -
Tombol Gabung mengikat ke
buttonJoin. -
Label State mengikat ke
labelState. -
Beralih Publikasikan mengikat ke
switchPublish. -
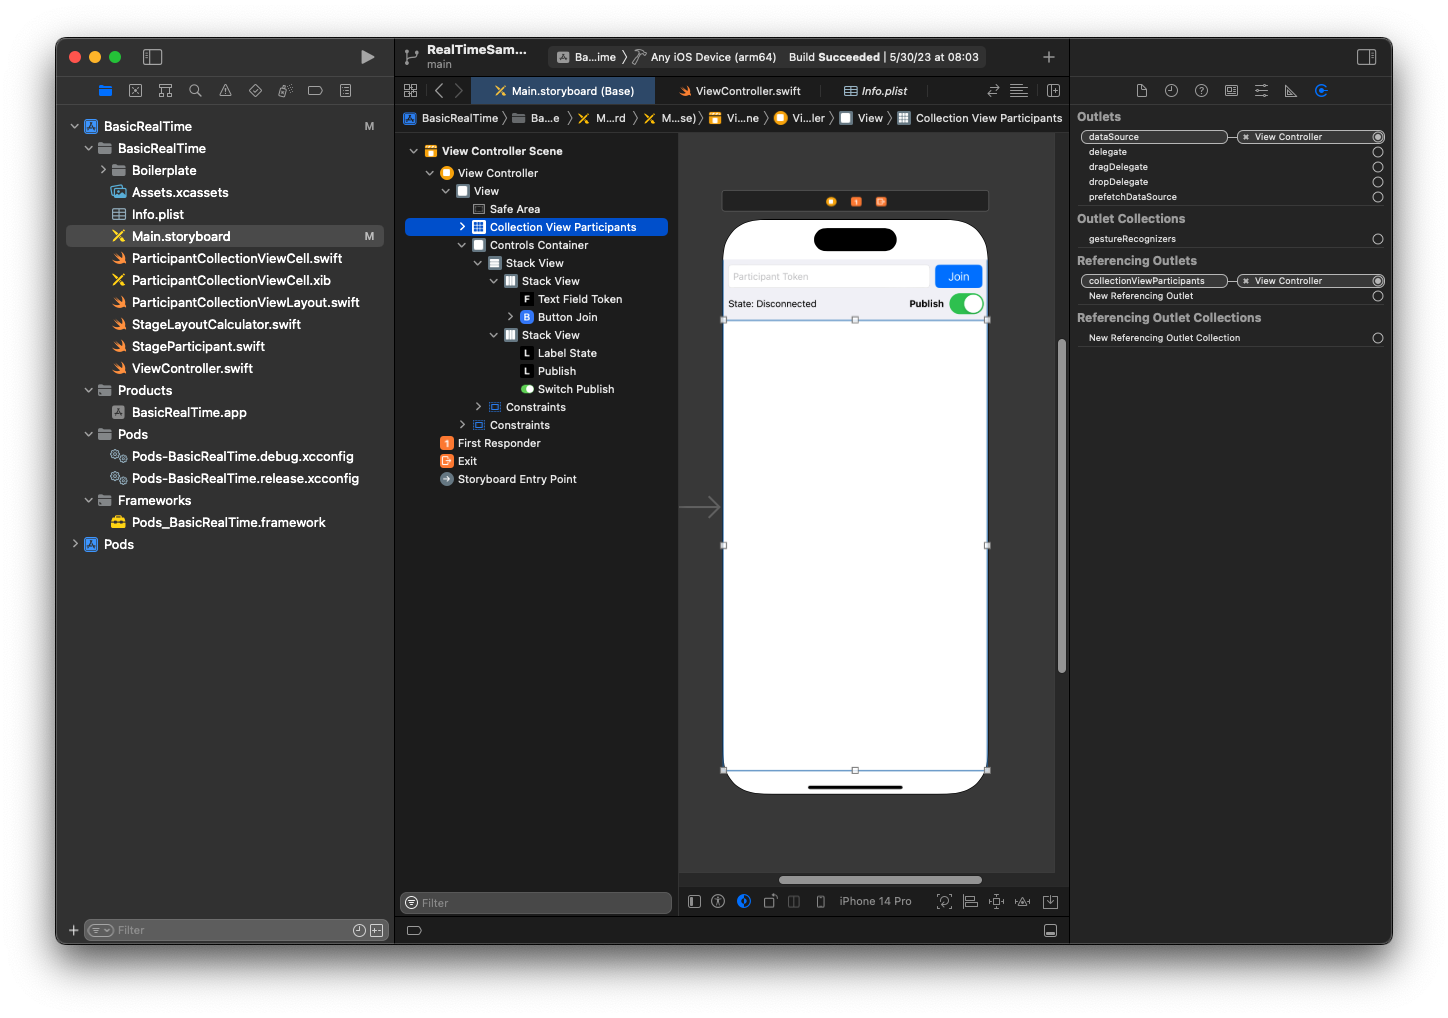
Tampilan Koleksi Peserta mengikat
collectionViewParticipants.
Gunakan juga waktu ini untuk mengatur item Peserta Tampilan Koleksi menjadi milikViewController: dataSource
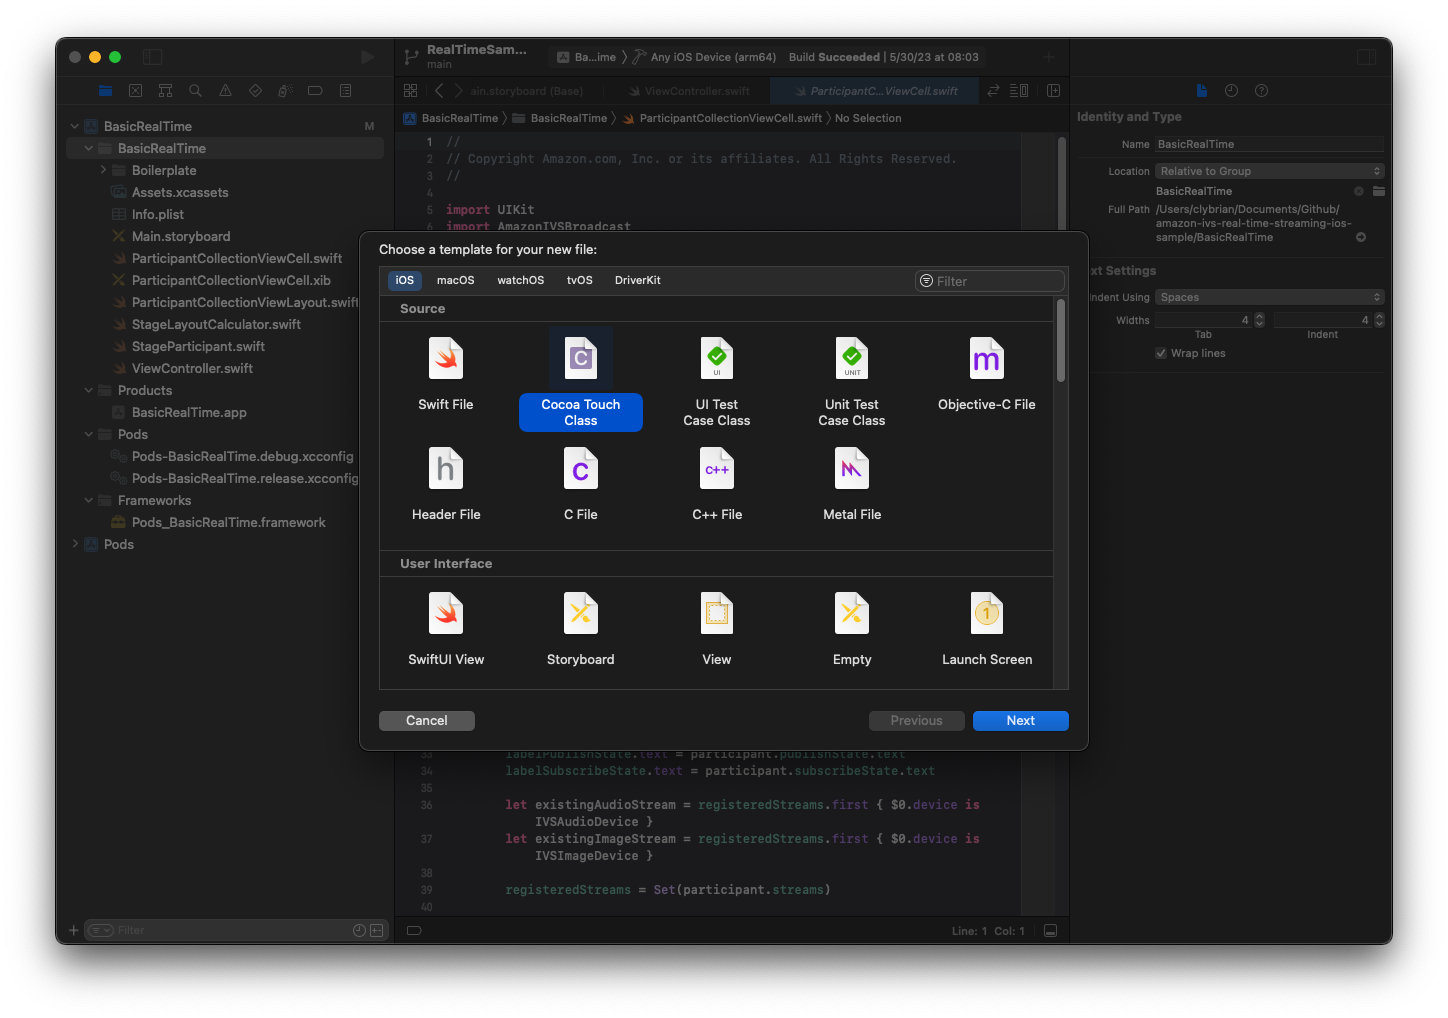
Sekarang kita membuat UICollectionViewCell subclass untuk membuat peserta. Mulailah dengan membuat file Cocoa Touch Class baru:
Beri nama ParticipantUICollectionViewCell dan jadikan subclass UICollectionViewCell di Swift. Kami mulai di file Swift lagi, membuat tautan @IBOutlets untuk kami:
import AmazonIVSBroadcast

class ParticipantCollectionViewCell: UICollectionViewCell {

    @IBOutlet private var viewPreviewContainer: UIView!
    @IBOutlet private var labelParticipantId: UILabel!
    @IBOutlet private var labelSubscribeState: UILabel!
    @IBOutlet private var labelPublishState: UILabel!
    @IBOutlet private var labelVideoMuted: UILabel!
    @IBOutlet private var labelAudioMuted: UILabel!
    @IBOutlet private var labelAudioVolume: UILabel!
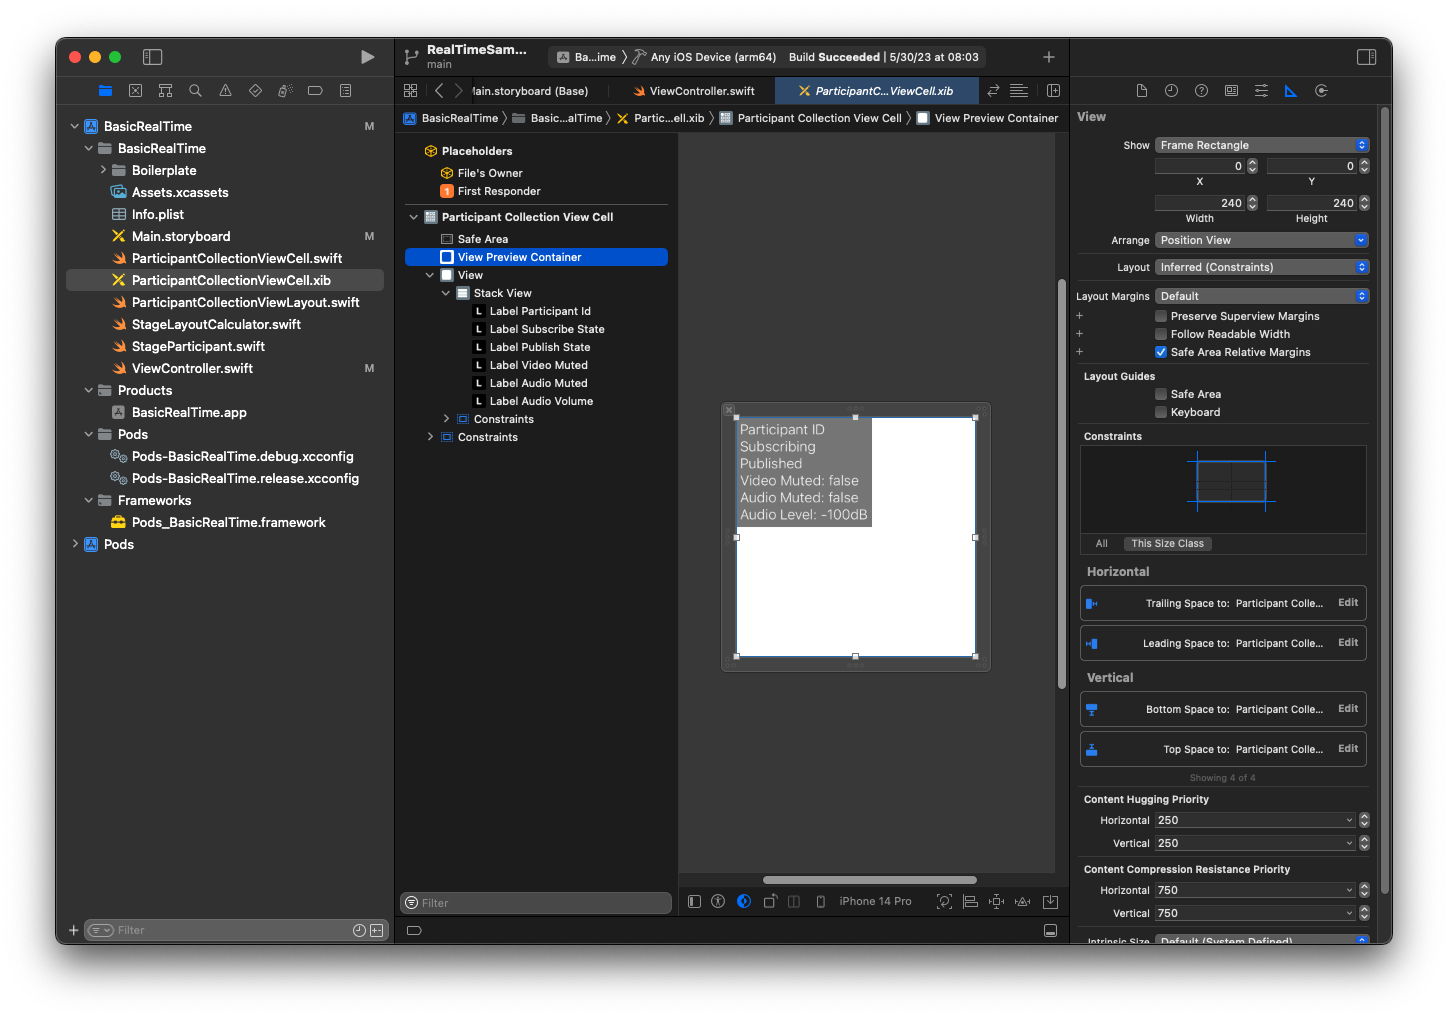
Dalam XIB file terkait, buat hierarki tampilan ini:
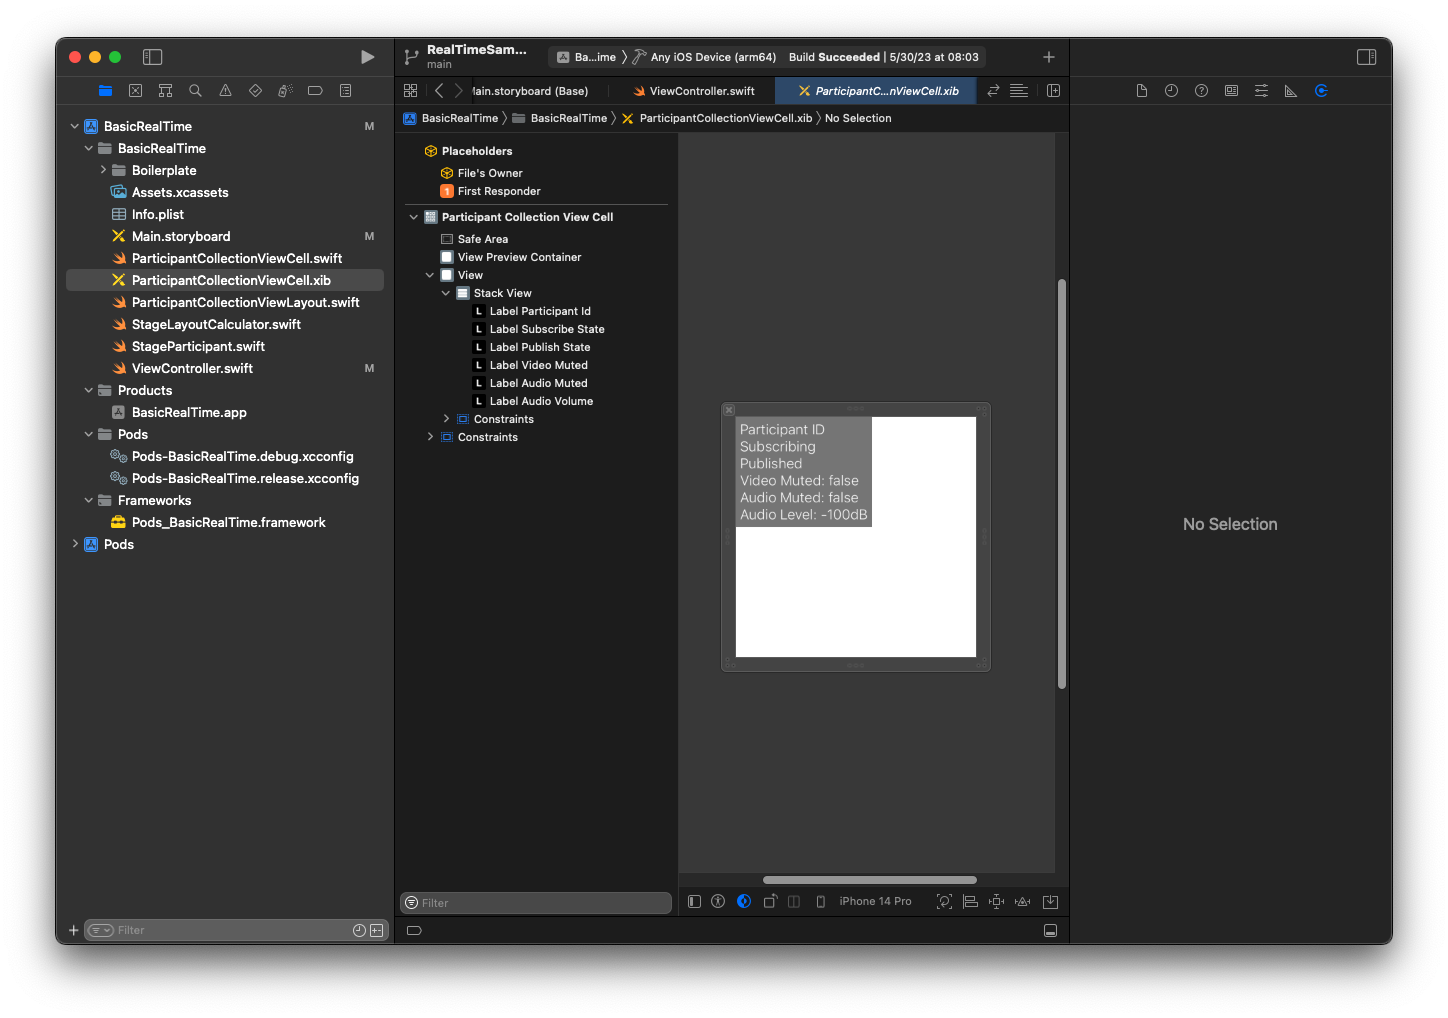
Untuk AutoLayout, kita akan memodifikasi tiga tampilan lagi. Tampilan pertama adalah View Preview Container. Atur Trailing, Leading, Top, dan Bottom ke Sel Tampilan Koleksi Peserta.
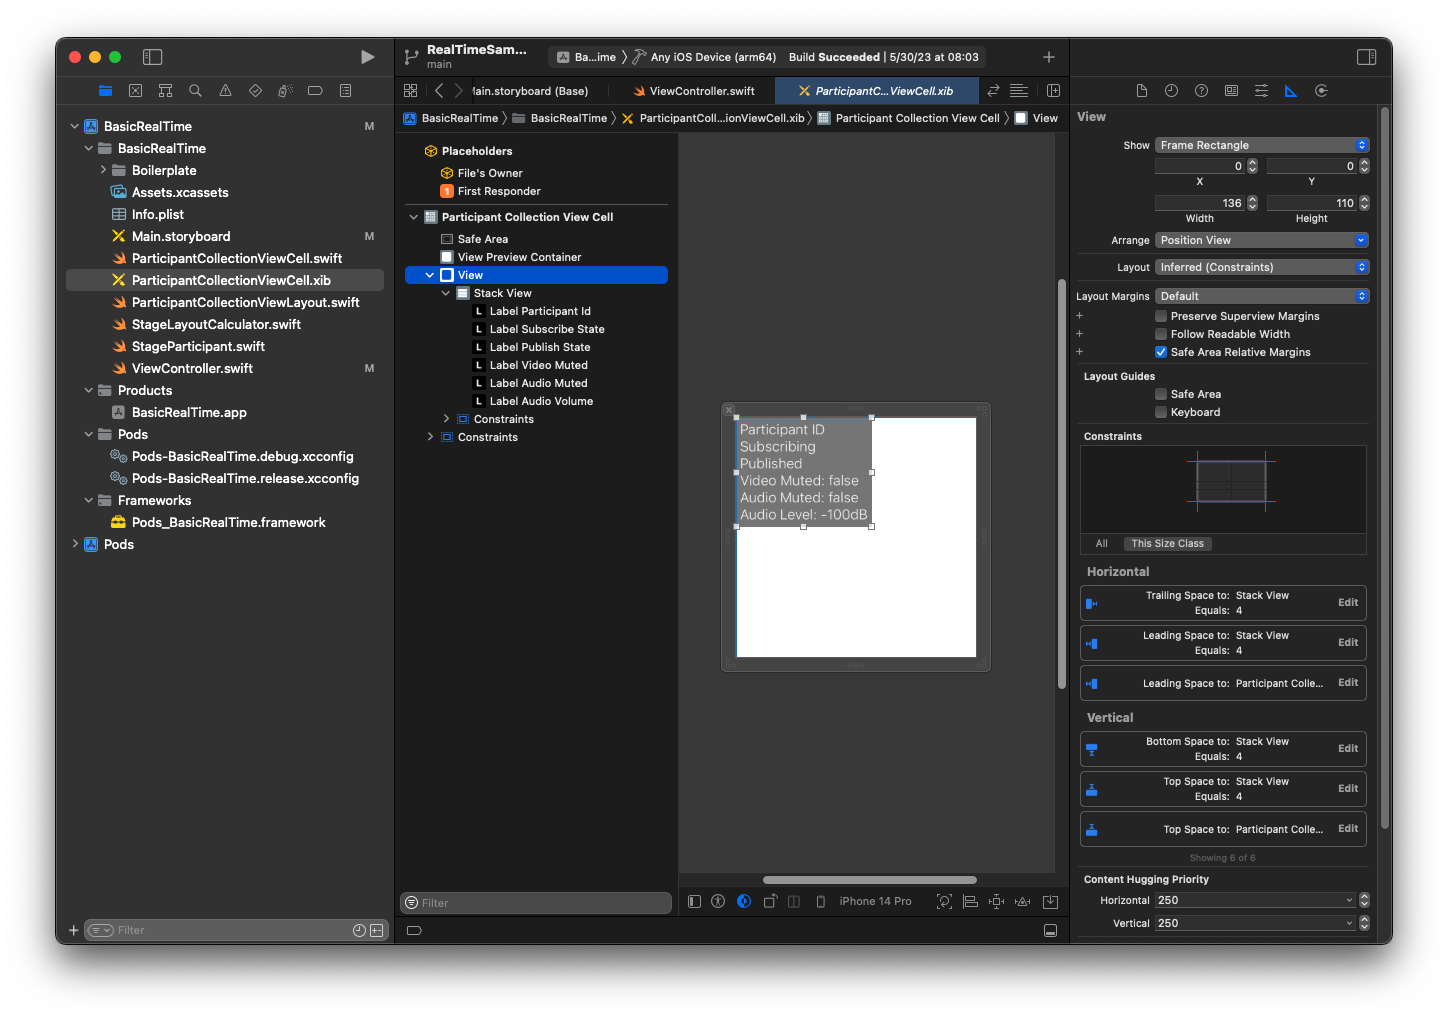
Pandangan kedua adalah View. Atur Leading dan Top ke Sel Tampilan Koleksi Peserta dan ubah nilainya menjadi 4.
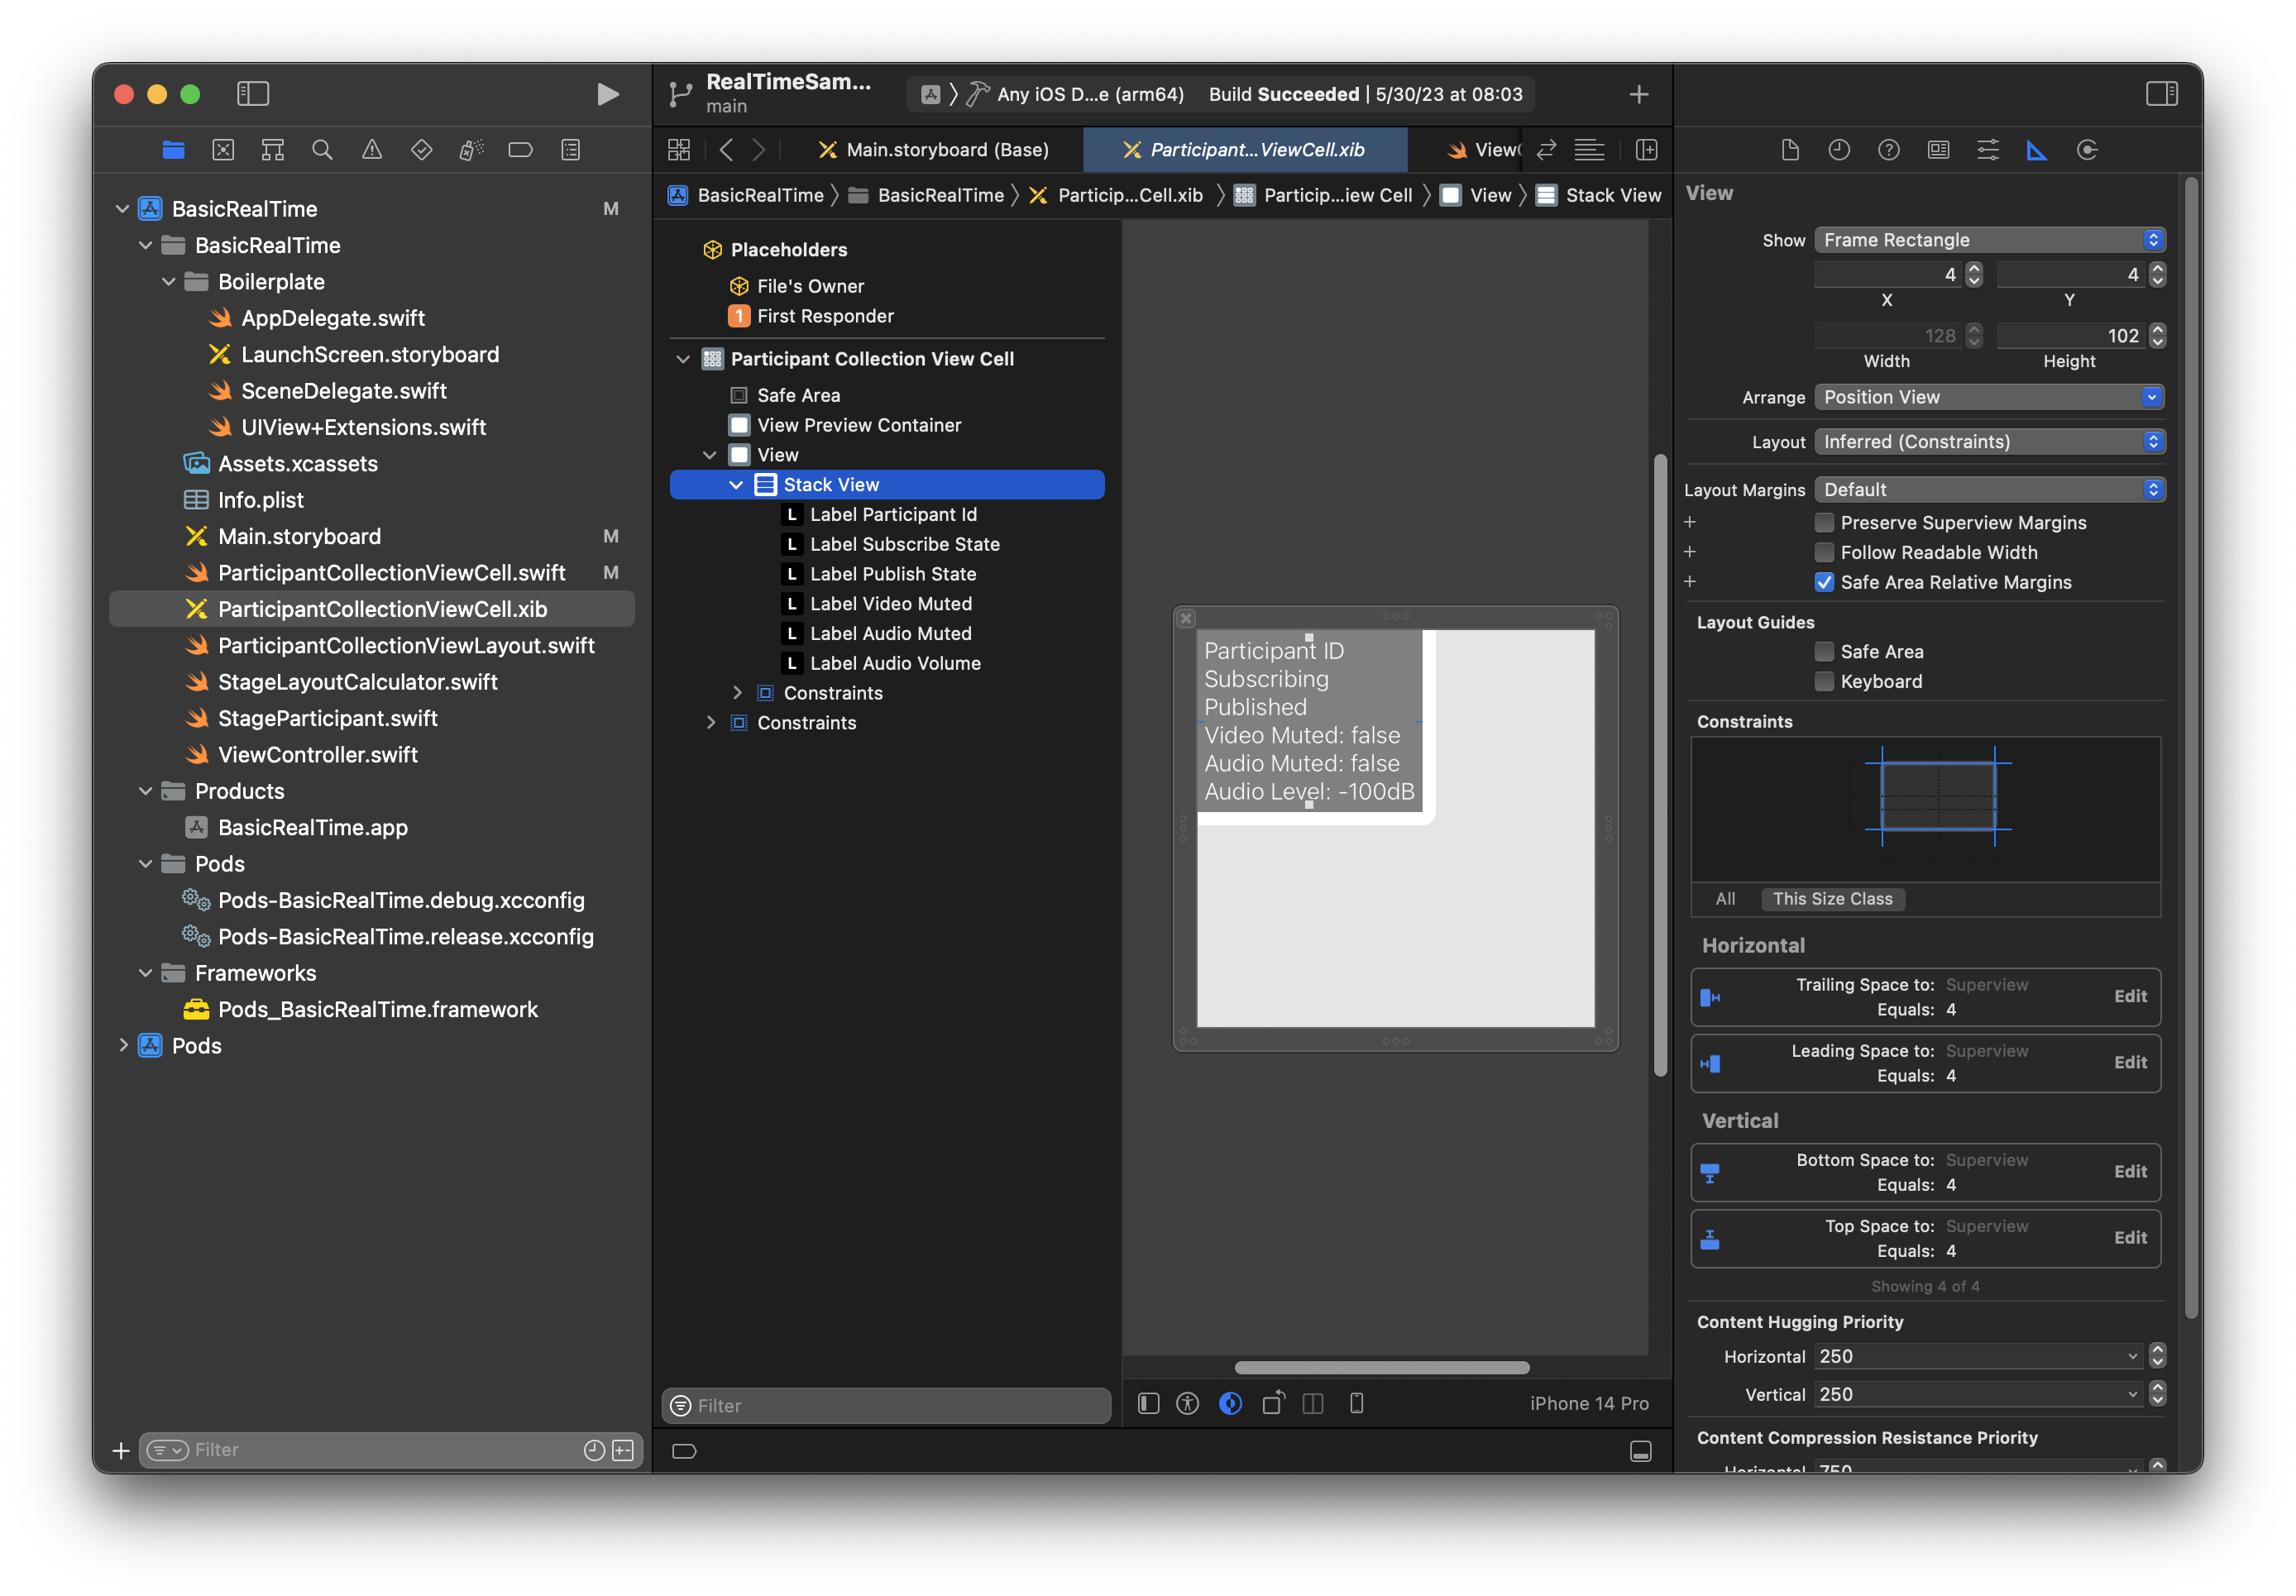
Tampilan ketiga adalah Stack View. Atur Trailing, Leading, Top, dan Bottom ke Superview dan ubah nilainya menjadi 4.
Izin dan Timer Idle
Kembali ke kamiViewController, kami akan menonaktifkan pengatur waktu idle sistem untuk mencegah perangkat tidur saat aplikasi kami digunakan:
override func viewDidAppear(_ animated: Bool) {
    super.viewDidAppear(animated)
    // Prevent the screen from turning off during a call.
    UIApplication.shared.isIdleTimerDisabled = true
}

override func viewDidDisappear(_ animated: Bool) {
    super.viewDidDisappear(animated)
    UIApplication.shared.isIdleTimerDisabled = false
}
Selanjutnya kami meminta izin kamera dan mikrofon dari sistem:
private func checkPermissions() {
    checkOrGetPermission(for: .video) { [weak self] granted in
        guard granted else {
            print("Video permission denied")
            return
        }
        self?.checkOrGetPermission(for: .audio) { [weak self] granted in
            guard granted else {
                print("Audio permission denied")
                return
            }
            self?.setupLocalUser() // we will cover this later
        }
    }
}

private func checkOrGetPermission(for mediaType: AVMediaType, _ result: @escaping (Bool) -> Void) {
    func mainThreadResult(_ success: Bool) {
        DispatchQueue.main.async {
            result(success)
        }
    }
    switch AVCaptureDevice.authorizationStatus(for: mediaType) {
    case .authorized: mainThreadResult(true)
    case .notDetermined:
        AVCaptureDevice.requestAccess(for: mediaType) { granted in
            mainThreadResult(granted)
        }
    case .denied, .restricted: mainThreadResult(false)
    @unknown default: mainThreadResult(false)
    }
}
Status Aplikasi
Kita perlu mengkonfigurasi kita collectionViewParticipants dengan file tata letak yang kita buat sebelumnya:
override func viewDidLoad() {
    super.viewDidLoad()
    // We render everything to exactly the frame, so don't allow scrolling.
    collectionViewParticipants.isScrollEnabled = false
    collectionViewParticipants.register(UINib(nibName: "ParticipantCollectionViewCell", bundle: .main), forCellWithReuseIdentifier: "ParticipantCollectionViewCell")
}
Untuk mewakili setiap peserta, kita membuat struct sederhana yang disebutStageParticipant. Ini dapat dimasukkan dalam ViewController.swift file, atau file baru dapat dibuat.
import Foundation
import AmazonIVSBroadcast

struct StageParticipant {
    let isLocal: Bool
    var participantId: String?
    var publishState: IVSParticipantPublishState = .notPublished
    var subscribeState: IVSParticipantSubscribeState = .notSubscribed
    var streams: [IVSStageStream] = []

    init(isLocal: Bool, participantId: String?) {
        self.isLocal = isLocal
        self.participantId = participantId
    }
}
Untuk melacak peserta tersebut, kami menyimpan array dari mereka sebagai milik pribadi diViewController:
private var participants = [StageParticipant]()
Properti ini akan digunakan untuk memberi daya pada kami UICollectionViewDataSource yang ditautkan dari storyboard sebelumnya:
extension ViewController: UICollectionViewDataSource {

    func collectionView(_ collectionView: UICollectionView, numberOfItemsInSection section: Int) -> Int {
        return participants.count
    }

    func collectionView(_ collectionView: UICollectionView, cellForItemAt indexPath: IndexPath) -> UICollectionViewCell {
        if let cell = collectionView.dequeueReusableCell(withReuseIdentifier: "ParticipantCollectionViewCell", for: indexPath) as? ParticipantCollectionViewCell {
            cell.set(participant: participants[indexPath.row])
            return cell
        } else {
            fatalError("Couldn't load custom cell type 'ParticipantCollectionViewCell'")
        }
    }

}
Untuk melihat pratinjau Anda sendiri sebelum bergabung dengan panggung, kami segera membuat peserta lokal:
override func viewDidLoad() {
    /* existing UICollectionView code */
    participants.append(StageParticipant(isLocal: true, participantId: nil))
}
Ini menghasilkan sel peserta segera dirender setelah aplikasi berjalan, mewakili peserta lokal.
Pengguna ingin dapat melihat diri mereka sendiri sebelum bergabung dengan tahap, jadi selanjutnya kita menerapkan setupLocalUser() metode yang dipanggil dari kode penanganan izin sebelumnya. Kami menyimpan referensi kamera dan mikrofon sebagai IVSLocalStageStream objek.
private var streams = [IVSLocalStageStream]()
private let deviceDiscovery = IVSDeviceDiscovery()

private func setupLocalUser() {
    // Gather our camera and microphone once permissions have been granted
    let devices = deviceDiscovery.listLocalDevices()
    streams.removeAll()
    if let camera = devices.compactMap({ $0 as? IVSCamera }).first {
        streams.append(IVSLocalStageStream(device: camera))
        // Use a front camera if available.
        if let frontSource = camera.listAvailableInputSources().first(where: { $0.position == .front }) {
            camera.setPreferredInputSource(frontSource)
        }
    }
    if let mic = devices.compactMap({ $0 as? IVSMicrophone }).first {
        streams.append(IVSLocalStageStream(device: mic))
    }
    participants[0].streams = streams
    participantsChanged(index: 0, changeType: .updated)
}
Di sini kami telah menemukan kamera dan mikrofon perangkat melalui SDK dan menyimpannya di streams objek lokal kami, kemudian menetapkan streams array peserta pertama (peserta lokal yang kami buat sebelumnya) ke kamistreams. Akhirnya kami memanggil participantsChanged dengan index 0 dan changeType dariupdated. Fungsi itu adalah fungsi pembantu untuk memperbarui kami UICollectionView dengan animasi yang bagus. Begini tampilannya:
private func participantsChanged(index: Int, changeType: ChangeType) {
    switch changeType {
    case .joined:
        collectionViewParticipants?.insertItems(at: [IndexPath(item: index, section: 0)])
    case .updated:
        // Instead of doing reloadItems, just grab the cell and update it ourselves. It saves a create/destroy of a cell
        // and more importantly fixes some UI flicker. We disable scrolling so the index path per cell
        // never changes.
        if let cell = collectionViewParticipants?.cellForItem(at: IndexPath(item: index, section: 0)) as? ParticipantCollectionViewCell {
            cell.set(participant: participants[index])
        }
    case .left:
        collectionViewParticipants?.deleteItems(at: [IndexPath(item: index, section: 0)])
    }
}
Jangan khawatircell.set; kita akan membahasnya nanti, tapi di situlah kita akan merender konten sel berdasarkan peserta.
ChangeTypeIni adalah enum sederhana:
enum ChangeType {
    case joined, updated, left
}
Akhirnya, kami ingin melacak apakah panggung terhubung. Kami menggunakan sederhana bool untuk melacaknya, yang secara otomatis akan memperbarui UI kami ketika diperbarui sendiri.
private var connectingOrConnected = false {
    didSet {
        buttonJoin.setTitle(connectingOrConnected ? "Leave" : "Join", for: .normal)
        buttonJoin.tintColor = connectingOrConnected ? .systemRed : .systemBlue
    }
}
Menerapkan Panggung SDK
Tiga konsep inti mendasari fungsionalitas real-time: panggung, strategi, dan penyaji. Tujuan desain adalah meminimalkan jumlah logika sisi klien yang diperlukan untuk membangun produk yang berfungsi.
IVSStageStrategy
IVSStageStrategyImplementasi kami sederhana:
extension ViewController: IVSStageStrategy {
    func stage(_ stage: IVSStage, streamsToPublishForParticipant participant: IVSParticipantInfo) -> [IVSLocalStageStream] {
        // Return the camera and microphone to be published.
        // This is only called if `shouldPublishParticipant` returns true.
        return streams
    }

    func stage(_ stage: IVSStage, shouldPublishParticipant participant: IVSParticipantInfo) -> Bool {
        // Our publish status is based directly on the UISwitch view
        return switchPublish.isOn
    }

    func stage(_ stage: IVSStage, shouldSubscribeToParticipant participant: IVSParticipantInfo) -> IVSStageSubscribeType {
        // Subscribe to both audio and video for all publishing participants.
        return .audioVideo
    }
}
Untuk meringkas, kami hanya mempublikasikan jika sakelar publikasi berada di posisi “on”, dan jika kami mempublikasikan, kami akan mempublikasikan aliran yang kami kumpulkan sebelumnya. Akhirnya, untuk sampel ini, kami selalu berlangganan peserta lain, menerima audio dan video mereka.
IVSStageRenderer
IVSStageRendererImplementasinya juga cukup sederhana, meskipun mengingat jumlah fungsi yang berisi lebih banyak kode. Pendekatan umum dalam penyaji ini adalah memperbarui participants array kami ketika SDK memberi tahu kami tentang perubahan pada peserta. Ada skenario tertentu di mana kami menangani peserta lokal secara berbeda, karena kami telah memutuskan untuk mengelolanya sendiri sehingga mereka dapat melihat pratinjau kamera mereka sebelum bergabung.
extension ViewController: IVSStageRenderer {

    func stage(_ stage: IVSStage, didChange connectionState: IVSStageConnectionState, withError error: Error?) {
        labelState.text = connectionState.text
        connectingOrConnected = connectionState != .disconnected
    }

    func stage(_ stage: IVSStage, participantDidJoin participant: IVSParticipantInfo) {
        if participant.isLocal {
            // If this is the local participant joining the Stage, update the first participant in our array because we
            // manually added that participant when setting up our preview
            participants[0].participantId = participant.participantId
            participantsChanged(index: 0, changeType: .updated)
        } else {
            // If they are not local, add them to the array as a newly joined participant.
            participants.append(StageParticipant(isLocal: false, participantId: participant.participantId))
            participantsChanged(index: (participants.count - 1), changeType: .joined)
        }
    }

    func stage(_ stage: IVSStage, participantDidLeave participant: IVSParticipantInfo) {
        if participant.isLocal {
            // If this is the local participant leaving the Stage, update the first participant in our array because
            // we want to keep the camera preview active
            participants[0].participantId = nil
            participantsChanged(index: 0, changeType: .updated)
        } else {
            // If they are not local, find their index and remove them from the array.
            if let index = participants.firstIndex(where: { $0.participantId == participant.participantId }) {
                participants.remove(at: index)
                participantsChanged(index: index, changeType: .left)
            }
        }
    }

    func stage(_ stage: IVSStage, participant: IVSParticipantInfo, didChange publishState: IVSParticipantPublishState) {
        // Update the publishing state of this participant
        mutatingParticipant(participant.participantId) { data in
            data.publishState = publishState
        }
    }

    func stage(_ stage: IVSStage, participant: IVSParticipantInfo, didChange subscribeState: IVSParticipantSubscribeState) {
        // Update the subscribe state of this participant
        mutatingParticipant(participant.participantId) { data in
            data.subscribeState = subscribeState
        }
    }

    func stage(_ stage: IVSStage, participant: IVSParticipantInfo, didChangeMutedStreams streams: [IVSStageStream]) {
        // We don't want to take any action for the local participant because we track those streams locally
        if participant.isLocal { return }
        // For remote participants, notify the UICollectionView that they have updated. There is no need to modify
        // the `streams` property on the `StageParticipant` because it is the same `IVSStageStream` instance. Just
        // query the `isMuted` property again.
        if let index = participants.firstIndex(where: { $0.participantId == participant.participantId }) {
            participantsChanged(index: index, changeType: .updated)
        }
    }

    func stage(_ stage: IVSStage, participant: IVSParticipantInfo, didAdd streams: [IVSStageStream]) {
        // We don't want to take any action for the local participant because we track those streams locally
        if participant.isLocal { return }
        // For remote participants, add these new streams to that participant's streams array.
        mutatingParticipant(participant.participantId) { data in
            data.streams.append(contentsOf: streams)
        }
    }

    func stage(_ stage: IVSStage, participant: IVSParticipantInfo, didRemove streams: [IVSStageStream]) {
        // We don't want to take any action for the local participant because we track those streams locally
        if participant.isLocal { return }
        // For remote participants, remove these streams from that participant's streams array.
        mutatingParticipant(participant.participantId) { data in
            let oldUrns = streams.map { $0.device.descriptor().urn }
            data.streams.removeAll(where: { stream in
                return oldUrns.contains(stream.device.descriptor().urn)
            })
        }
    }

    // A helper function to find a participant by its ID, mutate that participant, and then update the UICollectionView accordingly.
    private func mutatingParticipant(_ participantId: String?, modifier: (inout StageParticipant) -> Void) {
        guard let index = participants.firstIndex(where: { $0.participantId == participantId }) else {
            fatalError("Something is out of sync, investigate if this was a sample app or SDK issue.")
        }

        var participant = participants[index]
        modifier(&participant)
        participants[index] = participant
        participantsChanged(index: index, changeType: .updated)
    }
}
Kode ini menggunakan ekstensi untuk mengubah status koneksi menjadi teks ramah manusia:
extension IVSStageConnectionState {
    var text: String {
        switch self {
        case .disconnected: return "Disconnected"
        case .connecting: return "Connecting"
        case .connected: return "Connected"
        @unknown default: fatalError()
        }
    }
}
Menerapkan Kustom UICollectionViewLayout
Menempatkan jumlah peserta yang berbeda bisa menjadi rumit. Anda ingin mereka mengambil seluruh bingkai tampilan induk tetapi Anda tidak ingin menangani setiap konfigurasi peserta secara independen. Untuk membuatnya mudah, kita akan berjalan melalui penerapan aUICollectionViewLayout.
Buat file baru lainnya,ParticipantCollectionViewLayout.swift, yang harus diperluasUICollectionViewLayout. Kelas ini akan menggunakan kelas lain yang disebutStageLayoutCalculator, yang akan kita bahas segera. Kelas menerima nilai bingkai yang dihitung untuk setiap peserta dan kemudian menghasilkan UICollectionViewLayoutAttributes objek yang diperlukan.
import Foundation
import UIKit

/**
 Code modified from https://developer.apple.com/documentation/uikit/views_and_controls/collection_views/layouts/customizing_collection_view_layouts?language=objc
 */
class ParticipantCollectionViewLayout: UICollectionViewLayout {

    private let layoutCalculator = StageLayoutCalculator()

    private var contentBounds = CGRect.zero
    private var cachedAttributes = [UICollectionViewLayoutAttributes]()

    override func prepare() {
        super.prepare()

        guard let collectionView = collectionView else { return }

        cachedAttributes.removeAll()
        contentBounds = CGRect(origin: .zero, size: collectionView.bounds.size)

        layoutCalculator.calculateFrames(participantCount: collectionView.numberOfItems(inSection: 0),
                                         width: collectionView.bounds.size.width,
                                         height: collectionView.bounds.size.height,
                                         padding: 4)
        .enumerated()
        .forEach { (index, frame) in
            let attributes = UICollectionViewLayoutAttributes(forCellWith: IndexPath(item: index, section: 0))
            attributes.frame = frame
            cachedAttributes.append(attributes)
            contentBounds = contentBounds.union(frame)
        }
    }

    override var collectionViewContentSize: CGSize {
        return contentBounds.size
    }

    override func shouldInvalidateLayout(forBoundsChange newBounds: CGRect) -> Bool {
        guard let collectionView = collectionView else { return false }
        return !newBounds.size.equalTo(collectionView.bounds.size)
    }

    override func layoutAttributesForItem(at indexPath: IndexPath) -> UICollectionViewLayoutAttributes? {
        return cachedAttributes[indexPath.item]
    }

    override func layoutAttributesForElements(in rect: CGRect) -> [UICollectionViewLayoutAttributes]? {
        var attributesArray = [UICollectionViewLayoutAttributes]()

        // Find any cell that sits within the query rect.
        guard let lastIndex = cachedAttributes.indices.last, let firstMatchIndex = binSearch(rect, start: 0, end: lastIndex) else {
            return attributesArray
        }

        // Starting from the match, loop up and down through the array until all the attributes
        // have been added within the query rect.
        for attributes in cachedAttributes[..<firstMatchIndex].reversed() {
            guard attributes.frame.maxY >= rect.minY else { break }
            attributesArray.append(attributes)
        }

        for attributes in cachedAttributes[firstMatchIndex...] {
            guard attributes.frame.minY <= rect.maxY else { break }
            attributesArray.append(attributes)
        }

        return attributesArray
    }

    // Perform a binary search on the cached attributes array.
    func binSearch(_ rect: CGRect, start: Int, end: Int) -> Int? {
        if end < start { return nil }

        let mid = (start + end) / 2
        let attr = cachedAttributes[mid]

        if attr.frame.intersects(rect) {
            return mid
        } else {
            if attr.frame.maxY < rect.minY {
                return binSearch(rect, start: (mid + 1), end: end)
            } else {
                return binSearch(rect, start: start, end: (mid - 1))
            }
        }
    }
}
Yang lebih penting adalah StageLayoutCalculator.swift kelas. Ini dirancang untuk menghitung frame untuk setiap peserta berdasarkan jumlah peserta dalam tata letak baris/kolom berbasis aliran. Setiap baris memiliki tinggi yang sama dengan yang lain, tetapi kolom dapat memiliki lebar yang berbeda per baris. Lihat komentar kode di atas layouts variabel untuk deskripsi tentang cara menyesuaikan perilaku ini.
import Foundation
import UIKit

class StageLayoutCalculator {

    /// This 2D array contains the description of how the grid of participants should be rendered
    /// The index of the 1st dimension is the number of participants needed to active that configuration
    /// Meaning if there is 1 participant, index 0 will be used. If there are 5 participants, index 4 will be used.
    ///
    /// The 2nd dimension is a description of the layout. The length of the array is the number of rows that
    /// will exist, and then each number within that array is the number of columns in each row.
    ///
    /// See the code comments next to each index for concrete examples.
    ///
    /// This can be customized to fit any layout configuration needed.
    private let layouts: [[Int]] = [
        // 1 participant
        [ 1 ], // 1 row, full width
        // 2 participants
        [ 1, 1 ], // 2 rows, all columns are full width
        // 3 participants
        [ 1, 2 ], // 2 rows, first row's column is full width then 2nd row's columns are 1/2 width
        // 4 participants
        [ 2, 2 ], // 2 rows, all columns are 1/2 width
        // 5 participants
        [ 1, 2, 2 ], // 3 rows, first row's column is full width, 2nd and 3rd row's columns are 1/2 width
        // 6 participants
        [ 2, 2, 2 ], // 3 rows, all column are 1/2 width
        // 7 participants
        [ 2, 2, 3 ], // 3 rows, 1st and 2nd row's columns are 1/2 width, 3rd row's columns are 1/3rd width
        // 8 participants
        [ 2, 3, 3 ],
        // 9 participants
        [ 3, 3, 3 ],
        // 10 participants
        [ 2, 3, 2, 3 ],
        // 11 participants
        [ 2, 3, 3, 3 ],
        // 12 participants
        [ 3, 3, 3, 3 ],
    ]

    // Given a frame (this could be for a UICollectionView, or a Broadcast Mixer's canvas), calculate the frames for each
    // participant, with optional padding.
    func calculateFrames(participantCount: Int, width: CGFloat, height: CGFloat, padding: CGFloat) -> [CGRect] {
        if participantCount > layouts.count {
            fatalError("Only \(layouts.count) participants are supported at this time")
        }
        if participantCount == 0 {
            return []
        }
        var currentIndex = 0
        var lastFrame: CGRect = .zero

        // If the height is less than the width, the rows and columns will be flipped.
        // Meaning for 6 participants, there will be 2 rows of 3 columns each.
        let isVertical = height > width

        let halfPadding = padding / 2.0

        let layout = layouts[participantCount - 1] // 1 participant is in index 0, so `-1`.
        let rowHeight = (isVertical ? height : width) / CGFloat(layout.count)

        var frames = [CGRect]()
        for row in 0 ..< layout.count {
            // layout[row] is the number of columns in a layout
            let itemWidth = (isVertical ? width : height) / CGFloat(layout[row])
            let segmentFrame = CGRect(x: (isVertical ? 0 : lastFrame.maxX) + halfPadding,
                                      y: (isVertical ? lastFrame.maxY : 0) + halfPadding,
                                      width: (isVertical ? itemWidth : rowHeight) - padding,
                                      height: (isVertical ? rowHeight : itemWidth) - padding)

            for column in 0 ..< layout[row] {
                var frame = segmentFrame
                if isVertical {
                    frame.origin.x = (itemWidth * CGFloat(column)) + halfPadding
                } else {
                    frame.origin.y = (itemWidth * CGFloat(column)) + halfPadding
                }
                frames.append(frame)
                currentIndex += 1
            }

            lastFrame = segmentFrame
            lastFrame.origin.x += halfPadding
            lastFrame.origin.y += halfPadding
        }
        return frames
    }

}
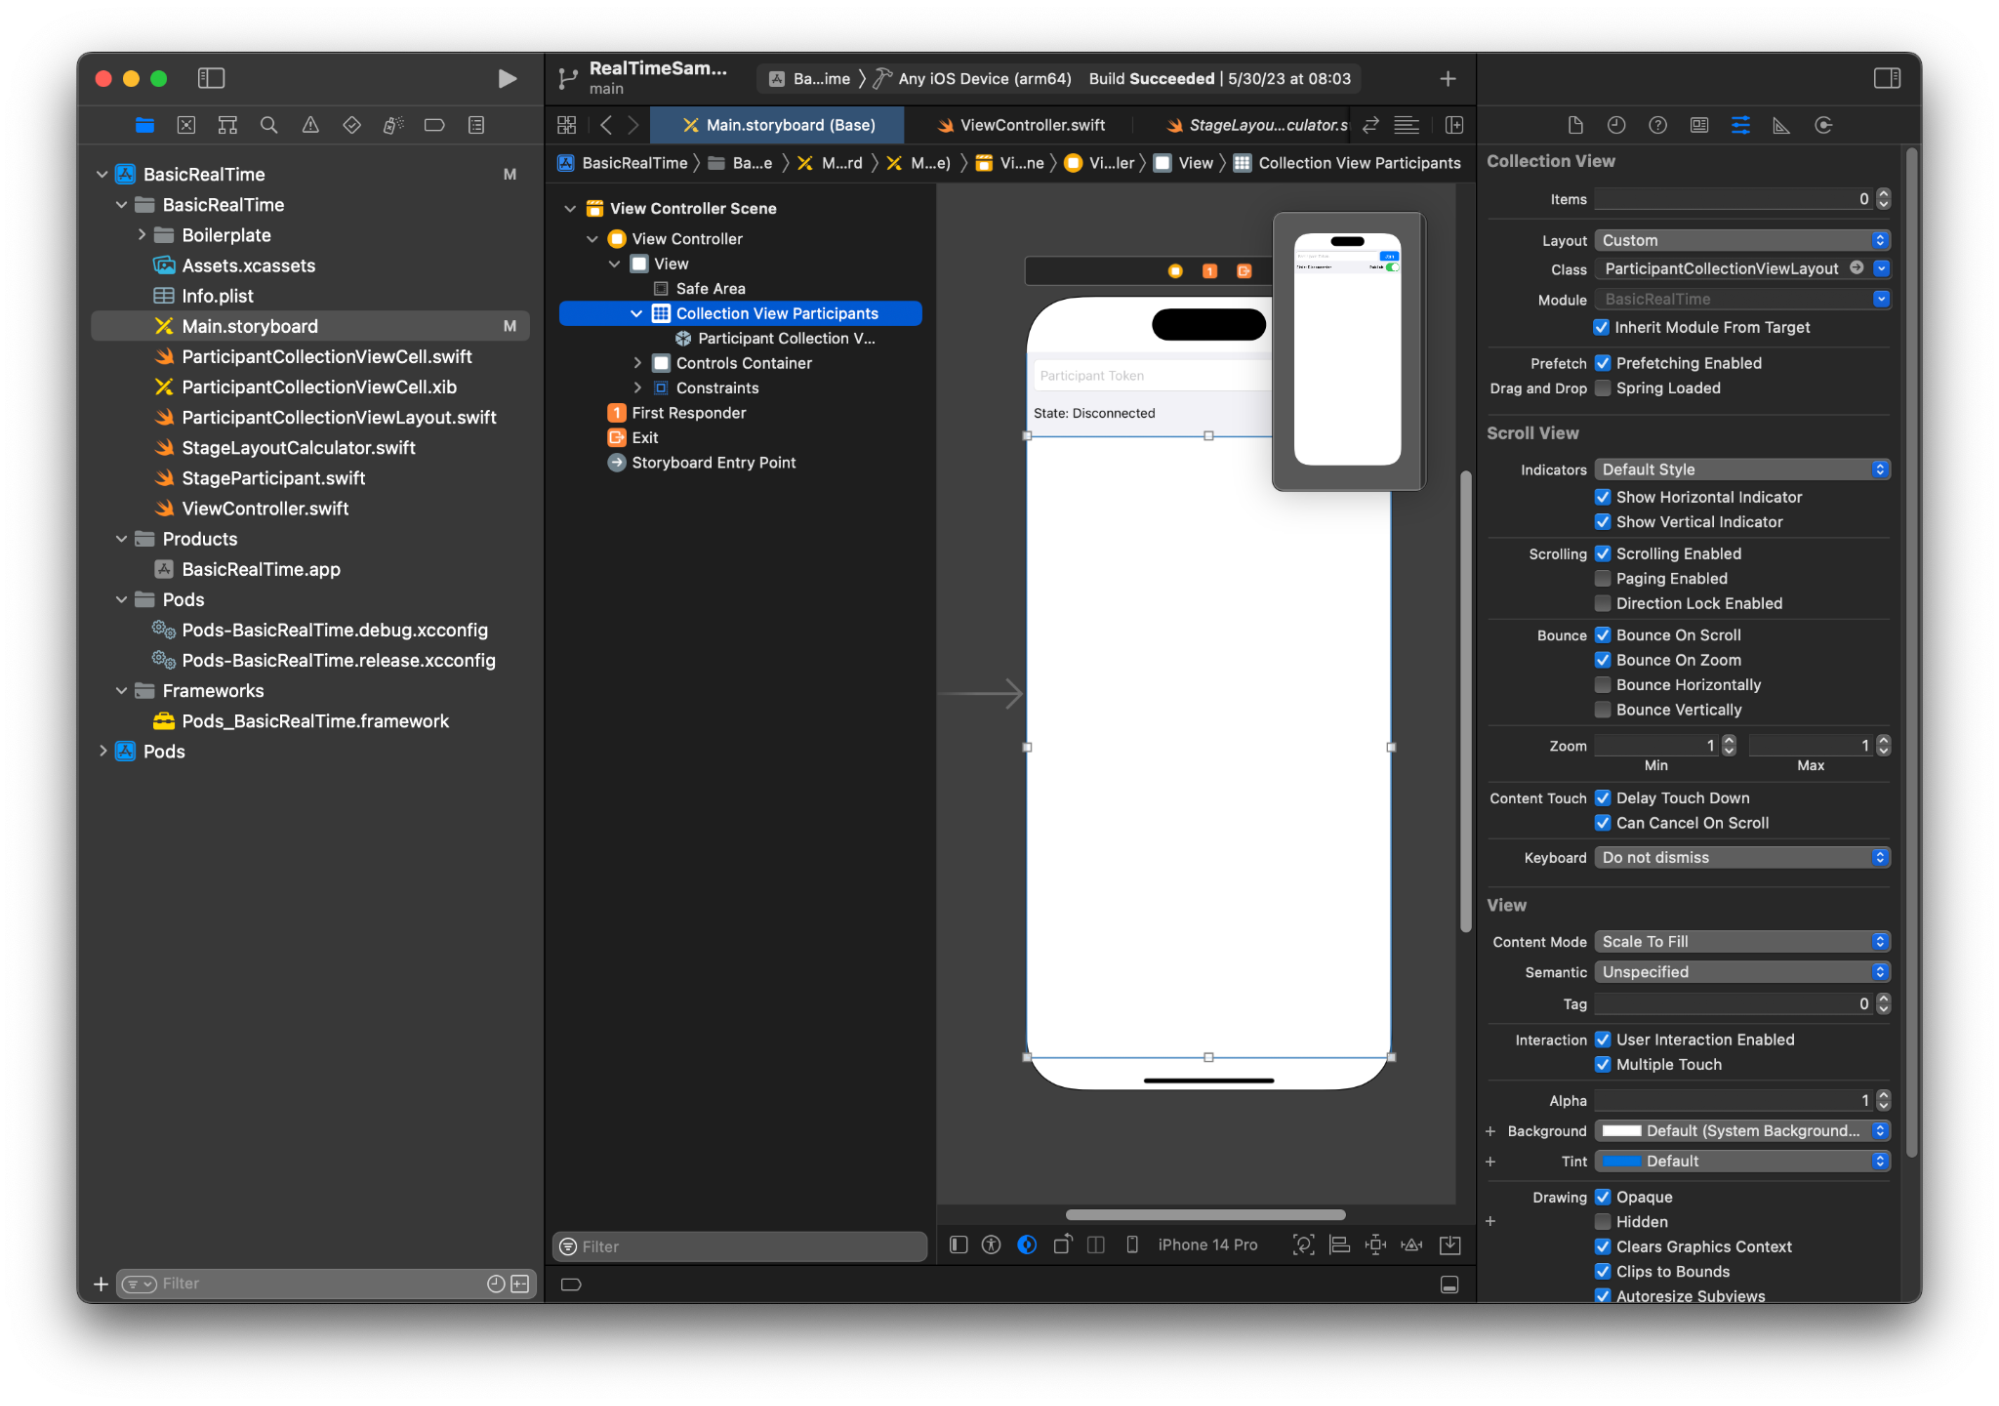
KembaliMain.storyboard, pastikan untuk mengatur kelas tata letak untuk kelas yang baru saja kita buat: UICollectionView
Menghubungkan Tindakan UI
Kami semakin dekat, ada beberapa IBActions yang perlu kami buat.
Pertama kita akan menangani tombol join. Ini merespons secara berbeda berdasarkan nilai. connectingOrConnected Ketika sudah terhubung, itu hanya meninggalkan panggung. Jika terputus, ia membaca teks dari token UITextField dan membuat yang baru IVSStage dengan teks itu. Kemudian kita menambahkan kita ViewController sebagaistrategy,errorDelegate, dan renderer untukIVSStage, dan akhirnya kita bergabung dengan panggung secara asinkron.
@IBAction private func joinTapped(_ sender: UIButton) {
    if connectingOrConnected {
        // If we're already connected to a Stage, leave it.
        stage?.leave()
    } else {
        guard let token = textFieldToken.text else {
            print("No token")
            return
        }
        // Hide the keyboard after tapping Join
        textFieldToken.resignFirstResponder()
        do {
            // Destroy the old Stage first before creating a new one.
            self.stage = nil
            let stage = try IVSStage(token: token, strategy: self)
            stage.errorDelegate = self
            stage.addRenderer(self)
            try stage.join()
            self.stage = stage
        } catch {
            print("Failed to join stage - \(error)")
        }
    }
}
Tindakan UI lain yang perlu kita hubungkan adalah sakelar publikasikan:
@IBAction private func publishToggled(_ sender: UISwitch) {
    // Because the strategy returns the value of `switchPublish.isOn`, just call `refreshStrategy`.
    stage?.refreshStrategy()
}
Rendering Peserta
Akhirnya, kita perlu merender data yang kita terima dari SDK ke sel peserta yang kita buat sebelumnya. Kami sudah menyelesaikan UICollectionView logika, jadi kami hanya perlu mengimplementasikan set API inParticipantCollectionViewCell.swift.
Kita akan mulai dengan menambahkan empty fungsi dan kemudian berjalan melalui langkah demi langkah:
func set(participant: StageParticipant) {

}
Pertama kita menangani status mudah, ID peserta, status publikasi, dan status berlangganan. Untuk ini, kami hanya memperbarui kami UILabels secara langsung:
labelParticipantId.text = participant.isLocal ? "You (\(participant.participantId ?? "Disconnected"))" : participant.participantId
labelPublishState.text = participant.publishState.text
labelSubscribeState.text = participant.subscribeState.text
Properti teks dari mempublikasikan dan berlangganan enum berasal dari ekstensi lokal:
extension IVSParticipantPublishState {
    var text: String {
        switch self {
        case .notPublished: return "Not Published"
        case .attemptingPublish: return "Attempting to Publish"
        case .published: return "Published"
        @unknown default: fatalError()
        }
    }
}

extension IVSParticipantSubscribeState {
    var text: String {
        switch self {
        case .notSubscribed: return "Not Subscribed"
        case .attemptingSubscribe: return "Attempting to Subscribe"
        case .subscribed: return "Subscribed"
        @unknown default: fatalError()
        }
    }
}
Selanjutnya kami memperbarui status audio dan video yang diredam. Untuk mendapatkan status yang diredam kita perlu menemukan IVSImageDevice dan IVSAudioDevice dari streams array. Untuk mengoptimalkan kinerja, kami akan mengingat perangkat terakhir yang terpasang.
// This belongs outside `set(participant:)`
private var registeredStreams: Set<IVSStageStream> = []
private var imageDevice: IVSImageDevice? {
    return registeredStreams.lazy.compactMap { $0.device as? IVSImageDevice }.first
}
private var audioDevice: IVSAudioDevice? {
    return registeredStreams.lazy.compactMap { $0.device as? IVSAudioDevice }.first
}

// This belongs inside `set(participant:)`
let existingAudioStream = registeredStreams.first { $0.device is IVSAudioDevice }
let existingImageStream = registeredStreams.first { $0.device is IVSImageDevice }

registeredStreams = Set(participant.streams)

let newAudioStream = participant.streams.first { $0.device is IVSAudioDevice }
let newImageStream = participant.streams.first { $0.device is IVSImageDevice }

// `isMuted != false` covers the stream not existing, as well as being muted.
labelVideoMuted.text = "Video Muted: \(newImageStream?.isMuted != false)"
labelAudioMuted.text = "Audio Muted: \(newAudioStream?.isMuted != false)"
Akhirnya kami ingin membuat pratinjau untuk imageDevice dan menampilkan statistik audio dariaudioDevice:
if existingImageStream !== newImageStream {
    // The image stream has changed
    updatePreview() // We’ll cover this next
}

if existingAudioStream !== newAudioStream {
    (existingAudioStream?.device as? IVSAudioDevice)?.setStatsCallback(nil)
    audioDevice?.setStatsCallback( { [weak self] stats in
        self?.labelAudioVolume.text = String(format: "Audio Level: %.0f dB", stats.rms)
    })
    // When the audio stream changes, it will take some time to receive new stats. Reset the value temporarily.
    self.labelAudioVolume.text = "Audio Level: -100 dB"
}
Fungsi terakhir yang perlu kita buat adalahupdatePreview(), yang menambahkan pratinjau peserta ke tampilan kita:
private func updatePreview() {
    // Remove any old previews from the preview container
    viewPreviewContainer.subviews.forEach { $0.removeFromSuperview() }
    if let imageDevice = self.imageDevice {
        if let preview = try? imageDevice.previewView(with: .fit) {
            viewPreviewContainer.addSubviewMatchFrame(preview)
        }
    }
}
Di atas menggunakan fungsi pembantu UIView untuk mempermudah penyematan subview:
extension UIView {
    func addSubviewMatchFrame(_ view: UIView) {
        view.translatesAutoresizingMaskIntoConstraints = false
        self.addSubview(view)
        NSLayoutConstraint.activate([
            view.topAnchor.constraint(equalTo: self.topAnchor, constant: 0),
            view.bottomAnchor.constraint(equalTo: self.bottomAnchor, constant: 0),
            view.leadingAnchor.constraint(equalTo: self.leadingAnchor, constant: 0),
            view.trailingAnchor.constraint(equalTo: self.trailingAnchor, constant: 0),
        ])
    }
}