The following are the requirements and connection instructions for using Datadog with Amazon AppFlow.
Note
You can use Datadog as a source only.
Requirements
-
You must provide Amazon AppFlow with an API key and an application key. For more information about how to retrieve your API key and application key, see the API and Application Keys
information in the Datadog documentation. -
You must configure your flow with a date range and query filter.
Connection instructions
To connect to Datadog while creating a flow
Sign in to the AWS Management Console and open the Amazon AppFlow console at https://console.aws.amazon.com/appflow/
. -
Choose Create flow.
-
For Flow details, enter a name and description for the flow.
-
(Optional) To use a customer managed CMK instead of the default AWS managed CMK, choose Data encryption, Customize encryption settings and then choose an existing CMK or create a new one.
-
(Optional) To add a tag, choose Tags, Add tag and then enter the key name and value.
-
Choose Next.
-
Choose Datadog from the Source name dropdown list.
-
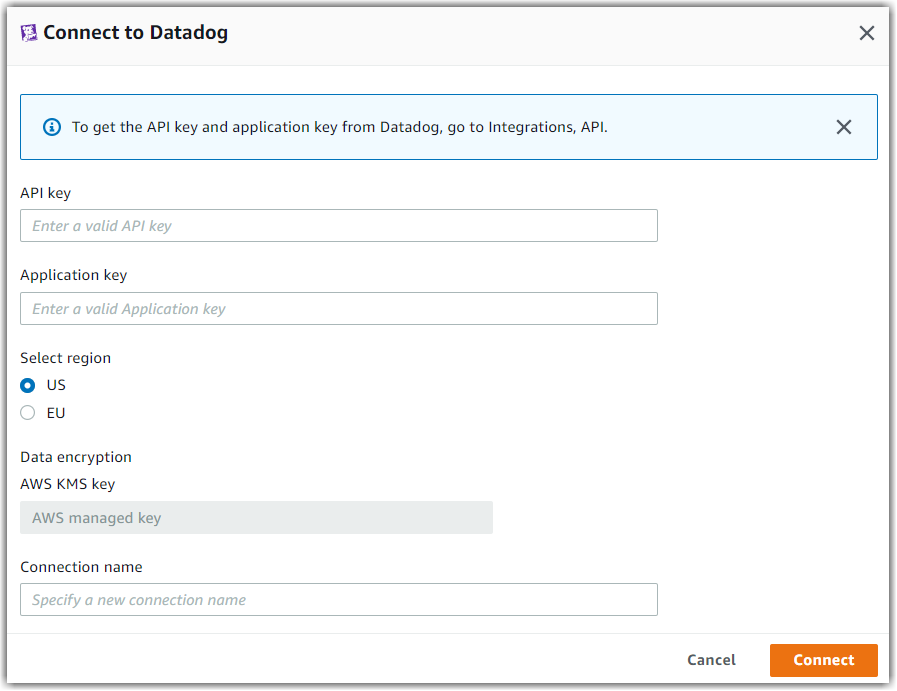
Choose Connect to open the Connect to Datadog dialog box.
-
Under API key, enter your API key.
-
Under Application key, enter your application key.
-
Under Select region, select the region for your instance of Datadog.
-
Under Data encryption, enter your AWS KMS key.
-
Under Connection name, specify a name for your connection.
-
Choose Connect.

-
-
You will be redirected to the Datadog login page. When prompted, grant Amazon AppFlow permissions to access your Datadog account.
Now that you are connected to your Datadog, you can continue with the flow creation steps as described in Creating flows in Amazon AppFlow.
Tip
If you aren’t connected successfully, ensure that you have followed the instructions in the Requirements section.
Notes
-
When you use Datadog as a source, you can run schedule-triggered flows at a maximum frequency of one flow run per minute.
Supported destinations
When you create a flow that uses Datadog as the data source, you can set the destination to any of the following connectors:
-
Amazon Connect
-
Amazon Honeycode
-
Amazon Redshift
-
Amazon S3
-
Marketo
-
Salesforce
-
Snowflake
-
Upsolver
-
Zendesk
You can also set the destination to any custom connectors that you
create with the Amazon AppFlow Custom Connector SDKs for
Python
Related resources
-
API and Application Keys
information in the Datadog documentation