Pubblica e sottoscrivi con l'SDK di trasmissione iOS IVS
Questa sezione illustra i passaggi necessari per pubblicare e sottoscrivere una fase utilizzando l'app per iOS.
Creazione delle viste
Iniziamo usando il file ViewController.swift creato automaticamente per importare AmazonIVSBroadcast e poi aggiungiamo @IBOutlets per collegare:
import AmazonIVSBroadcast

class ViewController: UIViewController {

    @IBOutlet private var textFieldToken: UITextField!
    @IBOutlet private var buttonJoin: UIButton!
    @IBOutlet private var labelState: UILabel!
    @IBOutlet private var switchPublish: UISwitch!
    @IBOutlet private var collectionViewParticipants: UICollectionView!
A questo punto creiamo quelle viste e le colleghiamo in Main.storyboard. Ecco la struttura delle viste che useremo:
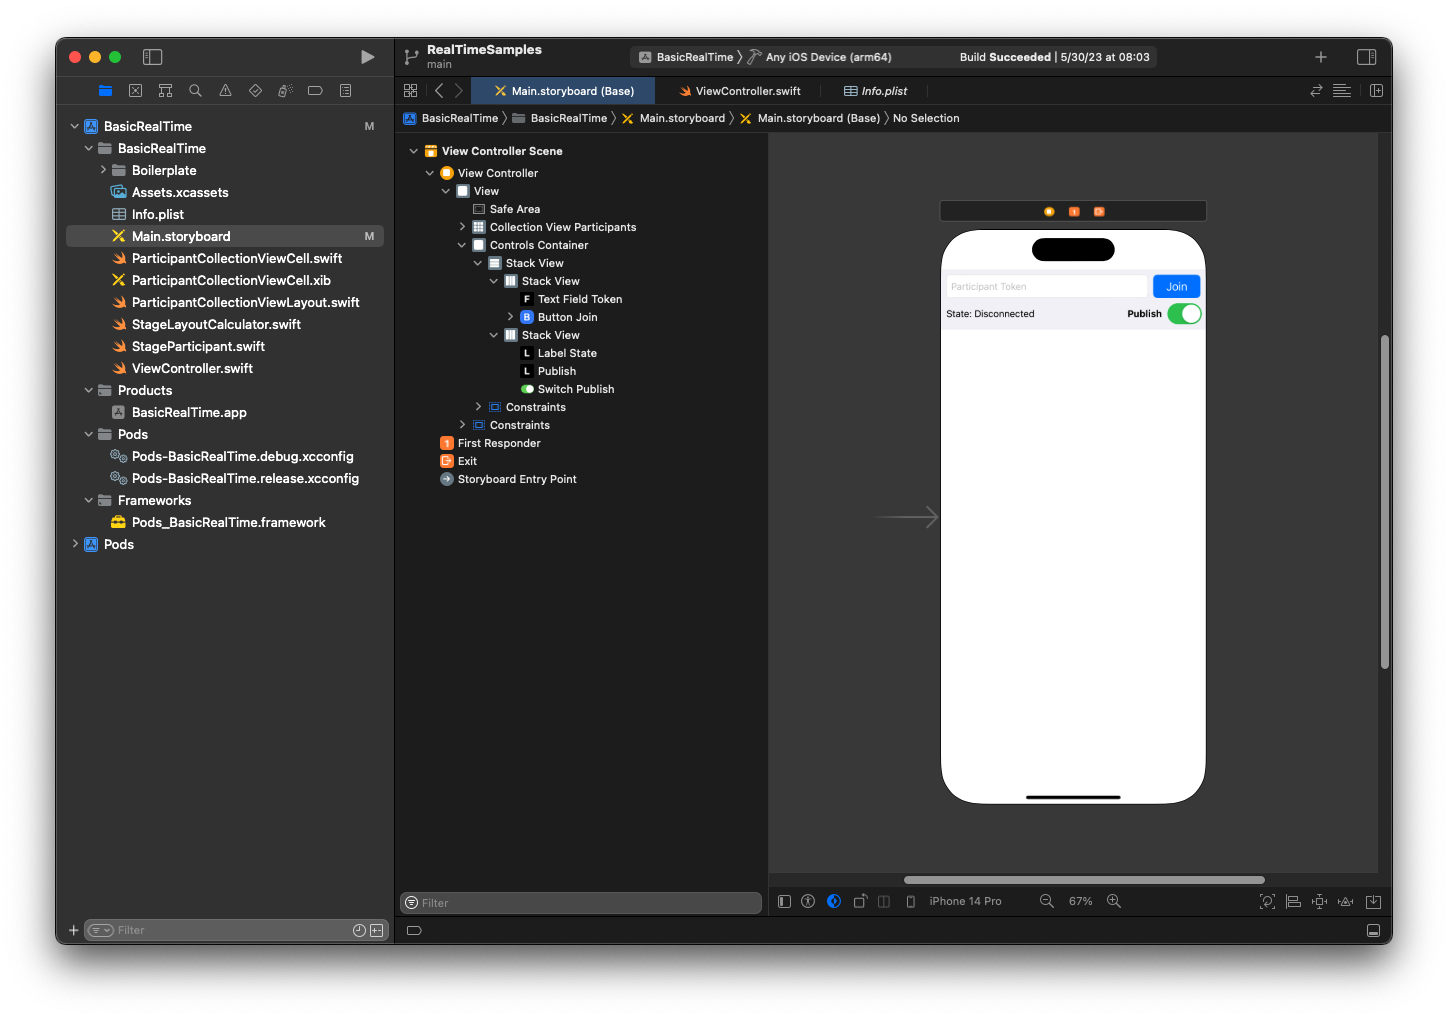
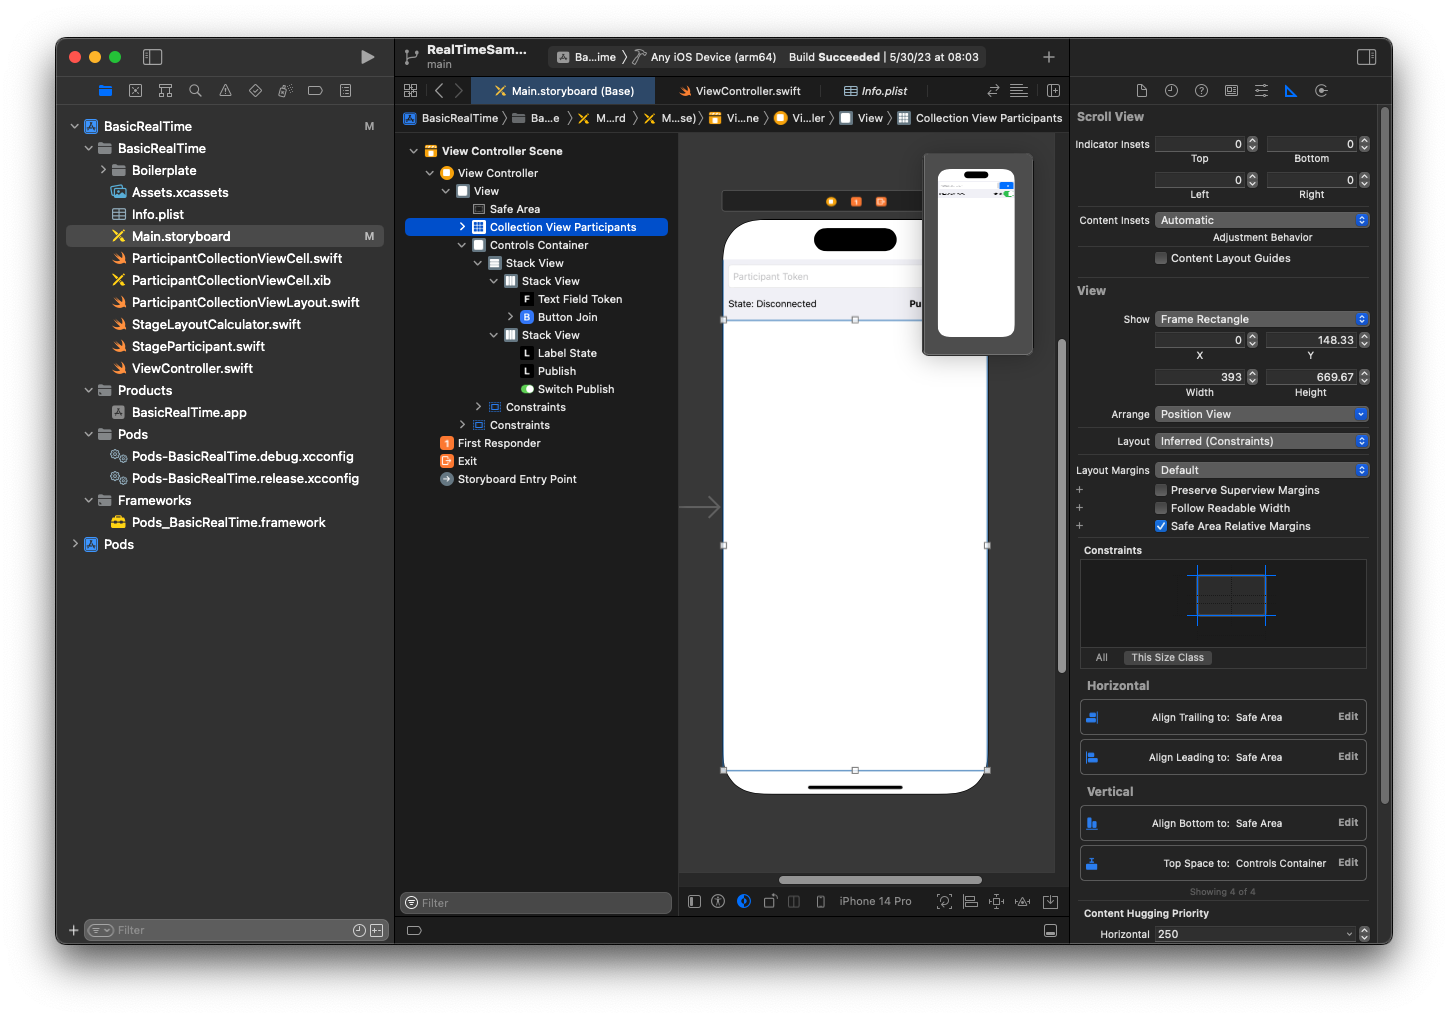
Per la configurazione di AutoLayout, dobbiamo personalizzare tre viste. La prima vista è Partecipanti della vista Raccolta (UICollectionView). Collegato Iniziale, Finale e In basso a Area sicura. Collegato anche In alto a Container controlli.
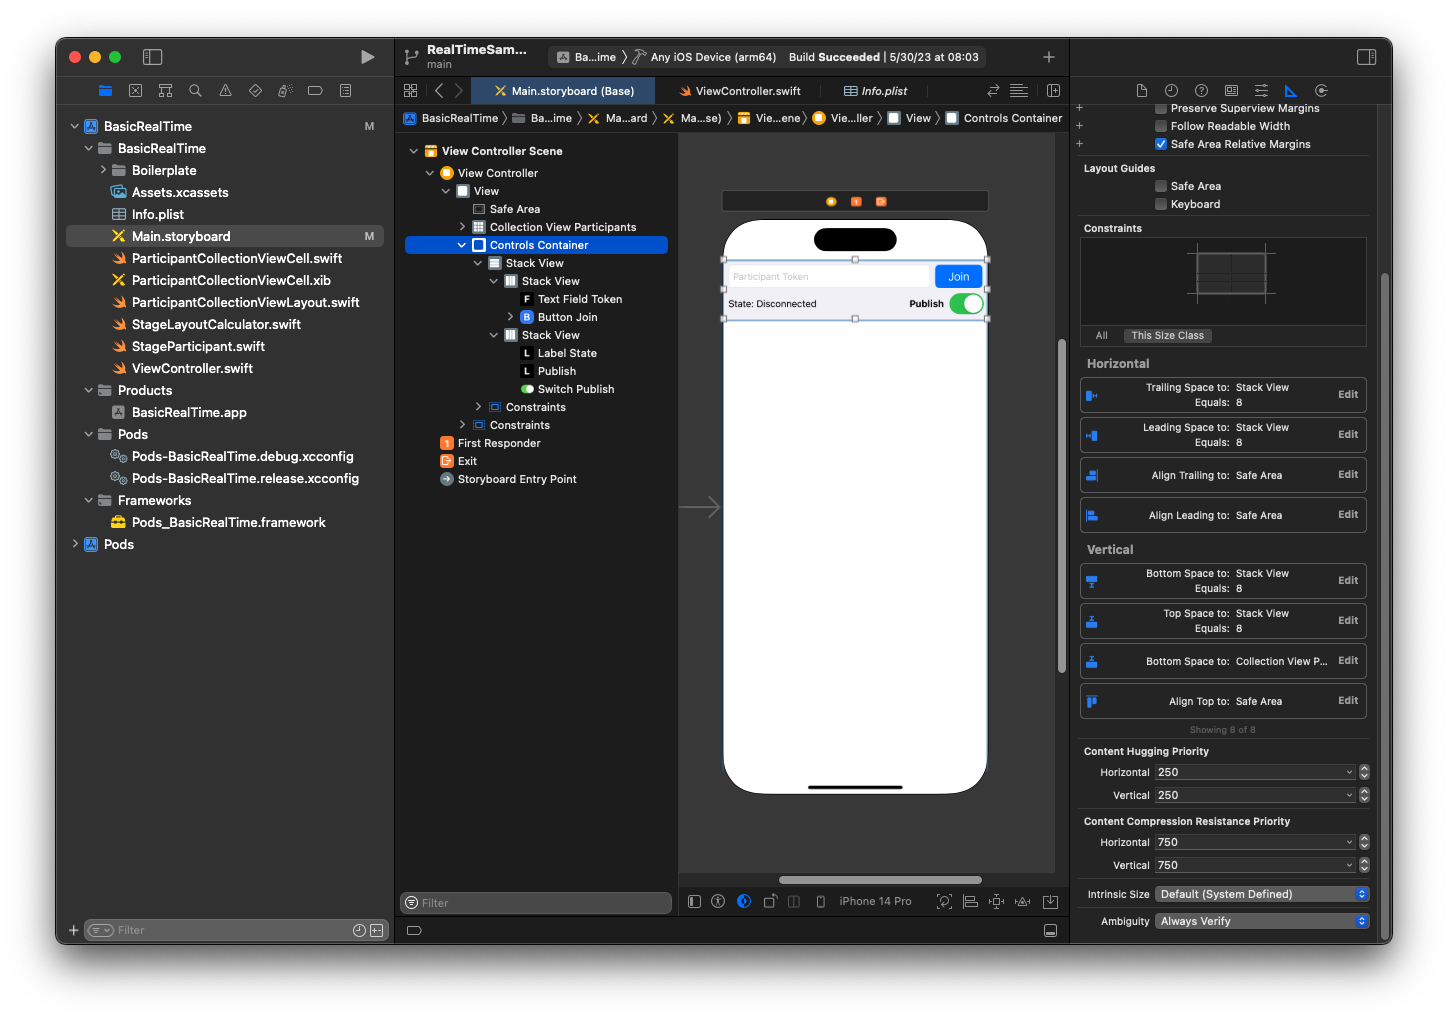
La seconda vista è Container controlli. Collegato Iniziale, Finale e In alto a Area sicura.
La terza e ultima vista è Vista Stack verticale. Collegato In alto, Iniziale, Finale e In basso a Supervista. Per lo stile, imposta la spaziatura su 8 anziché su 0.
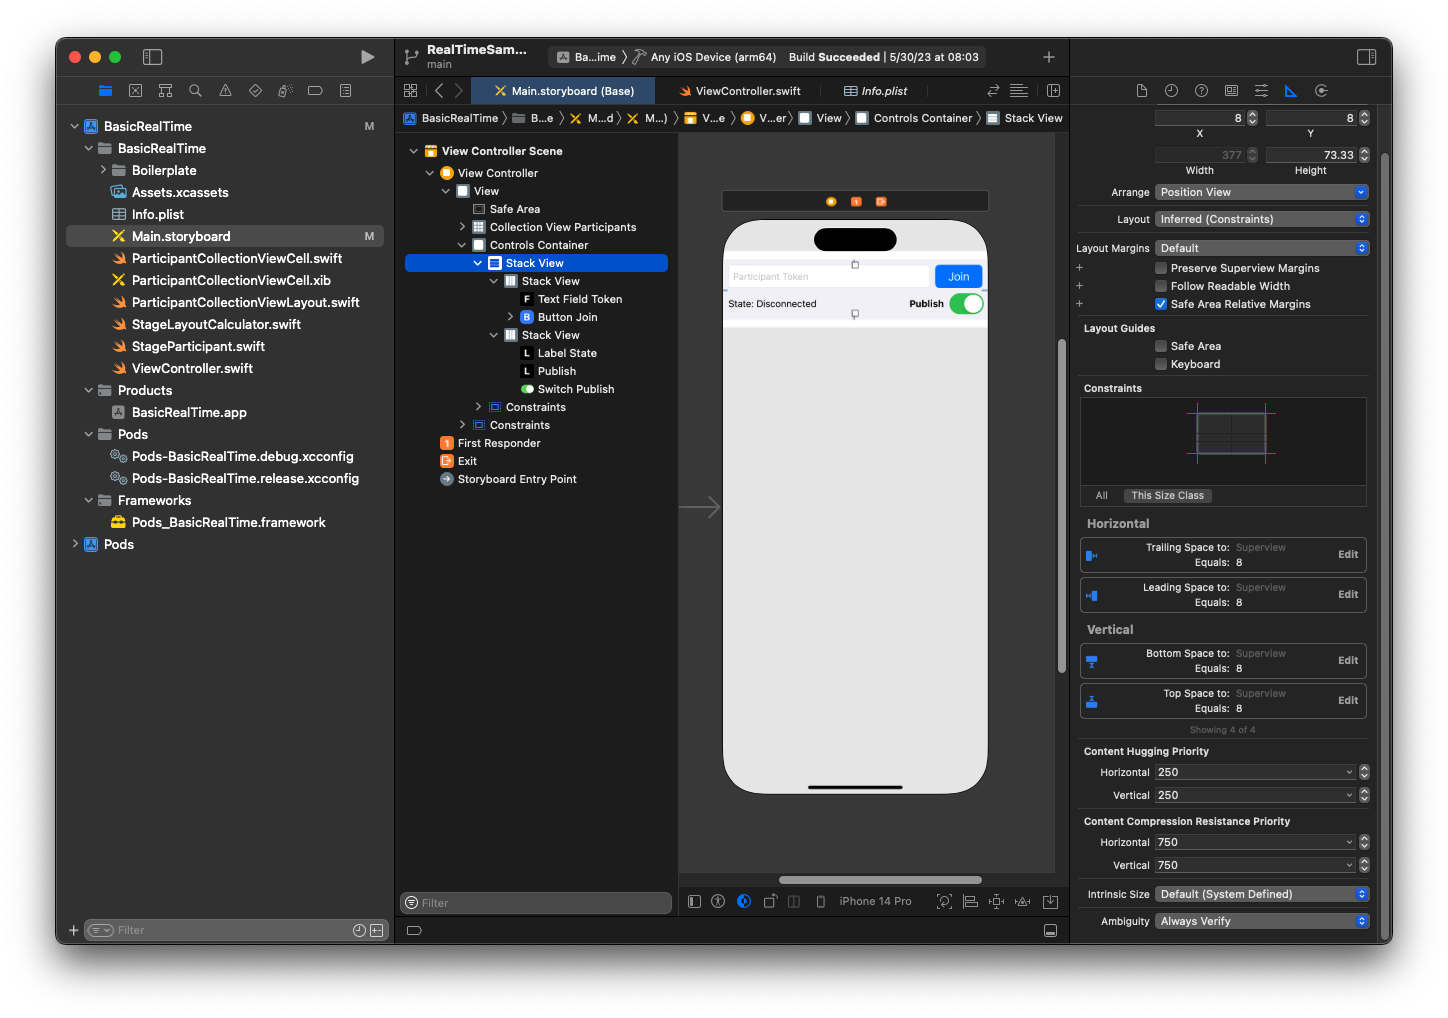
UIStackViews gestirà il layout delle viste rimanenti. Per tutte e tre UIStackViews, usa Riempi per Allineamento e Distribuzione.
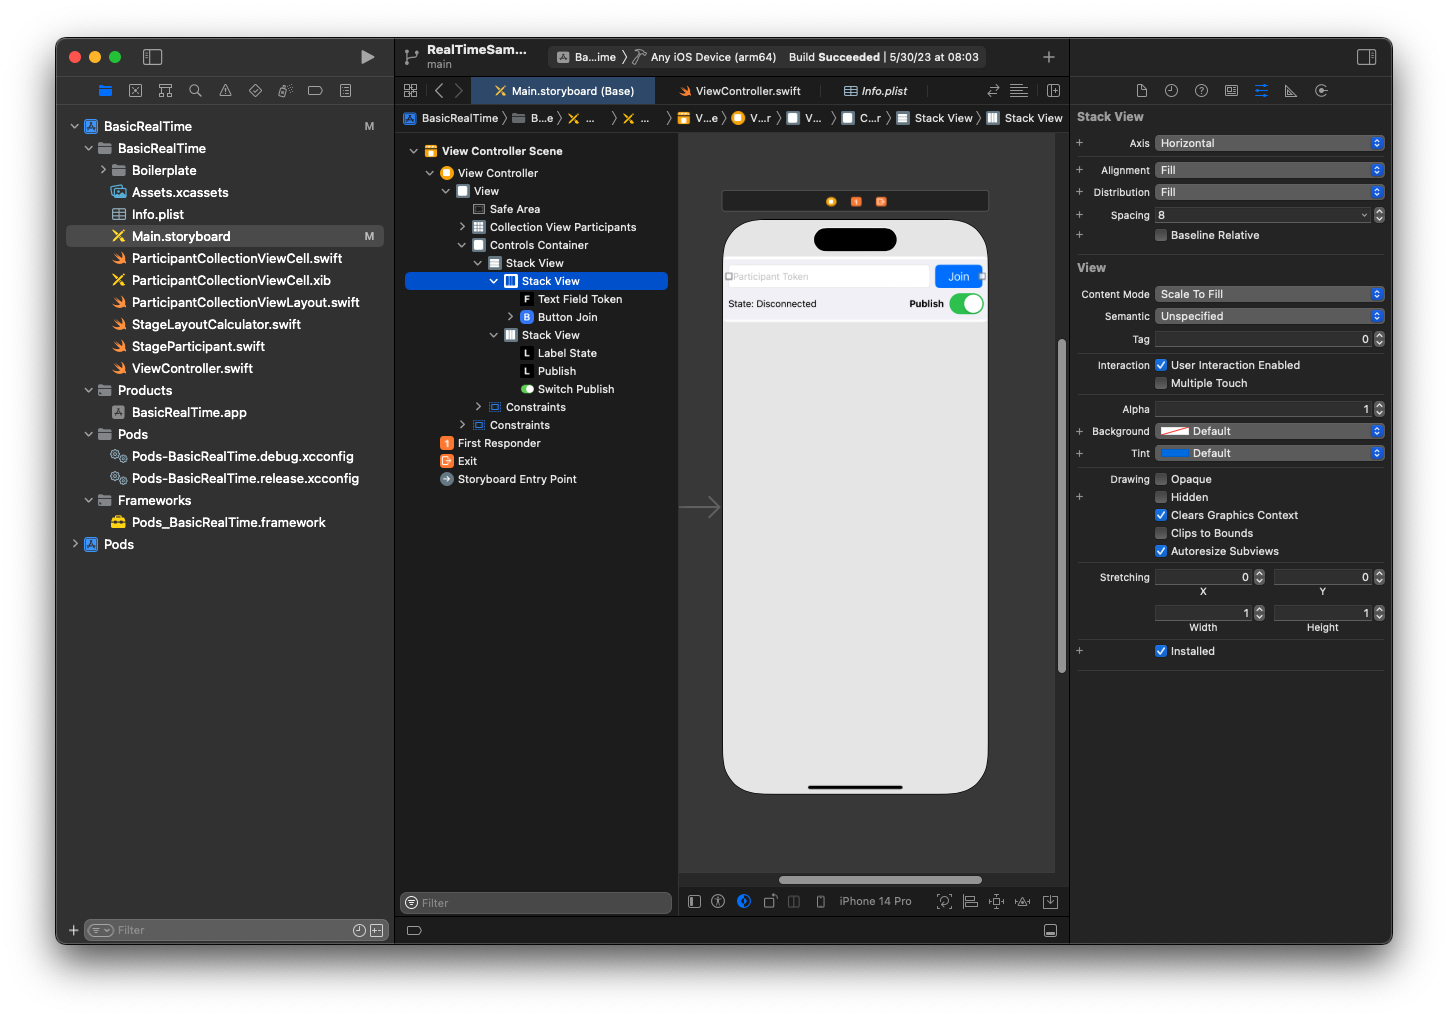
Infine, colleghiamo queste viste a ViewController. Dall'alto, mappa le seguenti viste:
-
Il campo di testo Unisciti si collega a
textFieldToken. -
Il pulsante Unisciti si collega a
buttonJoin. -
Lo stato dell'etichetta si collega a
labelState. -
Cambia pubblicazione si collega a
switchPublish. -
Partecipanti della vista Raccolta si collega a
collectionViewParticipants.
Usa questo tempo anche per impostare dataSource dell'elemento Partecipanti della vista Raccolta al ViewController di proprietà:
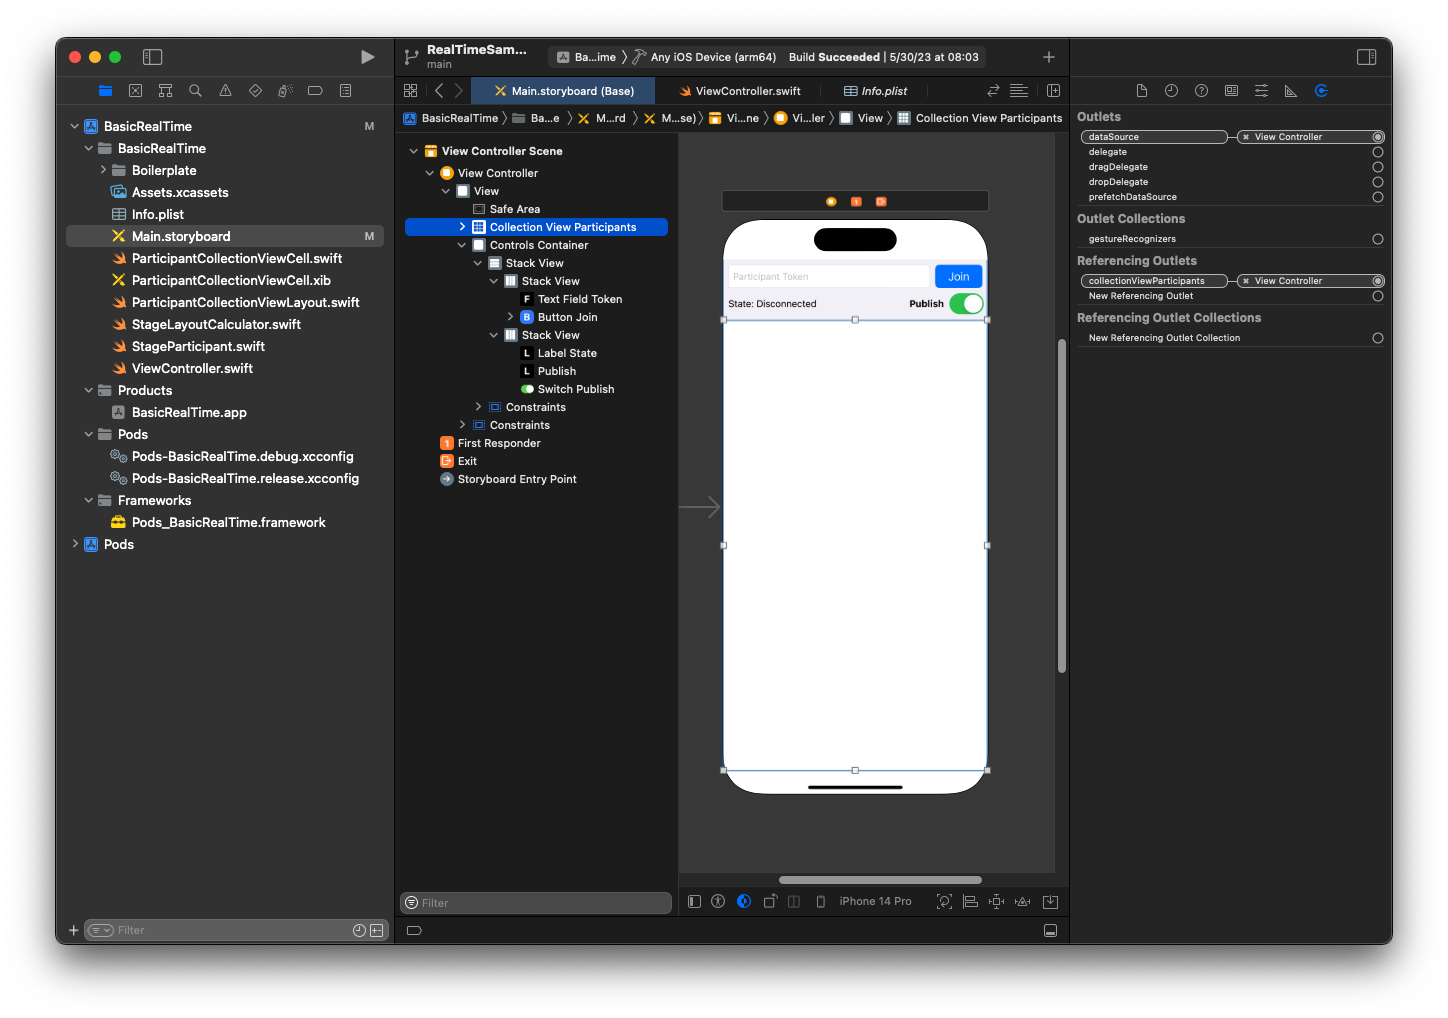
A questo punto creiamo la sottoclasse UICollectionViewCell in cui eseguire il rendering dei partecipanti. Inizia creando un nuovo file Classe Cocoa Touch:
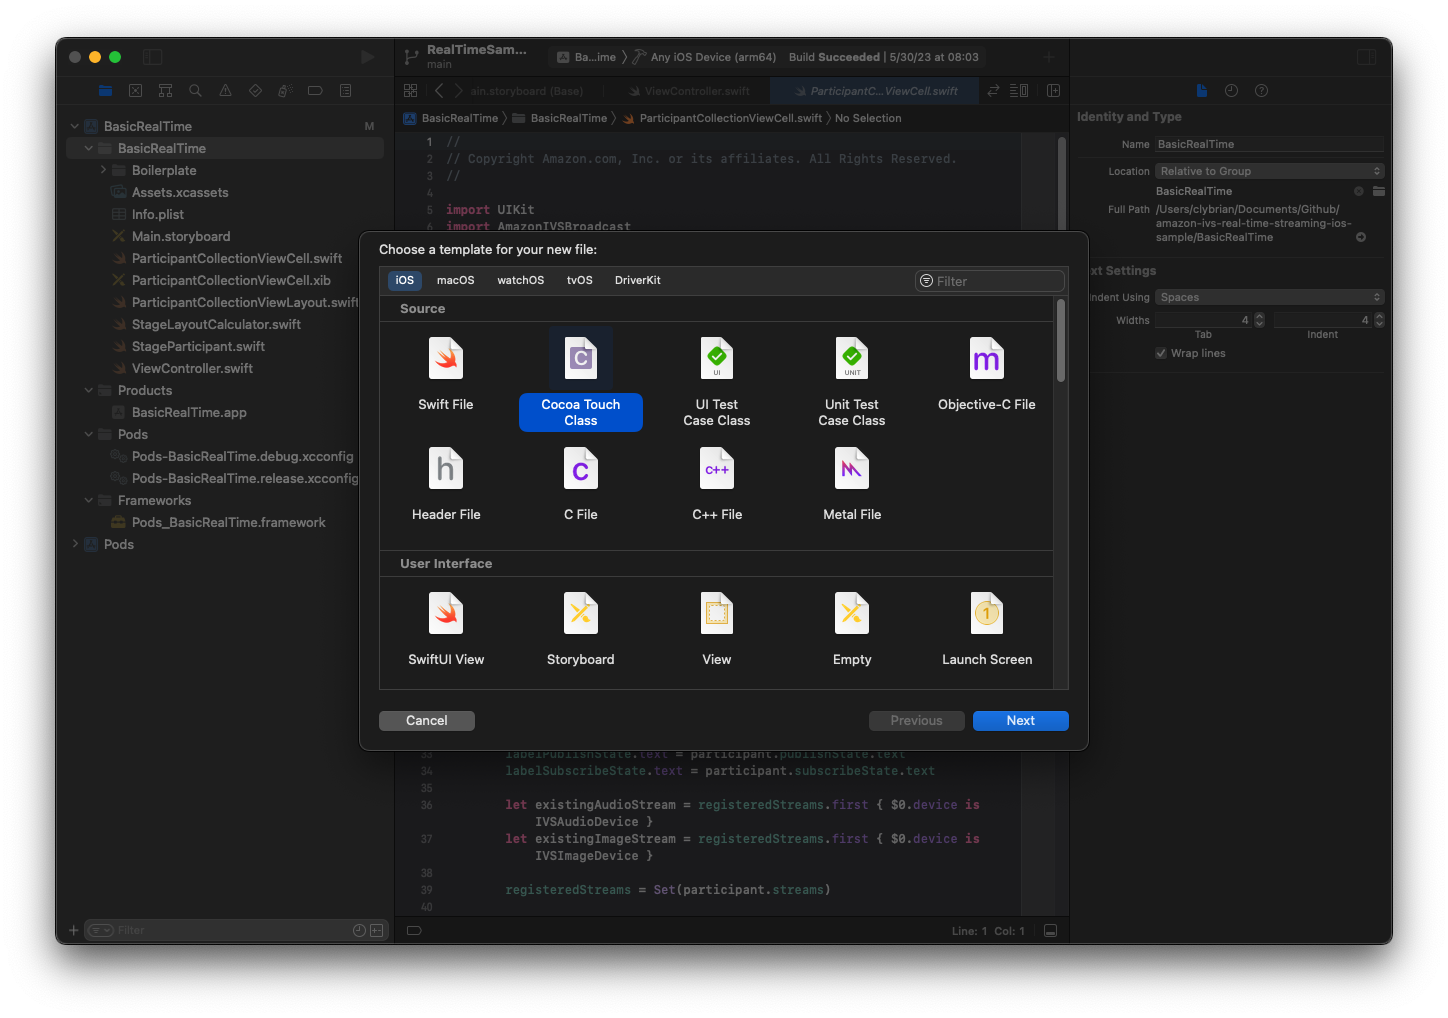
Denominalo ParticipantUICollectionViewCell e rendilo una sottoclasse di UICollectionViewCell in Swift. Ricominciamo dal file Swift, creando il @IBOutletsper collegare:
import AmazonIVSBroadcast

class ParticipantCollectionViewCell: UICollectionViewCell {

    @IBOutlet private var viewPreviewContainer: UIView!
    @IBOutlet private var labelParticipantId: UILabel!
    @IBOutlet private var labelSubscribeState: UILabel!
    @IBOutlet private var labelPublishState: UILabel!
    @IBOutlet private var labelVideoMuted: UILabel!
    @IBOutlet private var labelAudioMuted: UILabel!
    @IBOutlet private var labelAudioVolume: UILabel!
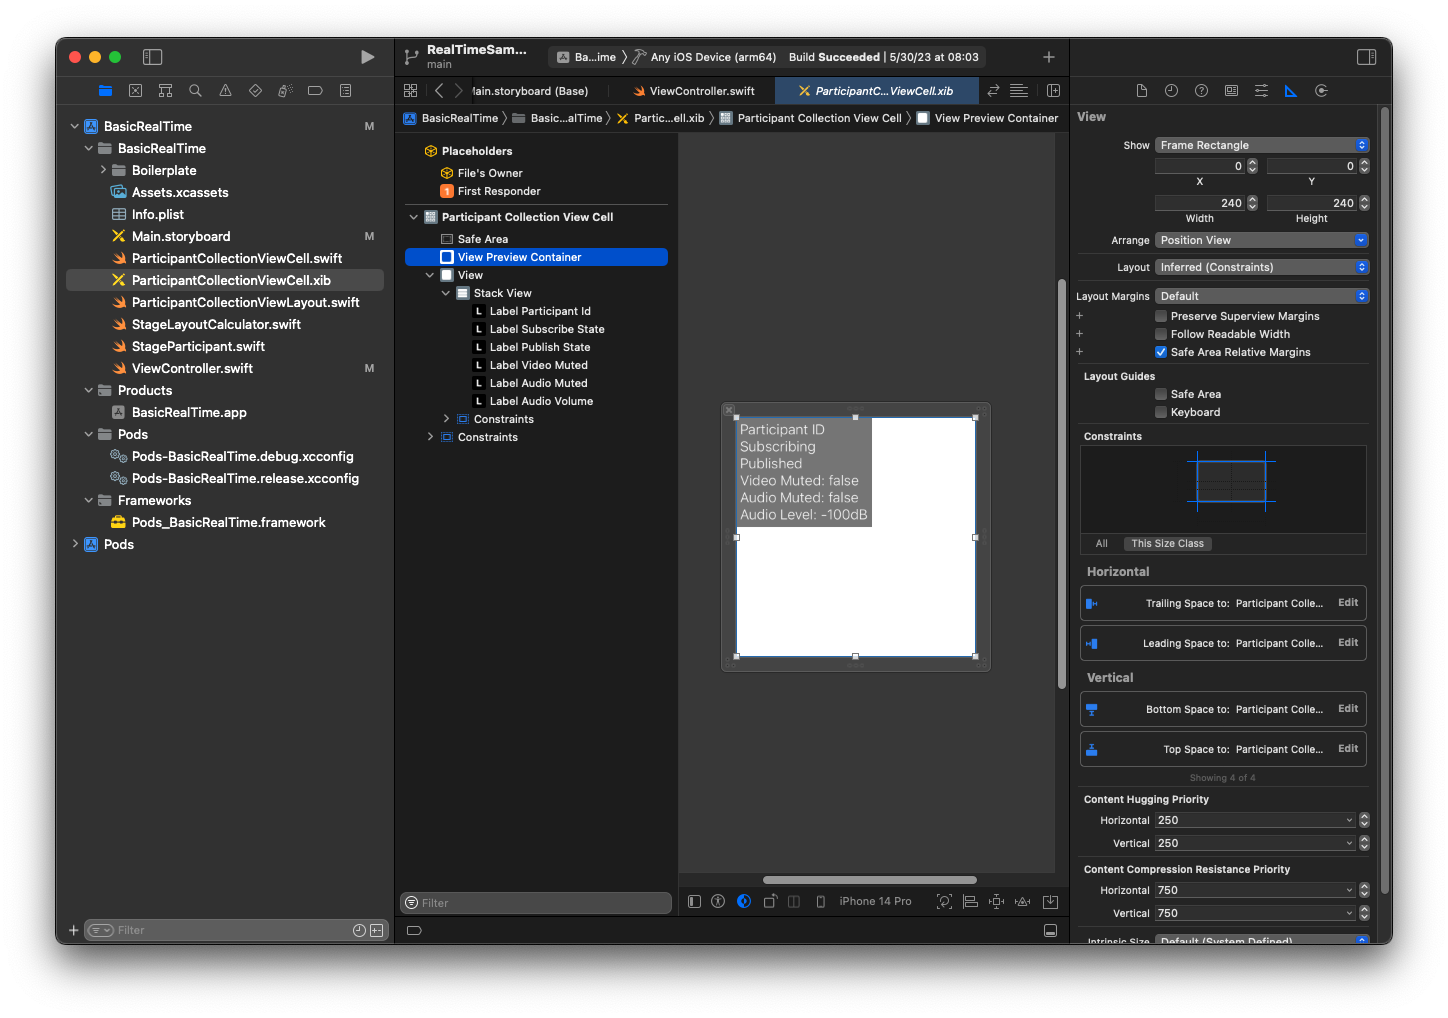
Nel file XIB associato, crea questa gerarchia di viste:
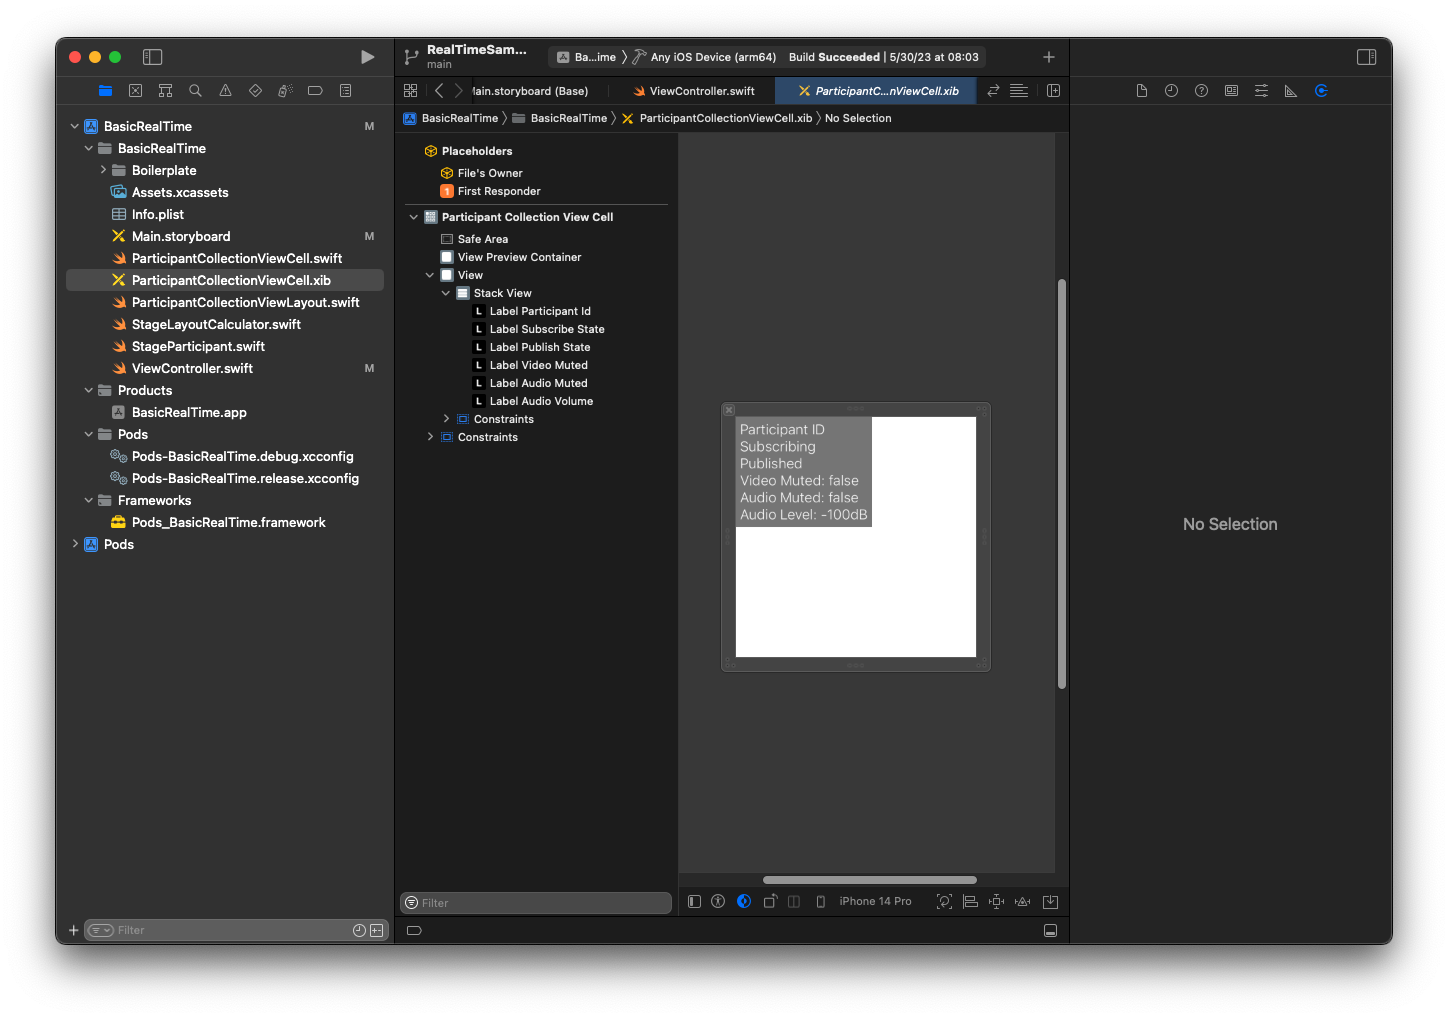
Per AutoLayout, modificheremo nuovamente tre viste. La prima vista è Container di anteprima vista. Imposta Finale, Iniziale, In alto e In basso su Cella vista raccolta partecipanti.
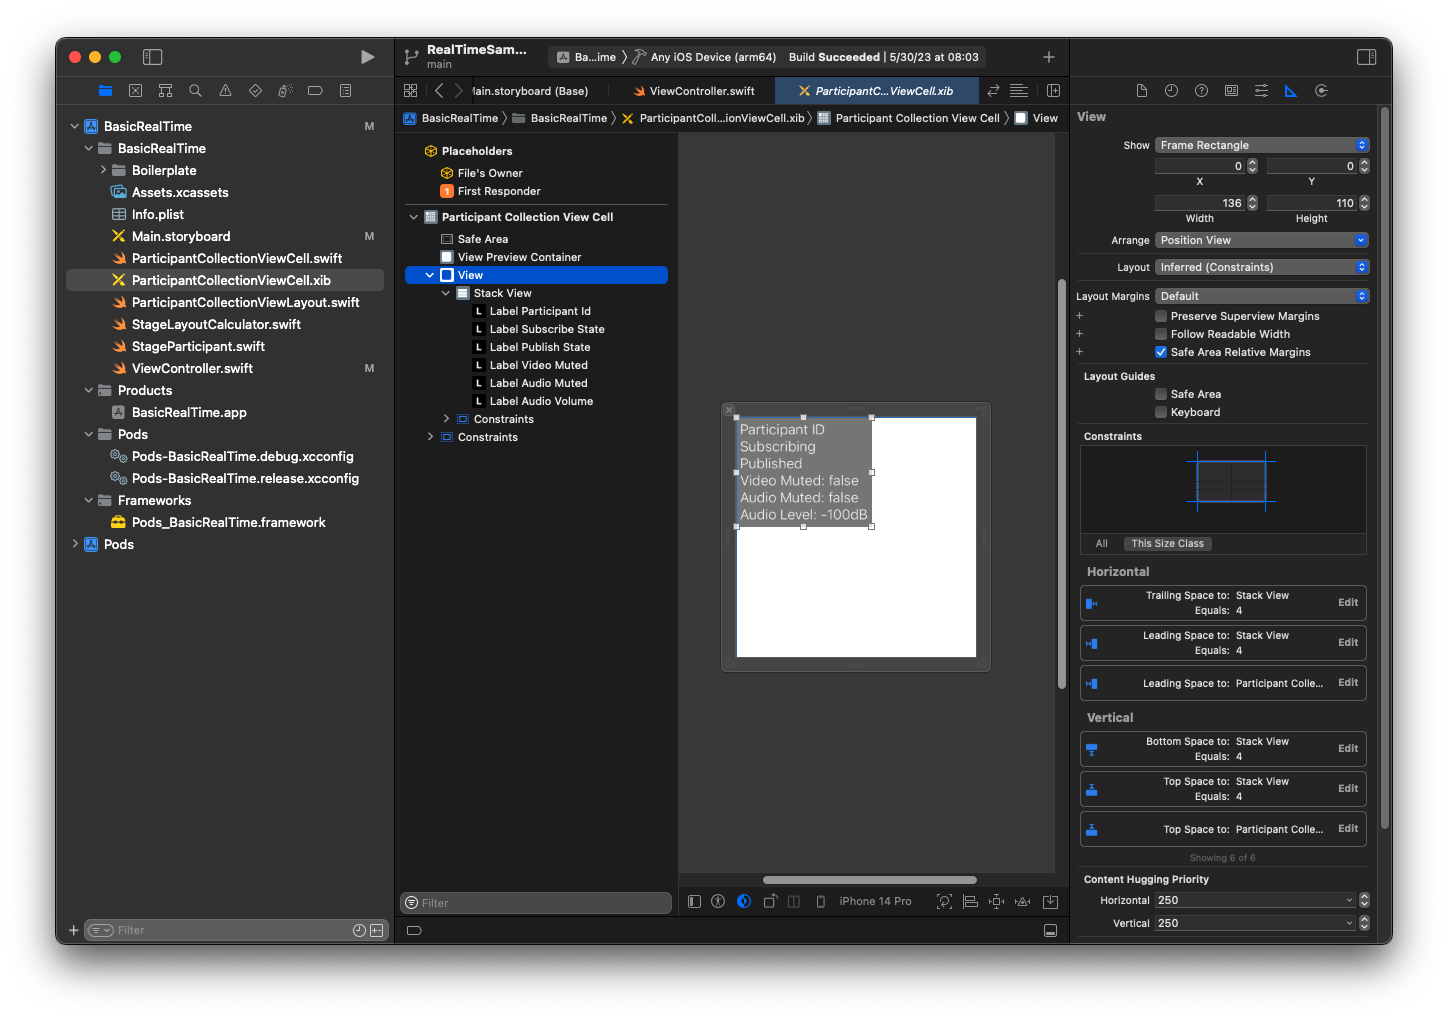
La seconda vista è Vista. Imposta Iniziale e In alto su Cella vista raccolta partecipanti e modifica il valore su 4.
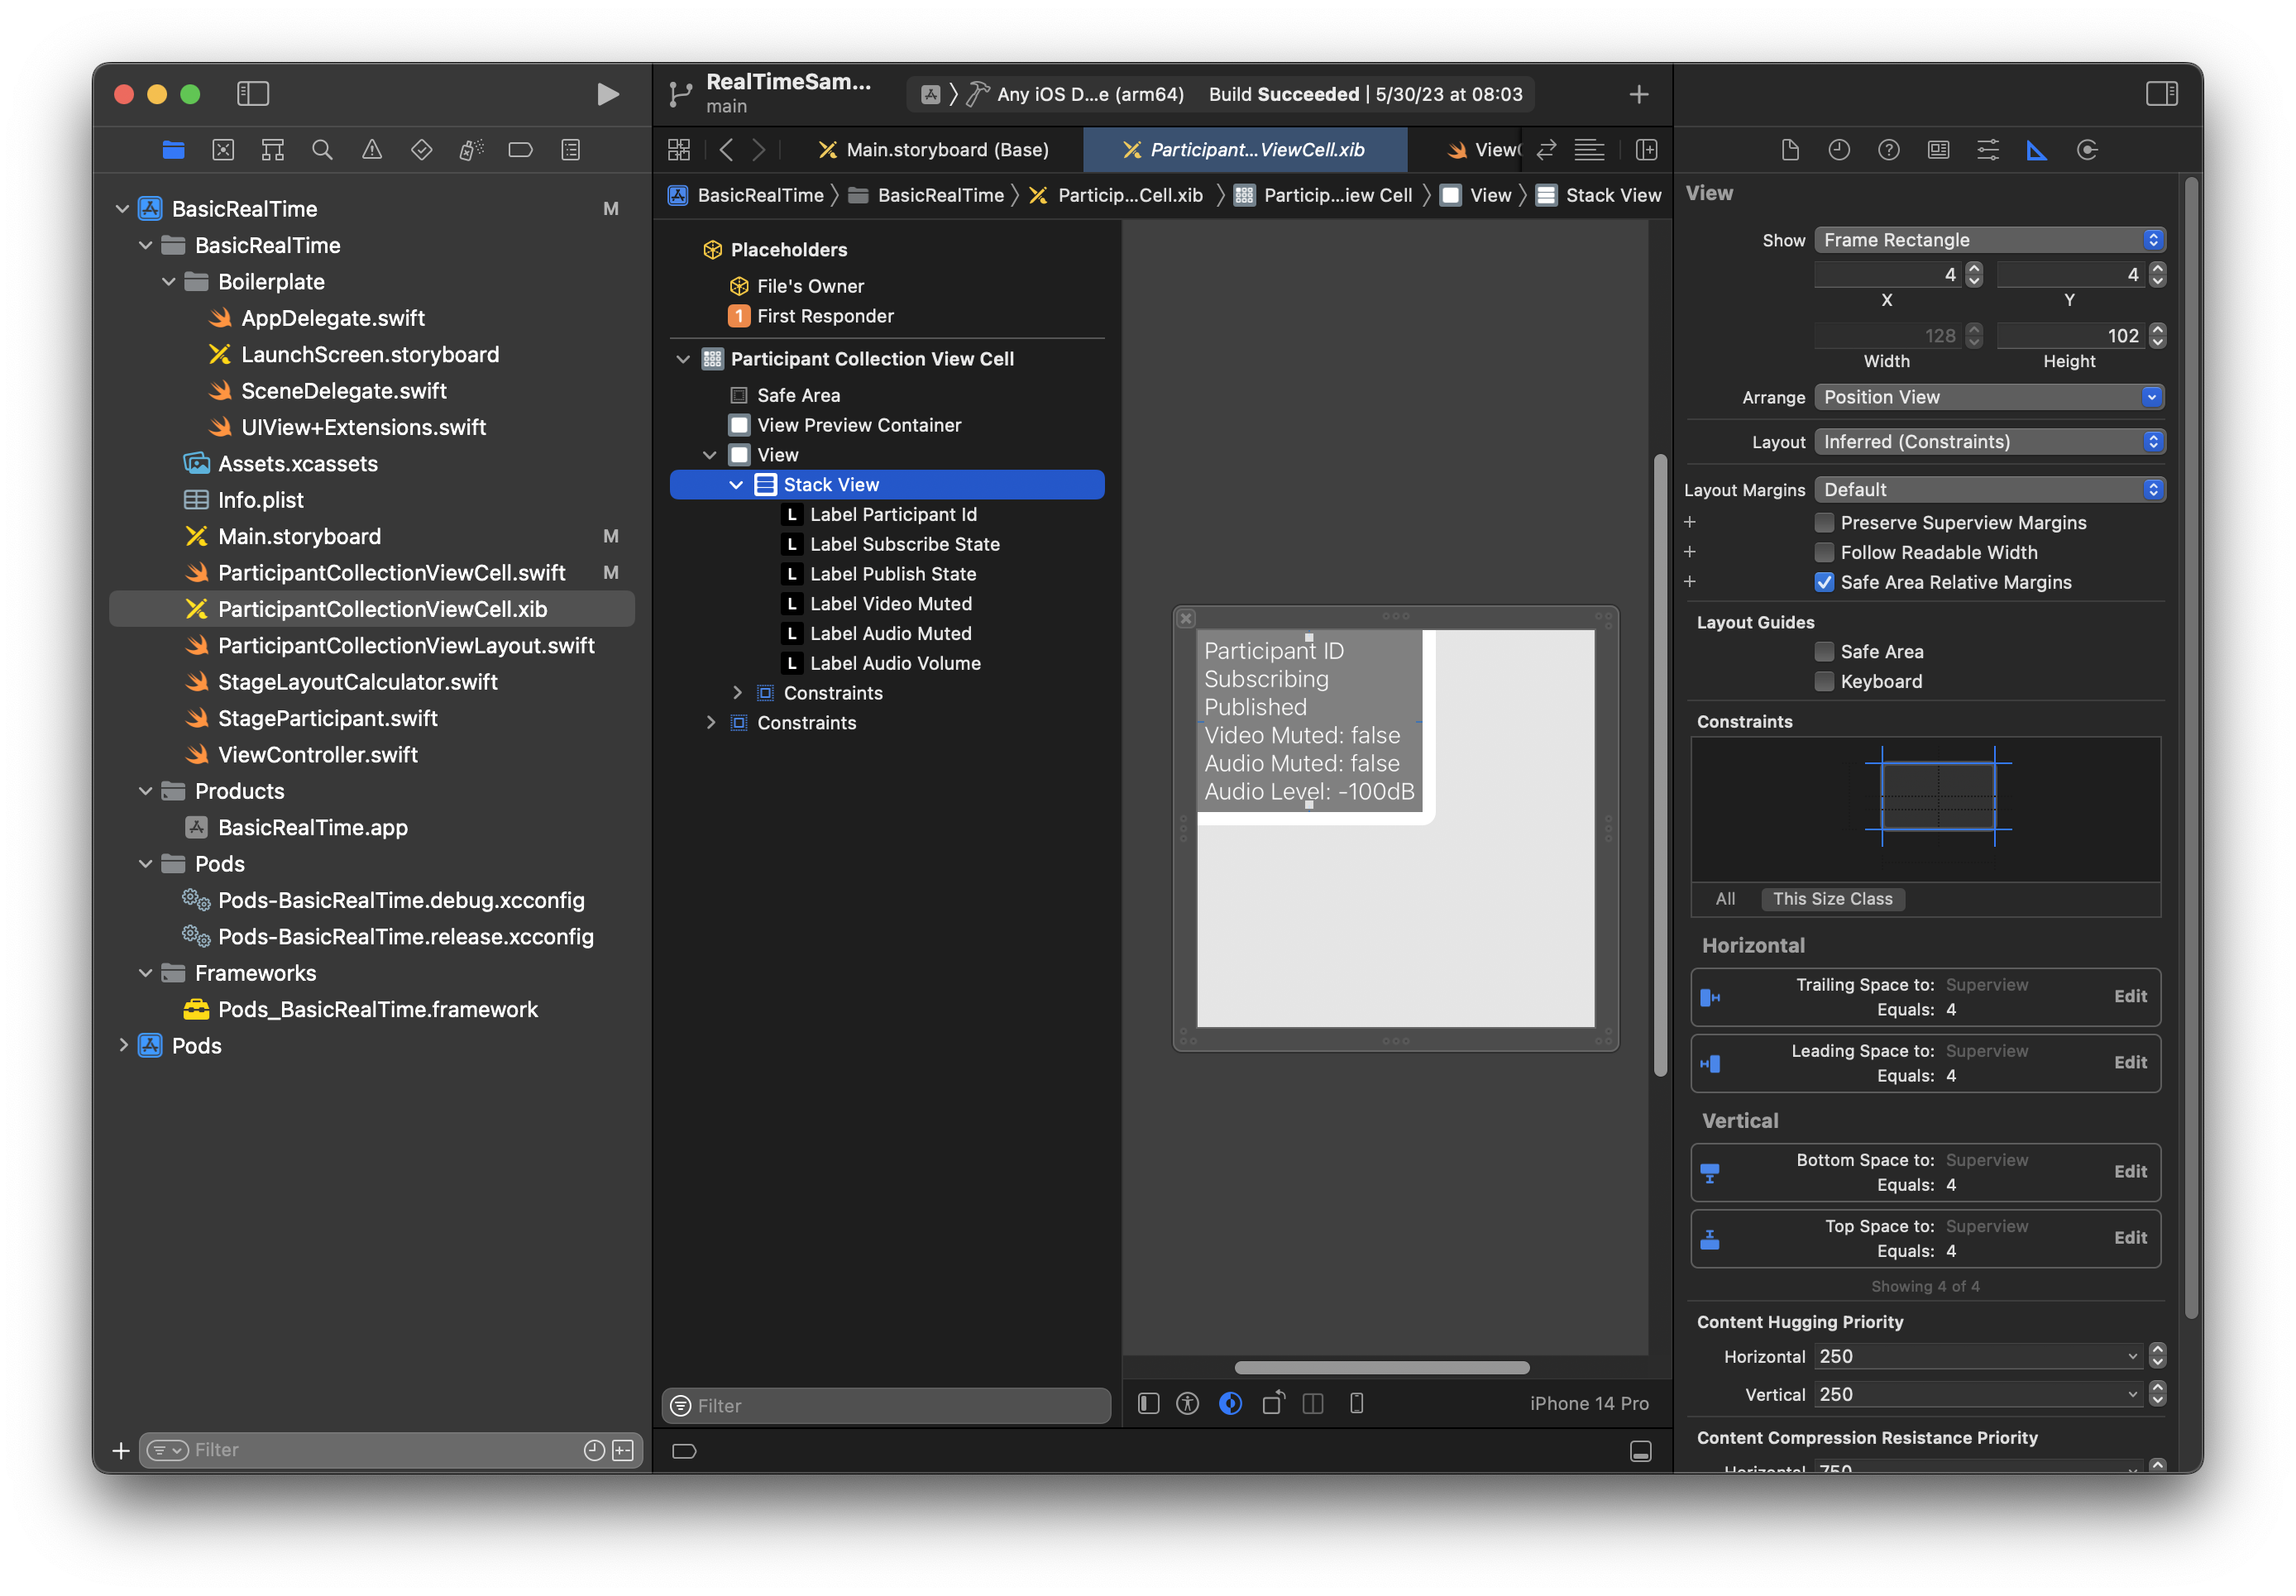
La terza vista è Vista stack. Imposta Finale, Iniziale, In alto e In basso su Supervista, quindi modifica il valore su 4.
Autorizzazioni e timer di inattività
Tornando a ViewController, disabiliteremo il timer di inattività del sistema per impedire al dispositivo di andare in modalità standby mentre la nostra applicazione è in uso:
override func viewDidAppear(_ animated: Bool) {
    super.viewDidAppear(animated)
    // Prevent the screen from turning off during a call.
    UIApplication.shared.isIdleTimerDisabled = true
}

override func viewDidDisappear(_ animated: Bool) {
    super.viewDidDisappear(animated)
    UIApplication.shared.isIdleTimerDisabled = false
}
Successivamente richiederemo al sistema le autorizzazioni per fotocamera e microfono:
private func checkPermissions() {
    checkOrGetPermission(for: .video) { [weak self] granted in
        guard granted else {
            print("Video permission denied")
            return
        }
        self?.checkOrGetPermission(for: .audio) { [weak self] granted in
            guard granted else {
                print("Audio permission denied")
                return
            }
            self?.setupLocalUser() // we will cover this later
        }
    }
}

private func checkOrGetPermission(for mediaType: AVMediaType, _ result: @escaping (Bool) -> Void) {
    func mainThreadResult(_ success: Bool) {
        DispatchQueue.main.async {
            result(success)
        }
    }
    switch AVCaptureDevice.authorizationStatus(for: mediaType) {
    case .authorized: mainThreadResult(true)
    case .notDetermined:
        AVCaptureDevice.requestAccess(for: mediaType) { granted in
            mainThreadResult(granted)
        }
    case .denied, .restricted: mainThreadResult(false)
    @unknown default: mainThreadResult(false)
    }
}
Stato dell'app
Dobbiamo configurare collectionViewParticipants con il file di layout creato in precedenza:
override func viewDidLoad() {
    super.viewDidLoad()
    // We render everything to exactly the frame, so don't allow scrolling.
    collectionViewParticipants.isScrollEnabled = false
    collectionViewParticipants.register(UINib(nibName: "ParticipantCollectionViewCell", bundle: .main), forCellWithReuseIdentifier: "ParticipantCollectionViewCell")
}
Per rappresentare ogni partecipante, creiamo una semplice struttura chiamata StageParticipant. Questa può essere inclusa nel file ViewController.swift oppure è possibile creare un nuovo file.
import Foundation
import AmazonIVSBroadcast

struct StageParticipant {
    let isLocal: Bool
    var participantId: String?
    var publishState: IVSParticipantPublishState = .notPublished
    var subscribeState: IVSParticipantSubscribeState = .notSubscribed
    var streams: [IVSStageStream] = []

    init(isLocal: Bool, participantId: String?) {
        self.isLocal = isLocal
        self.participantId = participantId
    }
}
Per tenere traccia di questi partecipanti, ne conserviamo un array come proprietà privata nel nostro ViewController:
private var participants = [StageParticipant]()
Questa proprietà verrà utilizzata per alimentare UICollectionViewDataSource che era collegato allo storyboard precedente:
extension ViewController: UICollectionViewDataSource {

    func collectionView(_ collectionView: UICollectionView, numberOfItemsInSection section: Int) -> Int {
        return participants.count
    }

    func collectionView(_ collectionView: UICollectionView, cellForItemAt indexPath: IndexPath) -> UICollectionViewCell {
        if let cell = collectionView.dequeueReusableCell(withReuseIdentifier: "ParticipantCollectionViewCell", for: indexPath) as? ParticipantCollectionViewCell {
            cell.set(participant: participants[indexPath.row])
            return cell
        } else {
            fatalError("Couldn't load custom cell type 'ParticipantCollectionViewCell'")
        }
    }

}
Per vedere l'anteprima prima di entrare nella fase, creiamo immediatamente un partecipante locale:
override func viewDidLoad() {
    /* existing UICollectionView code */
    participants.append(StageParticipant(isLocal: true, participantId: nil))
}
Ciò comporta il rendering di una cella partecipante immediatamente dopo l'esecuzione dell'app, che rappresenta il partecipante locale.
Gli utenti vogliono essere in grado di vedere se stessi prima di unirsi a una fase, quindi ora implementeremo il metodo setupLocalUser() che viene chiamato prima dal codice di gestione delle autorizzazioni. Memorizziamo il riferimento della fotocamera e del microfono come oggetti IVSLocalStageStream.
private var streams = [IVSLocalStageStream]()
private let deviceDiscovery = IVSDeviceDiscovery()

private func setupLocalUser() {
    // Gather our camera and microphone once permissions have been granted
    let devices = deviceDiscovery.listLocalDevices()
    streams.removeAll()
    if let camera = devices.compactMap({ $0 as? IVSCamera }).first {
        streams.append(IVSLocalStageStream(device: camera))
        // Use a front camera if available.
        if let frontSource = camera.listAvailableInputSources().first(where: { $0.position == .front }) {
            camera.setPreferredInputSource(frontSource)
        }
    }
    if let mic = devices.compactMap({ $0 as? IVSMicrophone }).first {
        streams.append(IVSLocalStageStream(device: mic))
    }
    participants[0].streams = streams
    participantsChanged(index: 0, changeType: .updated)
}
Qui abbiamo trovato la fotocamera e il microfono del dispositivo tramite l'SDK e li abbiamo archiviati nel nostro oggetto streams locale, quindi abbiamo assegnato l'array streams del primo partecipante (il partecipante locale che abbiamo creato in precedenza) al nostro streams. Finalmente richiamiamo participantsChanged con un index pari a 0 e changeType pari a updated. Questa funzione è una funzione helper per aggiornare il nostro UICollectionView con simpatiche animazioni. Ecco come appare:
private func participantsChanged(index: Int, changeType: ChangeType) {
    switch changeType {
    case .joined:
        collectionViewParticipants?.insertItems(at: [IndexPath(item: index, section: 0)])
    case .updated:
        // Instead of doing reloadItems, just grab the cell and update it ourselves. It saves a create/destroy of a cell
        // and more importantly fixes some UI flicker. We disable scrolling so the index path per cell
        // never changes.
        if let cell = collectionViewParticipants?.cellForItem(at: IndexPath(item: index, section: 0)) as? ParticipantCollectionViewCell {
            cell.set(participant: participants[index])
        }
    case .left:
        collectionViewParticipants?.deleteItems(at: [IndexPath(item: index, section: 0)])
    }
}
Non preoccuparti ancora di cell.set, ci arriveremo più tardi, ma è lì che eseguiremo il rendering del contenuto della cella in base al partecipante.
ChangeType è un semplice enum:
enum ChangeType {
    case joined, updated, left
}
Infine, vogliamo verificare se la fase è collegata. Per tenerne traccia, usiamo un semplice bool, che aggiornerà automaticamente la nostra interfaccia utente quando si aggiornata da sola.
private var connectingOrConnected = false {
    didSet {
        buttonJoin.setTitle(connectingOrConnected ? "Leave" : "Join", for: .normal)
        buttonJoin.tintColor = connectingOrConnected ? .systemRed : .systemBlue
    }
}
Implementazione dell'SDK della fase
La funzionalità in tempo reale si basa su tre concetti fondamentali: fase, strategia e renderer. L'obiettivo di progettazione è ridurre al minimo la quantità di logica lato client necessaria per creare un prodotto funzionante.
IVSStageStrategy
L'implementazione di IVSStageStrategy è semplice:
extension ViewController: IVSStageStrategy {
    func stage(_ stage: IVSStage, streamsToPublishForParticipant participant: IVSParticipantInfo) -> [IVSLocalStageStream] {
        // Return the camera and microphone to be published.
        // This is only called if `shouldPublishParticipant` returns true.
        return streams
    }

    func stage(_ stage: IVSStage, shouldPublishParticipant participant: IVSParticipantInfo) -> Bool {
        // Our publish status is based directly on the UISwitch view
        return switchPublish.isOn
    }

    func stage(_ stage: IVSStage, shouldSubscribeToParticipant participant: IVSParticipantInfo) -> IVSStageSubscribeType {
        // Subscribe to both audio and video for all publishing participants.
        return .audioVideo
    }
}
Per riassumere, eseguiamo la pubblicazione solo se l'opzione di pubblicazione è in posizione "on" e, se pubblichiamo, pubblicheremo i flussi raccolti in precedenza. Infine, per questo esempio, sottoscriviamo sempre gli altri partecipanti, ricevendo sia il loro audio che i loro video.
IVSStageRenderer
Anche l'implementazione di IVSStageRenderer è abbastanza semplice, sebbene dato il numero di funzioni contenga un po' più di codice. L'approccio generale in questo renderer è quello di aggiornare l'array participants quando l'SDK notifica una modifica a un partecipante. Ci sono alcuni scenari in cui gestiamo i partecipanti locali in modo diverso, perché abbiamo deciso di gestirli noi stessi in modo che possano vedere l'anteprima della fotocamera prima di partecipare.
extension ViewController: IVSStageRenderer {

    func stage(_ stage: IVSStage, didChange connectionState: IVSStageConnectionState, withError error: Error?) {
        labelState.text = connectionState.text
        connectingOrConnected = connectionState != .disconnected
    }

    func stage(_ stage: IVSStage, participantDidJoin participant: IVSParticipantInfo) {
        if participant.isLocal {
            // If this is the local participant joining the Stage, update the first participant in our array because we
            // manually added that participant when setting up our preview
            participants[0].participantId = participant.participantId
            participantsChanged(index: 0, changeType: .updated)
        } else {
            // If they are not local, add them to the array as a newly joined participant.
            participants.append(StageParticipant(isLocal: false, participantId: participant.participantId))
            participantsChanged(index: (participants.count - 1), changeType: .joined)
        }
    }

    func stage(_ stage: IVSStage, participantDidLeave participant: IVSParticipantInfo) {
        if participant.isLocal {
            // If this is the local participant leaving the Stage, update the first participant in our array because
            // we want to keep the camera preview active
            participants[0].participantId = nil
            participantsChanged(index: 0, changeType: .updated)
        } else {
            // If they are not local, find their index and remove them from the array.
            if let index = participants.firstIndex(where: { $0.participantId == participant.participantId }) {
                participants.remove(at: index)
                participantsChanged(index: index, changeType: .left)
            }
        }
    }

    func stage(_ stage: IVSStage, participant: IVSParticipantInfo, didChange publishState: IVSParticipantPublishState) {
        // Update the publishing state of this participant
        mutatingParticipant(participant.participantId) { data in
            data.publishState = publishState
        }
    }

    func stage(_ stage: IVSStage, participant: IVSParticipantInfo, didChange subscribeState: IVSParticipantSubscribeState) {
        // Update the subscribe state of this participant
        mutatingParticipant(participant.participantId) { data in
            data.subscribeState = subscribeState
        }
    }

    func stage(_ stage: IVSStage, participant: IVSParticipantInfo, didChangeMutedStreams streams: [IVSStageStream]) {
        // We don't want to take any action for the local participant because we track those streams locally
        if participant.isLocal { return }
        // For remote participants, notify the UICollectionView that they have updated. There is no need to modify
        // the `streams` property on the `StageParticipant` because it is the same `IVSStageStream` instance. Just
        // query the `isMuted` property again.
        if let index = participants.firstIndex(where: { $0.participantId == participant.participantId }) {
            participantsChanged(index: index, changeType: .updated)
        }
    }

    func stage(_ stage: IVSStage, participant: IVSParticipantInfo, didAdd streams: [IVSStageStream]) {
        // We don't want to take any action for the local participant because we track those streams locally
        if participant.isLocal { return }
        // For remote participants, add these new streams to that participant's streams array.
        mutatingParticipant(participant.participantId) { data in
            data.streams.append(contentsOf: streams)
        }
    }

    func stage(_ stage: IVSStage, participant: IVSParticipantInfo, didRemove streams: [IVSStageStream]) {
        // We don't want to take any action for the local participant because we track those streams locally
        if participant.isLocal { return }
        // For remote participants, remove these streams from that participant's streams array.
        mutatingParticipant(participant.participantId) { data in
            let oldUrns = streams.map { $0.device.descriptor().urn }
            data.streams.removeAll(where: { stream in
                return oldUrns.contains(stream.device.descriptor().urn)
            })
        }
    }

    // A helper function to find a participant by its ID, mutate that participant, and then update the UICollectionView accordingly.
    private func mutatingParticipant(_ participantId: String?, modifier: (inout StageParticipant) -> Void) {
        guard let index = participants.firstIndex(where: { $0.participantId == participantId }) else {
            fatalError("Something is out of sync, investigate if this was a sample app or SDK issue.")
        }

        var participant = participants[index]
        modifier(&participant)
        participants[index] = participant
        participantsChanged(index: index, changeType: .updated)
    }
}
Questo codice utilizza un'estensione per convertire lo stato della connessione in testo intuitivo per l'utente:
extension IVSStageConnectionState {
    var text: String {
        switch self {
        case .disconnected: return "Disconnected"
        case .connecting: return "Connecting"
        case .connected: return "Connected"
        @unknown default: fatalError()
        }
    }
}
Implementazione di un UICollectionViewLayout personalizzato
La creazione di un layout con un numero diverso di partecipanti può essere complessa. Vuoi che occupino l'intera cornice della vista principale, ma non vuoi gestire singolarmente la configurazione di ogni partecipante. Per semplificare questa operazione, descriveremo l'implementazione di un UICollectionViewLayout.
Crea un altra nuovo file, ParticipantCollectionViewLayout.swift, che dovrebbe estendere UICollectionViewLayout. Questa classe userà un'altra classe chiamata StageLayoutCalculator, di cui parleremo presto. La classe riceve i valori di frame calcolati per ogni partecipante e quindi genera gli oggetti UICollectionViewLayoutAttributes necessari.
import Foundation
import UIKit

/**
 Code modified from https://developer.apple.com/documentation/uikit/views_and_controls/collection_views/layouts/customizing_collection_view_layouts?language=objc
 */
class ParticipantCollectionViewLayout: UICollectionViewLayout {

    private let layoutCalculator = StageLayoutCalculator()

    private var contentBounds = CGRect.zero
    private var cachedAttributes = [UICollectionViewLayoutAttributes]()

    override func prepare() {
        super.prepare()

        guard let collectionView = collectionView else { return }

        cachedAttributes.removeAll()
        contentBounds = CGRect(origin: .zero, size: collectionView.bounds.size)

        layoutCalculator.calculateFrames(participantCount: collectionView.numberOfItems(inSection: 0),
                                         width: collectionView.bounds.size.width,
                                         height: collectionView.bounds.size.height,
                                         padding: 4)
        .enumerated()
        .forEach { (index, frame) in
            let attributes = UICollectionViewLayoutAttributes(forCellWith: IndexPath(item: index, section: 0))
            attributes.frame = frame
            cachedAttributes.append(attributes)
            contentBounds = contentBounds.union(frame)
        }
    }

    override var collectionViewContentSize: CGSize {
        return contentBounds.size
    }

    override func shouldInvalidateLayout(forBoundsChange newBounds: CGRect) -> Bool {
        guard let collectionView = collectionView else { return false }
        return !newBounds.size.equalTo(collectionView.bounds.size)
    }

    override func layoutAttributesForItem(at indexPath: IndexPath) -> UICollectionViewLayoutAttributes? {
        return cachedAttributes[indexPath.item]
    }

    override func layoutAttributesForElements(in rect: CGRect) -> [UICollectionViewLayoutAttributes]? {
        var attributesArray = [UICollectionViewLayoutAttributes]()

        // Find any cell that sits within the query rect.
        guard let lastIndex = cachedAttributes.indices.last, let firstMatchIndex = binSearch(rect, start: 0, end: lastIndex) else {
            return attributesArray
        }

        // Starting from the match, loop up and down through the array until all the attributes
        // have been added within the query rect.
        for attributes in cachedAttributes[..<firstMatchIndex].reversed() {
            guard attributes.frame.maxY >= rect.minY else { break }
            attributesArray.append(attributes)
        }

        for attributes in cachedAttributes[firstMatchIndex...] {
            guard attributes.frame.minY <= rect.maxY else { break }
            attributesArray.append(attributes)
        }

        return attributesArray
    }

    // Perform a binary search on the cached attributes array.
    func binSearch(_ rect: CGRect, start: Int, end: Int) -> Int? {
        if end < start { return nil }

        let mid = (start + end) / 2
        let attr = cachedAttributes[mid]

        if attr.frame.intersects(rect) {
            return mid
        } else {
            if attr.frame.maxY < rect.minY {
                return binSearch(rect, start: (mid + 1), end: end)
            } else {
                return binSearch(rect, start: start, end: (mid - 1))
            }
        }
    }
}
Più importante è la classe StageLayoutCalculator.swift. Questa classe è progettata per calcolare i frame per ogni partecipante in base al numero di partecipanti in un layout di riga/colonna basato sul flusso. Ogni riga ha la stessa altezza delle altre, ma le colonne possono avere larghezze diverse a seconda della riga. Vedi il commento sul codice sopra la variabile layouts per una descrizione di come personalizzare questo comportamento.
import Foundation
import UIKit

class StageLayoutCalculator {

    /// This 2D array contains the description of how the grid of participants should be rendered
    /// The index of the 1st dimension is the number of participants needed to active that configuration
    /// Meaning if there is 1 participant, index 0 will be used. If there are 5 participants, index 4 will be used.
    ///
    /// The 2nd dimension is a description of the layout. The length of the array is the number of rows that
    /// will exist, and then each number within that array is the number of columns in each row.
    ///
    /// See the code comments next to each index for concrete examples.
    ///
    /// This can be customized to fit any layout configuration needed.
    private let layouts: [[Int]] = [
        // 1 participant
        [ 1 ], // 1 row, full width
        // 2 participants
        [ 1, 1 ], // 2 rows, all columns are full width
        // 3 participants
        [ 1, 2 ], // 2 rows, first row's column is full width then 2nd row's columns are 1/2 width
        // 4 participants
        [ 2, 2 ], // 2 rows, all columns are 1/2 width
        // 5 participants
        [ 1, 2, 2 ], // 3 rows, first row's column is full width, 2nd and 3rd row's columns are 1/2 width
        // 6 participants
        [ 2, 2, 2 ], // 3 rows, all column are 1/2 width
        // 7 participants
        [ 2, 2, 3 ], // 3 rows, 1st and 2nd row's columns are 1/2 width, 3rd row's columns are 1/3rd width
        // 8 participants
        [ 2, 3, 3 ],
        // 9 participants
        [ 3, 3, 3 ],
        // 10 participants
        [ 2, 3, 2, 3 ],
        // 11 participants
        [ 2, 3, 3, 3 ],
        // 12 participants
        [ 3, 3, 3, 3 ],
    ]

    // Given a frame (this could be for a UICollectionView, or a Broadcast Mixer's canvas), calculate the frames for each
    // participant, with optional padding.
    func calculateFrames(participantCount: Int, width: CGFloat, height: CGFloat, padding: CGFloat) -> [CGRect] {
        if participantCount > layouts.count {
            fatalError("Only \(layouts.count) participants are supported at this time")
        }
        if participantCount == 0 {
            return []
        }
        var currentIndex = 0
        var lastFrame: CGRect = .zero

        // If the height is less than the width, the rows and columns will be flipped.
        // Meaning for 6 participants, there will be 2 rows of 3 columns each.
        let isVertical = height > width

        let halfPadding = padding / 2.0

        let layout = layouts[participantCount - 1] // 1 participant is in index 0, so `-1`.
        let rowHeight = (isVertical ? height : width) / CGFloat(layout.count)

        var frames = [CGRect]()
        for row in 0 ..< layout.count {
            // layout[row] is the number of columns in a layout
            let itemWidth = (isVertical ? width : height) / CGFloat(layout[row])
            let segmentFrame = CGRect(x: (isVertical ? 0 : lastFrame.maxX) + halfPadding,
                                      y: (isVertical ? lastFrame.maxY : 0) + halfPadding,
                                      width: (isVertical ? itemWidth : rowHeight) - padding,
                                      height: (isVertical ? rowHeight : itemWidth) - padding)

            for column in 0 ..< layout[row] {
                var frame = segmentFrame
                if isVertical {
                    frame.origin.x = (itemWidth * CGFloat(column)) + halfPadding
                } else {
                    frame.origin.y = (itemWidth * CGFloat(column)) + halfPadding
                }
                frames.append(frame)
                currentIndex += 1
            }

            lastFrame = segmentFrame
            lastFrame.origin.x += halfPadding
            lastFrame.origin.y += halfPadding
        }
        return frames
    }

}
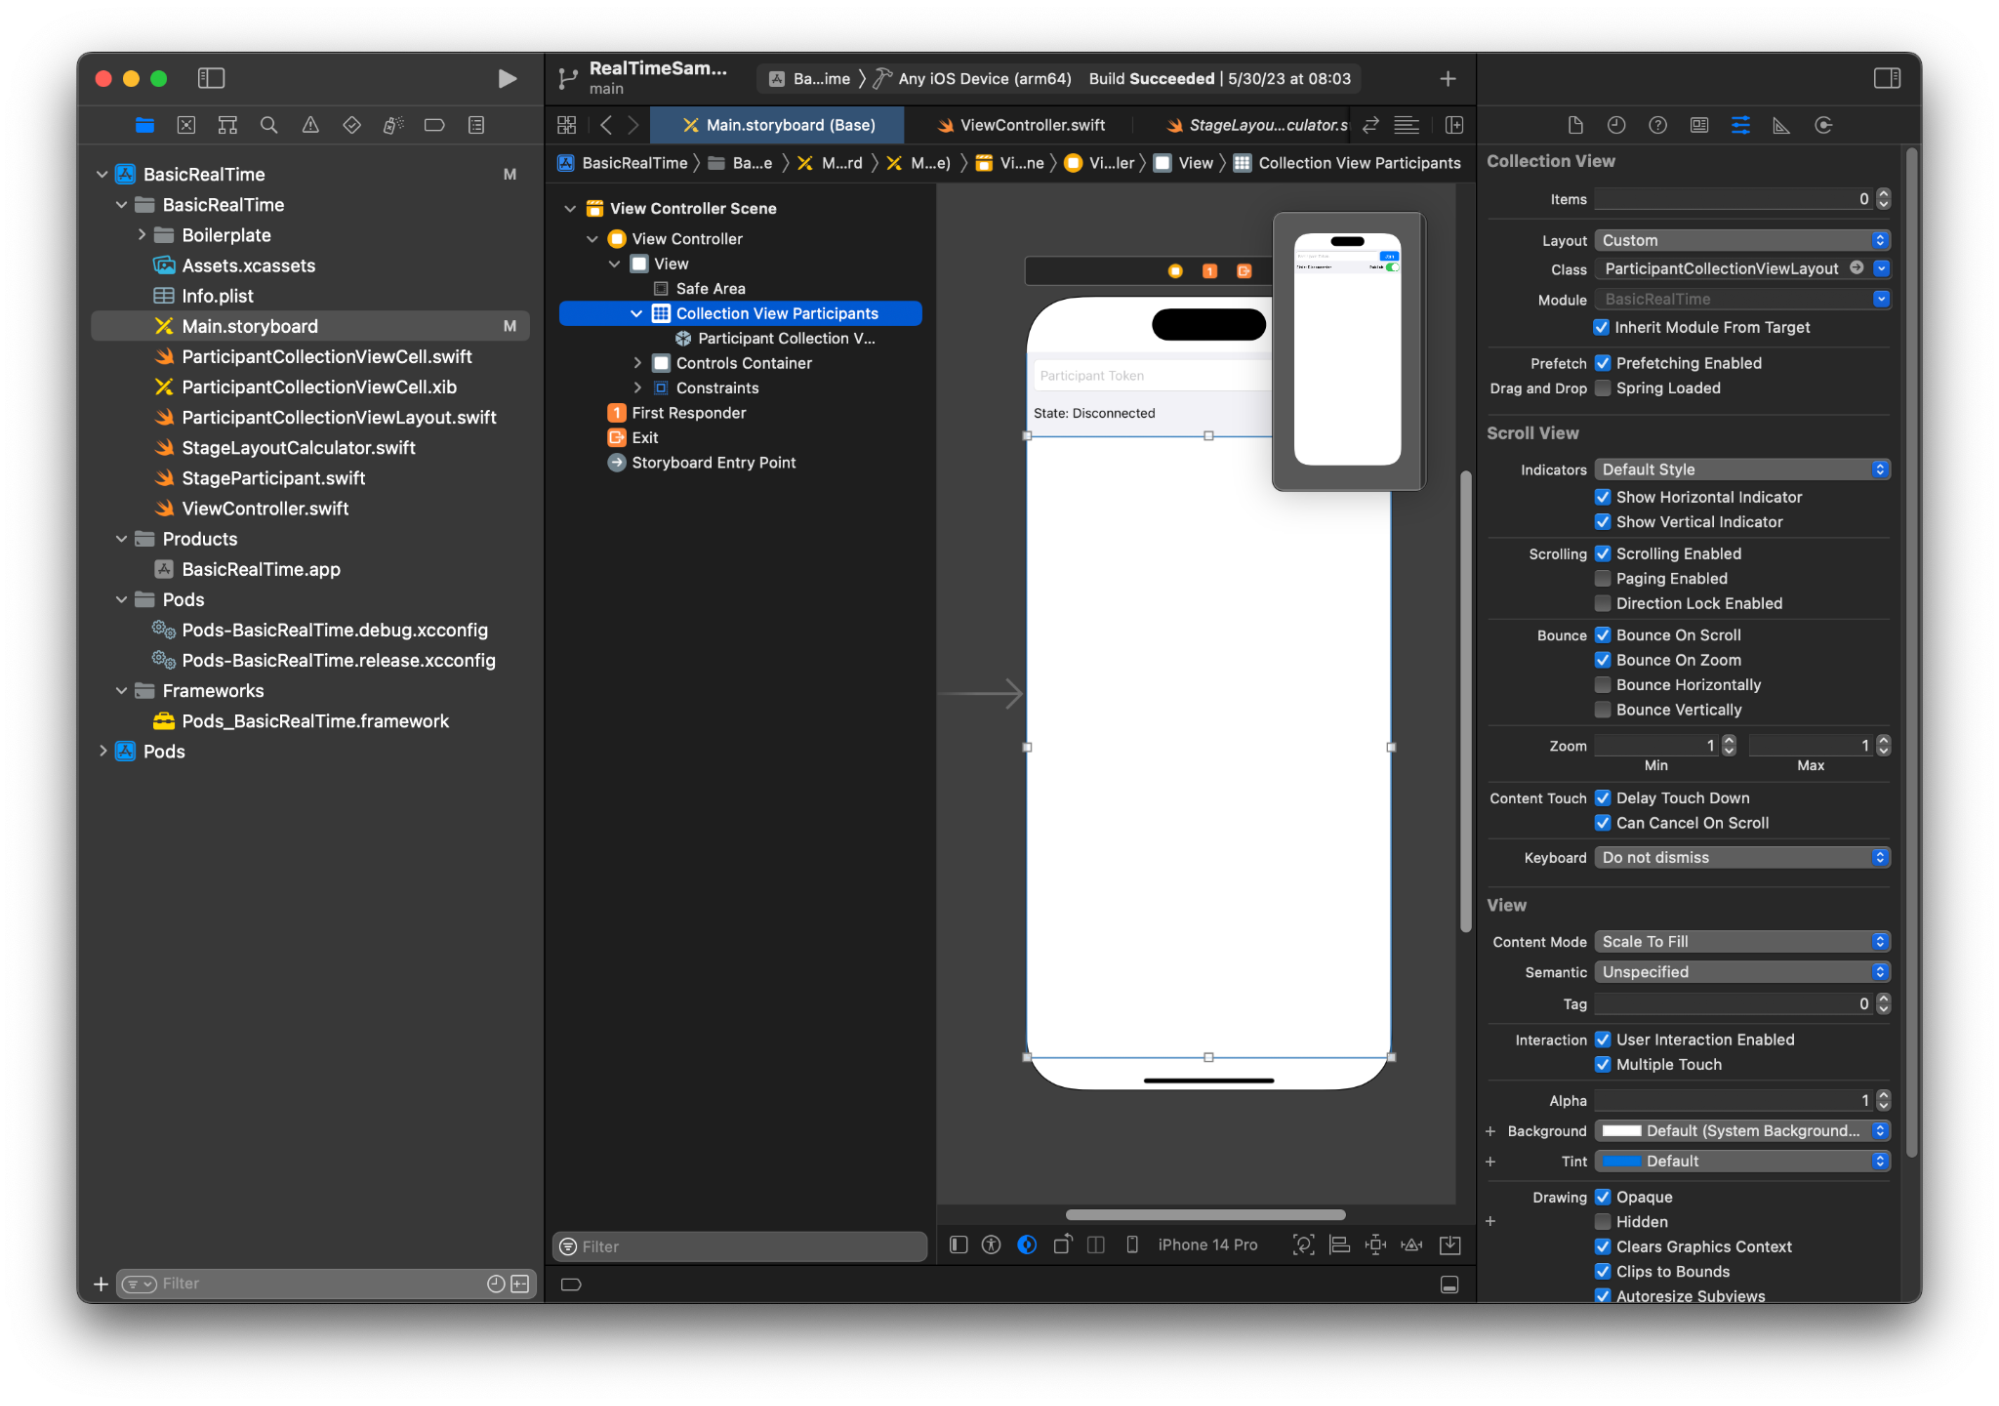
Di nuovo in Main.storyboard, assicurati di impostare la classe di layout per UICollectionView sulla classe che abbiamo appena creato:
Aggancio delle operazioni dell'interfaccia utente
Stiamo per finire, dobbiamo solo creare qualche IBActions.
Per prima cosa gestiremo il pulsante Unisciti. Questo pulsante risponde in modo diverso in base al valore di connectingOrConnected. Quando è già connesso, abbandona semplicemente la fase. Se è disconnesso, legge il testo dal token UITextField e crea un nuovo IVSStage con quel testo. Quindi aggiungiamo il nostro ViewController come strategy,errorDelegate e renderer per IVSStage, infine ci uniamo alla fase in modo asincrono.
@IBAction private func joinTapped(_ sender: UIButton) {
    if connectingOrConnected {
        // If we're already connected to a Stage, leave it.
        stage?.leave()
    } else {
        guard let token = textFieldToken.text else {
            print("No token")
            return
        }
        // Hide the keyboard after tapping Join
        textFieldToken.resignFirstResponder()
        do {
            // Destroy the old Stage first before creating a new one.
            self.stage = nil
            let stage = try IVSStage(token: token, strategy: self)
            stage.errorDelegate = self
            stage.addRenderer(self)
            try stage.join()
            self.stage = stage
        } catch {
            print("Failed to join stage - \(error)")
        }
    }
}
L'altra operazione dell'interfaccia utente di cui dobbiamo eseguire l'hook è il cambio di pubblicazione:
@IBAction private func publishToggled(_ sender: UISwitch) {
    // Because the strategy returns the value of `switchPublish.isOn`, just call `refreshStrategy`.
    stage?.refreshStrategy()
}
Rendering dei partecipanti
Infine, dobbiamo eseguire il rendering dei dati che riceviamo dall'SDK sulla cella del partecipante che abbiamo creato in precedenza. Abbiamo già la logica UICollectionView finita, quindi dobbiamo solo implementare l'API set in ParticipantCollectionViewCell.swift.
Inizieremo aggiungendo la funzione empty e poi la esamineremo dettagliatamente:
func set(participant: StageParticipant) {

}
Per prima cosa gestiremo lo stato di facilità, l'ID partecipante, lo stato di pubblicazione e lo stato di sottoscrizione. Per questi, ci limitiamo ad aggiornare direttamente il UILabels:
labelParticipantId.text = participant.isLocal ? "You (\(participant.participantId ?? "Disconnected"))" : participant.participantId
labelPublishState.text = participant.publishState.text
labelSubscribeState.text = participant.subscribeState.text
Le proprietà testuali delle enumerazioni di pubblicazione e sottoscrizione provengono da estensioni locali:
extension IVSParticipantPublishState {
    var text: String {
        switch self {
        case .notPublished: return "Not Published"
        case .attemptingPublish: return "Attempting to Publish"
        case .published: return "Published"
        @unknown default: fatalError()
        }
    }
}

extension IVSParticipantSubscribeState {
    var text: String {
        switch self {
        case .notSubscribed: return "Not Subscribed"
        case .attemptingSubscribe: return "Attempting to Subscribe"
        case .subscribed: return "Subscribed"
        @unknown default: fatalError()
        }
    }
}
Successivamente aggiorneremo gli stati di disattivazione audio e video. Per ottenere lo stato di audio disattivato, dobbiamo trovare IVSImageDevice e IVSAudioDevice dall'array streams. Per ottimizzare le prestazioni, ricorderemo gli ultimi dispositivi collegati.
// This belongs outside `set(participant:)`
private var registeredStreams: Set<IVSStageStream> = []
private var imageDevice: IVSImageDevice? {
    return registeredStreams.lazy.compactMap { $0.device as? IVSImageDevice }.first
}
private var audioDevice: IVSAudioDevice? {
    return registeredStreams.lazy.compactMap { $0.device as? IVSAudioDevice }.first
}

// This belongs inside `set(participant:)`
let existingAudioStream = registeredStreams.first { $0.device is IVSAudioDevice }
let existingImageStream = registeredStreams.first { $0.device is IVSImageDevice }

registeredStreams = Set(participant.streams)

let newAudioStream = participant.streams.first { $0.device is IVSAudioDevice }
let newImageStream = participant.streams.first { $0.device is IVSImageDevice }

// `isMuted != false` covers the stream not existing, as well as being muted.
labelVideoMuted.text = "Video Muted: \(newImageStream?.isMuted != false)"
labelAudioMuted.text = "Audio Muted: \(newAudioStream?.isMuted != false)"
Infine vogliamo eseguire il rendering di un'anteprima per imageDevice e visualizzare le statistiche audio dal audioDevice:
if existingImageStream !== newImageStream {
    // The image stream has changed
    updatePreview() // We’ll cover this next
}

if existingAudioStream !== newAudioStream {
    (existingAudioStream?.device as? IVSAudioDevice)?.setStatsCallback(nil)
    audioDevice?.setStatsCallback( { [weak self] stats in
        self?.labelAudioVolume.text = String(format: "Audio Level: %.0f dB", stats.rms)
    })
    // When the audio stream changes, it will take some time to receive new stats. Reset the value temporarily.
    self.labelAudioVolume.text = "Audio Level: -100 dB"
}
L'ultima funzione che dobbiamo creare è updatePreview(), che aggiunge un'anteprima del partecipante alla nostra vista:
private func updatePreview() {
    // Remove any old previews from the preview container
    viewPreviewContainer.subviews.forEach { $0.removeFromSuperview() }
    if let imageDevice = self.imageDevice {
        if let preview = try? imageDevice.previewView(with: .fit) {
            viewPreviewContainer.addSubviewMatchFrame(preview)
        }
    }
}
Quanto sopra utilizza una funzione helper su UIView per semplificare l'embedding delle viste secondarie:
extension UIView {
    func addSubviewMatchFrame(_ view: UIView) {
        view.translatesAutoresizingMaskIntoConstraints = false
        self.addSubview(view)
        NSLayoutConstraint.activate([
            view.topAnchor.constraint(equalTo: self.topAnchor, constant: 0),
            view.bottomAnchor.constraint(equalTo: self.bottomAnchor, constant: 0),
            view.leadingAnchor.constraint(equalTo: self.leadingAnchor, constant: 0),
            view.trailingAnchor.constraint(equalTo: self.trailingAnchor, constant: 0),
        ])
    }
}