Help improve this page
To contribute to this user guide, choose the Edit this page on GitHub link that is located in the right pane of every page.
Create a GPU NodePool using Terraform
Tip
Register
This section walks you through creating a GPU NodePool on the EKS cluster you set up in Set up Amazon EKS cluster for AI/ML workloads using Terraform, testing it with a sample Pod, and optionally adding reserved capacity. Run the terraform commands from the same terraform/<mode>/ directory you deployed the cluster from in the previous Cluster setup step. Choose the same path (EKS Auto Mode or self-managed Karpenter) that you used to create your cluster.
The highlighted area of the following diagram shows the NodeClass and NodePool that you configure in this section. The NodePool defines which GPU instances EKS Auto Mode or Karpenter can launch, and the NodeClass defines the node configuration, such as the AMI. The NodePool provisions an On-Demand Capacity Reservation (ODCR) G-family instance and a Spot or On-Demand G-family instance. The monitoring stack and the Amazon S3 bucket are shown for context.
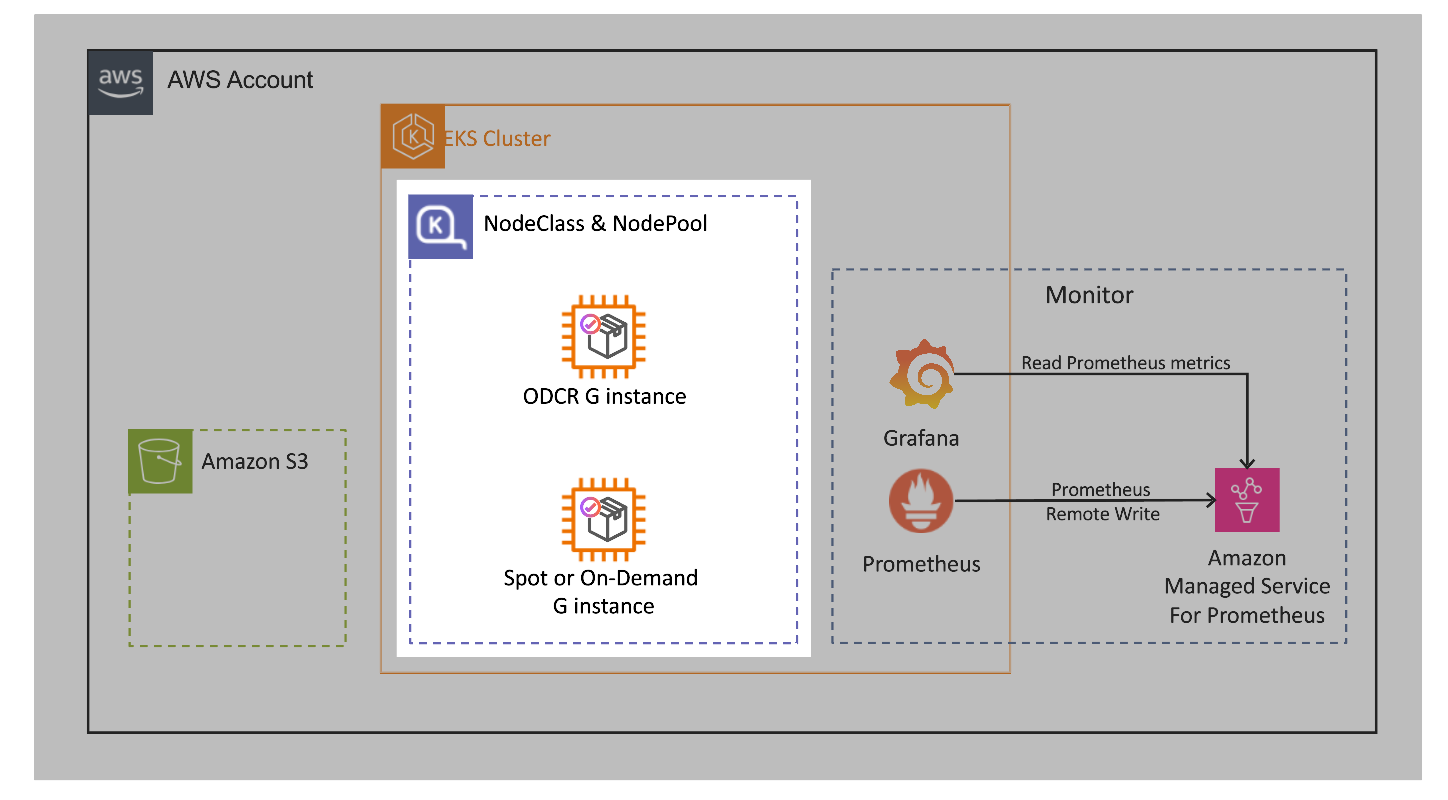
Prerequisites
Important
The GPU instances this section provisions incur charges, and an On-Demand Capacity Reservation bills from the moment Terraform creates it, whether or not an instance occupies it. Complete Clean up the GPU NodePool when you finish to avoid ongoing charges.
-
An EKS cluster created following the steps in Set up Amazon EKS cluster for AI/ML workloads using Terraform.
-
Terraform >= 1.15.0, for setup instructions, see Installing Terraform
. -
kubectl, configured for the cluster and within one minor version of your cluster’s Kubernetes version. For setup instructions, see Set up kubectl and eksctl. -
AWS CLI >= 2.27, for setup instructions, see Installing.
Confirm you are in the right directory, with state that matches the cluster kubectl points at:
terraform output cluster_name

kubectl config current-context
The cluster name in the Terraform output and the cluster in your current kubectl context must be the same. If terraform output reports no state, you are in the wrong directory.
Understand the Terraform code
The NodePools in this section come from nodepools.tf and the nodepools/ directory of the root module you deployed in Step 1:
terraform/karpenter/
├── nodepools.tf
└── nodepools/
    ├── general-purpose/
    ├── spot-ondemand/
    ├── reserved-spot-ondemand/
    ├── b-200s-static/
    └── b-200s-static-fsx/
Each strategy directory holds the NodeClass and NodePool manifests for one approach to GPU capacity. nodepools.tf reads the directories named in var.nodepools and applies the manifests it finds, so enabling a strategy is a variable change rather than an edit to the Terraform code.
var.nodepools is a map keyed by strategy directory name, and it defaults to {}, which is why the cluster has no GPU capacity after Step 1. Two constraints are enforced by variable validation:
-
spot-ondemandandreserved-spot-ondemandboth manage the samegpu-infNodePool, so you can enable at most one of them. -
reserved-spot-ondemandrequires areservationblock, because its reserved nodes run on an ODCR that Terraform creates for you.
The EKS Auto Mode directory has the same layout, without general-purpose/ and b-200s-static-fsx/. For usage beyond this guide, see the READMEterraform/ directory.
Step 1: Create a dynamic GPU NodePool
GPU NodePools are opt-in. By default, terraform apply creates the cluster and monitoring stack with no GPU capacity and no GPU billing. To provision GPU nodes, pass the nodepools variable with a strategy name.
Enable the spot-ondemand strategy, which provisions G-family GPU instances with a generation greater than 4, using Spot capacity with On-Demand as a fallback:
terraform apply -var 'nodepools={"spot-ondemand"={}}'
This command applies the NodePool and NodeClass templates from the nodepools/spot-ondemand/ directory. Both paths use the same NodePool API, but they differ in the NodeClass the NodePool references.
Both paths show 0 nodes for gpu-inf until a GPU workload is scheduled. EKS Auto Mode and Karpenter only launch nodes when pending Pods require them.
Immediately after the apply, the READY column can show False or Unknown for up to a minute, while Karpenter resolves the AMI, subnets, and security groups. Re-run the command until both objects report True.
Note
The g7 instance family requires NVIDIA driver version 595 or later, and the two paths differ in whether they can run it. The EKS-optimized AL2023 NVIDIA AMI that the self-managed Karpenter path uses includes driver 595, so g7 is eligible on that path. EKS Auto Mode does not support g7 yet, so the EKS Auto Mode NodePool excludes that family. Other generation-7 families, such as g7e, run on driver 580 and are eligible on both paths. If a NodePool manifest in nodepools/ constrains the instance generation or family differently than you need, edit it before you apply. For more information, see EKS-optimized NVIDIA AMIs.strategy/
Step 2: Test with a sample Pod
Test your GPU NodePool setup with an nvidia-smi Pod:
cat << EOF | kubectl apply -f -
apiVersion: v1
kind: Pod
metadata:
  name: nvidia-smi
  labels:
    guide: ai-eks-docs
spec:
  restartPolicy: OnFailure
  tolerations:
    - key: "nvidia.com/gpu"
      operator: "Exists"
      effect: "NoSchedule"
  containers:
    - name: nvidia-smi
      image: public.ecr.aws/amazonlinux/amazonlinux:2023-minimal
      command: ["sh", "-c", "nvidia-smi && sleep 300"]
      resources:
        limits:
          nvidia.com/gpu: 1
EOF
Verify the Pod is scheduled and running:
kubectl get pods nvidia-smi
Expected output:
NAME         READY   STATUS      RESTARTS   AGE
nvidia-smi   1/1     Running     0          67s
The Pod runs nvidia-smi and then sleeps for 5 minutes. This keeps the Pod, and the node it runs on, available long enough for you to retrieve the logs. If the Pod completes, Karpenter can consolidate the empty node before you read the logs. Check the Pod logs to see the GPU detected by the node:
kubectl logs nvidia-smi
Expected output:
Fri Oct  9 22:17:13 2026
+-----------------------------------------------------------------------------------------+
| NVIDIA-SMI 580.178.04             Driver Version: 580.178.04     CUDA Version: 13.0     |
+-----------------------------------------+------------------------+----------------------+
| GPU  Name                 Persistence-M | Bus-Id          Disp.A | Volatile Uncorr. ECC |
| Fan  Temp   Perf          Pwr:Usage/Cap |           Memory-Usage | GPU-Util  Compute M. |
|                                         |                        |               MIG M. |
|=========================================+========================+======================|
|   0  NVIDIA L4                      On  |   00000000:31:00.0 Off |                    0 |
| N/A   50C    P8             13W /   72W |       0MiB /  23034MiB |      0%      Default |
|                                         |                        |                  N/A |
+-----------------------------------------+------------------------+----------------------+

+-----------------------------------------------------------------------------------------+
| Processes:                                                                              |
|  GPU   GI   CI              PID   Type   Process name                        GPU Memory |
|        ID   ID                                                               Usage      |
|=========================================================================================|
|  No running processes found                                                             |
+-----------------------------------------------------------------------------------------+
The output shows the GPU model, driver version, CUDA version, and available memory. In this example, Karpenter provisioned a G6 instance which has an NVIDIA L4 GPU with 24 GB of memory. Both the driver version and the CUDA version come from the AMI: nvidia-smi reports the highest CUDA version the installed driver supports, not a CUDA runtime inside the container image. The GPU model and memory vary depending on the instance type Karpenter selects. G5 instances have NVIDIA A10G GPUs (24 GB), G6 instances have NVIDIA L4 GPUs (24 GB), and G6e instances have NVIDIA L40S GPUs (48 GB).
To understand how Karpenter and the Kubernetes scheduler coordinated to provision a node and place the Pod, check the Pod’s lifecycle events:
kubectl describe pod nvidia-smi
Expected output:
Events:
  Type     Reason            Age   From                   Message
  ----     ------            ----  ----                   -------
  Warning  FailedScheduling  75s   default-scheduler      0/2 nodes are available: 2 node(s) had untolerated taint(s).
  Normal   Nominated         74s   eks-auto-mode/compute  Pod should schedule on: nodeclaim/gpu-inf-z6q75
  Warning  FailedScheduling  41s   eks-auto-mode/compute  Failed to schedule pod, would schedule against uninitialized nodeclaim/gpu-inf-z6q75
  Normal   Scheduled         35s   default-scheduler      Successfully assigned default/nvidia-smi to i-0eb897a8302551589
  Normal   Pulling           27s   kubelet                spec.containers{nvidia-smi}: Pulling image "public.ecr.aws/amazonlinux/amazonlinux:2023-minimal"
  Normal   Pulled            22s   kubelet                spec.containers{nvidia-smi}: Successfully pulled image "public.ecr.aws/amazonlinux/amazonlinux:2023-minimal" in 5.625s (5.626s including waiting). Image size: 37440620 bytes.
  Normal   Created           22s   kubelet                spec.containers{nvidia-smi}: Container created
  Normal   Started           21s   kubelet                spec.containers{nvidia-smi}: Container started
These events show the Pod scheduling sequence: the Pod initially fails to schedule because no GPU nodes exist (FailedScheduling), Karpenter nominates a new NodeClaim (Nominated), the scheduler retries while the nominated node is still booting (the second FailedScheduling, which names the uninitialized NodeClaim), the scheduler assigns the Pod after the node is ready (Scheduled), and then the container image is pulled and started. EKS Auto Mode has SOCI (Seekable OCI) parallel pull installed and configured by default on G, P, and Trn instances, and the self-managed Karpenter path configures it explicitly through the FastImagePull feature gate.
Note
On a self-managed Karpenter cluster, the Nominated event comes From
karpenter instead of eks-auto-mode/compute, and the Scheduled event names the node by its private DNS name instead of its instance ID.
A NodeClaim is a request Karpenter creates to provision a specific node. It shows the instance type, capacity type, AZ, and whether the node is ready:
kubectl get nodeclaims
Expected output:
NAME            TYPE        CAPACITY   ZONE         NODE                  READY   AGE
gpu-inf-z6q75   g6.xlarge   spot       us-east-2a   i-0eb897a8302551589   True    5m
The instance type, capacity type, and AZ vary. Any G-family instance with a generation greater than 4 is eligible, and because the spot-ondemand strategy allows both capacity types, the CAPACITY column shows on-demand instead of spot whenever that is the cheapest available offering.
Tip
If no node appears, check for Insufficient Capacity Errors:
kubectl get events | grep InsufficientCapacityError
Karpenter caches unavailable offerings for 3 minutes. Widening the allowed instance types and AZs in your NodePool increases the chances of landing capacity.
Note
Spot instances launched by Karpenter do not appear in the EC2 Spot Requests console. Karpenter uses the EC2 CreateFleet API with type: instant. The instances appear in the EC2 Instances console with a spot lifecycle.
Step 3: Add reserved capacity to the NodePool (optional)
Although the GPU NodePool from Step 1 provisions Spot or On-Demand instances dynamically, some use cases require reserved capacity. You can create an ODCR to reserve GPU capacity in a specific Availability Zone without a long-term commitment.
With Terraform, a single command creates the ODCR, a custom NodeClass that references the reservation by tag, and updates the NodePool to include reserved as a capacity type. Terraform tags the ODCR with nodepool=reserved-spot-ondemand and the NodeClass selects it by that tag.
Warning
The following command creates an ODCR that bills immediately and continues billing until you destroy it with terraform destroy or the cleanup script, whether or not nodes are running on it.
Use defaults (g6e.4xlarge, 1 instance, first cluster AZ):
terraform apply -var 'nodepools={"reserved-spot-ondemand"={reservation={}}}'
Pick the instance type, count, and AZ:
terraform apply -var 'nodepools={"reserved-spot-ondemand"={reservation={instance_type="g6e.2xlarge",instance_count=1,az="us-east-2a"}}}'
The reservation object supports the following fields:
-
instance_type— The GPU instance type to reserve. Default:g6e.4xlarge. -
instance_count— The number of instances to reserve. Default:1. -
az— The Availability Zone for the reservation. Default:""(uses the first cluster AZ).
Important
The spot-ondemand and reserved-spot-ondemand strategies are mutually exclusive. You can enable at most one in the nodepools variable. If you previously used spot-ondemand in Step 1, the reserved-spot-ondemand command replaces it because both manage the same gpu-inf NodePool.
GPU capacity for reservations is often constrained, so expect to retry. AWS does not always reject an unfulfillable reservation outright: the CreateCapacityReservation call can succeed and the reservation then settles into the failed state. Terraform waits for the reservation to become active, so instead of an InsufficientInstanceCapacity error, the apply sits on Still creating… for as long as its timeout allows.
Because each unsuccessful attempt costs you a long apply and a reservation to clean up, find a combination that AWS can fulfill before you run Terraform. Create a reservation by hand, check its state, and cancel it. Repeat with other instance types and Availability Zones until one reports active, then pass that pair to terraform apply:
CR_ID=$(aws ec2 create-capacity-reservation \
  --instance-type [.replaceable]`g6e.4xlarge` \
  --instance-platform Linux/UNIX \
  --availability-zone [.replaceable]`us-east-2a` \
  --instance-count 1 \
  --instance-match-criteria open \
  --end-date-type unlimited \
  --region [.replaceable]`region-code` \
  --query 'CapacityReservation.CapacityReservationId' \
  --output text)

sleep 15

aws ec2 describe-capacity-reservations \
  --capacity-reservation-ids ${CR_ID} \
  --query 'CapacityReservations[0].State' \
  --output text \
  --region [.replaceable]`region-code`

aws ec2 cancel-capacity-reservation \
  --capacity-reservation-id ${CR_ID} \
  --region [.replaceable]`region-code`
An InsufficientInstanceCapacity error from the first command, or any state other than active from the second, means AWS cannot fulfill that instance type in that Availability Zone right now. A reservation that you create this way is not the one Terraform manages, so cancel it before you apply, as shown.
If the apply does not finish within a few minutes, check the reservation state from a second terminal:
aws ec2 describe-capacity-reservations \
  --filters "Name=tag:nodepool,Values=reserved-spot-ondemand" \
  --query 'CapacityReservations[].[CapacityReservationId,InstanceType,AvailabilityZone,State]' \
  --output table \
  --region [.replaceable]`region-code`
If the state is failed, or if the apply returns an InsufficientInstanceCapacity error, the reservation cannot be fulfilled as requested. Cancel the Terraform operation (Ctrl+C), then re-run with a different az value:
terraform apply -var 'nodepools={"reserved-spot-ondemand"={reservation={instance_type="g6e.4xlarge",az="us-east-2b"}}}'
If no Availability Zone in the Region has capacity, reserve a different instance type instead. A smaller size of the same family or another G-family generation greater than 4 both work, because the NodePool accepts any of them:
terraform apply -var 'nodepools={"reserved-spot-ondemand"={reservation={instance_type="g5.xlarge",az="us-east-2b"}}}'
Important
Interrupting the apply with Ctrl+C while the reservation is being created leaves the reservation outside of Terraform state, so neither terraform destroy nor a later apply removes it. A failed reservation does not incur charges, but cancel it anyway to keep your account clean:
aws ec2 cancel-capacity-reservation \
  --capacity-reservation-id [.replaceable]`cr-1234567890abcdef0` \
  --region [.replaceable]`region-code`
After applying, Terraform updates the NodePool to include reserved, spot, and on-demand in the capacity-type requirements. Karpenter treats reserved as the most cost-efficient option and launches it first. After the reservation is full, it falls back to Spot or On-Demand.
On the EKS Auto Mode path, Terraform creates a custom gpu-inf NodeClass (because the bundled default NodeClass is read-only) that references the ODCR by tag through capacityReservationSelectorTerms. On the self-managed Karpenter path, Terraform re-applies the gpu-inf EC2NodeClass with capacityReservationSelectorTerms added and updates the NodePool to include reserved.
Verify the ODCR was created:
aws ec2 describe-capacity-reservations \
  --filters "Name=state,Values=active" "Name=tag:nodepool,Values=reserved-spot-ondemand" \
  --query 'CapacityReservations[0].{Id:CapacityReservationId,State:State,InstanceType:InstanceType,AvailableCount:AvailableInstanceCount}' \
  --output table \
  --region $(terraform output -raw region)
Verify the NodeClass references the ODCR:
Verify the NodePool is ready:
kubectl get nodepools gpu-inf
Expected output:
NAME      NODECLASS   NODES   READY   AGE
gpu-inf   gpu-inf     0       True    30s
After applying the changes, validate that Karpenter prioritizes reserved capacity and falls back to Spot or On-Demand. Deploy a 2-replica Deployment that requests 1 GPU per Pod. The ODCR is for 1 instance (1 GPU), so the first Pod triggers Karpenter to launch a reserved node. The nodeSelector restricts the Pods to single-GPU instance types, so the second Pod cannot fit on the reserved node and triggers Karpenter to launch another node from Spot or On-Demand capacity.
Important
Keep the nodeSelector. The NodePool allows multi-GPU instance types, and without it Karpenter can satisfy both replicas with one multi-GPU Spot instance. The reserved node is then left empty, consolidation terminates it, and you see two Pods on a single Spot node instead of the reserved and Spot split described here. On the EKS Auto Mode path, use eks.amazonaws.com/instance-gpu-count as the nodeSelector key instead.
cat << 'EOF' | kubectl apply -f -
apiVersion: apps/v1
kind: Deployment
metadata:
  name: gpu-overflow-test
  labels:
    guide: ai-eks-docs
spec:
  replicas: 2
  selector:
    matchLabels:
      app: gpu-overflow-test
  template:
    metadata:
      labels:
        app: gpu-overflow-test
        guide: ai-eks-docs
    spec:
      nodeSelector:
        karpenter.k8s.aws/instance-gpu-count: "1"
      tolerations:
        - key: nvidia.com/gpu
          operator: Exists
          effect: NoSchedule
      containers:
        - name: nvidia-smi
          image: public.ecr.aws/amazonlinux/amazonlinux:2023-minimal
          command: ["sh", "-c", "nvidia-smi && sleep infinity"]
          resources:
            limits:
              nvidia.com/gpu: 1
EOF
Unlike the nvidia-smi test Pod from Step 2, which exits after 5 minutes, this Deployment keeps the Pods running (sleep infinity) so they hold the GPU and prevent the node from being consolidated.
Verify the Pods scheduled on different nodes:
kubectl get pods -l app=gpu-overflow-test -o wide
Expected output:
NAME                                 READY   STATUS    RESTARTS   AGE     IP            NODE                  NOMINATED NODE   READINESS GATES
gpu-overflow-test-55d55ff5b9-dvg52   1/1     Running   0          4m42s   10.0.75.210   i-08741a36089ff2088   <none>           <none>
gpu-overflow-test-55d55ff5b9-hw4m9   1/1     Running   0          4m43s   10.0.82.49    i-0f50cdbacb2017202   <none>           <none>
Check the NodeClaims to see the capacity types:
kubectl get nodeclaims
Expected output:
NAME            TYPE          CAPACITY   ZONE         NODE                  READY   AGE
gpu-inf-vw99m   g6e.4xlarge   reserved   us-east-2c   i-0f50cdbacb2017202   True    6m
gpu-inf-s65s6   g6.xlarge     spot       us-east-2b   i-08741a36089ff2088   True    5m59s
The reserved node launched first, followed by a Spot or On-Demand node after the reservation was full.
Clean up the test deployment:
kubectl delete deployment gpu-overflow-test
Next steps
With your GPU NodePool ready, you can proceed to Load & Serve Models to deploy a large language model and interact with the inference endpoint.
Clean up the GPU NodePool
Tip
If you plan to continue with the next sections of this guide, skip this cleanup. Only run it when you are done with the GPU NodePool. To tear down the whole cluster, see the cleanup steps in Set up Amazon EKS cluster for AI/ML workloads using Terraform.
Delete the test workloads so no Pods are holding GPU nodes:
kubectl delete pod nvidia-smi --ignore-not-found
kubectl delete deployment gpu-overflow-test --ignore-not-found
If you only want to release the ODCR and fall back to Spot and On-Demand capacity, switch the nodepools variable back to the spot-ondemand strategy:
terraform apply -var 'nodepools={"spot-ondemand"={}}'
This drops reserved from the NodePool capacity-type requirements and destroys the ODCR, and leaves the cluster, monitoring stack, and S3 bucket in place.
Important
Cancelling a reservation does not terminate instances already running on it. Those instances keep running at standard On-Demand rates until they are terminated. Delete the GPU workloads first, as shown previously, so the reserved node drains before the reservation is released.
To remove the GPU NodePool entirely and return the cluster to no GPU capacity, run terraform apply without the nodepools variable:
terraform apply
Important
Keep every other -var override you used when you deployed the cluster, such as region and my_cidr, on each of the preceding commands. Terraform does not persist variables between commands, so omitting them reverts those settings to their defaults.
Confirm the GPU nodes are gone, so no GPU instance keeps running:
kubectl get nodeclaims
No gpu-inf NodeClaim should appear in the output. Node termination takes a few minutes, during which the gpu-inf nodes show as NotReady in kubectl get nodes.
