End of support notice: On October 31, 2025, AWS
will discontinue support for Amazon Lookout for Vision. After October 31, 2025, you will
no longer be able to access the Lookout for Vision console or Lookout for Vision resources.
For more information, visit this
blog post
Getting started with Amazon Lookout for Vision
Before starting these Getting started instructions, we recommend that you read Understanding Amazon Lookout for Vision.
The Getting Started instructions show you how to use create an example image segmentation model. If you want to create an example image classification model, see Image classification dataset.
If you want to quickly try an example model, we provide example training images and mask images. We also provide a Python script that creates an image segmentation manifest file. You use the manifest file to create a dataset for your project and you don't need to label the images in the dataset. When you create a model with your own images, you must label the images in the dataset. For more information, see Creating your dataset.
The images we provide are of normal and anomalous cookies. An anomalous cookie has a crack across the cookie shape. The model you train with the images predicts a classification (normal or anomalous) and finds the area (mask) of cracks in an anomalous cookie, as shown in the following example.

Topics
Step 1: Create the manifest file and upload images
In this procedure, you clone the Amazon Lookout for Vision documentation repository to your computer. You then use a Python (version 3.7 or higher) script to create a manifest file and upload the training images and mask images to an Amazon S3 location that you specify. You use the manifest file to create your model. Later, you use test images in the local repository to try your model.
To create the manifest file and upload images
Set up Amazon Lookout for Vision by following the instructions at Setup Amazon Lookout for Vision. Be sure to install the AWS SDK for Python
. In the AWS Region in which you want to use Lookout for Vision, create an S3 bucket.
In the Amazon S3 bucket, create a folder named
getting-started.Note the Amazon S3 URI and Amazon Resource name (ARN) for the folder. You use them to set up permissions and to run the script.
Make sure that the user calling the script has permissions to call the
s3:PutObjectoperation. You can use the following policy. To assign permissions, see Assigning permissions.{ "Version": "2012-10-17", "Statement": [{ "Sid": "Statement1", "Effect": "Allow", "Action": [ "s3:PutObject" ], "Resource": [ "arn:aws:s3::: ARN for S3 folder in step 4/*" ] }] }-
Make sure that you have a local profile named
lookoutvision-accessand that the profile user has the permission from the previous step. For more information, see Using a profile on your local computer. -
Download the zip file, getting-started.zip. The zip file contains the getting started dataset and set up script.
Unzip the file
getting-started.zip.At the command prompt, do the following:
Navigate to the
getting-startedfolder.-
Run the following command to create a manifest file and upload the training images and image masks to the Amazon S3 path you noted in step 4.
python getting_started.pyS3-URI-from-step-4 When the script completes, note the path to the
train.manifestfile that the script displays afterCreate dataset using manifest file:. The path should be similar tos3://.path to getting started folder/manifests/train.manifest
Step 2: Create the model
In this procedure, you create a project and dataset using the images and manifest file that you previously uploaded to your Amazon S3 bucket. You then create the model and view the evaluation results from model training.
Because you create the dataset from the getting started manifest file, you don't need to label the dataset's images. When you create a dataset with your own images, you do need to label images. For more information, see Labeling images.
Important
You are charged for a successful training of a model.
To create a model
-
Open the Amazon Lookout for Vision console at https://console.aws.amazon.com/lookoutvision/
. Make sure you are in the same AWS Region that you created the Amazon S3 bucket in Step 1: Create the manifest file and upload images. To change the Region, choose the name of the currently displayed Region in the navigation bar. Then select the Region to which you want to switch.
-
Choose Get started.

In the Projects section, choose Create project.

-
On the Create project page, do the following:
-
In Project name, enter
getting-started. -
Choose Create project.

-
-
On the project page, in the How it works section, choose Create dataset.

On the Create dataset page, do the following:
-
Choose Create a single dataset.
-
In the Image source configuration section, choose Import images labeled by SageMaker Ground Truth.
-
For .manifest file location, enter the Amazon S3 location of the manifest file that you noted in step 6.c. of Step 1: Create the manifest file and upload images. The Amazon S3 location should be similar to
s3://path to getting started folder/manifests/train.manifest -
Choose Create dataset.

-
-
On the project details page, in the Images section, view the dataset images. You can view the classification and image segmentation information (mask and anomaly labels) for each dataset image. You can also search for images, filter images by labeling status (labeled/unlabeled), or filter images by the anomaly labels assigned to them.

-
On the project details page, choose Train model.

-
On the Train model details page, choose Train model.
-
In the Do you want to train your model? dialog box, choose Train model.
-
In the project Models page, you can see that training has started. Check the current status by viewing the Status column for the model version. Training the model takes at least 30 minutes to complete. Training has successfully finished when the status changes to Training complete.
-
When training finishes, choose the model Model 1 in the Models page.

-
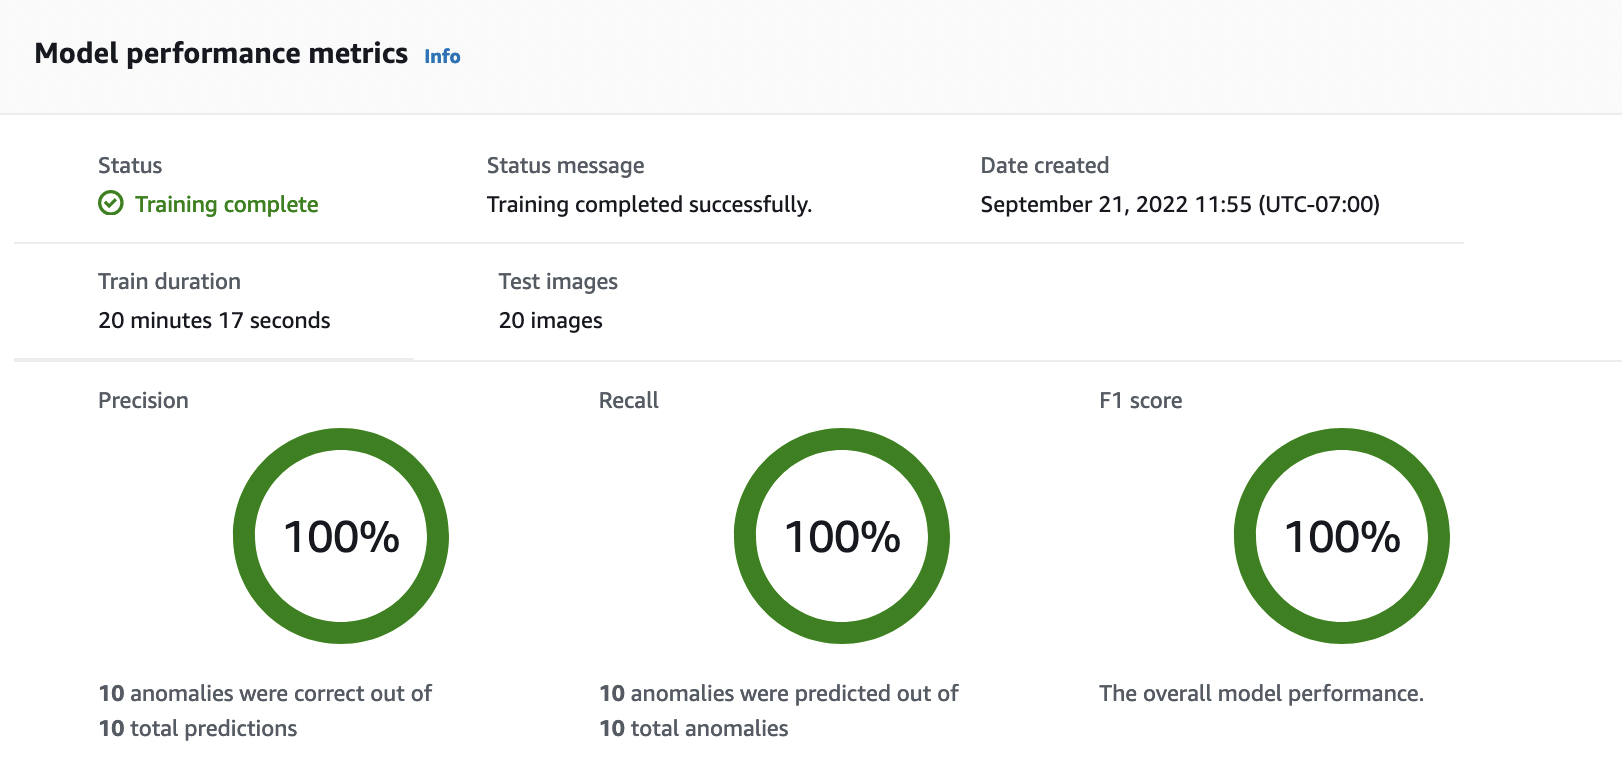
In the model's details page, view the evaluation results in the Performance metrics tab. There are metrics for the following:
-
Overall model performance metrics (precision, recall, and F1 score) for the classification predictions made by the model.

-
Performance metrics for anomaly labels found in the test images (Average IoU, F1 score)

-
Predictions for test images (classification, segmentation masks, and anomaly labels)

As model training is non-deterministic, your evaluation results might differ from the results on shown on this page. For more information, see Improving your Amazon Lookout for Vision model.
-
Step 3: Start the model
In this step, you start hosting the model so that it is ready to analyze images. For more information, see Running your trained Amazon Lookout for Vision model.
Note
You are charged for the amount of time that your model runs. You stop your model in Step 5: Stop the model.
To start the model.
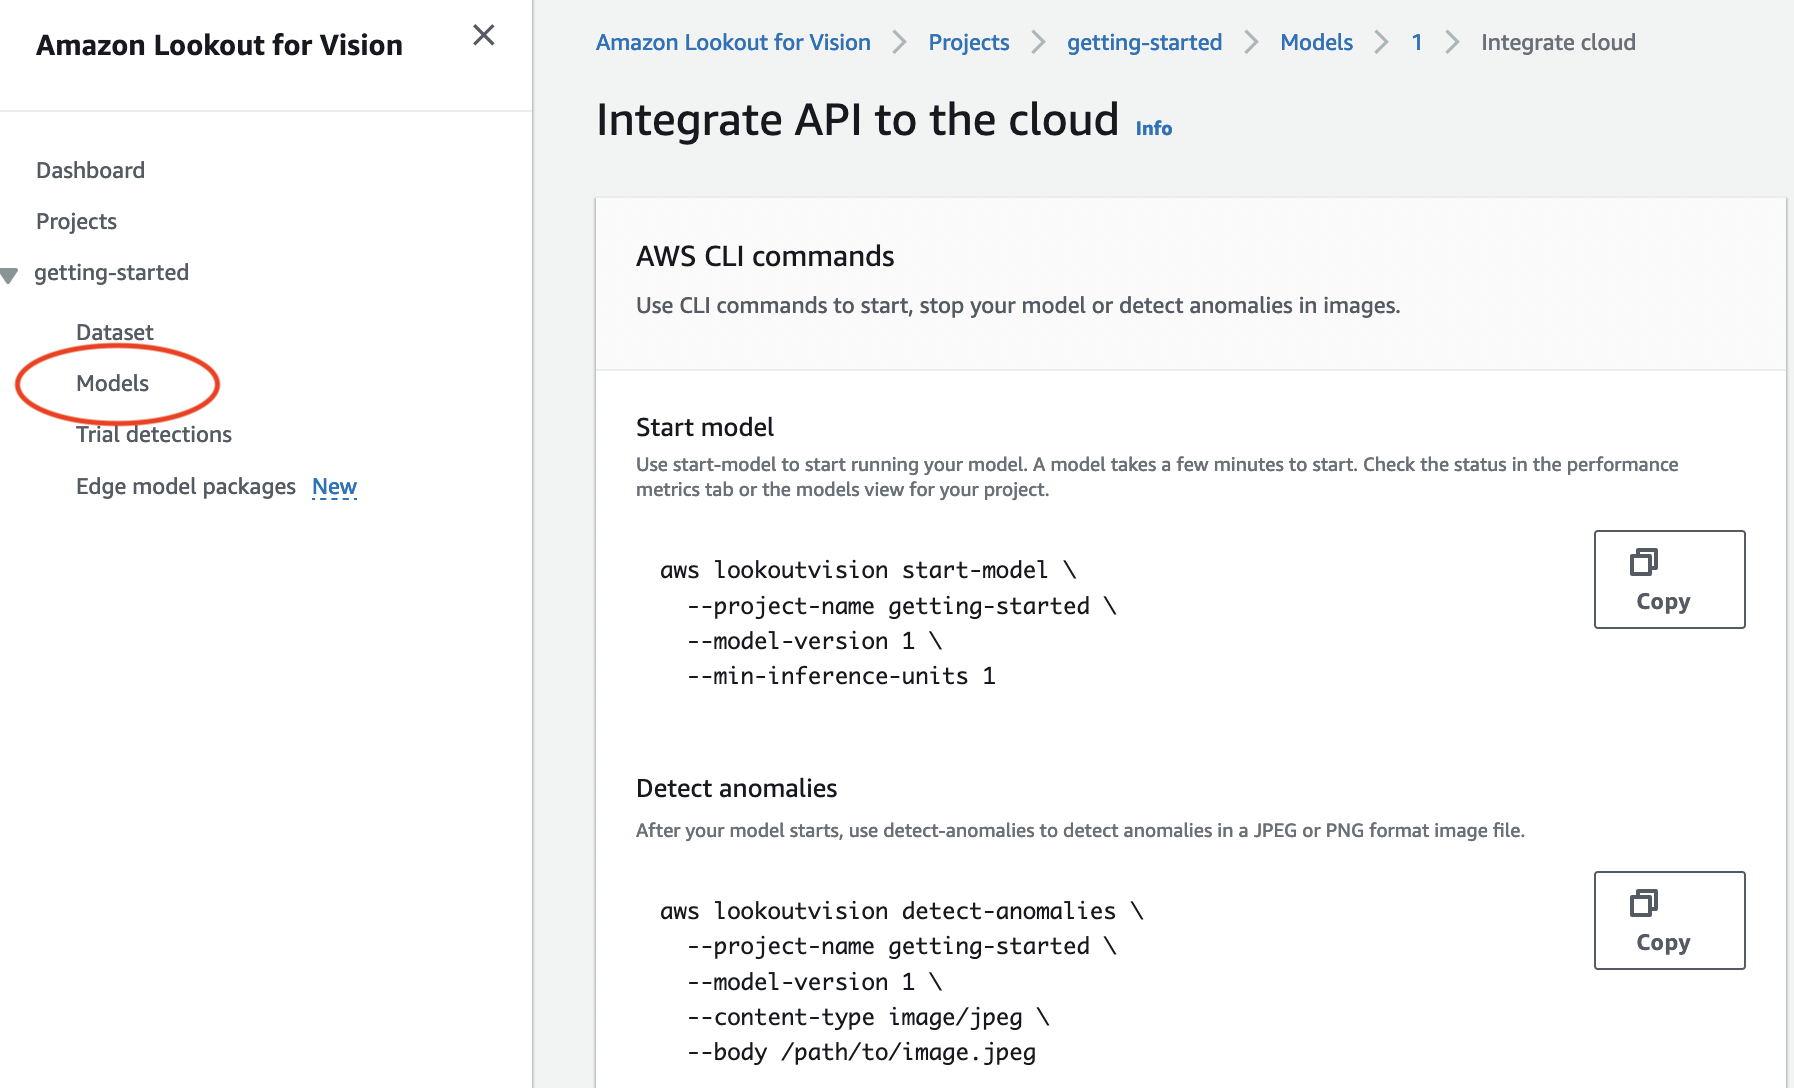
On the model's details page, choose Use model and then choose Integrate API to the cloud.

In the AWS CLI commands section, copy the
start-modelAWS CLI command.
-
Make sure that the AWS CLI is configured to run in the same AWS Region in which you are using the Amazon Lookout for Vision console. To change the AWS Region that the AWS CLI uses, see Install the AWS SDKS.
-
At the command prompt, start the model by entering the
start-modelcommand. If you are using thelookoutvisionprofile to get credentials, add the--profile lookoutvision-accessparameter. For example:aws lookoutvision start-model \ --project-name getting-started \ --model-version 1 \ --min-inference-units 1 \ --profile lookoutvision-accessIf the call is successful, the following output is displayed:
{
    "Status": "STARTING_HOSTING"
}
Back in the console, choose Models in the navigation pane.

Wait until the status of the model (Model 1) in the Status column displays Hosted. If you've previously trained a model in the project, wait for the latest model version to complete.

Step 4: Analyze an image
In this step, you analyze an image with your model. We provide example images that you
can use in the getting started test-images folder in the Lookout for Vision
documentation repository on your computer. For more information, see Detecting anomalies in an image.
To analyze an image
-
On the Models page, choose the model Model 1.

-
On the model's details page, choose Use model and then choose Integrate API to the cloud.

-
In the AWS CLI commands section, copy the
detect-anomaliesAWS CLI command.
-
At the command prompt, analyze an anomalous image by entering the
detect-anomaliescommand from the previous step. For the--bodyparameter, specify an anomalous image from the getting startedtest-imagesfolder on your computer. If you are using thelookoutvisionprofile to get credentials, add the--profile lookoutvision-accessparameter. For example:aws lookoutvision detect-anomalies \ --project-name getting-started \ --model-version 1 \ --content-type image/jpeg \ --body/path/to/test-images/test-anomaly-1.jpg\ --profile lookoutvision-accessThe output should look similar to the following:
{ "DetectAnomalyResult": { "Source": { "Type": "direct" }, "IsAnomalous": true, "Confidence": 0.983975887298584, "Anomalies": [ { "Name": "background", "PixelAnomaly": { "TotalPercentageArea": 0.9818974137306213, "Color": "#FFFFFF" } }, { "Name": "cracked", "PixelAnomaly": { "TotalPercentageArea": 0.018102575093507767, "Color": "#23A436" } } ], "AnomalyMask": "iVBORw0KGgoAAAANSUhEUgAAAkAAAAMACA......" } } -
In the output, note the following:
-
IsAnomalousis a Boolean for the predicted classification.trueif the image is anomalous, otherwisefalse. -
Confidenceis a float value representing the confidence that Amazon Lookout for Vision has in the prediction. 0 is the lowest confidence, 1 is the highest confidence. -
Anomaliesis a list of anomalies found in the image.Nameis the anomaly label.PixelAnomalyincludes the total percentage area of the anomaly (TotalPercentageArea) and a color (Color) for the anomaly label. The list also includes a "background" anomaly that covers the area outside of anomalies found on the image. -
AnomalyMaskis a mask image that shows the location of the anomalies on the analyzed image.
You can use information in the response to display a blend of the analyzed image and anomaly mask, as shown in the following example. For example code, see Showing classification and segmentation information.

-
-
At the command prompt, analyze a normal image from the getting started
test-imagesfolder. If you are using thelookoutvisionprofile to get credentials, add the--profile lookoutvision-accessparameter. For example:aws lookoutvision detect-anomalies \ --project-name getting-started \ --model-version 1 \ --content-type image/jpeg \ --body/path/to/test-images/test-normal-1.jpg\ --profile lookoutvision-accessThe output should look similar to the following:
{ "DetectAnomalyResult": { "Source": { "Type": "direct" }, "IsAnomalous": false, "Confidence": 0.9916400909423828, "Anomalies": [ { "Name": "background", "PixelAnomaly": { "TotalPercentageArea": 1.0, "Color": "#FFFFFF" } } ], "AnomalyMask": "iVBORw0KGgoAAAANSUhEUgAAAkAAAA....." } } -
In the output, note that the
falsevalue forIsAnomalousclassifies the image as having no anomalies. UseConfidenceto help decide your confidence in the classification. Also, theAnomaliesarray only has thebackgroundanomaly label.
Step 5: Stop the model
In this step, you stop hosting the model. You are charged for the amount of time your model is running. If you aren't using the model, you should stop it. You can restart the model when you next need it. For more information, see Starting your Amazon Lookout for Vision model.
To stop the model.
-
Choose Models in the navigation pane.

In the Models page, choose the model Model 1.

On the model's details page, choose Use model and then choose Integrate API to the cloud.

In the AWS CLI commands section, copy the
stop-modelAWS CLI command.
-
At the command prompt, stop the model by entering the
stop-modelAWS CLI command from the previous step. If you are using thelookoutvisionprofile to get credentials, add the--profile lookoutvision-accessparameter. For example:aws lookoutvision stop-model \ --project-name getting-started \ --model-version 1 \ --profile lookoutvision-accessIf the call is successful, the following output is displayed:
{
    "Status": "STOPPING_HOSTING"
}
Back in the console, choose Models in the left navigation page.
The model has stopped when the status of the model in the Status column is Training complete.
Next steps
When you are ready create a model with your own images, start by following the instructions in Creating your project. The instructions include steps for creating a model with the Amazon Lookout for Vision console and with the AWS SDK.
If you want to try other example datasets, see Example code and datasets.