本文為英文版的機器翻譯版本,如內容有任何歧義或不一致之處,概以英文版為準。
使用 Amazon WorkSpaces 測試設定
Amazon WorkSpaces 可讓您為使用者佈建虛擬、雲端式 Windows、Amazon Linux 或 Ubuntu Linux 桌面,也稱為 WorkSpaces。您可以在需求變更時快速新增或移除使用者。使用者可以從多個裝置或 Web 瀏覽器存取其虛擬桌面。若要進一步了解 WorkSpaces,請參閱 Amazon WorkSpaces 管理指南。
本節中的範例說明測試環境,其中使用者環境使用在 WorkSpace 上執行的 Web 瀏覽器來登入 AWS 管理主控台 Private Access。然後,使用者會造訪 Amazon Simple Storage Service 主控台。此 WorkSpace 旨在模擬企業使用者在 VPC 連線網路上使用筆記型電腦的體驗, AWS 管理主控台 並從瀏覽器存取 。
本教學課程使用 AWS CloudFormation 來建立和設定網路設定,以及由 WorkSpaces 使用的 Simple Active Directory,以及使用 設定 WorkSpace 的逐步說明 AWS 管理主控台。
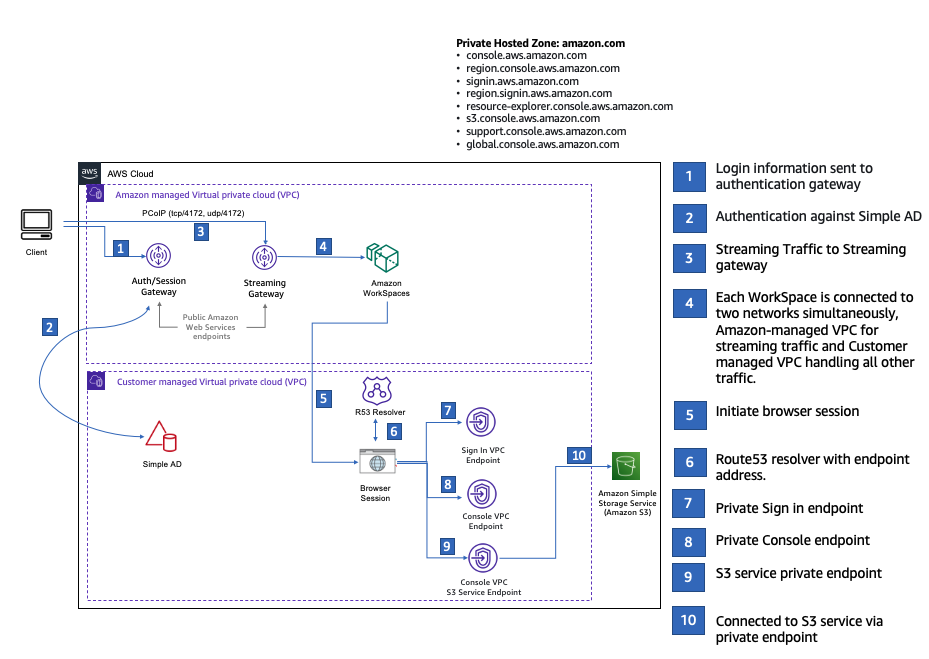
下圖說明使用 WorkSpace 測試 AWS 管理主控台 私有存取設定的工作流程。它顯示了用戶端 WorkSpace、Amazon 受管 VPC 和客戶受管 VPC 之間的關係。
複製下列 CloudFormation 範本,並將其儲存到您在設定網路的程序步驟 3 中使用的檔案。
Description: |
  AWS Management Console Private Access.
Parameters:
  VpcCIDR:
    Type: String
    Default: 172.16.0.0/16
    Description: CIDR range for VPC
  PrivateSubnet1CIDR:
    Type: String
    Default: 172.16.1.0/24
    Description: CIDR range for Private Subnet 1
  PrivateSubnet2CIDR:
    Type: String
    Default: 172.16.2.0/24
    Description: CIDR range for Private Subnet 2
  DSAdminPasswordResourceName:
    Type: String
    Default: ADAdminSecret
    Description: Password for directory services admin
Resources:

  #########################
  # VPC AND SUBNETS
  #########################

  AppVPC:
    Type: AWS::EC2::VPC
    Properties:
      CidrBlock: !Ref VpcCIDR
      InstanceTenancy: default
      EnableDnsSupport: true
      EnableDnsHostnames: true

  PrivateSubnet1:
    Type: AWS::EC2::Subnet
    Properties:
      VpcId: !Ref AppVPC
      CidrBlock: !Ref PrivateSubnet1CIDR
      AvailabilityZone:
        Fn::Select:
          - 0
          - Fn::GetAZs: ""

  PrivateSubnet2:
    Type: AWS::EC2::Subnet
    Properties:
      VpcId: !Ref AppVPC
      CidrBlock: !Ref PrivateSubnet2CIDR
      AvailabilityZone:
        Fn::Select:
          - 1
          - Fn::GetAZs: ""

  #########################
  # Route Tables
  #########################

  PrivateRouteTable:
    Type: AWS::EC2::RouteTable
    Properties:
      VpcId: !Ref AppVPC

  PrivateSubnet1RouteTableAssociation:
    Type: AWS::EC2::SubnetRouteTableAssociation
    Properties:
      RouteTableId: !Ref PrivateRouteTable
      SubnetId: !Ref PrivateSubnet1

  PrivateSubnet2RouteTableAssociation:
    Type: AWS::EC2::SubnetRouteTableAssociation
    Properties:
      RouteTableId: !Ref PrivateRouteTable
      SubnetId: !Ref PrivateSubnet2

  #########################
  # SECURITY GROUPS
  #########################

  VPCEndpointSecurityGroup:
    Type: AWS::EC2::SecurityGroup
    Properties:
      GroupDescription: Allow TLS for VPC Endpoint
      VpcId: !Ref AppVPC
      SecurityGroupIngress:
        - IpProtocol: tcp
          FromPort: 443
          ToPort: 443
          CidrIp: !GetAtt AppVPC.CidrBlock

  #########################
  # VPC ENDPOINTS
  #########################

  VPCEndpointInterfaceSignin:
    Type: AWS::EC2::VPCEndpoint
    Properties:
      VpcEndpointType: Interface
      PrivateDnsEnabled: true
      SubnetIds:
        - !Ref PrivateSubnet1
        - !Ref PrivateSubnet2
      SecurityGroupIds:
        - !Ref VPCEndpointSecurityGroup
      ServiceName: !Sub com.amazonaws.${AWS::Region}.signin
      VpcId: !Ref AppVPC
      PolicyDocument:
        Version: 2012-10-17
        Statement:
          - Effect: Allow
            Principal: '*'
            Action: signin:Authenticate
            Resource: '*'
            Condition:
              StringEquals:
                aws:ResourceAccount: !Ref AWS::AccountId
          - Effect: Allow
            Principal: '*'
            Action:
              - signin:AuthorizeOAuth2Access
              - signin:CreateOAuth2Token
            Resource: '*'
            Condition:
              StringEquals:
                aws:PrincipalAccount: !Ref AWS::AccountId

  VPCEndpointInterfaceConsole:
    Type: AWS::EC2::VPCEndpoint
    Properties:
      VpcEndpointType: Interface
      PrivateDnsEnabled: true
      SubnetIds:
        - !Ref PrivateSubnet1
        - !Ref PrivateSubnet2
      SecurityGroupIds:
        - !Ref VPCEndpointSecurityGroup
      ServiceName: !Sub com.amazonaws.${AWS::Region}.console
      VpcId: !Ref AppVPC
      PolicyDocument:
        Version: 2012-10-17
        Statement:
          - Effect: Allow
            Principal: '*'
            Action: '*'
            Resource: '*'
            Condition:
              StringEquals:
                aws:PrincipalAccount: !Ref AWS::AccountId
                aws:ResourceAccount: !Ref AWS::AccountId
                aws:SourceVpc: !Ref AppVPC
          - Effect: Deny
            Principal: '*'
            Action: '*'
            Resource: '*'
            Condition:
              StringNotEquals:
                aws:PrincipalAccount: !Ref AWS::AccountId
                aws:ResourceAccount: !Ref AWS::AccountId
                aws:SourceVpc: !Ref AppVPC

  VPCEndpointInterfaceConsoleStatic:
  # console-static only supports the full access endpoint policy
    Type: AWS::EC2::VPCEndpoint
    Properties:
      VpcEndpointType: Interface
      PrivateDnsEnabled: true
      SubnetIds:
        - !Ref PrivateSubnet1
        - !Ref PrivateSubnet2
      SecurityGroupIds:
        - !Ref VPCEndpointSecurityGroup
      ServiceName: !Sub com.amazonaws.${AWS::Region}.console-static
      VpcId: !Ref AppVPC

  #########################
  # WORKSPACE RESOURCES
  #########################

  ADAdminSecret:
    Type: AWS::SecretsManager::Secret
    Properties:
      Name: !Ref DSAdminPasswordResourceName
      Description: Password for directory services admin
      GenerateSecretString:
        SecretStringTemplate: '{"username": "Admin"}'
        GenerateStringKey: password
        PasswordLength: 30
        ExcludeCharacters: '"@/\'

  WorkspaceSimpleDirectory:
    Type: AWS::DirectoryService::SimpleAD
    Properties:
      Name: corp.awsconsole.com
      Password:
        Fn::Sub: "{{resolve:secretsmanager:${DSAdminPasswordResourceName}:SecretString:password}}"
      Size: Small
      VpcSettings:
        SubnetIds:
          - !Ref PrivateSubnet1
          - !Ref PrivateSubnet2
        VpcId: !Ref AppVPC
Outputs:
  PrivateSubnet1:
    Description: Private Subnet 1
    Value: !Ref PrivateSubnet1
  PrivateSubnet2:
    Description: Private Subnet 2
    Value: !Ref PrivateSubnet2
  WorkspaceSimpleDirectory:
    Description: Directory to be used for Workspaces
    Value: !Ref WorkspaceSimpleDirectory
  WorkspacesAdminPassword:
    Description: The ARN of the Workspaces admin's password. Navigate to the Secrets Manager in the AWS Console to view the value.
    Value: !Ref ADAdminSecret
注意
本測試設定會在美國東部 (維吉尼亞北部) 區域中執行。
若要設定網路
-
登入您組織的管理帳戶,並開啟 CloudFormation 主控台
。 -
選擇建立堆疊。
-
選擇 With new resources (standard) (使用新資源 (標準))。上傳您先前建立的 CloudFormation 範本檔案,然後選擇下一步。
-
輸入堆疊名稱,例如
PrivateConsoleNetworkForS3,然後選擇 下一步。 -
對於 VPC 和子網路,請輸入您偏好的 IP CIDR 範圍,或使用提供的預設值。如果您使用預設值,請確認它們未與 中的現有 VPC 資源重疊 AWS 帳戶。
-
選擇建立堆疊。
-
建立堆疊後,選擇 資源 索引標籤以檢視已建立的資源。
-
選擇 輸出 索引標籤,以檢視私有子網路和 Workspace Simple Directory 的值。請記下這些值,因為您將在下一個建立和設定 WorkSpace 的步驟四中使用這些值。
下列螢幕擷取畫面顯示 輸出 索引標籤的檢視,其中顯示私有子網路和 Workspace Simple Directory 的值。

現在您已經建立網路,請使用下列程序來建立並存取 WorkSpace。
如要建立 WorkSpace
-
開啟 WorkSpaces 主控台
。 -
在導覽窗格中,選擇目錄。
-
在 目錄 頁面上,確認目錄狀態為 作用中。以下螢幕擷取畫面顯示了作用中目錄的 目錄 頁面。

-
如要在 WorkSpaces 中使用目錄,您必須註冊該目錄。在導覽窗格中,選擇 WorkSpaces,然後選擇 建立 WorkSpaces。
-
在 選取目錄 中,請選擇上述程序中由 CloudFormation 建立的目錄。在 動作 功能表上,選擇 註冊。
-
對於子網路選擇,請選取上述程序步驟九中所述的兩個私有子網路。
-
選取 啟用自助服務許可,然後選擇 註冊。
-
註冊目錄之後,請繼續建立 WorkSpace。選取已註冊的目錄,然後選擇 下一步。
-
在 建立使用者 頁面上選擇 建立其他使用者。輸入您的姓名和電子郵件,以便您使用 WorkSpace。驗證電子郵件地址是否有效,因為 WorkSpace 登入資訊已傳送至此電子郵件地址。
-
選擇下一步。
-
在 識別使用者 頁面上,選取您在步驟九中建立的使用者,然後選擇 下一步。
-
在 選取套件 頁面上,選擇 Standard with Amazon Linux 2,然後選擇 下一步。
-
使用執行模式和使用者自訂的預設設定,檢閱並選擇建立工作區。WorkSpace 會以
Pending狀態開始,並在 20 分鐘內轉換為Available。 -
在 WorkSpace 可用時,您將收到一封電子郵件,包含有關如何透過第九步驟中提供之電子郵件地址以進行存取的說明。
登入 WorkSpace 之後,您可以測試您是否正在使用 AWS 管理主控台 私有存取許可進行存取。
如要存取 WorkSpace
-
開啟您在上述程序中的步驟 14 收到的電子郵件。
-
在該電子郵件中,選擇提供的唯一連結來設定您的設定檔,並下載 WorkSpaces 用戶端。
-
設定您的密碼。
-
下載您選擇的客戶。
-
安裝並啟動用戶端。輸入電子郵件中提供的註冊碼,然後選擇 註冊。
-
使用您在步驟三中建立的憑證來登入 Amazon WorkSpaces。
測試 AWS 管理主控台 私有存取設定
-
在 WorkSpace 中,開啟瀏覽器。然後,導覽至 AWS 管理主控台
並使用您的憑據登入。 注意
如果您使用 Firefox 作為您的瀏覽器,請確認您的瀏覽器設定中的透過 HTTPS 啟用 DNS 選項已關閉。
-
開啟 Amazon S3 主控台
,您可以在其中驗證您使用 AWS 管理主控台 Private Access 連線。 -
選擇導覽列上的鎖定私有圖示,以檢視 VPC 與使用中的 VPC 端點。下列螢幕擷取畫面顯示鎖定私有圖示的位置和 VPC 資訊。

