本文為英文版的機器翻譯版本,如內容有任何歧義或不一致之處,概以英文版為準。
使用您的 Windows 或 Linux PC 或 Mac 做為 AWS IoT 裝置
在本教學課程中,您將設定個人電腦以搭配 使用 AWS IoT。這些指示支援 Windows 和 Linux PC 以及 Mac。若要完成此目的,您需要在電腦上安裝一些軟體。如果您不想要在電腦上安裝軟體,則可以嘗試 使用 Amazon EC2 建立虛擬裝置,它會在虛擬機器上安裝所有軟體。
在本教學課程中,您將會執行下列動作:
設定您的個人電腦
若要完成本教學課程,您需要一部 Windows 或 Linux PC,或是一部可連接到網際網路的 Mac。
繼續下一個步驟之前,請確定您可以在電腦上開啟命令列視窗。在 Windows PC 上使用 cmd.exe。在 Linux PC 或 Mac 上,使用 Terminal。
安裝 Git、Python 和適用於 Python AWS IoT 的裝置 SDK
在本節中,您將在電腦上安裝 Python 和適用於 Python 的 AWS IoT 裝置 SDK。
安裝最新版本的 Git 和 Python
此程序說明如何在個人電腦上安裝最新版本的 Git 和 Python。
在您的電腦上下載並安裝 Git 和 Python
-
查看您的電腦上是否已安裝 Git。在命令列中輸入此命令。
git --version如果命令顯示 Git 版本,表示已安裝 Git,而且您可以繼續進行下一個步驟。
如果命令顯示錯誤,請開啟
https://git-scm.com/download並為您的電腦安裝 Git。 -
查看您是否已安裝 Python。在命令列中輸入此命令。
python -V注意
如果此命令提供錯誤:
Python was not
                                            found
,原因可能是您的作業系統呼叫 Python v3.x 可執行檔作為Python3。在此情況下,將python的所有執行個體取代為python3,並繼續進行本教學課程的其餘部分。如果命令顯示 Python 版本,則表示已安裝 Python。本教學課程需要 Python v3.7 或更新版本。
-
如果已安裝 Python,則可以跳過本節的其餘步驟。如果未安裝,請繼續。
-
開啟 https://www.python.org/downloads/
,並下載適用於您電腦的安裝程式。 -
如果下載未自動開始安裝,請執行下載的程式來安裝 Python。
-
驗證 Python 的安裝。
python -V確認命令顯示 Python 版本。如果未顯示 Python 版本,請嘗試再次下載並安裝 Python。
安裝適用於 Python 的 AWS IoT 裝置 SDK
在電腦上安裝適用於 Python 的 AWS IoT 裝置 SDK
-
安裝適用於 Python 的 AWS IoT 裝置 SDK v2。
python3 -m pip install awsiotsdk -
將適用於 Python 的 AWS IoT 裝置 SDK 儲存庫複製到主目錄的 aws-iot-device-sdk-python-v2 目錄中。此程序會將所安裝檔案的目錄稱為
home。home目錄的實際位置取決於您的作業系統。注意
如果您是使用 Windows PowerShell,而不是 cmd.exe,則會使用下列命令。
echo $home
如需詳細資訊,請參閱適用於 Python GitHub 儲存庫的AWS IoT
裝置 SDK
準備執行範例應用程式
準備您的系統以執行範例應用程式
-
建立
certs目錄。將下列項目複製至certs目錄:私有金鑰、裝置憑證,以及您在 建立 AWS IoT 資源 建立和註冊物件時所儲存的根憑證授權機構憑證檔案。目的地目錄中每個檔案的檔案名稱應與表格中的檔案名稱相符。下節命令假設您的金鑰和憑證檔案儲存在您的裝置上,如下表所示。
設定政策和執行範例應用程式
在本節中,您會設定政策,並執行 pubsub.py 範例指令碼,其位於 適用於 Python 的 AWS IoT Device SDK的 aws-iot-device-sdk-python-v2/samples 目錄中。此指令碼顯示您的裝置如何使用 MQTT 程式庫來發佈和訂閱 MQTT 訊息。
pubsub.py 範例應用程式會訂閱主題 test/topic、將 10 則訊息發佈至該主題,以及在從訊息代理程式接收訊息時顯示這些訊息。
若要執行 pubsub.py 範例指令碼,您需要以下資訊:
|
參數 |
可在哪裡找到值 |
|---|---|
your-iot-endpoint |
|
your-iot-endpoint 值的格式為:endpoint_id-ats.iot.region.amazonaws.com.rproxy.goskope.coma3qj468EXAMPLE-ats.iot.us-west-2.amazonaws.com。
執行指令碼之前,請確定您物件的政策許可範例指令碼連接、訂閱、發佈和接收。
尋找並檢閱物件資源的政策文件
-
在 AWS IoT 主控台
的 Things (物件) 清單中,尋找代表您裝置的資源。 -
選擇代表您裝置物件資源的 Name (名稱) 連結,以開啟 Thing details (物件詳細資訊) 頁面。
-
在 Thing details (物件詳細資訊) 頁面中的 Certificates (憑證) 索引標籤上,選擇與物件資源相連的憑證。清單中應該只有一個憑證。如果有一個以上的憑證,請選擇其檔案已安裝在裝置上且將用來連接至 AWS IoT Core的憑證。
於 Certificate (憑證) 詳細資訊頁面的 Policies (政策) 索引標籤中,選擇與憑證相連的政策。其中應只有一個政策。如果有多個政策,請針對每個政策重複下一個步驟,以確保至少有一個政策授予必要的存取權。
-
在 Policy (政策) 概觀頁面中,找到 JSON 編輯器並選擇 Edit policy document (編輯政策文件),視需要檢閱和編輯政策文件。
-
政策 JSON 會顯示在下列範例中。在
"Resource"元素中,將 取代region:accountResource值 AWS 帳戶 中的 AWS 區域 和 。-
{
    "Version":"2012-10-17",
    "Statement": [
        {
            "Effect": "Allow",
            "Action": [
                "iot:Publish",
                "iot:Receive"
            ],
            "Resource": [
            "arn:aws:iot:us-east-1:123456789012:topic/test/topic"
            ]
        },
        {
            "Effect": "Allow",
            "Action": [
                "iot:Subscribe"
            ],
            "Resource": [
            "arn:aws:iot:us-east-1:123456789012:topicfilter/test/topic"
            ]
        },
        {
            "Effect": "Allow",
            "Action": [
                "iot:Connect"
            ],
            "Resource": [
            "arn:aws:iot:us-east-1:123456789012:client/test-*"
            ]
        }
    ]
}
範例指令碼:
-
連線至 AWS IoT Core 您帳戶的 。
-
訂閱訊息主題 test/topic,並顯示其收到關於該主題的訊息。
-
將 10 則訊息發佈至主題 test/topic。
-
顯示類似下列內容的輸出:
Connected!
Subscribing to topic 'test/topic'...
Subscribed with QoS.AT_LEAST_ONCE
Sending 10 message(s)
Publishing message to topic 'test/topic': Hello World! [1]
Received message from topic 'test/topic': b'"Hello World! [1]"'
Publishing message to topic 'test/topic': Hello World! [2]
Received message from topic 'test/topic': b'"Hello World! [2]"'
Publishing message to topic 'test/topic': Hello World! [3]
Received message from topic 'test/topic': b'"Hello World! [3]"'
Publishing message to topic 'test/topic': Hello World! [4]
Received message from topic 'test/topic': b'"Hello World! [4]"'
Publishing message to topic 'test/topic': Hello World! [5]
Received message from topic 'test/topic': b'"Hello World! [5]"'
Publishing message to topic 'test/topic': Hello World! [6]
Received message from topic 'test/topic': b'"Hello World! [6]"'
Publishing message to topic 'test/topic': Hello World! [7]
Received message from topic 'test/topic': b'"Hello World! [7]"'
Publishing message to topic 'test/topic': Hello World! [8]
Received message from topic 'test/topic': b'"Hello World! [8]"'
Publishing message to topic 'test/topic': Hello World! [9]
Received message from topic 'test/topic': b'"Hello World! [9]"'
Publishing message to topic 'test/topic': Hello World! [10]
Received message from topic 'test/topic': b'"Hello World! [10]"'
10 message(s) received.
Disconnecting...
Disconnected!
若在執行範例應用程式時發生問題,請檢閱 對範例應用程式的問題進行故障診斷。
您也可以將 --verbosity Debug 參數新增至命令列,以便範例應用程式顯示有關其正在做什麼的詳細訊息。該資訊可能會協助您更正問題。
在 AWS IoT 主控台中檢視來自範例應用程式的訊息
您可以在範例應用程式的訊息透過訊息代理程式傳遞時看到這些訊臮,方法為使用 AWS IoT 主控台中的 MQTT test client (MQTT 測試用戶端)。
檢視範例應用程式所發佈的 MQTT 訊息
-
檢閱 使用 MQTT 用戶端檢視 AWS IoT MQTT 訊息。這有助於您了解如何使用 AWS IoT 主控台中的 MQTT 測試用戶端,在 MQTT 訊息通過訊息代理程式時,檢視訊息。
-
在 AWS IoT 主控台中開啟 MQTT 測試用戶端。
-
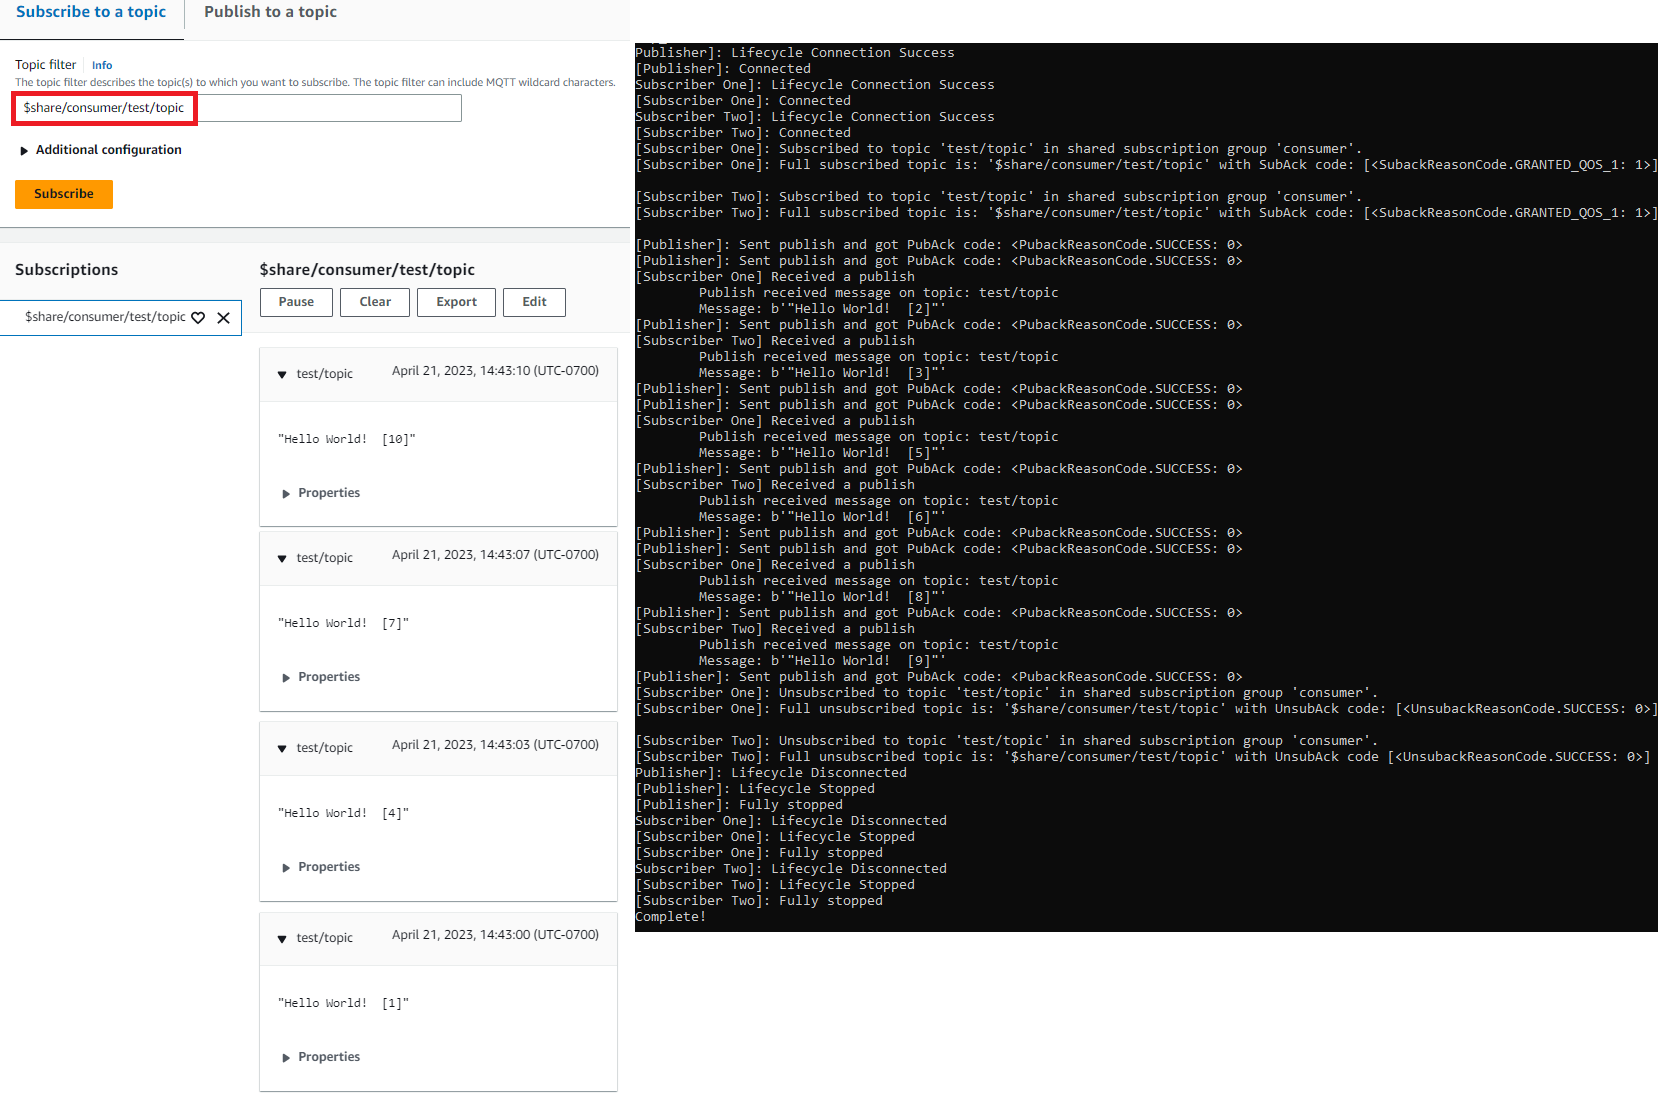
在 Subscribe to a topic (訂閱主題) 中,訂閱主題 test/topic。
-
在您的命令列視窗中,再次執行範例應用程式,並在 AWS IoT 主控台的 MQTT client (MQTT 用戶端) 中觀看訊息。
如需 MQTT 和 如何 AWS IoT Core 支援通訊協定的詳細資訊,請參閱 MQTT。
在 Python 中執行共享訂閱範例
AWS IoT Core 同時支援 MQTT 3 和 MQTT 5 的共用訂閱。共享訂閱允許多個用戶端共享一個主題的訂閱,而且只有一個用戶端會使用隨機分佈接收發佈至該主題的訊息。若要使用共享訂閱,用戶端會訂閱共享訂閱的主題篩選條件:$share/{ShareName}/{TopicFilter}。
設定政策並執行共享訂閱範例
-
若要執行共享訂閱範例,您必須依照 MQTT 5 共享訂閱
中所述來設定物件的政策。 -
若要執行共享訂閱,請執行下列命令。
注意
執行範例 (例如
--group_identifier
                                        consumer
) 時,您可以根據需求選擇性地指定群組識別碼。如果您沒有指定一個,則python-sample是預設群組識別碼。 -
此命令列的輸出如下所示:
Publisher]: Lifecycle Connection Success [Publisher]: Connected Subscriber One]: Lifecycle Connection Success [Subscriber One]: Connected Subscriber Two]: Lifecycle Connection Success [Subscriber Two]: Connected [Subscriber One]: Subscribed to topic 'test/topic' in shared subscription group 'consumer'. [Subscriber One]: Full subscribed topic is: '$share/consumer/test/topic' with SubAck code: [<SubackReasonCode.GRANTED_QOS_1: 1>] [Subscriber Two]: Subscribed to topic 'test/topic' in shared subscription group 'consumer'. [Subscriber Two]: Full subscribed topic is: '$share/consumer/test/topic' with SubAck code: [<SubackReasonCode.GRANTED_QOS_1: 1>] [Publisher]: Sent publish and got PubAck code: <PubackReasonCode.SUCCESS: 0> [Subscriber Two] Received a publish Publish received message on topic: test/topic Message: b'"Hello World! [1]"' [Publisher]: Sent publish and got PubAck code: <PubackReasonCode.SUCCESS: 0> [Subscriber One] Received a publish Publish received message on topic: test/topic Message: b'"Hello World! [2]"' [Publisher]: Sent publish and got PubAck code: <PubackReasonCode.SUCCESS: 0> [Subscriber Two] Received a publish Publish received message on topic: test/topic Message: b'"Hello World! [3]"' [Publisher]: Sent publish and got PubAck code: <PubackReasonCode.SUCCESS: 0> [Subscriber One] Received a publish Publish received message on topic: test/topic Message: b'"Hello World! [4]"' [Publisher]: Sent publish and got PubAck code: <PubackReasonCode.SUCCESS: 0> [Subscriber Two] Received a publish Publish received message on topic: test/topic Message: b'"Hello World! [5]"' [Publisher]: Sent publish and got PubAck code: <PubackReasonCode.SUCCESS: 0> [Subscriber One] Received a publish Publish received message on topic: test/topic Message: b'"Hello World! [6]"' [Publisher]: Sent publish and got PubAck code: <PubackReasonCode.SUCCESS: 0> [Subscriber Two] Received a publish Publish received message on topic: test/topic Message: b'"Hello World! [7]"' [Publisher]: Sent publish and got PubAck code: <PubackReasonCode.SUCCESS: 0> [Subscriber One] Received a publish Publish received message on topic: test/topic Message: b'"Hello World! [8]"' [Publisher]: Sent publish and got PubAck code: <PubackReasonCode.SUCCESS: 0> [Subscriber Two] Received a publish Publish received message on topic: test/topic Message: b'"Hello World! [9]"' [Publisher]: Sent publish and got PubAck code: <PubackReasonCode.SUCCESS: 0> [Subscriber One] Received a publish Publish received message on topic: test/topic Message: b'"Hello World! [10]"' [Subscriber One]: Unsubscribed to topic 'test/topic' in shared subscription group 'consumer'. [Subscriber One]: Full unsubscribed topic is: '$share/consumer/test/topic' with UnsubAck code: [<UnsubackReasonCode.SUCCESS: 0>] [Subscriber Two]: Unsubscribed to topic 'test/topic' in shared subscription group 'consumer'. [Subscriber Two]: Full unsubscribed topic is: '$share/consumer/test/topic' with UnsubAck code [<UnsubackReasonCode.SUCCESS: 0>] Publisher]: Lifecycle Disconnected [Publisher]: Lifecycle Stopped [Publisher]: Fully stopped Subscriber One]: Lifecycle Disconnected [Subscriber One]: Lifecycle Stopped [Subscriber One]: Fully stopped Subscriber Two]: Lifecycle Disconnected [Subscriber Two]: Lifecycle Stopped [Subscriber Two]: Fully stopped Complete! -
在 AWS IoT 主控台中開啟 MQTT 測試用戶端。在訂閱主題中,訂閱共享訂閱的主題,例如:
$share/consumer/test/topic。執行範例 (例如--group_identifier consumer) 時,您可以根據需求指定群組識別碼。如果您未指定群組識別碼,則預設值為python-sample。如需詳細資訊,請參閱來自《AWS IoT Core 開發人員指南》中的 MQTT 5 共享訂閱 Python 範例和共享訂閱。 在您的命令列視窗中,再次執行範例應用程式,並在 AWS IoT 主控台的 MQTT 測試用戶端,以及命令列中觀看訊息的分佈。