Le traduzioni sono generate tramite traduzione automatica. In caso di conflitto tra il contenuto di una traduzione e la versione originale in Inglese, quest'ultima prevarrà.
Abilita l'e-mail per la tua istanza Amazon Connect
Questo argomento è destinato agli amministratori che hanno accesso alla console Amazon Connect. Spiega come abilitare la posta elettronica per la tua istanza utilizzando il sito Web di Amazon Connect amministrazione. Per un elenco delle opzioni per abilitare la posta elettronica APIs a livello di codice, consulta. APIs per abilitare la posta elettronica
Quando abiliti la posta elettronica, ottieni un dominio e-mail generato automaticamente. Facoltativamente, puoi anche utilizzare domini personalizzati.
-
Dominio e-mail Amazon Connect. Il dominio e-mail è
instance-alias.email.connect.aws.-
Puoi usare questo dominio per i test.
-
In alternativa, puoi utilizzare questo dominio e-mail per integrarti con Amazon Connect e iniziare a ricevere e-mail in Amazon Connect. Ad esempio, se disponi di un indirizzo e-mail come support@example.com, puoi inoltrare e-mail in Amazon Connect utilizzando support@example.email.connect.aws.
-
-
Domini personalizzati. Puoi specificare fino a 5 domini personalizzati che sono stati inseriti in Amazon SES.
Fase 1: passaggio di Amazon SES alla modalità di produzione
Amazon Connect utilizza Amazon SES per inviare e ricevere e-mail. Se hai una nuova istanza Amazon SES, devi disattivarla dalla modalità sandbox. Per istruzioni, consulta Richiedere l'accesso alla produzione (uscire dalla sandbox di Amazon SES) nella Amazon SES Developer Guide.
Dopo aver spostato Amazon SES in modalità di produzione, se hai già abilitato l'e-mail quando hai creato l'istanza Amazon Connect, passa a questi argomenti:
Passaggio 2: ottieni un dominio e-mail Amazon Connect predefinito
Questi passaggi si applicano solo se hai già creato un'istanza Amazon Connect ma non hai abilitato l'e-mail. Completa questi passaggi per ottenere un dominio e-mail predefinito da Amazon Connect.
-
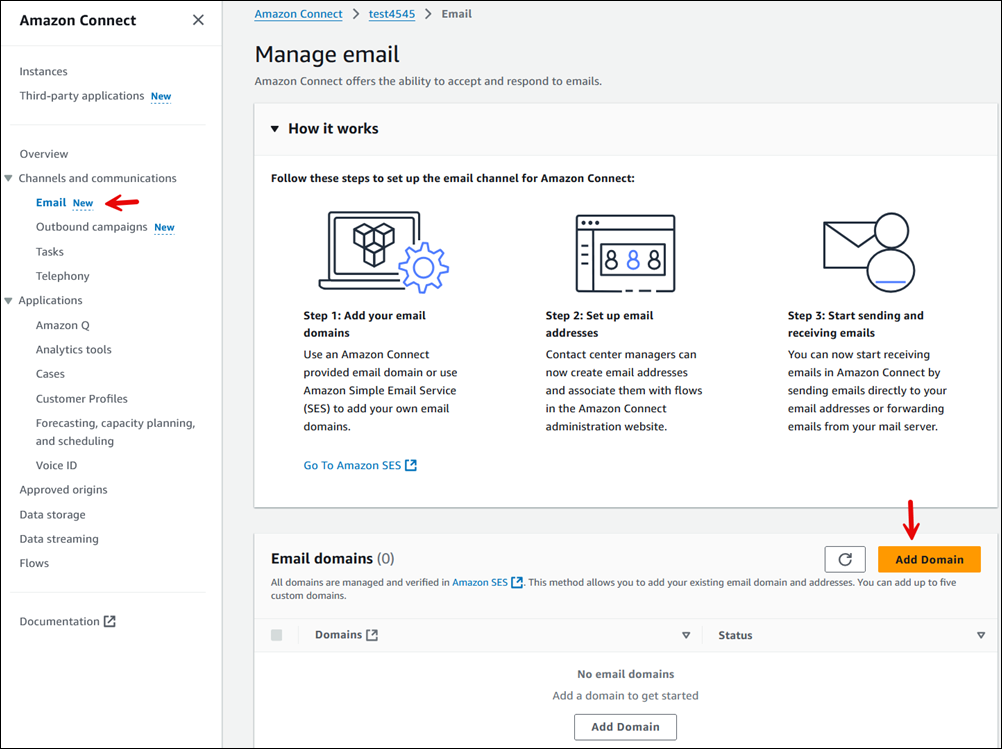
Nella console Amazon Connect, nel menu di navigazione a sinistra, scegli Email, quindi scegli Crea ruolo di servizio. Questo ruolo deve essere creato una sola volta per il tuo account. Consente ad Amazon SES di indirizzare le e-mail verso Amazon Connect.
-
Scegli Aggiungi dominio come mostrato nell'immagine seguente.
-
Nella casella Aggiungi dominio e-mail, scegli il dominio e-mail Amazon Connect, come mostrato nell'immagine seguente. Quando scegli questa opzione, il nome del dominio viene generato automaticamente: .email.connect.aws.
instance-aliasNon puoi modificare questo indirizzo email.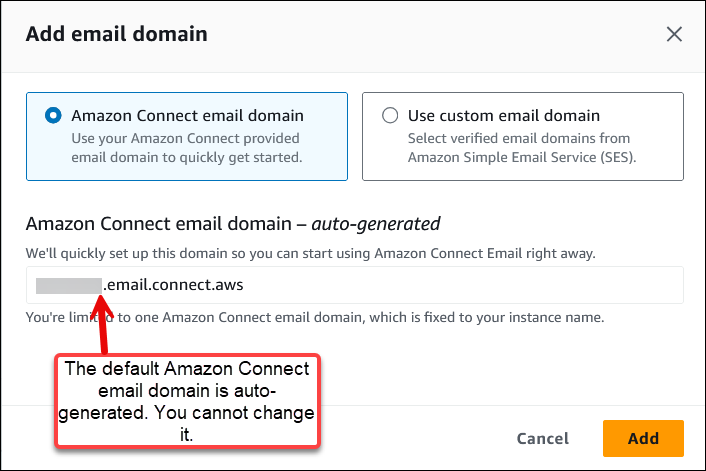
(Facoltativo) Passaggio 3: utilizza i tuoi domini e-mail personalizzati
Puoi importare fino a cinque domini personalizzati che sono stati inseriti in Amazon SES.
-
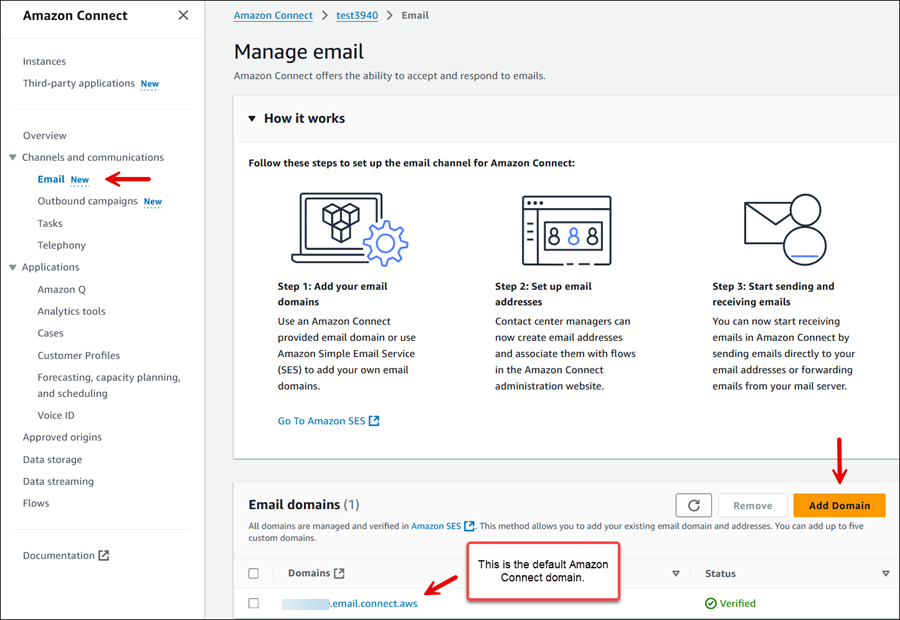
Nella console Amazon Connect, nel menu di navigazione a sinistra, scegli Email, quindi scegli Aggiungi dominio come mostrato nell'immagine seguente.
-
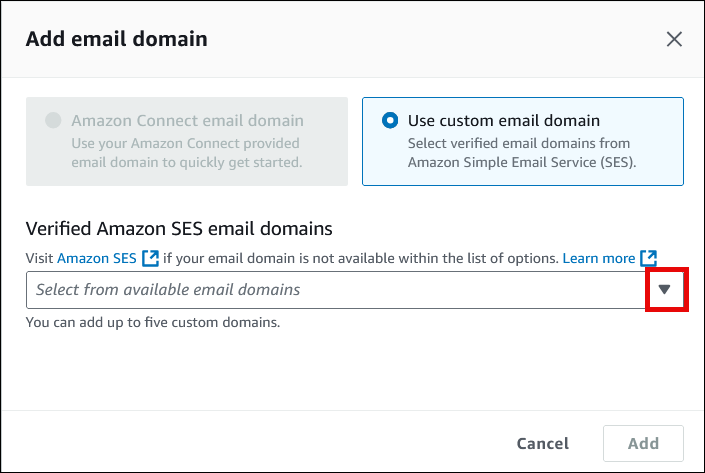
Scegli Usa un dominio e-mail personalizzato. Utilizza il menu a discesa per scegliere domini personalizzati che sono stati verificati da Amazon SES.
Passaggio 4: abilitare la posta elettronica e creare un bucket Amazon S3 per l'archiviazione di e-mail e allegati
Questi passaggi si applicano solo se hai già creato un'istanza Amazon Connect ma non hai abilitato l'e-mail.
È necessario aggiornare le impostazioni di archiviazione dei dati per abilitare il canale e-mail e specificare il bucket Amazon S3 in cui archiviare i messaggi e-mail e gli allegati. L'e-mail richiede due bucket pointer Amazon S3. Possono trovarsi nello stesso bucket Amazon S3 o in due bucket diversi.
Importante
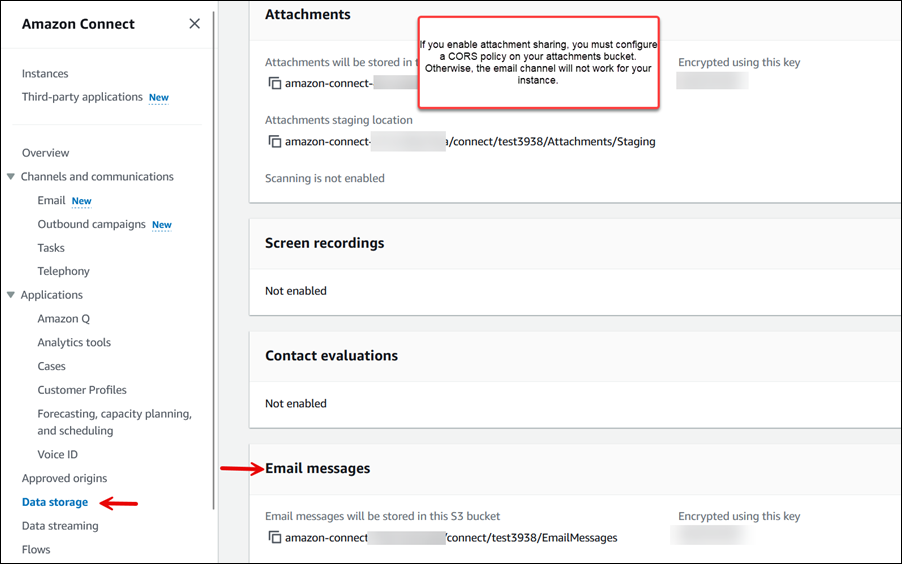
Se scegli Abilita la condivisione degli allegati per la tua istanza, devi creare un bucket Amazon S3 e configurare una policy CORS sul tuo bucket di allegati, come descritto in questo argomento. Se non lo fai, il canale e-mail non funzionerà per la tua istanza.
-
Apri la console Amazon Connect all'indirizzo https://console.aws.amazon.com/connect/
. Nella pagina delle istanze, seleziona l'alias dell'istanza. L'alias dell'istanza è anche il nome dell'istanza che appare nell'URL Amazon Connect. L'immagine seguente mostra la pagina Istanze di contact center virtuali di Amazon Connect, con un riquadro attorno all'alias dell'istanza.

-
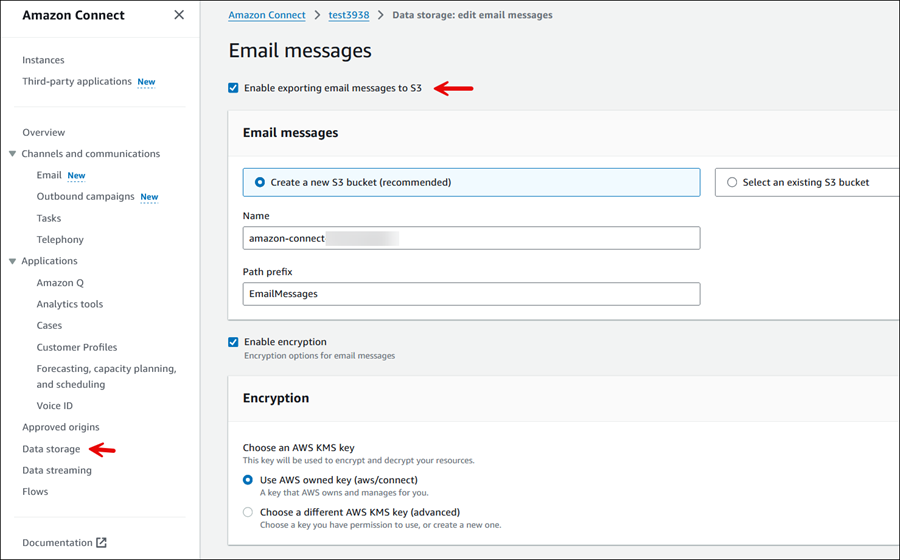
Nel menu di navigazione a sinistra, scegli Archiviazione dati, Messaggi e-mail, Modifica, Abilita l'esportazione dei messaggi e-mail in S3, quindi scegli Salva.
-
Completa la pagina Messaggi e-mail per creare o selezionare un bucket S3 in cui vengono archiviati i messaggi e-mail. L'immagine seguente mostra un esempio di pagina completata.
-
Se desideri consentire gli allegati e-mail, scegli anche Allegati. L'immagine seguente mostra queste opzioni.
L'immagine seguente della pagina di archiviazione dei dati mostra il bucket Amazon S3 per i messaggi e-mail e gli allegati.
Passaggio 5: configura una policy CORS nel bucket degli allegati
Per consentire a clienti e agenti di caricare e scaricare file, aggiorna la policy di condivisione di risorse di origine incrociata (CORS) per consentire PUT e GET richiedere il bucket Amazon S3 che stai utilizzando per gli allegati. Si tratta di una soluzione più sicura rispetto all'abilitazione pubblica di lettura/scrittura sul bucket Amazon S3, che non è consigliata.
Per configurare CORS nel bucket degli allegati
-
Trova il nome del bucket Amazon S3 per la conservazione degli allegati:
Apri la console Amazon Connect all'indirizzo https://console.aws.amazon.com/connect/
. -
Nella console Amazon Connect, scegli Archiviazione dei dati e individua il nome del bucket Amazon S3.
-
Apri la console Amazon S3 all'indirizzo. https://console.aws.amazon.com/s3/
-
Seleziona un bucket Amazon S3 sulla console Amazon S3.
-
Scegli la scheda Autorizzazioni, quindi scorri verso il basso fino alla sezione Condivisione di risorse di origine incrociata (CORS).
-
Aggiungi una policy CORS che abbia una delle seguenti regole per il bucket degli allegati. Ad esempio, policy CORS, consulta Condivisione di risorse di origine incrociata: scenari di casi d'uso nella Guida per gli sviluppatori di Amazon S3.
-
Opzione 1: elencare gli endpoint da cui verranno inviati e ricevuti gli allegati, ad esempio il nome del sito web aziendale. Questa regola consente richieste PUT e GET provenienti da più origini dal sito web (ad esempio, http://www.example1.com).
La policy CORS potrebbe essere simile all'esempio seguente:
[ { "AllowedHeaders": [ "*" ], "AllowedMethods": [ "PUT", "GET" ], "AllowedOrigins": [ "*.my.connect.aws", "*.awsapps.com" ], "ExposeHeaders": [] } ] -
Opzione 2: aggiungere il carattere jolly
*aAllowedOrigin. Questa regola consente richieste PUT e GET di origine incrociata da tutte le origini, quindi non è necessario elencare gli endpoint.La policy CORS potrebbe essere simile all'esempio seguente:
[
    {
        "AllowedMethods": [
            "PUT",
            "GET"
        ],
        "AllowedOrigins": [
            "*"
            ],
       "AllowedHeaders": [
            "*"
            ]
    }
]
-
Passaggi successivi
-
Configurare la scansione degli allegati in Amazon Connect: Questo argomento è destinato agli sviluppatori che hanno familiarità con Lambda. Puoi configurare Amazon Connect per scansionare gli allegati e-mail utilizzando la tua applicazione di scansione preferita.
APIs per abilitare la posta elettronica
Usa quanto segue APIs per abilitare la posta elettronica a livello di codice: