기계 번역으로 제공되는 번역입니다. 제공된 번역과 원본 영어의 내용이 상충하는 경우에는 영어 버전이 우선합니다.
셀프 서비스 가입 옵션이 있는 사용자 풀에서 가입 프로세스를 사용자 지정할 수 있습니다. 가입 전 트리거의 몇 가지 일반적인 용도는 새 사용자의 사용자 지정 분석 및 기록을 수행하거나, 보안 및 거버넌스 표준을 적용하거나, 타사 IdP의 사용자를 통합 사용자 프로필에 연결하는 것입니다. 검증 및 확인을 거치지 않아도 되는 신뢰할 수 있는 사용자가 있을 수도 있습니다.
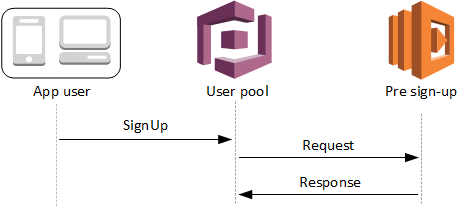
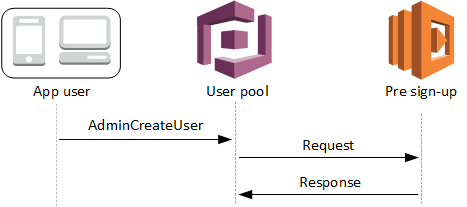
Amazon Cognito는 새로운 로컬 또는 페더레이션 사용자를 등록하기 직전에 등록 전 Lambda 함수를 활성화합니다. 가입 프로세스의 일환으로 이 함수를 사용하여 사용자 지정 로직으로 로그인 이벤트를 분석하고 새 사용자를 수정하거나 거부할 수 있습니다.
주제
사전 가입 Lambda 흐름
클라이언트 가입 흐름

서버 가입 흐름

요청에 클라이언트의 검증 데이터가 포함됩니다. 이 데이터는 사용자 풀 SignUp 및 AdminCreateUser API 메서드로 전달되는 ValidationData 값에서 가져옵니다.
사전 가입 Lambda 트리거 파라미터
Amazon Cognito가 이 Lambda 함수에 전달하는 요청은 아래 파라미터와 Amazon Cognito가 모든 요청에 추가하는 공통 파라미터의 조합입니다.
{
    "request": {
        "userAttributes": {
            "string": "string",
            . . .
        },
        "validationData": {
            "string": "string",
            . . .
         },
        "clientMetadata": {
            "string": "string",
            . . .
         }
    },

    "response": {
        "autoConfirmUser": "boolean",
        "autoVerifyPhone": "boolean",
        "autoVerifyEmail": "boolean"
    }
}
사전 가입 요청 파라미터
- userAttributes
-
사용자 속성을 나타내는 하나 이상의 이름-값 페어입니다. 속성 이름은 키입니다.
- validationData
-
새 사용자 생성 요청 시 앱이 Amazon Cognito에 전달한 사용자 속성 데이터가 포함된 하나 이상의 키-값 페어입니다. AdminCreateUser 또는 SignUp API 요청의 ValidationData 파라미터를 통해 Lambda 함수에 이 정보를 보냅니다.
Amazon Cognito는 ValidationData 데이터를 생성된 사용자의 속성으로 설정하지 않습니다. ValidationData는 사전 가입 Lambda 트리거 목적으로 제공하는 임시 사용자 정보입니다.
- clientMetadata
-
사전 가입 트리거에 지정하는 Lambda 함수에 사용자 지정 입력으로 제공할 수 있는 하나 이상의 키-값 페어입니다. 다음 API 작업에서 ClientMetadata 파라미터를 사용하여 이 데이터를 Lambda 함수에 전달할 수 있습니다. AdminCreateUser, AdminRespondToAuthChallenge, ForgotPassword 및 SignUp.
사전 가입 응답 파라미터
사용자를 자동으로 확인하려면 응답에서 autoConfirmUser를 true로 설정하면 됩니다. autoVerifyEmail을 true로 설정하여 사용자 이메일을 자동으로 확인할 수 있습니다. autoVerifyPhone을 true로 설정하여 사용자 전화 번호를 자동으로 확인할 수 있습니다.
참고
응답 파라미터 autoVerifyPhone, autoVerifyEmail 및 autoConfirmUser는 AdminCreateUser API에 의해 사전 가입 Lambda 함수가 트리거될 때 Amazon Cognito에서 무시됩니다.
- autoConfirmUser
-
사용자를 자동으로 확인하려면
true로 설정하고 그렇지 않으면false로 설정합니다. - autoVerifyEmail
-
가입 중인 사용자의 이메일 주소를 확인한 것으로 설정하려면
true로 설정하고 그렇지 않으면false로 설정합니다.autoVerifyEmail이true로 설정되면email속성에 null이 아닌 유효한 값이 있어야 합니다. 그렇지 않으면 오류가 발생하고 사용자가 가입을 완료할 수 없습니다.email속성이 별칭으로 선택된 경우autoVerifyEmail이 설정되면 사용자 이메일 주소의 별칭이 생성됩니다. 해당 이메일 주소의 별칭이 이미 있으면 별칭이 새 사용자로 이동하고 이전 사용자의 이메일 주소는 확인되지 않은 것으로 표시됩니다. 자세한 내용은 로그인 속성 사용자 지정 섹션을 참조하세요. - autoVerifyPhone
-
가입 중인 사용자의 전화 번호를 확인한 것으로 설정하려면
true로 설정하고 그렇지 않으면false로 설정합니다.autoVerifyPhone이true로 설정되면phone_number속성에 null이 아닌 유효한 값이 있어야 합니다. 그렇지 않으면 오류가 발생하고 사용자가 가입을 완료할 수 없습니다.phone_number속성이 별칭으로 선택될 경우autoVerifyPhone이 설정되면 사용자 전화 번호의 별칭이 생성됩니다. 해당 전화 번호의 별칭이 이미 있으면 별칭이 새 사용자로 이동하고 이전 사용자의 전화번호는 확인되지 않은 것으로 표시됩니다. 자세한 내용은 로그인 속성 사용자 지정 단원을 참조하십시오.
가입 예제
사용자는 관리형 로그인에 가입할 수 있습니다. 에서 SignUp 작업에 대한 SDK 예제 코드를 찾을 수도 있습니다AWS SDK 또는 CLI와 SignUp 함께 사용.
사전 가입 예제: 등록된 도메인의 사용자 자동 확인
다음은 Lambda 트리거 코드의 예입니다. Amazon Cognito가 가입 요청을 처리하기 직전에 사전 가입 트리거가 호출됩니다. 이 트리거는 사용자 지정 속성 custom:domain을 사용하여 특정 이메일 도메인의 신규 사용자를 자동으로 확인할 수 있습니다. 사용자 지정 도메인에 없는 모든 신규 사용자가 사용자 풀에 추가되지만 자동으로 확인되지는 않습니다.
export const handler = async (event, context, callback) => {
  // Set the user pool autoConfirmUser flag after validating the email domain
  event.response.autoConfirmUser = false;

  // Split the email address so we can compare domains
  var address = event.request.userAttributes.email.split("@");

  // This example uses a custom attribute "custom:domain"
  if (event.request.userAttributes.hasOwnProperty("custom:domain")) {
    if (event.request.userAttributes["custom:domain"] === address[1]) {
      event.response.autoConfirmUser = true;
    }
  }

  // Return to Amazon Cognito
  callback(null, event);
};
Amazon Cognito는 이벤트 정보를 Lambda 함수에 전달합니다. 그런 다음 함수는 응답이 변경되면 동일한 이벤트 객체를 Amazon Cognito에 반환합니다. Lambda 콘솔에서 해당 Lambda 트리거와 관련 있는 데이터로 테스트 이벤트를 설정할 수 있습니다. 다음은 이 코드 샘플의 테스트 이벤트입니다.
{
    "request": {
        "userAttributes": {
            "email": "testuser@example.com",
            "custom:domain": "example.com"
        }
    },
    "response": {}
}사전 가입 예제: 모든 사용자 자동 확인 및 자동 검증
이 예에서는 모든 사용자를 자동으로 컨펌하고, 속성이 있는 경우에 확인된 것으로 사용자의 email 및 phone_number 속성을 설정합니다. 그리고 별칭 기능이 활성화되어 있으면 자동 확인이 설정될 때 phone_number 및 email에 대한 별칭이 생성됩니다.
참고
해당 전화 번호의 별칭이 이미 있으면 별칭이 새 사용자로 이동하고 이전 사용자의 phone_number는 확인되지 않은 것으로 표시됩니다. 이메일 주소도 마찬가지입니다. 사용자 풀 ListUsers API를 사용하여 기존 사용자가 신규 사용자의 전화 번호나 이메일 주소를 이미 별칭으로 사용하고 있는지 확인하여 이를 방지할 수 있습니다.
exports.handler = (event, context, callback) => {
  // Confirm the user
  event.response.autoConfirmUser = true;

  // Set the email as verified if it is in the request
  if (event.request.userAttributes.hasOwnProperty("email")) {
    event.response.autoVerifyEmail = true;
  }

  // Set the phone number as verified if it is in the request
  if (event.request.userAttributes.hasOwnProperty("phone_number")) {
    event.response.autoVerifyPhone = true;
  }

  // Return to Amazon Cognito
  callback(null, event);
};
Amazon Cognito는 이벤트 정보를 Lambda 함수에 전달합니다. 그런 다음 함수는 응답이 변경되면 동일한 이벤트 객체를 Amazon Cognito에 반환합니다. Lambda 콘솔에서 해당 Lambda 트리거와 관련 있는 데이터로 테스트 이벤트를 설정할 수 있습니다. 다음은 이 코드 샘플의 테스트 이벤트입니다.
{
  "request": {
    "userAttributes": {
      "email": "user@example.com",
      "phone_number": "+12065550100"
    }
  },
  "response": {}
}사전 가입 예: 사용자 이름이 5자 미만인 경우 가입 거부
이 예에서는 가입 요청에서 사용자 이름의 길이를 확인합니다. 이 예에서는 사용자가 5자 미만의 이름을 입력한 경우 오류를 반환합니다.
export const handler = (event, context, callback) => {
    // Impose a condition that the minimum length of the username is 5 is imposed on all user pools.
    if (event.userName.length < 5) {
        var error = new Error("Cannot register users with username less than the minimum length of 5");
        // Return error to Amazon Cognito
        callback(error, event);
    }
    // Return to Amazon Cognito
    callback(null, event);
};Amazon Cognito는 이벤트 정보를 Lambda 함수에 전달합니다. 그런 다음 함수는 응답이 변경되면 동일한 이벤트 객체를 Amazon Cognito에 반환합니다. Lambda 콘솔에서 해당 Lambda 트리거와 관련 있는 데이터로 테스트 이벤트를 설정할 수 있습니다. 다음은 이 코드 샘플의 테스트 이벤트입니다.
{
  "userName": "rroe",
  "response": {}
}