Create an evaluation form in Connect Customer
In Connect Customer, you can create many different evaluation forms. For example, you may need a different evaluation form for each business unit, and for different queues. You can also create different evaluation forms for evaluating the agent interaction and the self-service interaction with a Lex bot or AI agent.
Each form can contain multiple sections and questions.
-
You can assign weights to each question and section to indicate how much their score impacts the overall score of the evaluation form.
-
You can configure automation on each question so that answers to those questions are automatically filled using insights and metrics from Contact Lens conversational analytics.
This topic explains how to create a form and configure automation using the Connect Customer admin website. To create and manage forms programmatically, see Evaluation actions in the Connect Customer API Reference.
Contents
Step 1: Create an evaluation form with a title
The following steps explain how to create or duplicate an evaluation form and set a title.
-
Log in to Connect Customer with a user account that has the following security profile permission: Analytics and Optimization - Evaluation forms - manage form definitions - Create.
-
Choose Analytics and optimization, then choose Evaluation forms.
-
On the Evaluation forms page, choose Create new form.
—or—
Select an existing form and choose Duplicate.
-
Enter a title for the form, such as Sales evaluation, or change the existing title. Add any tags to the form for controlling access to the form (see Set up tag-based-access controls on performance evaluations) When finished, choose Ok.

The following tabs appear at the top of the evaluation form page:
-
Sections and questions. Add sections, questions, and answers to the form.
-
Scoring. Enable scoring on the form. You can also apply scoring to sections or questions.
-
-
Choose Save at any time while creating your form. This enables you to navigate away from the page and return to the form later.
-
Continue to the next step to add sections and questions.
Import evaluation forms from another instance
You can export an evaluation form from one Connect Customer instance (say a test instance) and import it into another Connect Customer instance (say a production instance) using the Connect UI:
-
While viewing an existing evaluation form select Actions > Export as JSON

-
Open the instance where you want to import this form
-
On the page Evaluation Forms page, click import form. Select Choose File to upload the previously exported JSON and click Import

The form will be created including questions, instructions, answers, scoring and automation configuration. Note that any instance-specific settings such as rule categories and tags will not be present in the exported/imported file.
Step 2: Add sections and questions
-
While on the Sections and questions tab, add a title to the section 1, for example, Greeting.

-
Choose Add question to add a question.
-
In the Question title box, enter the question that will appear on the evaluation form. For example, Did the agent state their name and say they are here to assist?

-
In the Instructions to evaluators box, add information to help the evaluators or generative AI to answer the question.
For example, for the question Did the agent try to validate the customer identity? you may provide additional instructions such as, The agent is required to always ask a customer their membership ID and postal code before addressing the customer's questions.
-
In the Question type box, choose one of the following options to appear on the form:
-
Single selection: The evaluator can choose from a list of options, such as Yes, No, or Good, Fair, Poor.
-
Multiple selection: The evaluator can choose multiple answers from a list of options, such as list of products that the customer was interested in purchasing, or non-compliant agent behaviours.
-
Text field: The evaluator can enter free form text.
-
Number: The evaluator can enter a number from a range that you specify, such as 1-10.
-
Date: The evaluator can choose a date as an answer.
-
-
Continue to the next step to add answers.
Step 3: Add answers
-
On the Answers tab, add answer options that you want to display to evaluators, such as Yes, No.
-
To add more answers, choose Add option.
The following image shows example answers for a Single selection question.

The following image shows an answer range for a Number question.

-
You can also mark a question as optional. This enables managers to skip the question (or mark it as Not applicable) while performing an evaluation.

Step 4: Conditionally enable questions
Evaluation forms can have questions that are conditionally enabled or disabled, based on answers to other questions. For example, you can configure a follow-up question to appear in the form only if it is needed.
-
Choose a question that needs a follow-up question. The question type must be Single selection or Multiple selection, and it must be not be an optional question (do not select the Optional question checkbox).
For example, in the following image, question 1.1 is What was the reason for the call? and the Optional question checkbox is not selected.

-
Add a follow-up question and now select the Optional question checkbox.
In the following image, the follow-up question is question 1.2 Did the agent check if the customer attempted new account registration online? and the Optional question checkbox is selected.

-
Choose the Conditionally enable question tab and then turn on Conditional question. The toggle is shown in the following image.

-
Configure the follow-up question to be enabled only if answer to question 1.1. What was the reason for the call? is New account registration. These options are shown in the following image.

With this configuration, the follow-up question Did the agent check if the customer attempted new account registration online? is dynamically added to the form only if the answer to What was the reason for the call? is New account registration. In all other cases this question is not present in the form and does not need to be answered.
-
To verify that this configuration works as expected, use the Preview action.
Following are a few things to keep in mind when creating conditional questions:
-
When a question is conditionally enabled, it is by default disabled.
-
When a question is conditionally disabled, it is by default enabled.
-
You can only use Single selection or Multiple selection questions to conditionally enable or disable other questions. The question cannot be optional.
-
You can choose one or more answer options to trigger the condition of a conditional question.
Note
If generative AI-powered automation is enabled on a question that is conditionally enabled, then the use of generative AI on that question counts towards the usage limit of questions that can be evaluated on a contact using generative AI. It counts even if the question was conditionally disabled.
For the default limit of the Number of evaluation questions that can be answered automatically on a contact using generative AI, see Contact Lens service quotas.
Step 5: Assign scores and ranges to answers
-
Go to the top of the form. Choose the Scoring tab, and then select the Enable scoring checkbox.
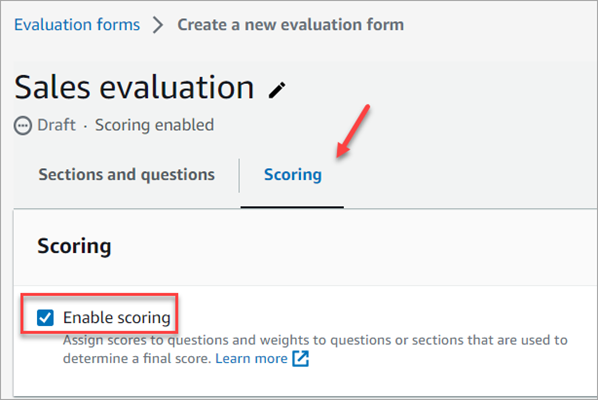
This enables scoring for the entire form. It also enables you to add ranges for answers to Number question types.
-
For Scoring mode, choose one of the following options:
-
Percentage – Calculate scores as percentages using weighted sections or questions.
-
Point-based – Calculate scores using points assigned to answer options.
Important
We recommend creating a new evaluation form rather than switching the scoring mode on an existing form. Changing the scoring mode resets all previously configured scoring values, and historical evaluations completed with the previous scoring mode cannot be directly compared with evaluations using the new mode.

-
Step 5.1: Percentage-based scoring
If you selected Percentage scoring mode, follow these steps to configure scoring for your evaluation form.
-
Return to the Sections and questions tab. You can assign scores to Single selection, Multiple selection, and add ranges for Number question types.

-
When you create a Number type question, on the Scoring tab, choose Add range to enter a range of values. Indicate the worst to best score for the answer.
The following image shows an example of ranges and scoring for a Number question type.

-
If the agent interrupted the customer 0 times, they get a score of 10 (best).
-
If the agent interrupted the customer 1-4 times, they get a score of 5.
-
If the agent interrupted the customer 5-10 times, they get a score of 1 (worst).
-
-
For Multiple selection questions, assign a score value (0-10) to each option. When multiple options are selected, the total score is the sum of selected options' scores, capped at 10.
-
(Optional) Configure Automatic fail for an answer option. You can choose to apply automatic fail to the section, the subsection, or the entire form. When the evaluator selects this answer during an evaluation, the score for the affected scope is set to zero.

-
(Optional) Exclude individual questions or entire sections from scoring. When a question or section is excluded, it is automatically assigned a weight of 0%, similar to a non-scorable question. The remaining weight is redistributed among the other scored items.

-
After you assign scores to all the answers, choose Save.
Updating existing forms with multiple selection questions
If you have existing evaluation forms that were created with multiple selection questions before scoring support was added, you will receive a validation error when creating a new version or activating the form. To resolve this, follow these steps:
-
Open the evaluation form and navigate to the multiple selection question.
-
Choose the Scoring tab for the question.
-
Do one of the following:
-
Assign score values to each answer option (0-10), or
-
Select the Exclude from scoring checkbox to remove the question from the scoring calculation.
-
-
Choose Save and then activate the form.
Step 5.2: Point-based scoring
If you selected Point-based scoring mode, follow these steps to configure scoring for your evaluation form.
-
Return to the Sections and questions tab. For each question, choose the Scoring tab and assign point values to each answer option. Point values can range from 0 to 100.
The following image shows an example of point values assigned to a Single selection question.

-
For Number type questions, choose Add range to define answer ranges and assign a point value to each range.

-
For Multiple selection questions, assign point values to each option. When multiple options are selected, their point values are summed. Optionally, select Set cap to configure a maximum point value cap for the question.

-
(Optional) Configure bonus options or bonus questions. Bonus points allow you to award extra credit without increasing the maximum possible score.
-
Bonus options – An individual answer option that awards extra points on top of the question's maximum base score. When a bonus option is selected, the earned points can exceed the question's normal maximum. Bonus options are only supported on single selection and numeric questions.
-
Bonus questions – An entire question that does not contribute to the maximum possible score. The earned points from a bonus question are added to the total, but the question's maximum points are not counted in the base total. Bonus questions cannot have automatic fail options.


-
-
(Optional) Configure automatic fail. When an automatic fail option is selected during an evaluation, the score for the affected scope is set to zero. You can choose to apply automatic fail to the Section or Entire form. Automatic fail is supported on single selection, numeric, and multiple selection questions. Bonus questions and bonus options cannot have automatic fail.

-
(Optional) Exclude individual questions or entire sections from scoring. Excluded items do not contribute to the total score or the maximum possible score.

-
After you assign scores to all the answers, choose Save.
-
When you're finished assigning scores, continue to the next step to automate the answer of certain questions, or continue to preview the evaluation form.
Step 5.3: Assign performance thresholds
Performance thresholds allow you to classify evaluation results into categories such as "Needs Improvement" or "Exceeds Expectations" based on score thresholds. This feature is supported in both percentage-based and point-based scoring modes.
You can configure performance thresholds at the form level, section level, or question level.
Performance thresholds are not inherited. If you set thresholds at the form level, those thresholds apply only to the overall form score. Sections and questions do not automatically inherit the form-level thresholds. You must explicitly configure thresholds at each level where you want them to apply.

Step 6: Enable automated evaluations
Connect Customer enables you to automatically answer questions within evaluation forms (for example, did the agent adhere to the greeting script?) using insights and metrics from conversational analytics. Automation can be used to:
-
Assist evaluators with performance evaluations: Evaluators receive automated answers to questions on evaluation forms while performing evaluations. Evaluators can override automated answers before submission.
-
Automatically fill and submit evaluations: Administrators can configure evaluation forms to automate responses to all questions within an evaluation form and automatically submit evaluations for up to 100% of customer interactions. Evaluators can edit and re-submit evaluations (if needed).
The ways of automation vary by whether you are evaluating the agent interaction or automated interaction (for example, self-service while interacting with a Lex bot or AI agent). You can choose between agent and automated interaction by choosing the Additional settings, under Contact interaction type.
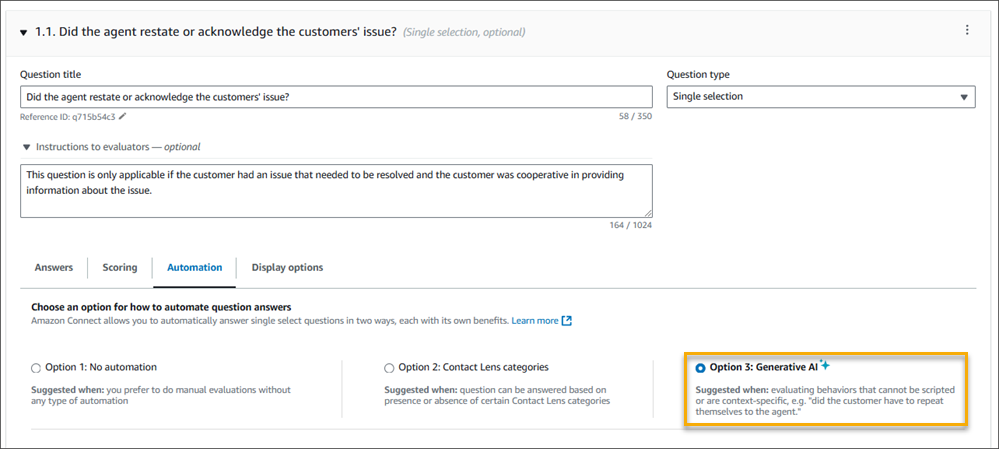
Both for assisting evaluators, and for automated submission of evaluations, you need to first set up automation on individual questions within an evaluation form. Connect Customer provides three ways of automating evaluations:
-
Contact categories: Single selection questions (for example, did the agent properly greet the customer (Yes/ No)?), and Multiple selection questions (for example, what parts of the greeting script did the agent state correctly?) can be automatically answered using contact categories defined with rules. For more information, see Create Contact Lens rules using the Connect Customer admin website.
-
Generative AI: Both Single selection and Text field questions can be automatically answered using generative AI.
For information about automating evaluations of self-service (automated) interactions, see Performance evaluations of self-service interactions in Connect Customer.
-
Metrics: Numeric questions (for example, what was the longest that the customer was put on hold?) can be automatically answered using metrics such as longest hold time, sentiment score, etc.
Following are examples of each type of automation for each type of question.
Example automation for a Single selection question using Contact Lens categories
-
The following image shows that the answer to the evaluation question is yes when Contact Lens has categorized the contact with a label ProperGreeting. To label contacts as ProperGreeting, you must first setup a rule that detects the words or phrases expected as part of a proper greeting, for example, the agent mentioned "Thank you for calling" in the first 30 seconds of the interaction. For more information, see Automatically categorize contacts.

For information about setting up contact categories, see Automatically categorize contacts.
Example automation for an optional Single selection question using contact categories
-
The following image shows example automation of an optional Single selection question. The first check is whether the question is applicable or not. A rule is created to check whether the contact is about opening a new account. If so, the contact is categorized as CallReasonNewAccountOpening. If the call is not about opening a new account, the question is marked as Not Applicable.
The subsequent conditions run only if the question is applicable. The answer is marked as Yes or No based on the contact category NewAccountDisclosures. This category checks whether the agent provided the customer with disclosures about opening a new account.

For information about setting up contact categories, see Automatically categorize contacts.
Example automation for an optional Single selection question using Generative AI
-
The following image show example automation using Generative AI. Generative AI will automatically answer the evaluation question by interpreting the question title and evaluation criteria specified in the instructions of the evaluation question, and using it to analyze the conversation transcript. Using complete sentences to phrase the evaluation question and clearly specifying the evaluation criteria within the instructions improves accuracy of generative AI. For information, see Evaluate agent performance in Connect Customer using generative AI.
Example automation for a Multiple selection question using Contact Lens categories
-
Multiple selection questions can be used to capture answer reasoning for a single select question. It can also be used to trigger conditional questions, by checking for customer scenarios, such as call reasons. The following example shows how you can use rules that capture customer call reasons to automatically fill answers to a multiple selection question. Unlike single select questions, all of the conditions are executed sequentially to answer a multiple selection question. In the following example, if the categories StatusCheck and ChangeExistingRequest are both present on the contact, then the answer would be both "Checking status of existing service request" and "Changing a service request".

For information about setting up contact categories, see Automatically categorize contacts.
Example automation for a Numeric question
-
If the agent interaction duration was less than 30 seconds, score the question as a 10.

-
On the Automation tab, choose the metric that is used to automatically evaluate the question.

-
You can automate responses to numeric questions using Contact Lens metrics (such as sentiment score of the customers, non-talk time percentage, and number of interruptions) and contact metrics (such as longest hold duration, number of holds, and agent interaction duration).
After an evaluation form is activated with automation configured on some of the questions, then you will receive automated responses to those questions when you start an evaluation from within the Connect Customer admin website.
To automatically fill and submit evaluations
-
Set up automation on every question within an evaluation form as previously described.
-
Turn on Enable fully automated submission of evaluations before activating the evaluation form. This toggle is shown in the following image.

-
Activate the evaluation form.
-
Upon activation you will be asked to create a rule in Contact Lens that submits an automated evaluation. For more information, see Create a rule in Contact Lens that submits an automated evaluation. The rule enables you to specify which contacts should be automatically evaluated using the evaluation form.
Step 7: Preview the evaluation form
The Preview button is active only after you have assigned scores to answers for all of the questions.

The following image shows the form preview. Use the arrows to collapse sections and make the form easier to preview. You can edit the form while viewing the preview, as shown in the following image.

Step 8: Assign weights for final score
When percentage-based scoring is enabled for the evaluation form, you can assign weights to sections or questions. The weight raises or lowers the impact of a section or question on the final score of the evaluation. This step applies only to the Percentage scoring mode. If you selected Point-based scoring, weights are not used; instead, the score is calculated from earned points versus maximum possible points.

Weight distribution mode
With Weight distribution mode, you choose whether to assign weight by section or question:
-
Weight by section: You can evenly distribute the weight of each question in the section.
-
Weight by question: You can lower or raise the weight of specific questions.
When you change a weight of a section or question, the other weights are automatically adjusted so the total is always 100 percent.
For example, in the following image, question 2.1 was manually set to 50 percent. The weights that display in italics were adjusted automatically. In addition, you can turn on Exclude optional questions from scoring, which assigns all optional questions a weight of zero and redistributes the weight among the remaining questions.

Step 9: Activate an evaluation form
Choose Activate to make the form available to evaluators. Evaluators will no longer be able to choose the previous version of the form from the dropdown list when starting new evaluations. For any evaluations that were completed using previous versions, you will still be able to view the version of the form on which the evaluation was based on.
If you are still working on setting up the evaluation form and want to save your work at any point you can choose Save, Save draft.
If you want to check whether the form has been correctly set up, but not activate it, select Save, Save and validate.
