Personalize the customer experience for in-app, web, and video calling in Connect Customer
The steps in this topic are optional but recommended. They enable you to personalize the customer's experience based on their actions previously taken within your app. This option provides you more control when initiating new calls, including the ability to pass contextual information as attributes.
After doing these steps, you'll need to work with your website administrator to set up your web servers to issue JSON Web Tokens (JWTs) for new calls
-
If you've already created your communications widget, on the Communication widgets page, choose the widget to edit it.
-
In the Domain & Security section, choose Edit.
-
Under Add security for your communications widget requests, choose Yes.

-
Choose Save and continue. Connect Customer creates the widget along with the following:
-
Connect Customer provides a 44-character security key on the next page that you can use to create JWTs.
-
Connect Customer adds a callback function within the communications widget embed script that checks for a JWT when a call is initiated.
You must implement the callback function in the embedded snippet, as shown in the following example.
amazon_connect('authenticate', function(callback) {
  window.fetch('/token').then(res => {
    res.json().then(data => {
      callback(data.data);
    });
  });
});
In the next step you'll get a security key for all calls initiated on your websites. Ask your website administrator to set up your web servers to issue JWTs using this security key.
-
-
Choose Save and continue.
-
Copy the custom HTML code snippet and insert it into your website's source code.
Alternate method: Pass contact attributes directly from snippet code
Note
Although these attributes are scoped with the HostedWidget-
prefix, they are still mutable client-site. Use the JWT setup if you require PII
or immutable data in your contact flow.
The following example shows how to pass contact attributes directly from snippet code without enabling widget security.
<script type="text/javascript"> (function(w, d, x, id){ /* ... */ })(window, document, 'amazon_connect', 'widgetId'); amazon_connect('snippetId', 'snippetId'); amazon_connect('styles', /* ... */); // ... amazon_connect('contactAttributes', {foo: 'bar' }) <script/>
Using the attributes in contact flows
The Check contact attributes
flow block provides access to these attributes via the User
defined namespace, as shown in the following image. You can use
the flow block to add branching logic. The full path is
$Attribute.HostedWidget-. attributeName

Copy communications widget code and security keys
In this step, you confirm your selections and copy the code for the communications widget and embed it in your website. You can also copy the secret keys for creating the JWTs.
Security key
Use this 44-character security key to generate JSON web tokens from your web server. You can also update, or rotate, keys if you need to change them. When you do this, Connect Customer provides you with a new key and maintains the previous key until you have a chance to replace it. After you have the new key deployed, you can come back to Connect Customer and delete the previous key.

When your customers interact with the start call icon on your website, the communications widget requests your web server for a JWT. When this JWT is provided, the widget will then include it as part of the end customer’s call to Connect Customer. Connect Customer then uses the secret key to decrypt the token. If successful, this confirms that the JWT was issued by your web server and Connect Customer routes the call to your contact center agents.
JSON Web Token specifics
-
Algorithm: HS256
-
Claims:
-
sub:
widgetIdReplace
widgetIdwith your own widgetId. To find your widgetId, see the example Communications widget script. -
iat: *Issued At Time.
-
exp: *Expiration (10 minute maximum).
* For information about the date format, see the following Internet Engineering Task Force (IETF) document: JSON Web Token (JWT)
, page 5. -
The following code snippet shows an example of how to generate a JWT in Python:
payload = { 'sub':widgetId, // don't add single quotes, such as 'widgetId' 'iat': datetime.utcnow(), 'exp': datetime.utcnow() + timedelta(seconds=JWT_EXP_DELTA_SECONDS) } header = { 'typ': "JWT", 'alg': 'HS256' } encoded_token = jwt.encode((payload), CONNECT_SECRET, algorithm=JWT_ALGORITHM, headers=header) // CONNECT_SECRET is the security key provided by Amazon Connect
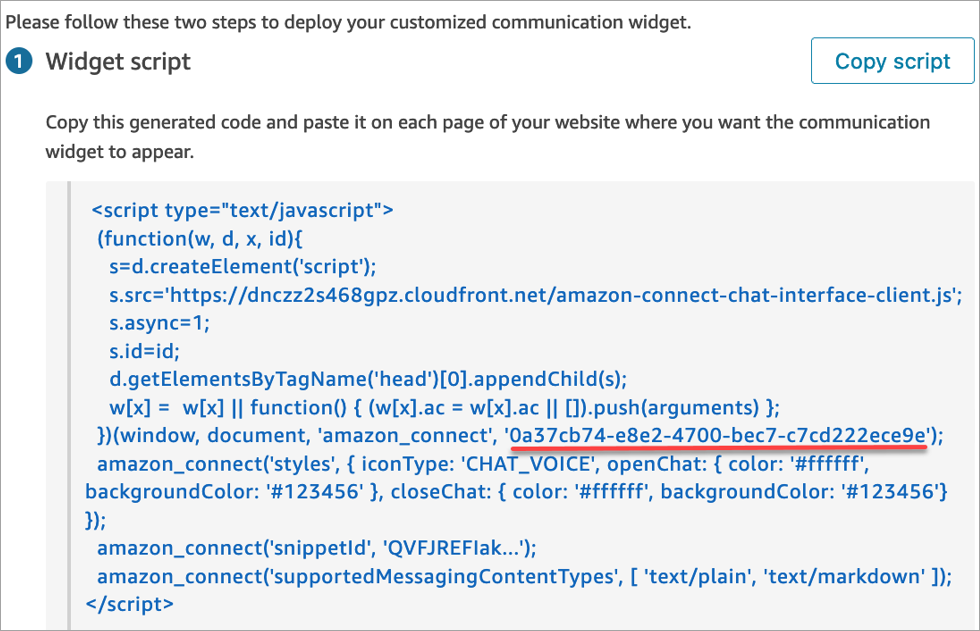
Communications widget script
The following image shows an example of the JavaScript that you embed on the websites where you want customers to be able to call your contact center. This script displays the widget in the bottom-right corner of your website.
The following image shows an example of where to find your widgetId.
When your website loads, customers first see the Start icon. When they choose this icon, the communications widget opens and customers are able to call your agents.
To make changes to the communications widget at any time, choose Edit.
Note
Saved changes update the customer experience in a few minutes. Confirm your widget configuration before saving it.

To make changes to widget icons on the website, you will receive a new code snippet to update your website directly.
