Create a template for an agent's weekly shift in Connect Customer
Use shift profiles to create templates for weekly shifts. The template includes the days of the week worked, the earliest start time and the latest end times the staff can be scheduled, the activities they would do during their shift, and various roles.
-
Log in to the Connect Customer admin website with an account that has security profile permissions for Scheduling, Schedule manager - Edit.
For more information, see Assign permissions.
-
On the Connect Customer navigation menu, select Analytics and optimization, Scheduling.
-
Choose the Shift Profiles tab, and then choose Add shift profiles.
-
On the Add shift profile page, choose a time-zone for this shift profile. This time-zone configuration will automatically adjust agent shifts for daylight saving changes. For example, an 8AM - 5PM (8:00 - 17:00) shift profile for US/Pacific time-zone will automatically switch from 8AM - 5PM (8:00 - 17:00) Pacific Standard Time to 8AM - 5PM (8:00 - 17:00) Pacific Daylight Savings Time.
-
In the Schedule Window section, complete the section as follows:
-
For Work status, choose one of the following options:
-
Working: This means when Connect Customer generates the schedule, it must schedule the staff to work between the specified hours and minutes.
-
Flex: This means if Connect Customer predicts enough contact volume to warrant scheduling the agent, it may schedule them to work between the specified hours and minutes.
The following image shows the Schedule Window section of the Add shift profile page. It shows examples of Flex, Working (with a shift length of 8 hours and 30 minutes), and the Default activity.

-
-
Start Time and End Time: Specify the earliest start time and the latest end time for each day in the selected time zone.
-
Shift length (Optional): Specify the maximum shift length that an agent can be scheduled on a specific day. This option is especially useful if your contact center is open for long periods of time, such as 24 hours, but each shift is shorter than that, such as 8 hours.
-
Default activity: Specify the default activity for each day. Only activities set up as work activities can be selected as default activities. For more information about work activities, see Create shift activities.
Depending on the contact demand pattern forecast, Connect Customer determines the best possible start and end times for shifts, while adhering to the minimum and maximum hours per day and week worked.
-
-
Choose Add shift activities. Select the shift activities the staff will do during their shift. (You create the shift activities that appear in the list, such as Productive, Time off, and Non-Productive.)
-
For each activity, set placement rules. The rules include:
-
The time duration from the beginning to end of the shift where the activities need to be placed.
-
The time window for Connect Customer to pick the best spot to maximize efficiency of the generated schedules to meet the goals, such as the service level percent (SL%) targets.
-
-
Optionally, complete the Rules section as follows:
Important
These rules override the settings in the Schedule Window section.
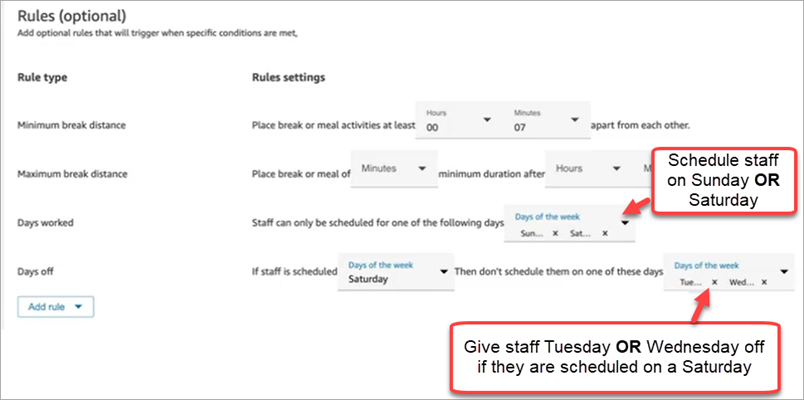
Choose the Add rule dropdown box and choose from the following options:
-
Minimum break distance
-
Maximum break distance
-
Days worked: If you list multiple days, they are separated by OR.
-
Days off: If you list multiple days, they are separated by OR.
-
-
In the Daily shift activities section, complete the Default shift activity group section to specify when activities such as lunch breaks and training should be scheduled during the shift. The shift activities apply to everyone in the shift. In the following image, agents are scheduled for a Break 6 hours after starting their shift and within 7 hours.

Optionally, choose Add new group to add a subgroup of agents and specify shift activities for them. In the following image, the shift is 2 hours and no activities are specified. This means the agents in Shift activity group 2 don't get a break.

-
After saving the shift profile, you can edit or remove it from the list view.
For example, if you set break to start 6 hours after the start of a shift and lunch to start 3 hours after the start of a shift, the lunch is scheduled to occur first.
