As traduções são geradas por tradução automática. Em caso de conflito entre o conteúdo da tradução e da versão original em inglês, a versão em inglês prevalecerá.
Tutorial: Configurando um aplicativo web básico do Transfer Family
Este tutorial explica como configurar um aplicativo web Transfer Family. Os aplicativos web Transfer Family permitem uma interface simples para transferir dados de e para o Amazon S3 por meio de um navegador da web. Para obter a documentação detalhada desse recurso, consulteAplicativos web Transfer Family.
Tutorial de aplicativos web: pré-requisitos
-
Crie uma instância de conta ou uma instância de organização do Centro de Identidade do AWS IAM. Para obter detalhes, consulte Configure seu provedor de identidade para os aplicativos web Transfer Family.
Se você não estiver usando o IAM Identity Center como seu provedor de identidade, Integre o Okta como seu provedor de identidade para aplicativos da web ilustra como usar um provedor de identidade alternativo (neste caso, Okta).
-
Você precisa de um bucket Amazon S3 para interagir com seu aplicativo web Transfer Family. Para obter detalhes, consulte Configurar um bucket do Amazon S3
nota
Este tutorial pressupõe que você esteja usando o diretório do IAM Identity Center para seu provedor de identidade. Se esse não for o caso, consulte Configure seu provedor de identidade para os aplicativos web Transfer Family antes de continuar com este tutorial.
Depois de concluir o tutorial, seu usuário pode fazer login e interagir com o aplicativo web que você criou.
Etapa 1: criar os recursos de suporte necessários
Você precisa adicionar um usuário ao seu diretório do IAM Identity Center. Você também precisa de duas funções: uma para usar como portador de identidade para seu aplicativo web e uma segunda para configurar uma concessão de acesso ao Amazon S3. Para o tutorial, permitimos que AWS os serviços criem essas funções para nós.
Para adicionar um usuário
Faça login no AWS Management Console e abra o Centro de Identidade do AWS IAM console em https://console.aws.amazon.com/singlesignon/
. -
No painel de navegação esquerdo, escolha Usuários.
-
Escolha Adicionar usuário e especifique os detalhes do usuário.
Especifique um nome de usuário, endereço de e-mail e outras informações necessárias. Você pode optar por enviar um e-mail ao usuário com instruções para configurar sua senha ou gerar uma senha de uso único para compartilhar com ele.
-
Escolha Avançar e, opcionalmente, atribua o novo usuário a um ou mais grupos.
-
Escolha Avançar e revise suas escolhas.
Se tudo estiver correto, escolha Adicionar usuário para criar o novo usuário com os detalhes que você especificou.
Para o tutorial, o usuário de exemplo é Bob Stiles, nome de usuário bobstiles e endereço de e-mail bobstiles@example.com.
Etapa 2: criar um aplicativo web Transfer Family
Para criar um aplicativo web Transfer Family
-
Faça login no AWS Management Console e abra o AWS Transfer Family console em https://console.aws.amazon.com/transfer/
. -
No painel de navegação esquerdo, escolha Aplicativos Web.
-
Escolha Criar aplicativo web.
Para acesso à autenticação, observe que o serviço encontra automaticamente a Centro de Identidade do AWS IAM instância que você configurou como pré-requisito.
-
No painel Tipo de permissão, selecione Criar e usar uma nova função de serviço. O serviço cria a função de portador de identidade para você. Uma função de portador de identidade inclui a identidade de um usuário autenticado em suas sessões.
-
No painel Unidades do aplicativo Web, aceite o valor padrão de 1 ou ajuste para um valor maior, se necessário.
-
Adicione uma tag para ajudar você a organizar seus aplicativos da web. Para o tutorial, insira Nome para a chave e Aplicativo Web Tutorial para o valor.
dica
Você pode editar o nome do aplicativo Web diretamente da página da lista de aplicativos Web depois de criá-lo.
-
Escolha Avançar para abrir a página Design do aplicativo web. Nessa tela, forneça as seguintes informações.
Opcionalmente, você pode fornecer um título para seu aplicativo web. Você também pode fazer upload de arquivos de imagem para seu logotipo e favicon.
-
Para o título da página, personalize o título da guia do navegador que seus usuários veem quando se conectam ao aplicativo web. Se você não inserir nada para o título da página, o padrão será Transfer Web App.
-
Para o logotipo, faça o upload de um arquivo de imagem. O tamanho máximo do arquivo para a imagem do seu logotipo é de 50 KB.
-
Para o favicon, faça upload de um arquivo de imagem. O tamanho máximo do arquivo para seu favicon é 20 KB.
-
-
Escolha Avançar e, em seguida, escolha Criar aplicativo web.
Para fornecer uma experiência de marca, você pode fornecer um URL personalizado para que seus usuários acessem seu aplicativo web Transfer Family. Para obter detalhes, consulte Atualize seu endpoint de acesso com um URL personalizado.
Etapa 3: configurar o compartilhamento Cross-origin de recursos (CORS) para seu bucket
Você deve configurar o compartilhamento de recursos de origem cruzada (CORS) para todos os buckets usados pelo seu aplicativo web. Uma configuração CORS é um documento que define regras que identificam as origens que você permitirá acessar seu bucket. Para obter mais informações sobre o CORS, consulte Configurando o compartilhamento de recursos de origem cruzada (CORS).
Para configurar o compartilhamento Cross-origin de recursos (CORS) para seu bucket Amazon S3
Faça login no AWS Management Console e abra o console do Amazon S3 em. https://console.aws.amazon.com/s3/
-
Escolha Buckets no painel de navegação esquerdo, pesquise seu bucket na caixa de diálogo de pesquisa e, em seguida, escolha a guia Permissões.
-
Em compartilhamento Cross-origin de recursos (CORS), escolha Editar e cole o código a seguir.
AccessEndpointSubstitua pelo endpoint de acesso real do seu aplicativo web. Certifique-se de não inserir barras finais, pois isso causa erros quando os usuários tentam fazer login no seu aplicativo web.-
Exemplo incorreto:
https://webapp-c7bf3423.transfer-webapp.us-east-2.on.aws/ -
Exemplo correto:
https://webapp-c7bf3423.transfer-webapp.us-east-2.on.aws
Se você estiver reutilizando um bucket para vários aplicativos web, anexe seus endpoints de acesso ao aplicativo web à lista.
AllowedOrigins[ { "AllowedHeaders": [ "*" ], "AllowedMethods": [ "GET", "PUT", "POST", "DELETE", "HEAD" ], "AllowedOrigins": [ "https://AccessEndpoint" ], "ExposeHeaders": [ "last-modified", "content-length", "etag", "x-amz-version-id", "content-type", "x-amz-request-id", "x-amz-id-2", "date", "x-amz-cf-id", "x-amz-storage-class", "access-control-expose-headers" ], "MaxAgeSeconds": 3000 } ] -
-
Escolha Salvar alterações para atualizar o CORS.
Etapa 4: adicionar um usuário ao seu aplicativo web Transfer Family
Adicione o usuário que você criou anteriormente no IAM Identity Center.
Para atribuir usuários a um aplicativo web Transfer Family
-
Navegue até o aplicativo web que você criou anteriormente.
-
Escolha Atribuir usuários e grupos.

-
Para atribuir o usuário que você criou anteriormente no IAM Identity Center, selecione Atribuir usuários e grupos existentes e selecione Avançar.
-
Pesquise o usuário pelo nome de exibição. Observe que nenhum usuário aparece até você começar a inserir seus critérios de pesquisa. Para adicionar
Bob
                                Stiles
, digite bob na caixa de pesquisa. Se você não conseguir encontrar seu usuário, navegue até o console de gerenciamento do IAM Identity Center, encontre o usuário e, em seguida, copie e cole o nome de exibição dele aqui. -
Escolha o
Bob Stilesusuário e, em seguida, escolha Atribuir.
-
Etapa 5: registrar um local no Amazon S3 e criar uma concessão de acesso
Depois de atribuir um usuário ao seu aplicativo web, você precisa registrar um bucket e criar uma concessão de acesso para esse usuário.
nota
Você deve ter uma instância do S3 Access Grants antes de continuar. Para obter detalhes, consulte Criar uma instância do S3 Access Grants no Guia do usuário do Amazon Simple Storage Service.
Para registrar um local e criar uma concessão de acesso
Faça login no AWS Management Console e abra o console do Amazon S3 em. https://console.aws.amazon.com/s3/
-
Escolha Access Grants no painel de navegação esquerdo.
-
Escolha Exibir detalhes para ver os detalhes da sua instância do S3 Access Grants.
-
Selecione a guia Localizações e escolha Registrar localização.
-
Forneça as informações a seguir.
-
Para o Escopo, procure um bucket ou insira o nome do seu bucket e, opcionalmente, um prefixo. Observe que o escopo começa com a string
s3://. -
Para a função do IAM, escolha Create new role para que o Amazon S3 crie uma função. Essa função permite que o S3 Access Grants acesse seu escopo de localização especificado.

Escolha Registrar local para continuar.
-
-
Selecione a guia Concessões e, em seguida, escolha Criar concessão e forneça os detalhes a seguir.
-
Em Local, selecione Procurar locais e escolha o local que você registrou na etapa anterior.
-
Em Subprefixo, insira
*para indicar que a concessão de acesso se aplica a todo o bucket. -
Em Permissões, selecione Ler e gravar.
-
Para o tipo de beneficiário, escolha Identidade do diretório no IAM Identity Center.
-
Em Tipo de identidade de diretório, selecione Usuário.
-
No ID de usuário/ID do IAM Identity Center, copie e cole o ID do usuário para
Bob Stiles. Essa ID está disponível no painel Usuários do seu aplicativo web Transfer Family.
-
-
Escolha Criar concessão.
A concessão de acesso é criada.
Etapa 6: Acesse seu aplicativo web Transfer Family como usuário
Agora, navegamos até o URL do aplicativo web e fazemos login como o usuário que atribuímos anteriormente.
Para fazer login no aplicativo web Transfer Family
-
Navegue até seu aplicativo web
-
Escolha o endpoint do Access no painel de detalhes do aplicativo Web.

-
Na tela de login, insira o usuário que você criou
bobstilese selecione Avançar. -
Digite a senha que o sistema atribuiu a esse usuário quando foi criada e selecione Avançar.
-
Se sua organização exige autenticação multifator (MFA), você precisa configurá-la agora. Caso contrário, vá para a etapa 6.
-
Você verá uma tela para registrar seu dispositivo de MFA. Escolha uma das opções disponíveis e selecione Avançar.
-
Execute as etapas necessárias para configurar a MFA para esse usuário: as etapas dependem da opção de MFA escolhida.
-
Talvez seja necessário definir uma nova senha para seu usuário: se necessário, faça isso agora. O sistema também pode exigir que você faça login novamente, usando as novas credenciais de MFA que você configurou.
-
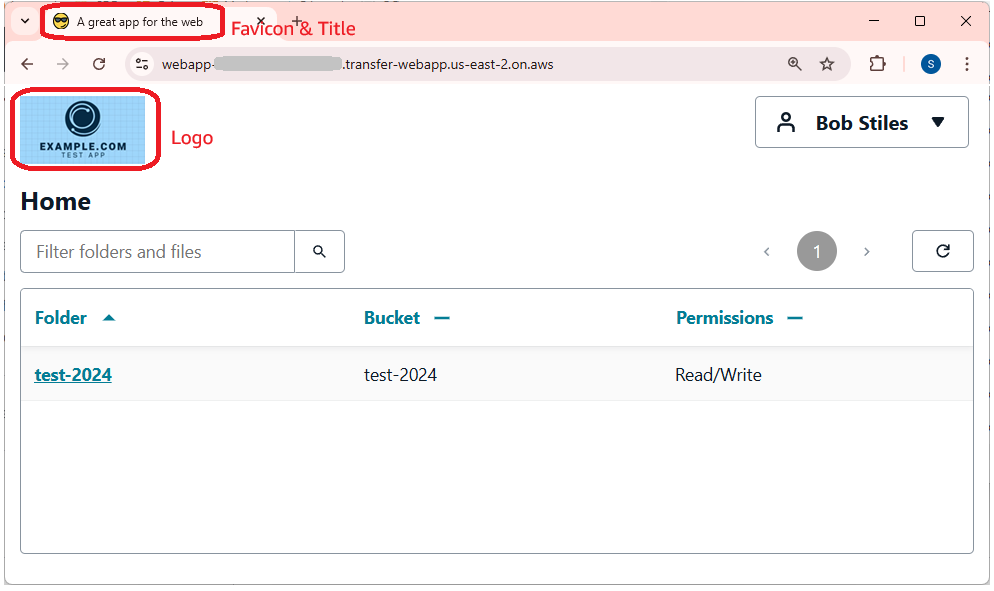
Seu usuário deve ver uma tela semelhante à seguinte. Observe que essa captura de tela inclui a personalização do favicon e do logotipo.
Próximas etapas
Você configurou com êxito um aplicativo web básico do Transfer Family com acesso padrão ao bucket do S3. Se você precisar de um controle mais granular sobre as permissões do bucket, como permitir que os usuários baixem de um bucket e façam o upload para outro, consulteTutorial: Configurando um aplicativo AWS Transfer Family web com acesso seletivo a vários buckets.
Integre o Okta como seu provedor de identidade para aplicativos da web
Você pode integrar um provedor de identidade externo aos aplicativos web Transfer Family. Esta seção descreve como configurar o Okta como seu provedor de identidade.
-
No Okta, crie um usuário, um grupo e um aplicativo. Para obter detalhes sobre como fazer isso, consulte Configurar SAML e SCIM com o Okta e o IAM Identity Center.

-
Conecte o Okta e importe usuários e grupos do Okta para o. Centro de Identidade do AWS IAM Siga as etapas de 1 a 4 em Configurar SAML e SCIM com Okta e IAM Identity Center.


-
Confirme se a fonte de identidade no IAM Identity Center é SAML 2.0.

-
Atribua seu usuário e grupo, conforme descrito emEtapa 4: adicionar um usuário ao seu aplicativo web Transfer Family.
-
Para evitar que seus usuários precisem usar o MFA ao fazer login em seu aplicativo web, execute as etapas a seguir no Okta.
-
No console de administração do Okta, acesse [Aplicativos] - [Aplicativos] e selecione o Centro de Identidade do AWS IAM aplicativo.
-
Na guia Entrar, selecione [Autenticação do usuário] - Editar.
-
Selecione Somente senha.
-
Depois de realizar todas as outras etapas do tutorial, seu usuário deverá conseguir acessar seu aplicativo web Transfer Family navegando até o ponto final de acesso do aplicativo web em um navegador da web.
