Add an Amazon Lex bot to Connect Customer
Important
End of support notice: On September 15, 2025, AWS will discontinue support for Amazon Lex V1. After September 15, 2025, you will no longer be able to access the Amazon Lex V1 console or Amazon Lex V1 resources. To learn about migrating to Amazon Lex V2, see Migrating a bot.
In this article we guide you through the steps to add an Amazon Lex bot to Connect Customer.
With Amazon Lex, you can build conversational interactions (bots) that feel natural to your customers. Connect Customer with Amazon Lex bots can also capture customer input as digits that customers enter on their numeric keypad when used in a Connect Customer flow. This way customers can choose how they want to enter sensitive information such as account numbers.
To follow along with this walkthrough, you need the following:
-
An active AWS account.
-
An Connect Customer instance.
Tip
You can also use Amazon Lex to power interactive messages for Connect Customer chat. Interactive messages are rich messages that present a prompt and pre-configured display options that a customer can select from. These messages are powered by Amazon Lex and configured through Amazon Lex using a Lambda. For more information, see Add Amazon Lex interactive messages for customers in chat.
Create an Amazon Lex bot
In this step you'll create a custom bot to demonstrate the Press or Say integration with Connect Customer. The bot prompts callers to press or say a number that matches the menu option for the task to complete. In this case, the input is checking their account balance.
Configure the Amazon Lex bot
In this step you'll determine how the bot responds to customers by providing intents, sample utterances, slots for input, and error handling.
For this example, you'll configure the bot with two intents: one to look up account information, and another to speak with an agent.
Create AccountLookup intent


Create SpeakToAgent intent
Build and test the Amazon Lex bot
After you create your bot, make sure it works as intended.
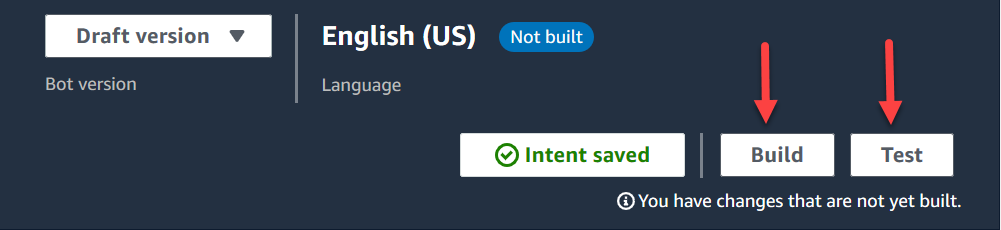
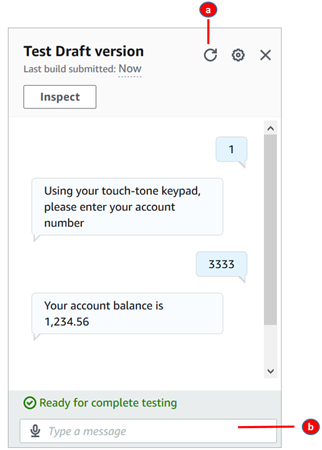


Create a bot version (Optional)
In this step you create a new bot version to use in an alias. It's how you create an alias that can be used in a production environment. Test aliases are subject to lower throttling limits. Although this is a test walkthrough, creating a version is a best practice.

Create an alias for the bot
Add the Amazon Lex bot to your Connect Customer instance


Create a flow and add your Amazon Lex bot
Important
If you're using an Amazon Lex V2 V2 bot, your language attribute in Connect Customer must match the language model used to build your Lex bot. This is different than Amazon Lex (Classic). Use a Set voice block to indicate the Connect Customer language model, or use a Set contact attributes block.
Next, create a new flow that uses your Amazon Lex bot. When you create the flow, you configure the message played to callers.
-
Log in to your Connect Customer instance with an account that has permissions for contact flows and Amazon Lex bots.
-
On the navigation menu, choose Routing, Flows, Create Flow, and type a name for the flow.
-
Under Interact, drag a Get customer input block onto the designer, and connect it to the Entry point block.
-
Choose the Get customer input block to open it. Choose Text to speech or chat text, Enter text.
-
Type a message that provides callers with information about what they can do. For example, use a message that matches the intents used in the bot, such as "To check your account balance, press or say 1. To speak to an agent, press or say 2." The following image shows this message on the Properties page of the Get customer input block.

-
Select the Amazon Lex tab, as shown in the following image.

-
In the Name dropdown, select the AccountBalance bot you created earlier.
-
If you selected an Amazon Lex bot, under Alias use the dropdown menu to select the bot alias, Test. from
-
Amazon Lex Classic bots have the suffix "(Classic)" appended to their names. If you have selected a Classic bot, enter the alias you want to use in the Alias field.
-
For Amazon Lex V2 bots, you also have the option of manually setting a bot alias ARN. Choose Set manually, then either type the ARN of the bot alias you want to use or set the ARN using a dynamic attribute.
-
-
Under Intents, choose Add an intent.
-
Type AccountLookup and choose Add another intent. The following image shows the Intents section configured with this information.

-
Type SpeakToAgent and choose Save.
Finish the flow
In this step you finish adding parts to the flow that run after the caller interacts with the bot:
-
If the caller presses 1 to get their account balance, use a Prompt block to play a message and disconnect the call.
-
If the caller presses 2 to speak to an agent, use a Set queue block to set the queue and transfer the caller to the queue, which ends the flow.
Here are the steps to create the flow:
-
Under Interact, drag a Play prompt block to the designer, and connect the AccountLookup node of the Get customer input block to it. After the customer gets their account balance from the Amazon Lex bot, the message in the Play prompt block plays.
-
Under Terminate/Transfer, drag a Disconnect block to the designer, and connect the Play prompt block to it. After the prompt message plays, the call is disconnected.
To complete the SpeakToAgent intent:
-
Add a Set working queue block and connect it to the SpeakToAgent node of the Get customer input block.
-
Add a Transfer to queue block.
-
Connect the Success node of the Set customer queue flow block to the Transfer queue.
-
Choose Save, then Publish.
Your finished flow will look something like the following image. The flow starts with the Get customer input block. That block branches to Play prompt or Set customer queue.

Tip
If your business uses multiple locales in a single bot, add a Set contact attributes block to the beginning of your flow. Configure this block to use the $.LanguageCode system attribute.
Assign the flow to a phone number
When customers call in to your contact center, the flow to which they are sent is the one assigned to the telephone number that they called. To make the new flow active, assign it to a phone number for your instance.
-
Open the Connect Customer console.
-
Choose Routing, Phone numbers.
-
On the Manage Phone numbers page, select the phone number to assign to the flow.
-
Add a description.
-
In the Flow/IVR menu, choose the flow that you just created.
-
Choose Save.
Try it!
To try the bot and flow, call the number you assigned to the flow. Follow the prompts.
