Grant Connect Customer access to your AWS Lambda functions
Connect Customer can interact with your own systems and take different paths in flows dynamically. To achieve this, invoke AWS Lambda functions in a flow, fetch the results, and call your own services or interact with other AWS data stores or services. For more information, see the AWS Lambda Developer Guide.
To invoke a Lambda function from a flow, complete the following tasks.
Tasks
Create a Lambda function
Create a Lambda function, using any runtime, and configure it. For more information, see Get started with Lambda in the AWS Lambda Developer Guide.
If you create the Lambda function in the same Region as your contact center, you can
use the Connect Customer console to add the Lambda function to your instance as described in the
next task, Add a Lambda function to your Connect Customer instance.
This automatically adds resource permissions that allow Connect Customer to invoke the Lambda
function. Otherwise, if the Lambda function is in a different Region, you can add it to
your flow using the flow designer and add the resource permissions using the add-permission command, with a principal of
connect.amazonaws.com and the ARN of your Connect Customer instance. For more
information, see Using
Resource-Based Policies for AWS Lambda in the
AWS Lambda Developer Guide.
Add a Lambda function to your Connect Customer instance
Before you can use an Lambda function in a flow, you need to add it to your Connect Customer instance.
Add a Lambda function to your instance
-
Open the Connect Customer console at https://console.aws.amazon.com/connect/
. -
On the instances page, choose your instance name in the Instance Alias column. This instance name appears in the URL you use to access Connect Customer.

-
In the navigation pane, choose Flows.
-
In the AWS Lambda section, use the Function drop-down box to select the function to add to your instance.
Tip
The drop-down lists only those functions in the same Region as your instance. If no functions are listed, choose Create a new Lambda function, which opens the AWS Lambda console.
To use a Lambda in a different Region or account, in the AWS Lambda function, under Select a function, you can enter the ARN of a Lambda. Then set up the corresponding resource-based policy on that Lambda to allow the flow to call it.
To call
lambda:AddPermission, you need to:-
Set the principal to connect.amazonaws.com
-
Set the source account to be the account your instance is in.
-
Set the source ARN to the ARN of your instance.
For more information, see Granting function access to other accounts.
-
-
Choose Add Lambda Function. Confirm that the ARN of the function is added under Lambda Functions.
Now you can refer to that Lambda function in your flows.
Invoke a Lambda function from a flow
-
Open or create a flow.
-
Add an AWS Lambda function block (in the Integrate group) to the grid. Connect the branches to and from the block.
-
Choose the title of the AWS Lambda function block to open its properties page.
-
Under Select a function, choose from the list of functions you've added to your instance.
-
(Optional) Under Function input parameters, choose Add a parameter. You can specify key-value pairs that are sent to the Lambda function when it is invoked. You can also specify a Timeout value for the function.
-
In Timeout (max 8 seconds), specify how long to wait for Lambda to time out. After this time, the contact routes down the Error branch.
For every Lambda function invocation from a flow, you pass a default set of information related to ongoing contact, as well as any additional attributes defined in the Function input parameters section for the Invoke AWS Lambda function block added.
The following is an example JSON request to a Lambda function:
{
    "Details": {
        "ContactData": {
            "Attributes": {
               "exampleAttributeKey1": "exampleAttributeValue1"
              },
            "Channel": "VOICE",
            "ContactId": "4a573372-1f28-4e26-b97b-XXXXXXXXXXX",
            "CustomerEndpoint": {
                "Address": "+1234567890",
                "Type": "TELEPHONE_NUMBER"
            },
            "CustomerId": "someCustomerId",
            "Description": "someDescription",
            "InitialContactId": "4a573372-1f28-4e26-b97b-XXXXXXXXXXX",
            "InitiationMethod": "INBOUND | OUTBOUND | TRANSFER | CALLBACK",
            "InstanceARN": "arn:aws:connect:aws-region:1234567890:instance/c8c0e68d-2200-4265-82c0-XXXXXXXXXX",
            "LanguageCode": "en-US",
            "MediaStreams": {
                "Customer": {
                    "Audio": {
                        "StreamARN": "arn:aws:kinesisvideo::eu-west-2:111111111111:stream/instance-alias-contact-ddddddd-bbbb-dddd-eeee-ffffffffffff/9999999999999",
                        "StartTimestamp": "1571360125131", // Epoch time value
                        "StopTimestamp": "1571360126131",
                        "StartFragmentNumber": "100" // Numberic value for fragment number
                    }
                }
            },
            "Name": "ContactFlowEvent",
            "PreviousContactId": "4a573372-1f28-4e26-b97b-XXXXXXXXXXX",
            "Queue": {
                   "ARN": "arn:aws:connect:eu-west-2:111111111111:instance/cccccccc-bbbb-dddd-eeee-ffffffffffff/queue/aaaaaaaa-bbbb-cccc-dddd-eeeeeeeeeeee",
                 "Name": "PasswordReset",
                "OutboundCallerId": {
                    "Address": "+12345678903",
                    "Type": "TELEPHONE_NUMBER"
                }
            },
            "References": {
                "key1": {
                    "Type": "url",
                    "Value": "urlvalue"
                }
            },
            "SystemEndpoint": {
                "Address": "+1234567890",
                "Type": "TELEPHONE_NUMBER"
            }
        },
        "Parameters": {"exampleParameterKey1": "exampleParameterValue1",
               "exampleParameterKey2": "exampleParameterValue2"
        }
    },
    "Name": "ContactFlowEvent"
}
The request is divided into two parts:
-
Contact data—This is always passed by Connect Customer for every contact. Some parameters are optional.
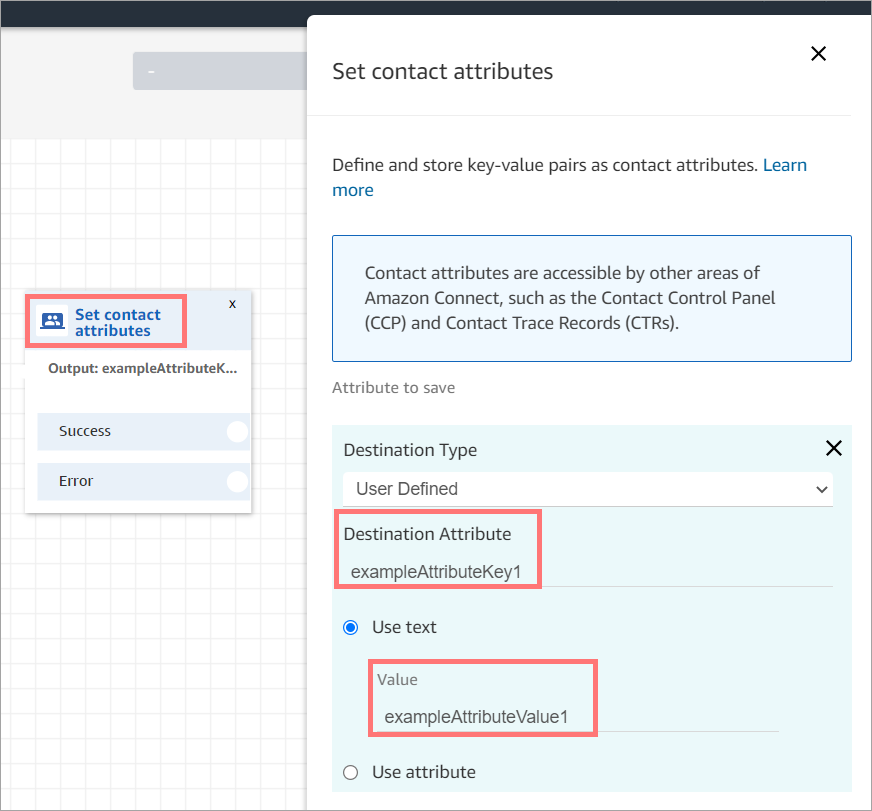
This section may include attributes that have been previously associated with a contact, such as when using a Set contact attributes block in a flow. This map may be empty if there aren't any saved attributes.
The following image shows where these attributes would appear in the properties page of a Set contact attributes.
-
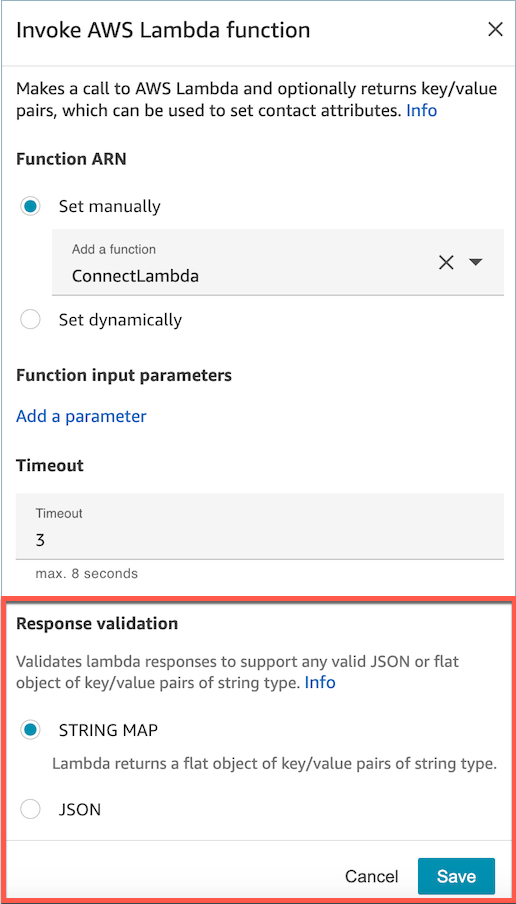
Parameters—These are parameters specific to this call that were defined when you created the Lambda function. The following image shows where these parameters would appear in the properties page of the Invoke AWS Lambda function block.

The AWS Lambda function block can receive input parameters in JSON format, accommodating both primitive data types and nested JSON. The following is an example of a JSON input that can be used in the AWS Lambda function block.
{
  "Name": "Jane",
  "Age":10,
  "isEnrolledInSchool": true,
  "hobbies": {
    "books":["book1", "book2"],
    "art":["art1", "art2"]
  }
}
Invocation retry policy
If your Lambda invocation in a flow gets throttled, the request will be retried. It will also be retried if a general service failure (500 error) happens.
When a synchronous invocation returns an error, Connect Customer retries up to 3 times, for a maximum of 8 seconds. At that point, the flow will progress down the Error branch.
To learn more about how Lambda retries, see Error Handling and Automatic Retries in AWS Lambda.
Best practice for invoking multiple Lambda functions
Connect Customer limits the duration of a sequence of Lambda functions to 20 seconds. It times out with an error message when the total execution time exceeds this threshold. Because customers hear silence while a Lambda function runs, we recommend adding a Play prompt block between functions to keep them engaged during the long interaction.
By breaking up a chain of Lambda functions with the Play prompt block, you can invoke multiple functions that last longer than the 20 second threshold.
Configure your Lambda function to parse the event
To successfully pass attributes and parameters between your Lambda function and Connect Customer, configure your function to correctly parse the JSON request sent from the Invoke AWS Lambda function block or Set contact attributes, and define any business logic that should be applied. How the JSON is parsed depends on the runtime you use for your function.
For example, the following code shows how to access exampleParameterKey1
from Invoke AWS Lambda function block and
exampleAttributeKey1 from Set contact attributes
block using Node.JS:
exports.handler = function(event, context, callback) {
// Example: access value from parameter (Invoke AWS Lambda function)
let parameter1 = event['Details']['Parameters']['exampleParameterKey1'];

// Example: access value from attribute (Set contact attributes block)
let attribute1 = event['Details']['ContactData']['Attributes']['exampleAttributeKey1'];

// Example: access customer's phone number from default data
let phone = event['Details']['ContactData']['CustomerEndpoint']['Address'];

// Apply your business logic with the values
// ...
}
Verify the function response
Tip
Referencing an array is not supported in a flow. Arrays can be used only in another Lambda function.
The Lambda function response could be either a STRING_MAP or JSON and has to be set while configuring the Invoke AWS Lambda function block in the flow. If response validation is set to STRING_MAP, then the Lambda function should return a flat object of key/value pairs of the string type. Otherwise, if response validation is set to JSON, the Lambda function can return any valid JSON including nested JSON.
The Lambda response can be up to 32kb. If you fail to reach Lambda, the function throws
an exception, the response is not understood, or the Lambda function takes more time than
the limit, the flow jumps to the Error label.
Test the output returned from your Lambda function to confirm that it will be correctly consumed when returned to Connect Customer. The following example shows a sample response in Node.JS:
exports.handler = function(event, context, callback) {
// Extract data from the event object
let phone = event['Details']['ContactData']['CustomerEndpoint']['Address'];

// Get information from your APIs

let customerAccountId = getAccountIdByPhone(phone);
let customerBalance = getBalanceByAccountId(customerAccountId);

    let resultMap = {
        AccountId: customerAccountId,
        Balance: '$' + customerBalance,
}

callback(null, resultMap);
}
This example shows an example response using Python:
def lambda_handler(event, context):
// Extract data from the event object
  phone = event['Details']['ContactData']['CustomerEndpoint']['Address']

// Get information from your APIs
  customerAccountId = getAccountIdByPhone(phone)
  customerBalance = getBalanceByAccountId(customerAccountId)

  	resultMap = {
  		"AccountId": customerAccountId,
  		"Balance": '$%s' % customerBalance
  		}

 return resultMap
The output returned from the function must be a flat object of key/value pairs, with values that include only alphanumeric, dash, and underscore characters. The size of the returned data must be less than 32 KB of UTF-8 data.
The following example shows the JSON output from these Lambda functions:
{
"AccountId": "a12345689",
"Balance": "$1000"
}
If response validation is set to JSON, then Lambda function can return even a nested JSON, for example:
{
  "Name": {
      "First": "John",
      "Last": "Doe"
  },
  "AccountId": "a12345689",
  "OrderIds": ["x123", "y123"]
}
You may return any result as long as they are simple key-value pairs.
Consume the Lambda function response
There are two ways to use the function response in your flow. You can either directly reference the variables returned from Lambda, or store the values returned from the function as contact attributes and then reference the stored attributes. When you use an external reference to a response from a Lambda function, the reference will always receive the response from the most recently invoked function. To use the response from a function before a subsequent function is invoked, the response must be saved as a contact attribute, or passed as a parameter to the next function.
1. Access variables directly
If you access the variables directly, you can use them in flow blocks, but they are not included in contact records. To access these variables directly in a flow block, add the block after the Invoke AWS Lambda function block, and then reference the attributes as shown in the following example:
Name - $.External.Name
Address - $.External.Address
CallerType - $.External.CallerType
The following image shows the properties page of the Play prompt block. The variables are specified in the text-to-speech block.

Make sure that the name specified for the source attribute matches the key name returned from Lambda.
2. Store variables as contact attributes
If you store the variables as contact attributes, you can use them throughout your flow, and they are included in contact records.
To store the values returned as contact attributes and then reference them, use a
Set contact attributes block in your flow after the
Invoke AWS Lambda function block. Choose Use
attribute, External for the
Type. Following the example we're using, set
Destination Attribute to MyAccountId, and set
the attribute to AccountId, and do the same for
MyBalance and Balance. This configuration is
shown in the following image.

Add Address as a Source attribute and use
returnedContactAddress as the Destination key.
Then add CallerType as a Source attribute and use
returnedContactType for the Destination key,
as shown in the following image.

Make sure that the name specified for the source external attribute matches the key name returned from Lambda.
Tutorial: Create a Lambda function and invoke in a flow
Step 1: Create the Lambda example
Sign in to the AWS Management Console and open the AWS Lambda console at https://console.aws.amazon.com/lambda/
. -
In AWS Lambda, choose Create function.
-
Choose Author from scratch, if it's not selected already. Under Basic information, for Function name, enter MyFirstConnectLambda. For all other options, accept the defaults. These options are shown in the following image of the AWS Lambda console.

-
Choose Create function.
-
In the Code source box, in the index.js tab, delete the template code from the code editor.
-
Copy and paste the following code into the code editor as shown in the following image:

exports.handler = async (event, context, callback) => {
// Extract information
        const customerNumber = event.Details.ContactData.CustomerEndpoint.Address;
        const companyName = event.Details.Parameters.companyName;
// Fetch data
        const balance = await fetchBalance(customerNumber, companyName);
        const support = await fetchSupportUrl(companyName);
// Prepare result
        const resultMap = {
        customerBalance: balance,
        websiteUrl: support
        }
        callback(null, resultMap);
        }

        async function fetchBalance(customerPhoneNumber, companyName) {
// Get data from your API Gateway or Database like DynamoDB
        return Math.floor(Math.random() * 1000);
        }

        async function fetchSupportUrl(companyName) {
// Get data from your API Gateway or Database like DynamoDB
        return 'www.GGG.com/support';
        }
Node.js 18 and later
If you are using Node.js 18 or later, use
export const handlerinstead ofexports.handler.This code is going to generate a random result for the customerBalance.
-
Choose Deploy.
-
After you choose Deploy, choose Test to launch the test editor.
-
In the Configure test event dialog box, select Create new event. For Event name, enter ConnectMock as the test name.
-
In the Event JSON box, delete the sample code and enter the following code instead.
{ "Details": { "ContactData": { "Attributes": {}, "Channel": "VOICE", "ContactId": "4a573372-1f28-4e26-b97b-XXXXXXXXXXX", "CustomerEndpoint": { "Address": "+1234567890", "Type": "TELEPHONE_NUMBER" }, "InitialContactId": "4a573372-1f28-4e26-b97b-XXXXXXXXXXX", "InitiationMethod": "INBOUND | OUTBOUND | TRANSFER | CALLBACK", "InstanceARN": "arn:aws:connect:aws-region:1234567890:instance/c8c0e68d-2200-4265-82c0-XXXXXXXXXX", "PreviousContactId": "4a573372-1f28-4e26-b97b-XXXXXXXXXXX", "Queue": { "ARN": "arn:aws:connect:eu-west-2:111111111111:instance/cccccccc-bbbb-dddd-eeee-ffffffffffff/queue/aaaaaaaa-bbbb-cccc-dddd-eeeeeeeeeeee", "Name": "PasswordReset" }, "SystemEndpoint": { "Address": "+1234567890", "Type": "TELEPHONE_NUMBER" } }, "Parameters": { "companyName": "GGG" } }, "Name": "ContactFlowEvent" } -
Choose Save.
-
Choose Test. You should see the following something similar to the following image:

Your balance will be different. The code generates a random number.
Step 2: Add your Lambda to Connect Customer
-
Go to the Connect Customer console, at https://console.aws.amazon.com/connect/
. -
Choose your Connect Customer instance alias.
-
On the navigation menu, choose Flows.
-
In the AWS Lambda section, use the Lambda Functions dropdown box to select MyFirstConnectLambda.

-
Choose Add Lambda Function.
Step 3: Create the contact flow
The following image is an example of the flow you are going to build using the steps in this procedure. It contains the following blocks: Set contact attributes, Play prompt, Invoke AWS Lambda function, another Set contact attributes block, another Play prompt block, and finally a Disconnect block.

-
Log in to the Connect Customer admin website at https://
instance name.my.connect.aws/. -
On the navigation menu, go to Routing, Flows, Create a contact flow.
-
Drag a Set contact attributes block onto the grid, and configure its properties page shown in the following image:

-
Namespace = User defined.
-
Attribute = companyName.
-
Choose Set manually. Value = GGG.
-
Choose Save.
-
-
Drag a Play prompt block onto the grid, and configure its properties page as shown in the following image:

-
Choose Text-to-speech or chat text, Set manually, and set Interpret as to SSML. Enter the following text in the box for the text to be spoken:
Hello, thank you for calling $.Attributes.companyName inc. -
Choose Save.
-
-
Drag another Play prompt block onto the grid, and configure its properties page as shown in the following image:

-
Choose Text-to-speech or chat text, Set manually, and set Interpret as to Text. Enter the following text in the box for the text to be spoken:
Please try again later. -
Choose Save.
-
-
Drag a AWS Lambda function block onto the grid, and configure its properties page as shown in the following image:

-
Choose Select manually, and then choose MyFirstConnectLambda from the dropdown.
-
In the Destination Key box, enter companyName. (This is sent to Lambda.)
-
Choose Set dynamically box
-
For Namespace, select User Defined.
-
For Attribute, enter companyName.
-
Choose Save.
-
-
Drag a Set contact attributes block onto the grid, choose Add another attribute, and configure its properties page as shown in the following image:

-
Namespace = User Defined. Attribute = MyBalance.
-
Choose Set dynamically.
-
Namespace = External.
-
Attribute = customerBalance. This is the result from Lambda.
-
Choose Add another attribute.
-
Namespace = User-defined.
-
Attribute = MyURL.
-
Select Set dynamically. Namespace =External.
-
Attribute = websiteUrl. This is the result from Lambda.
-
Choose Save.
-
-
Drag a Play prompt block onto the grid, and configure its properties page as shown in the following image:

-
Choose Text-to-speech or chat text, and set Interpret as to SSML. Enter the following text in the box:
Your remaining balance is <say-as
                                    interpret-as="characters">$.Attributes.MyBalance</say-as>.
Thank you for calling $.Attributes.companyName.Visit $.Attributes.MyURL for more information. -
Choose Save.
-
-
Drag a Disconnect / hang up block onto the grid.
-
Connect the all blocks so your flow looks like the image shown at the top of this procedure.
-
Enter MyFirstConnectFlow as the name, and then choose Publish.
-
On the navigation menu, go to Channels, Phone numbers.
-
Select your phone number.
-
Select MyFirstConnectFlow and choose Save.
Now try it out. Call the number. You should hear a greeting message, your balance, and the website to visit.
