Die vorliegende Übersetzung wurde maschinell erstellt. Im Falle eines Konflikts oder eines Widerspruchs zwischen dieser übersetzten Fassung und der englischen Fassung (einschließlich infolge von Verzögerungen bei der Übersetzung) ist die englische Fassung maßgeblich.
Erstellen Sie einen RFC
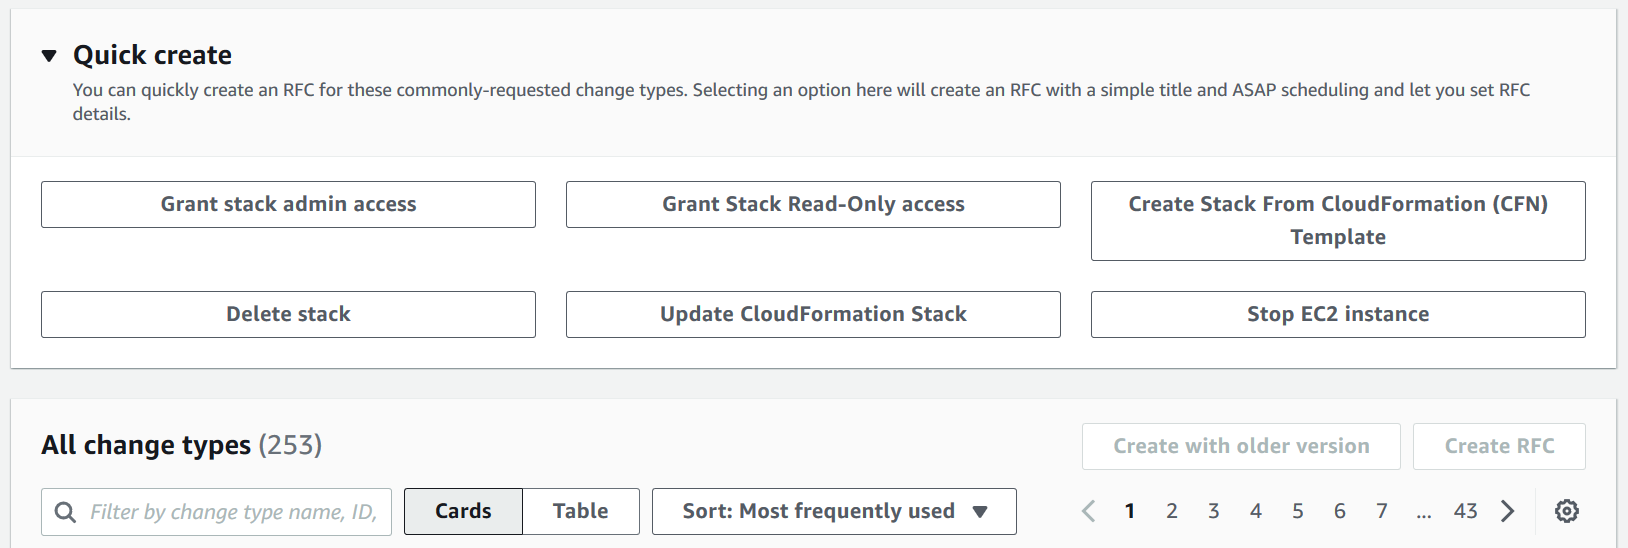
Im Folgenden finden Sie die erste Seite des RFC-Erstellungsprozesses in der AMS-Konsole, auf der Quick Cards geöffnet und Browse-Änderungstypen aktiv sind:
Im Folgenden finden Sie die erste Seite des RFC-Erstellungsprozesses in der AMS-Konsole, auf der die Option Nach Kategorie auswählen aktiviert ist:

Funktionsweise
Navigieren Sie zur Seite „RFC erstellen“: Klicken Sie im linken Navigationsbereich der AMS-Konsole, um die RFCs Listenseite RFCszu öffnen, und klicken Sie dann auf RFC erstellen.
Wählen Sie in der Standardansicht „Änderungstypen durchsuchen“ einen beliebten Änderungstyp (CT) oder wählen Sie in der Ansicht „Nach Kategorie auswählen“ einen CT aus.
Nach Änderungstyp suchen: Sie können im Bereich Schnellerstellung auf ein beliebtes CT klicken, um sofort die Seite RFC ausführen zu öffnen. Beachten Sie, dass Sie mit Quick Create keine ältere CT-Version auswählen können.
Verwenden Sie zum Sortieren CTs den Bereich Alle Änderungstypen in der Karten - oder Tabellenansicht. Wählen Sie in einer der Ansichten einen CT aus und klicken Sie dann auf RFC erstellen, um die Seite RFC ausführen zu öffnen. Falls zutreffend, wird neben der Schaltfläche „RFC erstellen“ die Option Mit älterer Version erstellen angezeigt.
Nach Kategorie auswählen: Wählen Sie eine Kategorie, eine Unterkategorie, einen Artikel und einen Vorgang aus. Daraufhin wird das Feld mit den CT-Details geöffnet. Dort können Sie gegebenenfalls die Option „Mit älterer Version erstellen“ auswählen. Klicken Sie auf RFC erstellen, um die Seite RFC ausführen zu öffnen.
Öffnen Sie auf der Seite RFC ausführen den Bereich CT-Name, um das Feld mit den CT-Details zu sehen. Ein Betreff ist erforderlich (dieser wird für Sie ausgefüllt, wenn Sie Ihr CT in der Ansicht „Änderungstypen durchsuchen“ auswählen). Öffnen Sie den Bereich Zusätzliche Konfiguration, um Informationen zum RFC hinzuzufügen.
Verwenden Sie im Bereich Ausführungskonfiguration die verfügbaren Dropdownlisten oder geben Sie Werte für die erforderlichen Parameter ein. Um optionale Ausführungsparameter zu konfigurieren, öffnen Sie den Bereich Zusätzliche Konfiguration.
Wenn Sie fertig sind, klicken Sie auf Ausführen. Wenn keine Fehler vorliegen, wird die Seite mit dem RFC erfolgreich erstellt mit den übermittelten RFC-Details und der ersten Run-Ausgabe angezeigt.
Öffnen Sie den Bereich Run-Parameter, um die von Ihnen eingereichten Konfigurationen zu sehen. Aktualisieren Sie die Seite, um den RFC-Ausführungsstatus zu aktualisieren. Brechen Sie optional den RFC ab oder erstellen Sie eine Kopie davon mit den Optionen oben auf der Seite.
Funktionsweise
Verwenden Sie entweder Inline Create (Sie geben einen
create-rfcBefehl mit allen RFC- und Ausführungsparametern aus) oder Template Create (Sie erstellen zwei JSON-Dateien, eine für die RFC-Parameter und eine für die Ausführungsparameter) und geben Sie dencreate-rfcBefehl mit den beiden Dateien als Eingabe aus. Beide Methoden werden hier beschrieben.Reichen Sie den
aws amscm submit-rfc --rfc-idBefehl RFC: mit der zurückgegebenen RFC-ID ein.IDÜberwachen Sie den RFC: -Befehl.
aws amscm get-rfc --rfc-idID
Verwenden Sie diesen Befehl, um die Version des Änderungstyps zu überprüfen:
aws amscm list-change-type-version-summaries --filter Attribute=ChangeTypeId,Value=CT_ID
Anmerkung
Sie können alle CreateRfc Parameter mit jedem RFC verwenden, unabhängig davon, ob sie Teil des Schemas für den Änderungstyp sind oder nicht. Um beispielsweise Benachrichtigungen zu erhalten, wenn sich der RFC-Status ändert, fügen Sie diese Zeile dem RFC-Parameter-Teil der Anfrage hinzu (nicht den Ausführungsparametern). --notification "{\"Email\": {\"EmailRecipients\" : [\"email@example.com\"]}}" Eine Liste aller CreateRfc Parameter finden Sie in der AMS Change Management API-Referenz.
INLINE-ERSTELLUNG:
Geben Sie den Befehl create RFC mit den direkt angegebenen Ausführungsparametern aus (vermeiden Sie Anführungszeichen, wenn Sie die Ausführungsparameter inline angeben), und senden Sie dann die zurückgegebene RFC-ID. Sie können den Inhalt beispielsweise durch etwas Ähnliches ersetzen:
aws amscm create-rfc --change-type-id "CT_ID" --change-type-version "VERSION" --title "TITLE" --execution-parameters "{\"Description\": \"example\"}"
VORLAGE ERSTELLEN:
Anmerkung
In diesem Beispiel für die Erstellung eines RFC wird der Stack-Änderungstyp Load Balancer (ELB) verwendet.
-
Suchen Sie das entsprechende CT. Der folgende Befehl durchsucht CT-Klassifikationszusammenfassungen nach solchen, die „ELB“ im Artikelnamen enthalten, und erstellt eine Ausgabe der Kategorie, des Artikels, der Operation und der ChangeType ID in Tabellenform (Unterkategorie für beide ist
Advanced stack components).aws amscm list-change-type-classification-summaries --query "ChangeTypeClassificationSummaries[?contains(Item,'ELB')].[Category,Item,Operation,ChangeTypeId]" --output table--------------------------------------------------------------------- | CtSummaries | +-----------+---------------------------+---------------------------+ | Deployment| Load balancer (ELB) stack | Create | ct-123h45t6uz7jl | | Management| Load balancer (ELB) stack | Update | ct-0ltm873rsebx9 | +-----------+---------------------------+---------------------------+ Finden Sie die aktuellste Version des CT:
ChangeTypeIdundChangeTypeVersion: Die Änderungstyp-ID für diese exemplarische Vorgehensweise lautetct-123h45t6uz7jl(create ELB). Um die neueste Version herauszufinden, führen Sie diesen Befehl aus:aws amscm list-change-type-version-summaries --filter Attribute=ChangeTypeId,Value=ct-123h45t6uz7jlMachen Sie sich mit den Optionen und Anforderungen vertraut. Der folgende Befehl gibt das Schema in eine JSON-Datei namens CreateElbParams .json aus.
aws amscm get-change-type-version --change-type-id "ct-123h45t6uz7jl" --query "ChangeTypeVersion.ExecutionInputSchema" --output text > CreateElbParams.jsonÄndern und speichern Sie die JSON-Datei mit den Ausführungsparametern. In diesem Beispiel wird die Datei „ CreateElbParams.json“ genannt.
Bei einem Bereitstellungs-CT StackTemplateId ist das im Schema enthalten und muss in den Ausführungsparametern eingereicht werden.
Für die Angabe TimeoutInMinutes, wie viele Minuten für die Erstellung des Stacks vorgesehen sind, bevor der RFC fehlschlägt, verzögert diese Einstellung die RFC-Ausführung nicht, aber Sie müssen genügend Zeit einplanen (geben Sie beispielsweise nicht „5" an). Gültige Werte sind „60" bis „360" für CTs mit langer Laufzeit UserData: Create EC2 und Create ASG. Wir empfehlen für alle anderen Bereitstellungen den zulässigen Höchstwert von „60“. CTs
Geben Sie die ID der VPC an, in der der Stack erstellt werden soll. Sie können die VPC-ID mit dem CLI-Befehl abrufen.
aws amsskms list-vpc-summaries{ "Description": "ELB-Create-RFC", "VpcId": "VPC_ID", "StackTemplateId": "stm-sdhopv00000000000", "Name": "MyElbInstance", "TimeoutInMinutes":60, "Parameters": { "ELBSubnetIds":["SUBNET_ID"], "ELBHealthCheckHealthyThreshold":4, "ELBHealthCheckInterval":5, "ELBHealthCheckTarget":"HTTP:80/", "ELBHealthCheckTimeout":60, "ELBHealthCheckUnhealthyThreshold":5, "ELBScheme":false} }Geben Sie die RFC-JSON-Vorlage in eine Datei in Ihrem aktuellen Ordner namens .json aus: CreateElbRfc
aws amscm create-rfc --generate-cli-skeleton > CreateElbRfc.jsonÄndern und speichern Sie die CreateElbRfc JSON-Datei. Da Sie die Ausführungsparameter in einer separaten Datei erstellt haben, entfernen Sie die
ExecutionParametersZeile. Sie können den Inhalt beispielsweise durch etwas Ähnliches ersetzen:{ "ChangeTypeVersion": "2.0", "ChangeTypeId": "ct-123h45t6uz7jl", "Title": "Create ELB" }Erstellen Sie den RFC. Der folgende Befehl spezifiziert die Ausführungsparameterdatei und die RFC-Vorlagendatei:
aws amscm create-rfc --cli-input-json file://CreateElbRfc.json --execution-parameters file://CreateElbParams.jsonSie erhalten die ID des neuen RFC in der Antwort und können sie verwenden, um den RFC zu senden und zu überwachen. Bis Sie ihn abschicken, verbleibt der RFC im Bearbeitungszustand und startet nicht.
Anmerkung
Sie können das AMS verwenden, um einen RFC API/CLI zu erstellen, ohne eine RFC-JSON-Datei oder eine JSON-Datei mit CT-Ausführungsparametern zu erstellen. Dazu verwenden Sie den create-rfc Befehl und fügen dem Befehl die erforderlichen RFC- und Ausführungsparameter hinzu. Dies wird als „Inline Create“ bezeichnet. Beachten Sie, dass alle Bereitstellungen CTs innerhalb des execution-parameters Blocks ein Parameters Array mit den Parametern für die Ressource enthielten. Die Parameter müssen Anführungszeichen enthalten, die mit einem umgekehrten Schrägstrich (\) maskiert werden.
Die andere dokumentierte Methode zur Erstellung eines RFC heißt „Template Create“. Hier erstellen Sie eine JSON-Datei für die RFC-Parameter und eine weitere JSON-Datei für die Ausführungsparameter und senden die beiden Dateien mit dem create-rfc Befehl ab. Diese Dateien können als Vorlagen dienen und für die future wiederverwendet werden. RFCs
Bei der Erstellung RFCs mit Vorlagen können Sie einen Befehl verwenden, um die JSON-Datei mit dem gewünschten Inhalt zu erstellen, indem Sie einen Befehl wie in der Abbildung gezeigt ausführen. Die Befehle erstellen eine Datei mit dem Namen „parameters.json“ mit dem angezeigten Inhalt. Sie können diese Befehle auch verwenden, um die RFC-JSON-Datei zu erstellen.
