기계 번역으로 제공되는 번역입니다. 제공된 번역과 원본 영어의 내용이 상충하는 경우에는 영어 버전이 우선합니다.
Windows 또는 Linux PC 또는 Mac을 AWS IoT 디바이스로 사용
이 자습서에서는와 함께 사용할 개인용 컴퓨터를 구성합니다 AWS IoT. 이 지침은 Windows 및 Linux PC와 Mac을 지원합니다. 이를 위해서는 컴퓨터에 소프트웨어를 설치해야 합니다. 컴퓨터에 소프트웨어를 설치하지 않으려는 경우 Amazon EC2를 사용하여 가상 디바이스 생성을(를) 시도하여 가상 머신에 모든 소프트웨어를 설치할 수 있습니다.
이 자습서에서 배울 내용은 다음과 같습니다.
개인용 컴퓨터 설정
이 자습서를 완료하려면 인터넷에 연결된 Windows 또는 Linux PC 또는 Mac이 필요합니다.
다음 단계를 진행하기 전에 컴퓨터에서 명령줄 창을 열 수 있는지 확인합니다. Windows PC에서 cmd.exe를 사용합니다. Linux PC 또는 Mac에서는 Terminal을 사용합니다.
Git, Python 및 AWS IoT Device SDK for Python 설치
이 단원에서는 Python과 Python용 AWS IoT 디바이스 SDK를 컴퓨터에 설치합니다.
최신 버전의 Git와 Python 설치
이 절차에서는 PC에 최신 버전의 Git 및 Python을 설치하는 방법을 설명합니다.
Git와 Python을 컴퓨터에 다운로드하고 설치하려면
-
컴퓨터에 Git가 설치되어 있는지 확인합니다. 명령줄에 다음 명령을 입력합니다.
git --version명령이 Git 버전을 표시하면 Git가 설치된 것이므로, 다음 단계를 진행할 수 있습니다.
명령에 오류가 표시되면
https://git-scm.com/download를 열고 컴퓨터에 Git를 설치하세요. -
Python이 이미 설치되어 있는지 확인합니다. 명령줄에 다음 명령을 입력합니다.
python -V참고
이 명령으로
Python was not
                                            found
오류가 발생하는 경우 운영 체제가 Python v3.x 실행 파일을Python3(으)로 호출하기 때문일 수 있습니다. 이 경우python의 모든 인스턴스를python3(으)로 바꾸고 이 자습서의 나머지 단원을 진행합니다.명령이 Python 버전을 표시하면 Python이 이미 설치되어 있는 것입니다. 이 자습서에서는 Python v3.7 이상이 필요합니다.
-
Python이 설치되어 있으면 이 단원의 나머지 단계를 건너뛸 수 있습니다. 그렇지 않은 경우 계속 진행합니다.
-
https://www.python.org/downloads/
를 열고 컴퓨터에 설치 프로그램을 다운로드하세요. -
다운로드가 자동으로 설치되지 않으면 다운로드한 프로그램을 실행하여 Python을 설치합니다.
-
Python의 설치를 확인합니다.
python -V명령이 Python 버전을 표시하는지 확인합니다. Python 버전이 표시되지 않으면 Python을 다시 다운로드하여 설치해 보세요.
AWS IoT Device SDK for Python 설치
컴퓨터에 AWS IoT Device SDK for Python을 설치하려면
-
AWS IoT Device SDK for Python의 v2를 설치합니다.
python3 -m pip install awsiotsdk -
AWS IoT Device SDK for Python 리포지토리를 홈 디렉터리의 aws-iot-device-sdk-python-v2 디렉터리에 복제합니다. 이 절차에서는 설치하는 파일의 기본 디렉터리를
홈(home)으로 지칭합니다.홈디렉터리의 실제 위치는 운영 체제에 따라 다릅니다.참고
cmd.exe 대신 Windows PowerShell을 사용하는 경우 다음 명령을 사용합니다.
echo $home
자세한 내용은 Python GitHub 리포지토리용AWS IoT
디바이스 SDK
샘플 애플리케이션 실행 준비
샘플 애플리케이션을 실행하도록 시스템을 준비하려면
-
certs디렉터리를 만듭니다. AWS IoT 리소스 생성에서 사물 객체를 생성하고 등록할 때 저장한 프라이빗 키, 디바이스 인증서 및 루트 CA 인증서 파일을certs디렉터리에 복사합니다. 대상 디렉터리에 있는 각 파일의 이름은 테이블의 파일 이름과 일치해야 합니다.다음 섹션의 명령은 이 표에 표시된 대로 키 및 인증서 파일이 디바이스에 저장되어 있다고 가정합니다.
정책을 설정하고 샘플 애플리케이션을 실행합니다.
이 단원에서는 정책을 설정하고 AWS IoT Device SDK for Python의 aws-iot-device-sdk-python-v2/samples디렉터리에 있는 pubsub.py 샘플 스크립트를 실행합니다. 이 스크립트는 디바이스가 MQTT 라이브러리를 사용하여 MQTT 메시지를 게시 및 구독하는 방법을 보여 줍니다.
pubsub.py 샘플 앱은 test/topic 주제를 구독하고 해당 주제에 10개의 메시지를 게시하고 메시지 브로커로부터 받은 메시지를 표시합니다.
pubsub.py 샘플 스크립트를 실행하려면 다음 정보가 필요합니다.
|
파라미터 |
값을 찾을 수 있는 위치 |
|---|---|
your-iot-endpoint |
|
your-iot-endpoint 값의 형식은 endpoint_id-ats.iot.region.amazonaws.com.rproxy.goskope.coma3qj468EXAMPLE-ats.iot.us-west-2.amazonaws.com)입니다.
스크립트를 실행하기 전에 사물 정책이 샘플 스크립트에 연결, 구독, 게시 및 수신할 수 있는 권한을 제공하는지 확인합니다.
사물 리소스에 대한 정책 문서를 찾고 검토하려면
-
AWS IoT 콘솔
의 사물(Things) 목록에서 디바이스를 나타내는 사물 리소스를 찾습니다. -
디바이스를 나타내는 사물 리소스의 이름(Name) 링크를 선택하여 사물 세부 정보(Thing details) 페이지를 엽니다.
-
사물 세부 정보(Thing details) 페이지의 인증서(Certificates) 탭에서 사물 리소스에 연결된 인증서를 선택합니다. 목록에는 인증서가 하나만 있어야 합니다. 여러 개 있는 경우 디바이스에 파일이 설치되어 있고 AWS IoT Core에 연결하는 데 사용할 인증서를 선택합니다.
인증서(Certificate) 세부 정보 페이지의 정책(Policies) 탭에서 인증서에 연결된 정책을 선택합니다. 단 하나만 있어야 합니다. 여러 개 있는 경우 각각에 대해 다음 단계를 반복하여 최소한 하나의 정책이 필요한 액세스 권한을 부여하는지 확인합니다.
-
정책(Policy) 개요 페이지에서 JSON 편집기를 찾고 정책 문서 편집(Edit policy document)을 선택하여 필요에 따라 정책 문서를 검토하고 편집합니다.
-
다음 예제에 정책 JSON이 표시됩니다.
"Resource"요소에서를 각Resource값 AWS 계정 에서 AWS 리전 및region:account-
{
    "Version":"2012-10-17",
    "Statement": [
        {
            "Effect": "Allow",
            "Action": [
                "iot:Publish",
                "iot:Receive"
            ],
            "Resource": [
            "arn:aws:iot:us-east-1:123456789012:topic/test/topic"
            ]
        },
        {
            "Effect": "Allow",
            "Action": [
                "iot:Subscribe"
            ],
            "Resource": [
            "arn:aws:iot:us-east-1:123456789012:topicfilter/test/topic"
            ]
        },
        {
            "Effect": "Allow",
            "Action": [
                "iot:Connect"
            ],
            "Resource": [
            "arn:aws:iot:us-east-1:123456789012:client/test-*"
            ]
        }
    ]
}
샘플 스크립트는 다음과 같은 작업을 수행합니다.
-
계정의 AWS IoT Core 에 연결합니다.
-
메시지 주제 test/topic를 구독하고 해당 주제에 대해 수신하는 메시지 표시.
-
test/topic 주제에 10개의 메시지 게시.
-
다음과 유사한 출력 표시.
Connected!
Subscribing to topic 'test/topic'...
Subscribed with QoS.AT_LEAST_ONCE
Sending 10 message(s)
Publishing message to topic 'test/topic': Hello World! [1]
Received message from topic 'test/topic': b'"Hello World! [1]"'
Publishing message to topic 'test/topic': Hello World! [2]
Received message from topic 'test/topic': b'"Hello World! [2]"'
Publishing message to topic 'test/topic': Hello World! [3]
Received message from topic 'test/topic': b'"Hello World! [3]"'
Publishing message to topic 'test/topic': Hello World! [4]
Received message from topic 'test/topic': b'"Hello World! [4]"'
Publishing message to topic 'test/topic': Hello World! [5]
Received message from topic 'test/topic': b'"Hello World! [5]"'
Publishing message to topic 'test/topic': Hello World! [6]
Received message from topic 'test/topic': b'"Hello World! [6]"'
Publishing message to topic 'test/topic': Hello World! [7]
Received message from topic 'test/topic': b'"Hello World! [7]"'
Publishing message to topic 'test/topic': Hello World! [8]
Received message from topic 'test/topic': b'"Hello World! [8]"'
Publishing message to topic 'test/topic': Hello World! [9]
Received message from topic 'test/topic': b'"Hello World! [9]"'
Publishing message to topic 'test/topic': Hello World! [10]
Received message from topic 'test/topic': b'"Hello World! [10]"'
10 message(s) received.
Disconnecting...
Disconnected!
샘플 앱을 실행하는 데 문제가 있는 경우 샘플 애플리케이션 문제 해결를 검토합니다.
샘플 앱이 수행 중인 작업에 대한 자세한 메시지를 표시하도록 명령줄에 --verbosity Debug 파라미터를 추가할 수도 있습니다. 이 정보는 문제를 해결하는 데 도움이 될 수 있습니다.
AWS IoT 콘솔에서 샘플 앱의 메시지 보기
AWS IoT 콘솔에서 MQTT 테스트 클라이언트를 사용하여, 샘플 앱의 메시지가 메시지 브로커를 통과할 때 해당 메시지를 볼 수 있습니다.
샘플 앱에서 게시한 MQTT 메시지를 보려면
-
MQTT 클라이언트를 사용하여 AWS IoT MQTT 메시지 보기을(를) 검토합니다. 이는 MQTT 메시지가 메시지 브로커를 통과할 때 해당 메시지를 보기 위해 AWS IoT 콘솔에서 MQTT 테스트 클라이언트를 사용하는 방법을 파악하는 데 도움이 됩니다.
-
AWS IoT 콘솔에서 MQTT 테스트 클라이언트를 엽니다.
-
Subscribe to a topic(주제 구독)에서 test/topic 주제를 구독합니다.
-
명령줄 창에서 샘플 앱을 다시 실행하고 AWS IoT 콘솔의 MQTT 클라이언트에서 메시지를 확인합니다.
MQTT 및가 프로토콜을 AWS IoT Core 지원하는 방법에 대한 자세한 내용은 MQTT를 참조하세요.
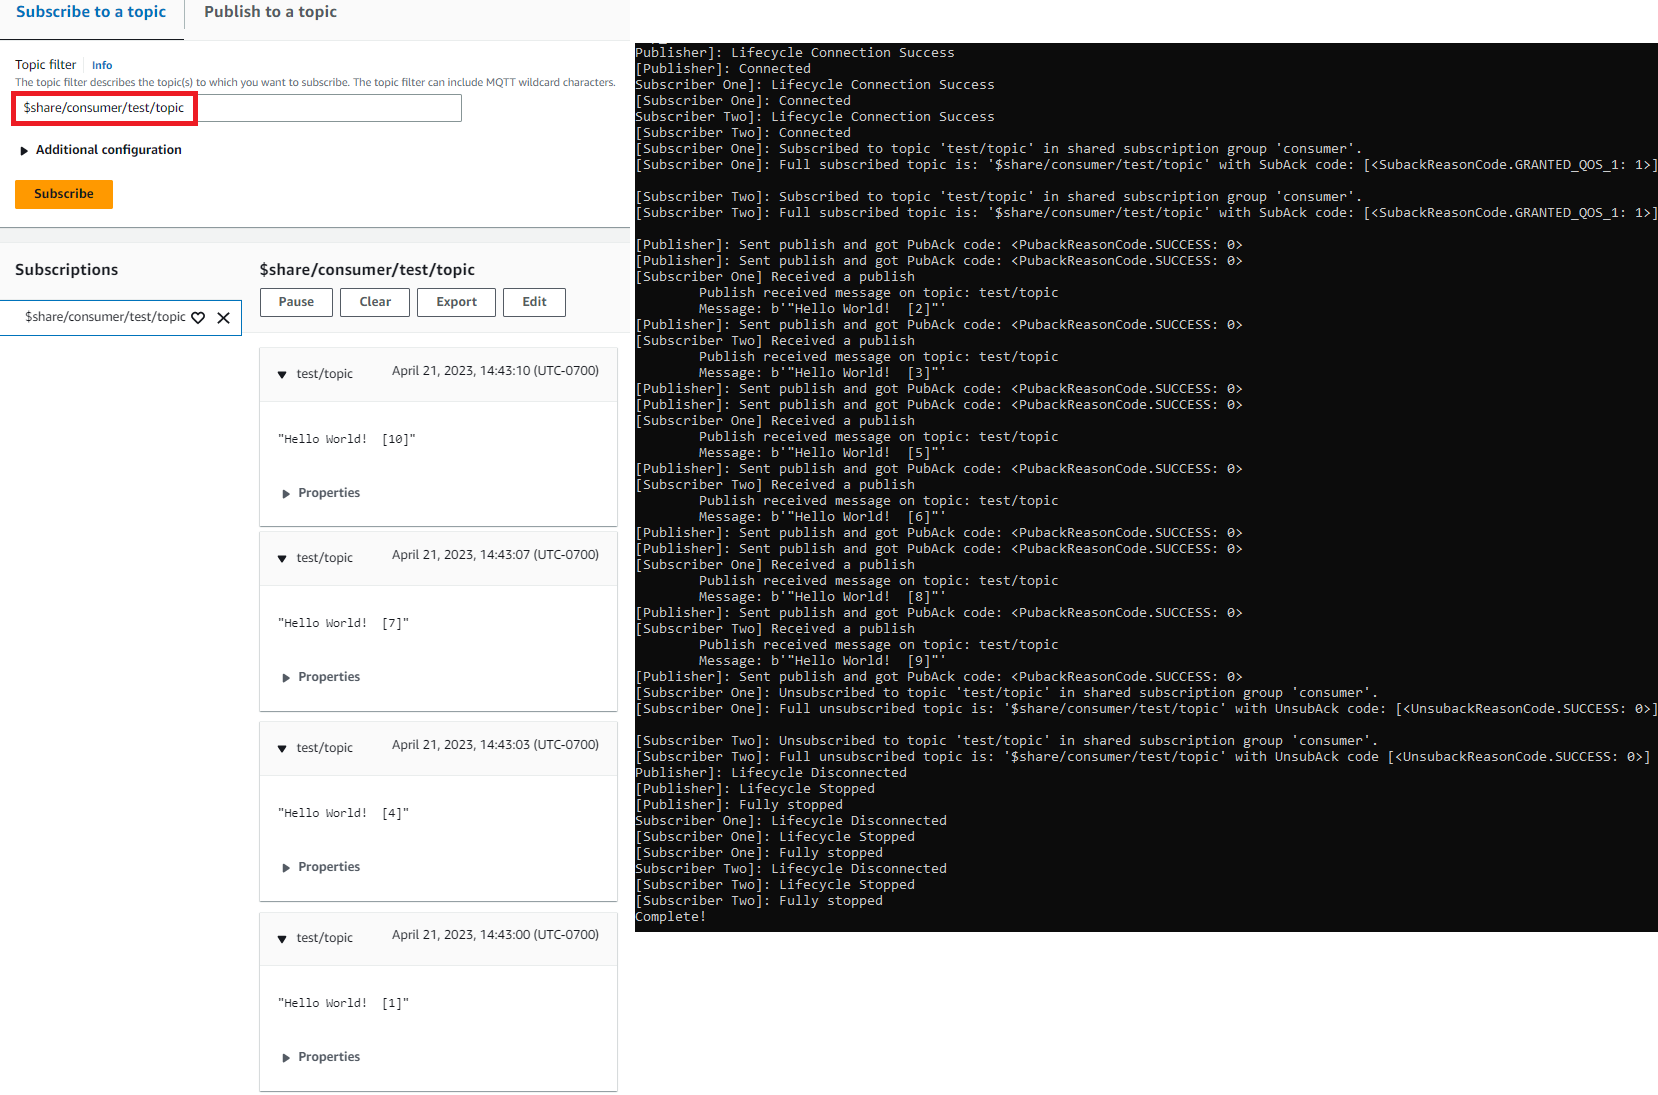
Python에서 공유 구독 예시 실행하기
AWS IoT Core 는 MQTT 3 및 MQTT 5 모두에 대해 공유 구독을 지원합니다. 공유 구독을 사용하면 여러 클라이언트가 한 주제에 대한 구독을 공유할 수 있으며 무작위 배포를 통해 해당 주제에 게시된 메시지를 한 클라이언트만 수신할 수 있습니다. 공유 구독을 사용하려면 클라이언트가 공유 구독의 주제 필터를 구독합니다. $share/{ShareName}/{TopicFilter}
정책을 설정하고 공유 구독 예시를 실행하는 방법
-
공유 구독 예시를 실행하려면 MQTT 5 공유 구독
에 설명된 대로 사물 정책을 설정해야 합니다. -
공유 구독 예시를 실행하려면 다음 명령을 실행합니다.
참고
샘플을 실행할 때 필요에 따라 그룹 식별자를 선택적으로 지정할 수 있습니다(예:
--group_identifier
                                        consumer
). 지정하지 않는 경우python-sample이 기본 그룹 식별자입니다. -
명령줄의 출력은 다음과 같을 수 있습니다.
Publisher]: Lifecycle Connection Success [Publisher]: Connected Subscriber One]: Lifecycle Connection Success [Subscriber One]: Connected Subscriber Two]: Lifecycle Connection Success [Subscriber Two]: Connected [Subscriber One]: Subscribed to topic 'test/topic' in shared subscription group 'consumer'. [Subscriber One]: Full subscribed topic is: '$share/consumer/test/topic' with SubAck code: [<SubackReasonCode.GRANTED_QOS_1: 1>] [Subscriber Two]: Subscribed to topic 'test/topic' in shared subscription group 'consumer'. [Subscriber Two]: Full subscribed topic is: '$share/consumer/test/topic' with SubAck code: [<SubackReasonCode.GRANTED_QOS_1: 1>] [Publisher]: Sent publish and got PubAck code: <PubackReasonCode.SUCCESS: 0> [Subscriber Two] Received a publish Publish received message on topic: test/topic Message: b'"Hello World! [1]"' [Publisher]: Sent publish and got PubAck code: <PubackReasonCode.SUCCESS: 0> [Subscriber One] Received a publish Publish received message on topic: test/topic Message: b'"Hello World! [2]"' [Publisher]: Sent publish and got PubAck code: <PubackReasonCode.SUCCESS: 0> [Subscriber Two] Received a publish Publish received message on topic: test/topic Message: b'"Hello World! [3]"' [Publisher]: Sent publish and got PubAck code: <PubackReasonCode.SUCCESS: 0> [Subscriber One] Received a publish Publish received message on topic: test/topic Message: b'"Hello World! [4]"' [Publisher]: Sent publish and got PubAck code: <PubackReasonCode.SUCCESS: 0> [Subscriber Two] Received a publish Publish received message on topic: test/topic Message: b'"Hello World! [5]"' [Publisher]: Sent publish and got PubAck code: <PubackReasonCode.SUCCESS: 0> [Subscriber One] Received a publish Publish received message on topic: test/topic Message: b'"Hello World! [6]"' [Publisher]: Sent publish and got PubAck code: <PubackReasonCode.SUCCESS: 0> [Subscriber Two] Received a publish Publish received message on topic: test/topic Message: b'"Hello World! [7]"' [Publisher]: Sent publish and got PubAck code: <PubackReasonCode.SUCCESS: 0> [Subscriber One] Received a publish Publish received message on topic: test/topic Message: b'"Hello World! [8]"' [Publisher]: Sent publish and got PubAck code: <PubackReasonCode.SUCCESS: 0> [Subscriber Two] Received a publish Publish received message on topic: test/topic Message: b'"Hello World! [9]"' [Publisher]: Sent publish and got PubAck code: <PubackReasonCode.SUCCESS: 0> [Subscriber One] Received a publish Publish received message on topic: test/topic Message: b'"Hello World! [10]"' [Subscriber One]: Unsubscribed to topic 'test/topic' in shared subscription group 'consumer'. [Subscriber One]: Full unsubscribed topic is: '$share/consumer/test/topic' with UnsubAck code: [<UnsubackReasonCode.SUCCESS: 0>] [Subscriber Two]: Unsubscribed to topic 'test/topic' in shared subscription group 'consumer'. [Subscriber Two]: Full unsubscribed topic is: '$share/consumer/test/topic' with UnsubAck code [<UnsubackReasonCode.SUCCESS: 0>] Publisher]: Lifecycle Disconnected [Publisher]: Lifecycle Stopped [Publisher]: Fully stopped Subscriber One]: Lifecycle Disconnected [Subscriber One]: Lifecycle Stopped [Subscriber One]: Fully stopped Subscriber Two]: Lifecycle Disconnected [Subscriber Two]: Lifecycle Stopped [Subscriber Two]: Fully stopped Complete! -
AWS IoT 콘솔에서 MQTT 테스트 클라이언트를 엽니다. 주제 구독에서
$share/consumer/test/topic과 같은 공유 구독 주제를 구독하세요. 샘플을 실행할 때 필요에 따라 그룹 식별자를 지정할 수 있습니다(예:--group_identifier consumer). 그룹 식별자를 지정하지 않는 경우 기본값은python-sample입니다. 자세한 내용은 AWS IoT Core 개발자 안내서의 MQTT 5 공유 구독 Python 예시및 공유 구독을 참조하세요. 명령줄 창에서 샘플 앱을 다시 실행하고 AWS IoT 콘솔 및 명령줄의 MQTT 테스트 클라이언트에서 메시지 배포를 확인합니다.