Set or change the pipeline execution mode
You can set the execution mode for your pipeline to specify how multiple executions are handled.
For more information about pipeline execution modes, see How pipeline executions work.
Important
For pipelines in PARALLEL mode, when editing the pipeline execution mode to QUEUED or SUPERSEDED, the pipeline state will not display the updated state as PARALLEL. For more information, see Pipelines changed from PARALLEL mode will display a previous execution mode.
Important
For pipelines in PARALLEL mode, when editing the pipeline execution mode to QUEUED or SUPERSEDED, the pipeline definition for the pipeline in each mode will not be updated. For more information, see Pipelines in PARALLEL mode have an outdated pipeline definition if edited when changing to QUEUED or SUPERSEDED mode.
Important
For pipelines in PARALLEL mode, stage rollback is not available. Similarly, failure conditions with a rollback result type cannot be added to a PARALLEL mode pipeline.
Considerations for viewing execution modes
There are considerations for viewing pipelines in specific execution modes.
For SUPERSEDED and QUEUED modes, use the pipeline view to see in-progress executions, and click the execution ID to view details and history. For PARALLEL mode, click the execution ID to view the in-progress execution on the Visualization tab.
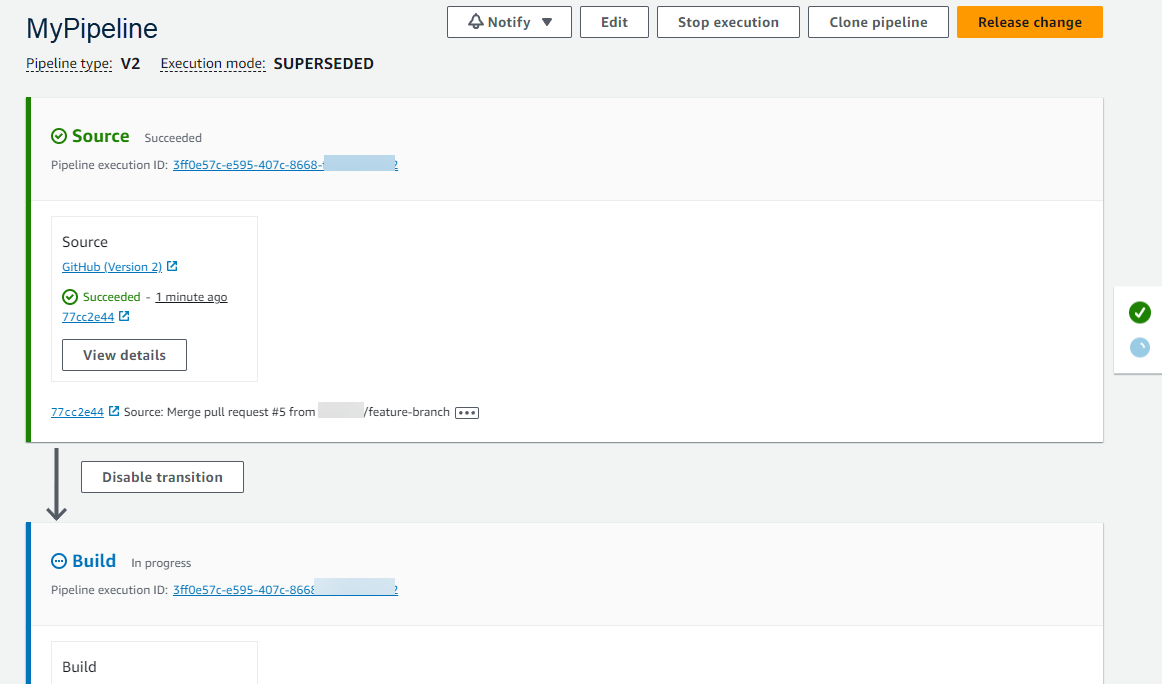
The following shows the view for SUPERSEDED mode in CodePipeline.
The following shows the view for QUEUED mode in CodePipeline.

The following shows the view for PARALLEL mode in CodePipeline.
Important
For pipelines in PARALLEL mode, stage rollback is not available. Similarly, failure conditions with a rollback result type cannot be added to a PARALLEL mode pipeline.

Considerations for switching between execution modes
The following are considerations for pipelines when changing the mode for the pipeline. When switching from one execution mode to another in Edit mode and then saving the change, certain views or states might adjust.
For example, when switching from PARALLEL mode to a QUEUED or SUPERSEDED mode, the execution started in PARALLEL mode will continue to run. These can be viewed on the execution history page. The pipeline view will show the execution that ran on QUEUED or SUPERSEDED mode earlier or an empty state otherwise.
As another example, when switching from QUEUED or SUPERSEDED to PARALLEL mode, you will no longer see the pipeline view/state page. To view an execution in PARALLEL mode, use the visualization tab on the execution details page. Executions started in SUPERSEDED or QUEUED mode will be cancelled.
The following table provides more detail.
| Mode change | Pending and active execution details | Pipeline state details |
|---|---|---|
| SUPERSEDED to SUPERSEDED / SUPERSEDED to QUEUED |
|
The pipeline state, such as cancelled, is preserved between the version of the first mode and the second mode. |
| QUEUED to QUEUED / QUEUED to SUPERSEDED |
|
The pipeline state, such as cancelled, is preserved between the version of the first mode and the second mode. |
| PARALLEL to PARALLEL |
All executions are allowed to run independently of pipeline definition updates. |
Empty. Parallel mode does not have a pipeline state. |
| SUPERSEDED to PARALLEL / QUEUED to PARALLEL |
|
Empty. Parallel mode does not have a pipeline state. |
Set or change the pipeline execution mode (console)
You can use the console to set the pipeline execution mode.
-
Sign in to the AWS Management Console and open the CodePipeline console at http://console.aws.amazon.com/codesuite/codepipeline/home
. The names and status of all pipelines associated with your AWS account are displayed.
-
In Name, choose the name of the pipeline you want to edit.
-
On the pipeline details page, choose Edit.
-
On the Edit page, choose Edit: Pipeline properties.
-
Choose the mode for your pipeline.
-
Superseded
-
Queued (Pipeline type V2 required)
-
Parallel (Pipeline type V2 required)
-
-
On the Edit page, choose Done.
Set the pipeline execution mode (CLI)
To use the AWS CLI to set the pipeline execution mode, use the
create-pipeline or update-pipeline command.
-
Open a terminal session (Linux, macOS, or Unix) or command prompt (Windows) and run the get-pipeline command to copy the pipeline structure into a JSON file. For example, for a pipeline named
MyFirstPipeline, enter the following command:aws codepipeline get-pipeline --nameMyFirstPipeline>pipeline.jsonThis command returns nothing, but the file you created should appear in the directory where you ran the command.
-
Open the JSON file in any plain-text editor and modify the structure of the file to reflect the pipeline execution mode you want to set, such as QUEUED.
"executionMode": "QUEUED"The following example shows how you would set the execution mode to QUEUED in an example pipeline with two stages.
{ "pipeline": { "name": "MyPipeline", "roleArn": "arn:aws:iam::111122223333:role/service-role/AWSCodePipelineServiceRole-us-east-1-dkpippe", "artifactStore": { "type": "S3", "location": "bucket" }, "stages": [ { "name": "Source", "actions": [ { "name": "Source", "actionTypeId": { "category": "Source", "owner": "AWS", "provider": "CodeCommit", "version": "1" }, "runOrder": 1, "configuration": { "BranchName": "main", "OutputArtifactFormat": "CODE_ZIP", "PollForSourceChanges": "true", "RepositoryName": "MyDemoRepo" }, "outputArtifacts": [ { "name": "SourceArtifact" } ], "inputArtifacts": [], "region": "us-east-1", "namespace": "SourceVariables" } ] }, { "name": "Build", "actions": [ { "name": "Build", "actionTypeId": { "category": "Build", "owner": "AWS", "provider": "CodeBuild", "version": "1" }, "runOrder": 1, "configuration": { "ProjectName": "MyBuildProject" }, "outputArtifacts": [ { "name": "BuildArtifact" } ], "inputArtifacts": [ { "name": "SourceArtifact" } ], "region": "us-east-1", "namespace": "BuildVariables" } ] } ], "version": 1, "executionMode": "QUEUED" } } -
If you are working with the pipeline structure retrieved using the get-pipeline command, you must modify the structure in the JSON file. You must remove the
metadatalines from the file so the update-pipeline command can use it. Remove the section from the pipeline structure in the JSON file (the"metadata": { }lines and the"created","pipelineARN", and"updated"fields).For example, remove the following lines from the structure:
"metadata": {
  "pipelineArn": "arn:aws:codepipeline:region:account-ID:pipeline-name",
  "created": "date",
  "updated": "date"
  }
Save the file.
-
To apply your changes, run the update-pipeline command, specifying the pipeline JSON file:
Important
Be sure to include
file://before the file name. It is required in this command.aws codepipeline update-pipeline --cli-input-json file://pipeline.jsonThis command returns the entire structure of the edited pipeline.
Note
The update-pipeline command stops the pipeline. If a revision is being run through the pipeline when you run the update-pipeline command, that run is stopped. You must start the pipeline manually to run that revision through the updated pipeline.
