本文為英文版的機器翻譯版本,如內容有任何歧義或不一致之處,概以英文版為準。
您通常可以在 Amazon Neptune 中調校 Gremlin 查詢,以取得更好的效能,方法是使用從 Neptune explain 和 profile API 取得的報告中可供您使用的資訊 這樣做有助於了解 Neptune 如何處理 Girmlin 周遊。
重要
已在 TinkerPop 3.4.11 版中進行變更,這可提高查詢處理方式的正確性,但目前有時可能會嚴重影響查詢效能。
例如,此類查詢的執行速度可能會明顯變慢:
g.V().hasLabel('airport').
  order().
    by(out().count(),desc).
  limit(10).
  out()
由於 TinkerPop 3.4.11 變更,限制步驟之後的頂點現在會以非最佳方式擷取。若要避免這種情況,您可以在 order().by() 之後的任何點新增 barrier() 步驟來修改查詢。例如:
g.V().hasLabel('airport').
  order().
    by(out().count(),desc).
  limit(10).
  barrier().
  out()
TinkerPop 3.4.11 已在 Neptune 引擎 1.0.5.0 版中啟用。
了解 Neptune 中處理的 Gremlin 周遊
將 Grimlin 周遊傳送至 Neptune 時,有三個主要程序可將周遊轉換為基礎執行計畫,供引擎執行。這些是剖析、轉換和最佳化:
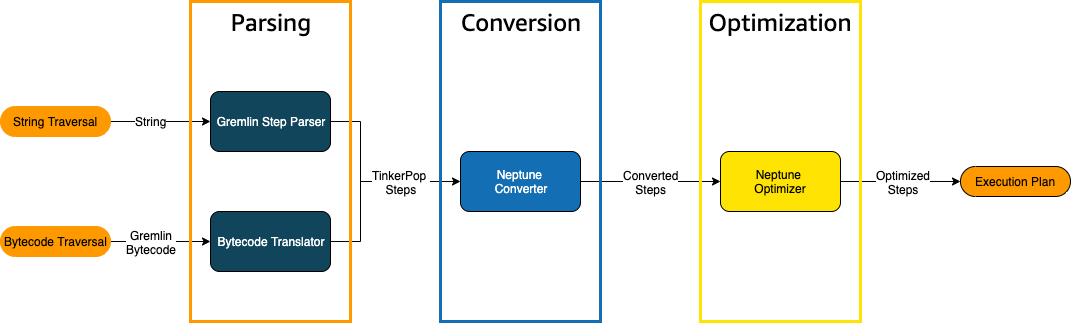
周遊剖析程序
處理周遊的第一步是將其剖析為通用語言。在 Neptune 中,該通用語言是屬於 TinkerPop API
您可以將 Girmlin 周遊傳送至 Neptune 做為字串或位元碼。REST 端點和 Java 用戶端驅動程式 submit() 方法會以字串形式傳送周遊,如以下範例所示:
client.submit("g.V()")
使用 Gremlin 語言變體 (GLV)
周遊轉換程序
處理遍歷的第二步是將其 TinkerPop 步驟轉換為一組已轉換和未轉換的 Neptune 步驟。Apache TinkerPop Grimlin 查詢語言中的大部分步驟都會轉換為 Neptune 特定的步驟,這些步驟會進行最佳化,以在基礎 Neptune 引擎上執行。在周遊中遇到沒有 Neptune 對等項目的 TinkerPop 步驟時,該步驟和周遊中的所有後續步驟都會由 TinkerPop 查詢引擎處理。
如需在哪些情況下可轉換哪些步驟的詳細資訊,請參閱 Gremlin 步驟支援。
周遊最佳化程序
周遊處理中的最後一步是透過最佳化工具執行一系列已轉換和未轉換的步驟,以嘗試確定最佳執行計畫。此最佳化的輸出是 Neptune 引擎所處理的執行計畫。
使用 Neptune Gremlin explain API 來調校查詢
Neptune Explain API 與 Gremlin explain() 步驟不同。它會傳回 Neptune 引擎在執行查詢時將處理的最終執行計畫。因為它不會執行任何處理,所以不論使用哪些參數,都會傳回相同的計畫,而且其輸出不包含任何有關實際執行的統計資料。
考慮以下簡單的周遊,尋找安克拉治的所有機場頂點:
g.V().has('code','ANC')
有兩種方法,您可以透過 Neptune explain API 執行此周遊。第一種方法是對 Explain 端點進行 REST 呼叫,如下所示:
curl -X POST https://your-neptune-endpoint:port/gremlin/explain -d '{"gremlin":"g.V().has('code','ANC')"}'
第二種方法是搭配 explain 參數使用 Neptune 工作台的 %%gremlin 儲存格魔法。這會將儲存格本文中包含的周遊傳遞至 Neptune explain API,然後在您執行儲存格時顯示產生的輸出:
%%gremlin explain

g.V().has('code','ANC')
產生的 explain API 輸出描述了 Neptune 針對周遊的執行計畫。如您在下圖中所見,該計畫包含了處理管道中 3 個步驟中的每個步驟:

透過查看未轉換的步驟來調校周遊
要在 Neptune explain API 輸出中尋找的其中一個首要項目是未轉換為 Neptune 原生步驟的 Gremlin 步驟。在查詢計畫中,當遇到無法轉換為 Neptune 原生步驟的步驟時,它和計畫中的所有後續步驟都會由 Gramlin 伺服器處理。
在上面的範例中,已轉換周遊中的所有步驟。讓我們檢查這個周遊的 explain API 輸出:
g.V().has('code','ANC').out().choose(hasLabel('airport'), values('code'), constant('Not an airport'))
如您在下圖中所見,Neptune 無法轉換 choose() 步驟:
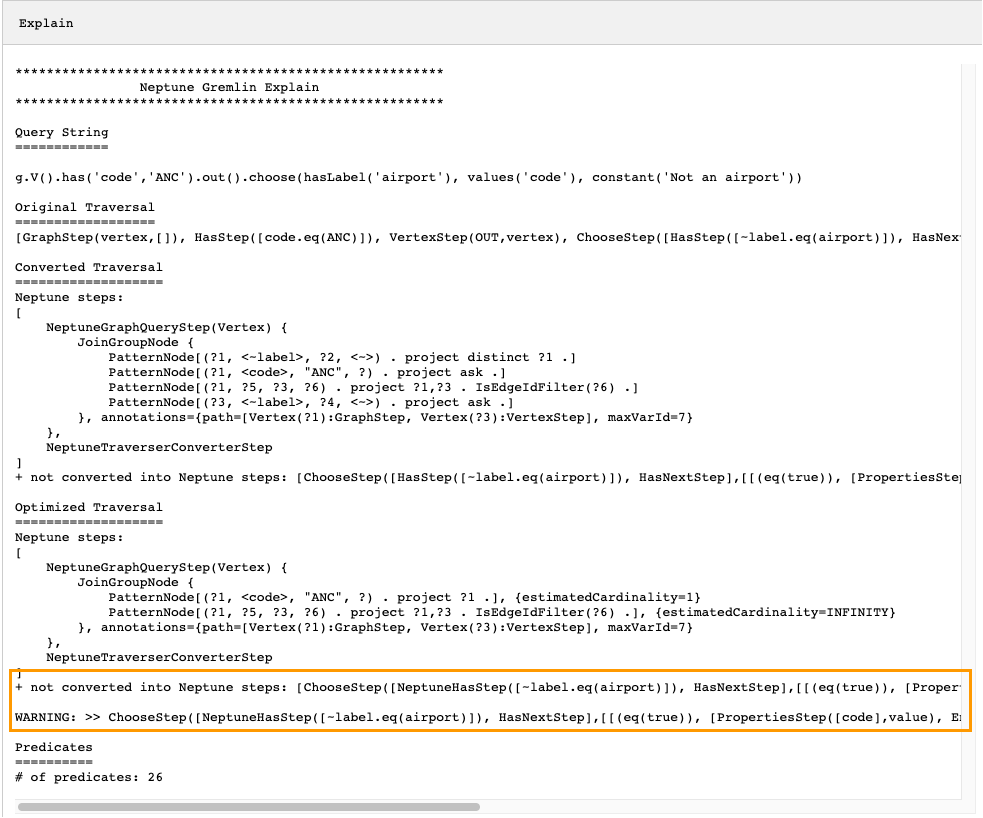
您可以做幾件事來調校周遊的效能。第一件事是以這樣的方式重寫它,以消除無法轉換的步驟。另一件事是將步驟移至周遊尾端,以便所有其他步驟都可以轉換為原生步驟。
具有未轉換之步驟的查詢計畫並不一定需要調校。如果無法轉換的步驟位於周遊尾端,並且與輸出的格式化方式相關,而不是圖形的周遊方式,它們可能對效能沒有什麼影響。
在檢查來自 Neptune explain API 的輸出時要尋找的另一件事物是未使用索引的步驟。以下周遊會尋找有航班降落在安克拉治的所有機場:
g.V().has('code','ANC').in().values('code')
來自 Explain API 針對此周遊的輸出是:
*******************************************************
                Neptune Gremlin Explain
*******************************************************

Query String
============

g.V().has('code','ANC').in().values('code')

Original Traversal
==================
[GraphStep(vertex,[]), HasStep([code.eq(ANC)]), VertexStep(IN,vertex), PropertiesStep([code],value)]

Converted Traversal
===================
Neptune steps:
[
    NeptuneGraphQueryStep(PropertyValue) {
        JoinGroupNode {
            PatternNode[(?1, <~label>, ?2, <~>) . project distinct ?1 .]
            PatternNode[(?1, <code>, "ANC", ?) . project ask .]
            PatternNode[(?3, ?5, ?1, ?6) . project ?1,?3 . IsEdgeIdFilter(?6) .]
            PatternNode[(?3, <~label>, ?4, <~>) . project ask .]
            PatternNode[(?3, ?7, ?8, <~>) . project ?3,?8 . ContainsFilter(?7 in (<code>)) .]
        }, annotations={path=[Vertex(?1):GraphStep, Vertex(?3):VertexStep, PropertyValue(?8):PropertiesStep], maxVarId=9}
    },
    NeptuneTraverserConverterStep
]

Optimized Traversal
===================
Neptune steps:
[
    NeptuneGraphQueryStep(PropertyValue) {
        JoinGroupNode {
            PatternNode[(?1, <code>, "ANC", ?) . project ?1 .], {estimatedCardinality=1}
            PatternNode[(?3, ?5, ?1, ?6) . project ?1,?3 . IsEdgeIdFilter(?6) .], {estimatedCardinality=INFINITY}
            PatternNode[(?3, ?7=<code>, ?8, <~>) . project ?3,?8 .], {estimatedCardinality=7564}
        }, annotations={path=[Vertex(?1):GraphStep, Vertex(?3):VertexStep, PropertyValue(?8):PropertiesStep], maxVarId=9}
    },
    NeptuneTraverserConverterStep
]

Predicates
==========
# of predicates: 26

WARNING: reverse traversal with no edge label(s) - .in() / .both() may impact query performance
因為無法使用 Neptune 維護的 3 個索引之一,處理周遊中的 in() 步驟,所以輸出底部出現 WARNING 訊息 (請參閱 陳述式在 Neptune 中如何編製索引 和 Neptune 中的 Gremlin 陳述式)。因為 in() 步驟沒有包含任何邊緣篩選條件,所以無法使用 SPOG、POGS 或 GPSO 索引來剖析它。相反地,Neptune 必須執行聯合掃描以尋找請求的頂點,效率要低得多。
在此情況下,有兩種方法可以調校周遊。第一種方法是將一或多個篩選條件新增至 in() 步驟,以便可以使用已編製索引的查詢來剖析查詢。對於上面範例,這可能是:
g.V().has('code','ANC').in('route').values('code')
來自 Neptune explain API 針對已修訂周遊的輸出不再包含 WARNING 訊息:
*******************************************************
                Neptune Gremlin Explain
*******************************************************

Query String
============

g.V().has('code','ANC').in('route').values('code')

Original Traversal
==================
[GraphStep(vertex,[]), HasStep([code.eq(ANC)]), VertexStep(IN,[route],vertex), PropertiesStep([code],value)]

Converted Traversal
===================
Neptune steps:
[
    NeptuneGraphQueryStep(PropertyValue) {
        JoinGroupNode {
            PatternNode[(?1, <~label>, ?2, <~>) . project distinct ?1 .]
            PatternNode[(?1, <code>, "ANC", ?) . project ask .]
            PatternNode[(?3, ?5, ?1, ?6) . project ?1,?3 . IsEdgeIdFilter(?6) . ContainsFilter(?5 in (<route>)) .]
            PatternNode[(?3, <~label>, ?4, <~>) . project ask .]
            PatternNode[(?3, ?7, ?8, <~>) . project ?3,?8 . ContainsFilter(?7 in (<code>)) .]
        }, annotations={path=[Vertex(?1):GraphStep, Vertex(?3):VertexStep, PropertyValue(?8):PropertiesStep], maxVarId=9}
    },
    NeptuneTraverserConverterStep
]

Optimized Traversal
===================
Neptune steps:
[
    NeptuneGraphQueryStep(PropertyValue) {
        JoinGroupNode {
            PatternNode[(?1, <code>, "ANC", ?) . project ?1 .], {estimatedCardinality=1}
            PatternNode[(?3, ?5=<route>, ?1, ?6) . project ?1,?3 . IsEdgeIdFilter(?6) .], {estimatedCardinality=32042}
            PatternNode[(?3, ?7=<code>, ?8, <~>) . project ?3,?8 .], {estimatedCardinality=7564}
        }, annotations={path=[Vertex(?1):GraphStep, Vertex(?3):VertexStep, PropertyValue(?8):PropertiesStep], maxVarId=9}
    },
    NeptuneTraverserConverterStep
]

Predicates
==========
# of predicates: 26
如果您正在執行許多此類周遊,則另一個選項是在已啟用選用 OSGP 索引的 Neptune 資料庫叢集中執行它們 (請參閱 啟用 OSGP 索引)。啟用 OSGP 索引有缺點:
在載入任何資料之前,必須在資料庫叢集中啟用它。
頂點和邊緣的插入速率可能會降低多達 23%。
儲存體用量將增加 20% 左右。
將請求分散到所有索引的讀取查詢可能會增加延遲。
有一個 OSGP 索引對於一組受限制的查詢模式很有意義,但除非您經常執行這些模式,否則通常最好嘗試確保您撰寫的周遊可以使用三個主要索引來剖析。
使用大量述詞
Neptune 會將圖形中的每個邊緣標籤和每個不同的頂點或邊屬性名稱視為述詞,並且根據預設,設計為使用相當少量的不同述詞。當您的圖形資料中有幾千個以上的述詞時,效能可能會降低。
若是這種情況,Neptune explain 輸出將會警告您:
Predicates
==========
# of predicates: 9549
WARNING: high predicate count (# of distinct property names and edge labels)
如果不方便重新設計資料模型以減少標籤和屬性的數目,從而減少述詞的數目,則調校周遊的最佳方法是在已啟用 OSGP 索引的資料庫叢集中執行它們,如上所述。
使用 Neptune Gremlin profile API 來調校周遊
Neptune profile API 與 Gremlin profile() 步驟有很大不同。與 explain API 一樣,其輸出包含 Neptune 引擎在執行周遊時使用的查詢計畫。此外,鑑於其參數的設定方式,profile 輸出還包括周遊的實際執行統計資料。
再次採取簡單的周遊,尋找安克拉治的所有機場頂點:
g.V().has('code','ANC')
與 explain API 一樣,您可以使用 REST 呼叫來調用 profile API:
curl -X POST https://your-neptune-endpoint:port/gremlin/profile -d '{"gremlin":"g.V().has('code','ANC')"}'
您也可以搭配 profile 參數使用 Neptune 工作台的 %%gremlin 儲存格魔法。這會將儲存格本文中包含的周遊傳遞至 Neptune profile API,然後在您執行儲存格時顯示產生的輸出:
%%gremlin profile

g.V().has('code','ANC')
產生的 profile API 輸出包含 Neptune 對周遊的執行計畫,以及有關計劃執行的統計資料,如您在下圖所見:

在 profile 輸出中,執行計畫區段僅包含周遊的最終執行計畫,而不包含中繼步驟。管道區段包含已執行的實體管道操作,以及周遊執行所花費的實際時間 (以毫秒為單位)。執行期指標在比較兩個不同版本的周遊在您最佳化它們時所花費的時間非常有用。
注意
周遊的初始執行期通常比後續執行期長,因為第一個執行期會導致快取相關資料。
profile 輸出的第三個區段包含執行統計資料和周遊的結果。若要了解此資訊在調校周遊時如何有用,請考慮以下周遊,它會尋找名稱以 "Anchora" 開頭的每個機場,以及從這些機場二趟短航程即可到達的所有機場,同時傳回機場代碼、航線和距離:
%%gremlin profile

g.withSideEffect("Neptune#fts.endpoint", "{your-OpenSearch-endpoint-URL").
    V().has("city", "Neptune#fts Anchora~").
    repeat(outE('route').inV().simplePath()).times(2).
    project('Destination', 'Route').
        by('code').
        by(path().by('code').by('dist'))
Neptune profile API 輸出中的周遊指標
所有 profile 輸出中可用的第一組指標是周遊指標。這些類似於 Gemlin profile() 步驟指標,但有一些差異:
Traversal Metrics
=================
Step                                                               Count  Traversers       Time (ms)    % Dur
-------------------------------------------------------------------------------------------------------------
NeptuneGraphQueryStep(Vertex)                                       3856        3856          91.701     9.09
NeptuneTraverserConverterStep                                       3856        3856          38.787     3.84
ProjectStep([Destination, Route],[value(code), ...                  3856        3856         878.786    87.07
  PathStep([value(code), value(dist)])                              3856        3856         601.359
                                            >TOTAL                     -           -        1009.274        -
周遊指標資料表的第一個資料行列出周遊所執行的步驟。前兩個步驟通常是 Neptune 特定的步驟,即 NeptuneGraphQueryStep 和 NeptuneTraverserConverterStep。
NeptuneGraphQueryStep 代表可由 Neptune 引擎以原生方式轉換和執行之周遊整個部分的執行時間。
NeptuneTraverserConverterStep 代表將那些轉換後步驟的輸出轉換為 TinkerPop 周遊器的過程,這些周遊器允許處理無法轉換的步驟 (如果有的話),或以 TinkerPop 相容格式傳回結果。
在上述範例中,我們有幾個未轉換的步驟,因此看到這些 TinkerPop 步驟 (ProjectStep、PathStep) 的每一個隨後以資料列形式出現在資料表中。
資料表中的第二個資料行 (Count) 會報告已通過步驟的「代表」周遊器數目,而第三個資料行 (Traversers) 會報告已通過該步驟的周遊器數目,如 TinkerPop 設定檔步驟文件
在我們的範例中,有 3,856 個頂點和 3,856 個由 NeptuneGraphQueryStep 傳回的周遊,並且這些數目在整個剩餘處理過程中保持不變,因為 ProjectStep 和 PathStep 正在格式化結果,而不是篩選它們。
注意
與 TinkerPop 不同,Neptune 引擎不會透過其 NeptuneGraphQueryStep 和 NeptuneTraverserConverterStep 步驟中的「大量處理」來最佳化效能。大量處理是結合相同頂點上周遊器以減少操作負荷的 TinkerPop 操作,也是導致 Count 和 Traversers 數字不同的原因。因為大量處理只發生在 Neptune 委派給 TinkerPop 的步驟中,而不是發生在 Neptune 原生處理的步驟中,因此 Count 和 Traverser 資料行很少不同。
時間資料行會報告步驟所花費的毫秒數,而 % Dur 資料行則報告步驟所花費的總處理時間百分比。這些指標會透過顯示花費最多時間的步驟,告訴您將調校工作集中在哪裡。
Neptune profile API 輸出中的索引操作指標
Neptune 設定檔 API 輸出中的另一組指標是索引操作:
Index Operations
================
Query execution:
    # of statement index ops: 23191
    # of unique statement index ops: 5960
    Duplication ratio: 3.89
    # of terms materialized: 0
這些報告:
索引查閱的總數。
已執行的唯一索引查詢數目。
索引查詢總數與唯一索引查詢數目的比率。較低的比率指示較少的冗餘。
從字詞字典具體化的字詞數目。
Neptune profile API 輸出中的重複指標
如果您的周遊使用上述範例中的 repeat() 步驟,則輸出中會出現包含重複指標的區段:profile
Repeat Metrics
==============
Iteration  Visited   Output    Until     Emit     Next
------------------------------------------------------
        0        2        0        0        0        2
        1       53        0        0        0       53
        2     3856     3856     3856        0        0
------------------------------------------------------
              3911     3856     3856        0       55
這些報告:
資料列的迴圈計數 (
Iteration資料行)。迴圈造訪的元素數目 (
Visited資料行)。迴圈輸出的元素數目 (
Output資料行)。迴圈輸出的最後一個元素 (
Until資料行)。迴圈發出的元素數目 (
Emit資料行)。從迴圈傳遞至後續迴圈的元素數目 (
Next資料行)。
這些重複指標對於理解周遊的分支因素非常有幫助,如此可讓您開始了解資料庫正在完成多少工作。您可以使用這些數字來診斷效能問題,尤其是當相同的周遊搭配不同的參數執行有很大不同時。
Neptune profile API 輸出中的全文搜尋指標
當周遊使用全文搜尋查詢 (如上述範例所示) 時,包含全文搜尋 (FTS) 指標的區段會出現在 profile 輸出中。
FTS Metrics
==============
SearchNode[(idVar=?1, query=Anchora~, field=city) . project ?1 .],
    {endpoint=your-OpenSearch-endpoint-URL, incomingSolutionsThreshold=1000, estimatedCardinality=INFINITY,
    remoteCallTimeSummary=[total=65, avg=32.500000, max=37, min=28],
    remoteCallTime=65, remoteCalls=2, joinTime=0, indexTime=0, remoteResults=2}

    2 result(s) produced from SearchNode above
這會顯示傳送至 ElasticSearch (ES) 叢集的查詢,並報告與 ElasticSearch 互動的數個指標,這些指標可以協助您找出與全文搜尋相關的效能問題:
-
關於呼叫 ElasticSearch 索引的摘要資訊:
所有 RemoteCall 滿足查詢所需的毫秒總數 (
total)。在 remoteCall 中花費的平均毫秒數 (
avg)。在 remoteCall 中花費的毫秒數下限 (
min)。在 remoteCall 中花費的毫秒數上限 (
max)。
對 ElasticSearch 進行 remoteCall 所耗費的總時間 (
remoteCallTime)。對 ElasticSearch 進行的 remoteCall 數目 (
remoteCalls)。聯結 ElasticSearch 結果所花費的毫秒數 (
joinTime)。進行索引查詢所花費的毫秒數 (
indexTime)。ElasticSearch 傳回的結果總數 (
remoteResults)。
