Tagging an Amazon Connect
instance
Instance Tagging provides the ability for you to tag Amazon Connect instances and build tailored authorization through tag-based access control (TBAC). To help you manage your Amazon Connect instances, you can assign your own metadata in the form of tags to the instance. If you have multiple Amazon Connect instances in a single AWS account, each serving different functions or catering to specific lines of business, using tags can help you better organize and apply tag-based access control (TBAC) policies to these instances for improved management and control.
AWS Tags serve as a useful tool for organizing your AWS resources. They consist of key-value pairs that help you categorize resources based on criteria like purpose, owner, or environment. This enables you to identify and manage your resources. Amazon Connect, allows you to add tags to your instances directly from the AWS console, or by utilizing public APIs.
Tagging Amazon Connect
instances at creation
-
Open the Amazon Connect console at https://console.aws.amazon.com/connect/
. -
Choose Add an instance.

-
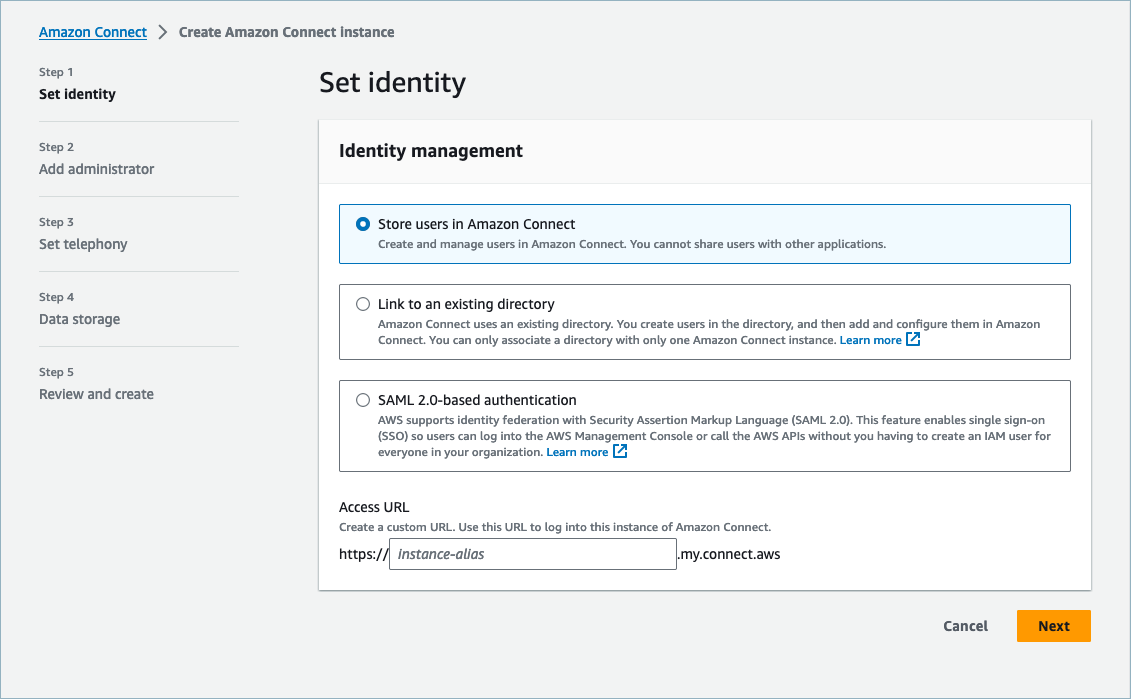
Under Set identity, select the type of Identity management that you would like to use, enter a customer Access URL, and choose Next.

-
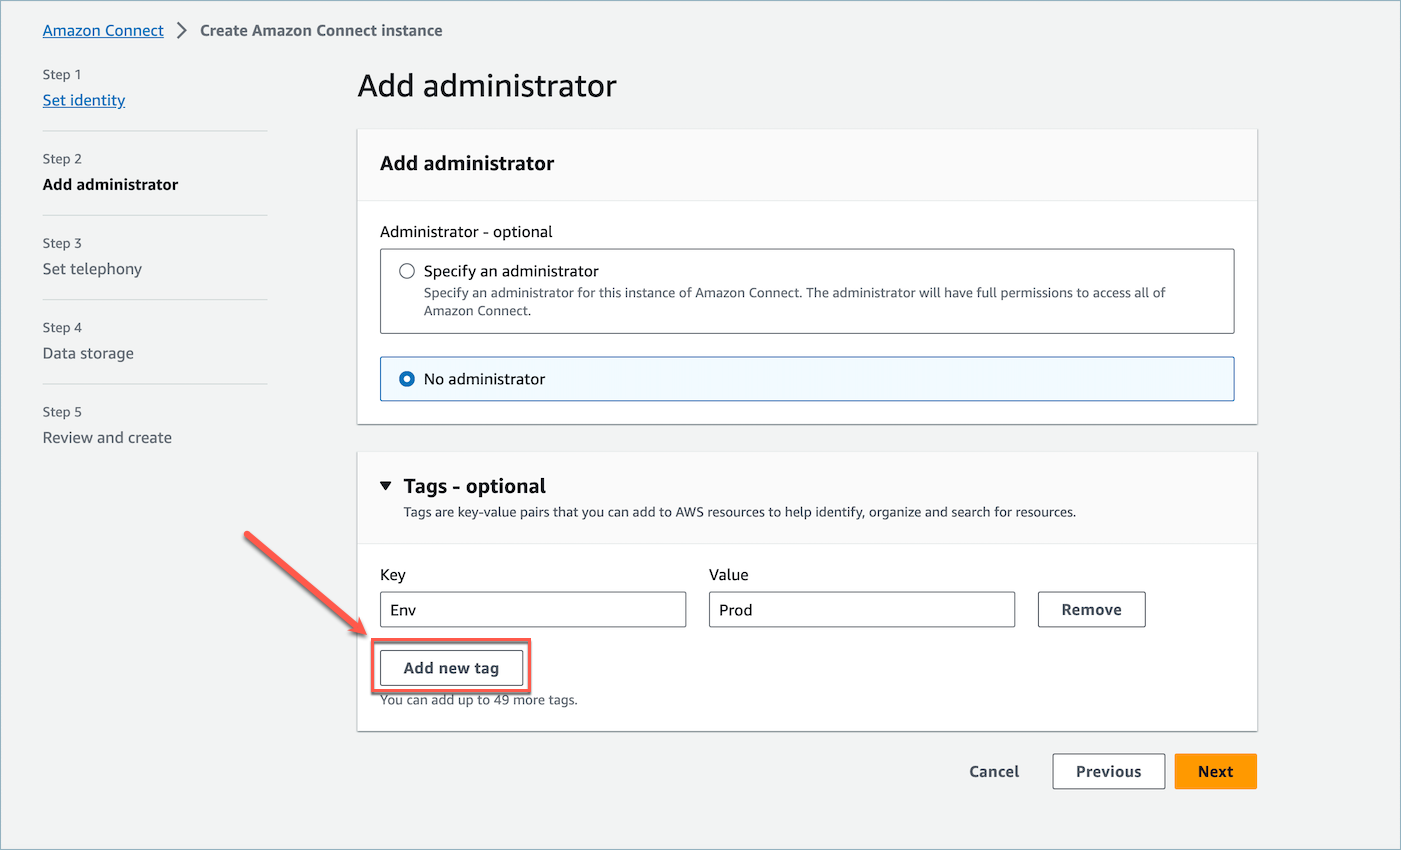
Under the Add administrator section, you can choose the Add new tag option if you would like to add tags to your instance.

-
Enter a
KeyandValuepair and choose Next. -
Once you have made your desired configurations under the Set telephony and Data storage steps, review your configurations and choose Create instance.

-
Once the instance has been created, navigate to the Account overview page of the instance and the tags that you added will appear in the Tags section.

Tagging an existing Amazon Connect instance
-
Open the Amazon Connect console at https://console.aws.amazon.com/connect/
. -
Select an existing instance that you would like to add tags too.

-
On the Account overview, choose Add new tag.

-
Enter a
KeyandValuepair and choose Next. You can add up to 50 tags on a single instance.
-
Choose Save to add your tags to your instance.

Tagging an Amazon Connect
instance using the API
To tag Amazon Connect instances using the public APIs, see TagResource and UntagResource.
Sample IAM policies
for scenarios with and without instance tags
For TBAC on instances, you can define IAM policies based on instance tags and assign them to IAM roles to control access to specific instances. The following are sample scenarios and sample IAM policies for how to use conditions on tags or conditions on resource IDs.
Scenario 1: Controlling access to a specific
Amazon Connect instance through an IAM role using tags associated with the instance. The following
policy allows access only to instances which are tagged with
key:Environment and value:Dev.
{
  "Version": "2012-10-17",
  "Statement": [
    {
      "Effect": "Allow",
      "Action": "connect:*",
      "Resource": "*",
      "Condition": {
        "StringEquals": {
          "aws:ResourceTag/Environment": "Dev"
        }
      }
    },
    {
      "Effect": "Deny",
      "Action": "connect:*",
      "Resource": "*",
      "Condition": {
        "StringNotEquals": {
          "aws:ResourceTag/Environment": "Dev"
        }
      }
    }
  ]
}
Scenario 2: Controlling access to a specific instance and all resources within the instance without using tags.
{
    "Version": "2012-10-17",
    "Statement": [
        {
            "Sid": "VisualEditor0",
            "Effect": "Allow",
            "Action": "connect:*",
            "Resource": "*",
            "Condition": {
                "ForAnyValue:StringEquals": {
                    "connect:InstanceId": [
                        "868722ed-3b3b-42b0-a639-b11052ab2851", //Allowing all connect actions on these instances
                        "f28afebb-613a-4f88-bc09-00becc6e171f"
                    ]
                }
            }
        },
        {
            "Sid": "VisualEditor1",
            "Effect": "Deny",
            "Action": "connect:*",
            "Resource": "*",
            "Condition": {
                "ForAnyValue:StringEquals": {
                    "connect:InstanceId": "dd57837f-d4c0-49f3-88bd-b37a1fe7bd75" //Denying all connect actions on these instances
                }
            }
        }
    ]
}
Additional information
about instance tagging
Replicating instances: When you create a replica of your existing Amazon Connect instance to another region using the ReplicateInstance API, tags from the source instance will not be automatically tagged to the newly replicated instance. You will have to tag the replicated instance manually.
Tag inheritance: When you tag an Amazon Connect instance, all underlying resources in Amazon Connect, such as routing profiles, queues, will not inherit the instance tags. To learn how to control granular access to specific resources in Amazon Connect, see how to configure more granular access by using tag-based access control.