Create an IT help desk in Amazon Connect
This tutorial shows you how to create an IT Help Desk. It shows how to create an Amazon Lex bot that finds out why the customer is calling. You next create a flow to use the customer's input to route them to the right queue.
Prerequisite
This tutorial is part of a series. If you performed Tutorial 1, you're ready to go. If not, here's what you need:
-
An AWS account
-
A configured Amazon Connect instance
-
An Amazon Connect administrative account
-
A claimed phone number
Contents
Step 1: Create an Amazon Lex
bot
Bots provide an efficient way to offload repetitive tasks from your agents. This tutorial shows how to use the bot to find out why customers are calling the IT Help Desk. Later, we use the customer's response to route them to the right queue.
In previous tutorials, you used the Amazon Connect console. In this tutorial to set up a bot, you use the Amazon Lex console.
This step has five parts to it.
Part 1: Create an Amazon Lex bot
This step assumes it's the first time you've opened the Amazon Lex console. If you've created a Amazon Lex bot before, your steps differ slightly from the ones in this section.
-
Choose the following link to open the Amazon Lex console, or enter the URL in your web browser: https://console.aws.amazon.com/lex/
. -
If this is the first time you've created Amazon Lex bot, choose Get Started. Otherwise, you're already in the Amazon Lex dashboard.

-
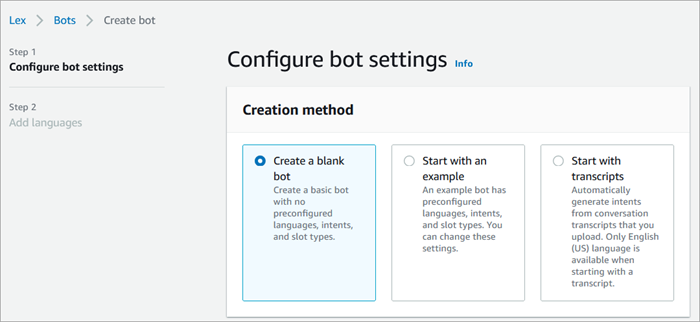
Choose Create a blank bot.
-
Enter the following information:
-
Bot name — For this tutorial, name the bot HelpDesk.

-
IAM permissions: Choose Create a role with basic Amazon Lex permissions.

-
COPPA— Choose whether the bot is subject to the Children's Online Privacy Protection Act
. -
Idle session timeout— Choose how long the bot should wait to get input from a caller before ending the session.
-
-
Choose Next.
-
On the Add language to bot page, choose the language and voice for your bot to use when speaking to callers. The default voice for Amazon Connect is Joanna.

-
Choose Done.
Go to Part 2: Add intents to your Amazon Lex bot.
Part 2: Add intents to your Amazon Lex bot
An intent is the action the user wants to perform. In this part, add two intents to the bot. Each intent represents a reason that users call the Help Desk: password reset and network issues.
-
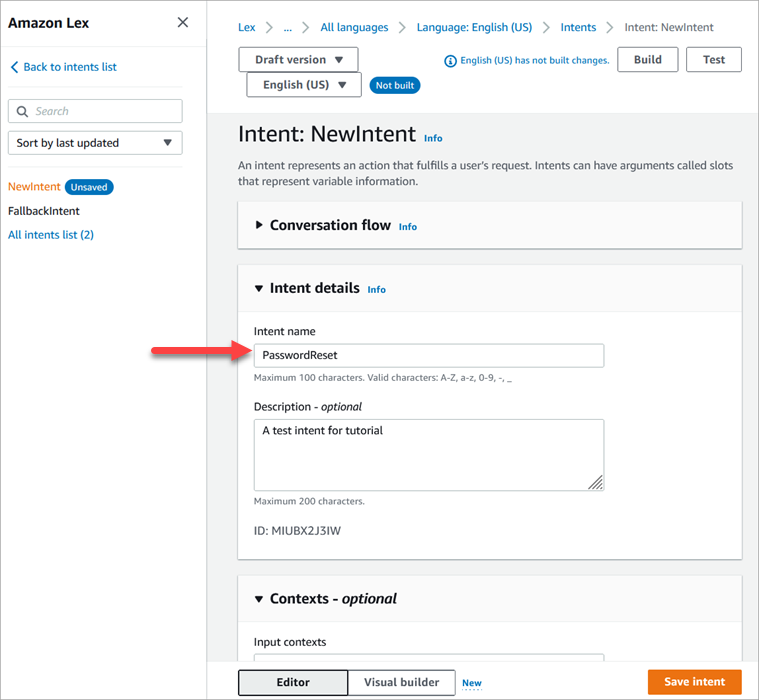
In the Amazon Lex console, in the Intent details section, enter PasswordReset as the name of your intent.
-
Scroll to the Sample utterances section.

-
Type I forgot my password, and then choose Add utterance. Then add reset my password and choose Add utterance again.
-
Choose Save intent.
-
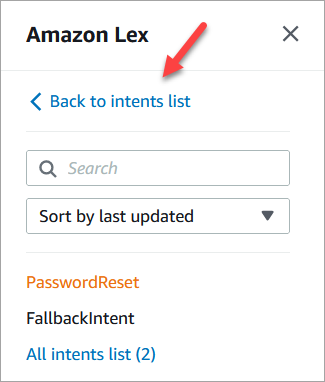
On the left navigation menu, choose All intents list.
-
On the left navigation menu, choose Back to intents list.
-
Choose Add intent, Add empty intent, and assign the name NetworkIssue. Scroll down the page and add the following sample utterances:
-
I can't access the internet
-
my email is down
-
When you're done, go to Part 3: Build and test the Amazon Lex bot.
Part 3: Build and test the Amazon Lex bot
Build and test your bot to make sure that it works as intended before you publish it.
-
In the Amazon Lex console, choose Build. The build may take a minute or two.

-
When it's finished building, choose Test.
-
Test the PasswordReset intent. In the Test Draft version pane, type I forgot my password, and press Enter.

-
The verification looks like what's shown in the following image.

-
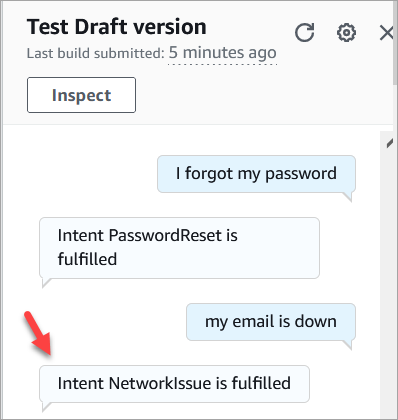
To confirm that the NetworkIssue intent is working, type my email is down. The verification looks like what's shown in the following image.
Go to Step 2: Add permissions to Amazon Lex bot.
Step 2: Add permissions to Amazon Lex
bot
To use a bot in your flow, add it to your Amazon Connect instance.
-
Open the Amazon Connect console (https://console.aws.amazon.com/connect/).
-
Choose the name of the instance that you created.

-
Do not log in on the name page (this method of logging in is for emergency access only). Rather, choose Flows.

-
Under Amazon Lex, use the drop-down arrow to choose HelpDesk. Under Alias, choose TestBotAlias, and then choose + Add Lex Bot, and then choose Add Amazon Lex Bot.

-
When you're done, choose Amazon Connect to navigate back to instances page.

-
Choose the access URL of your instance.

The Access URL takes you back to the Amazon Connect dashboard.
Step 3: Set up routing
In this step, you start at the Amazon Connect console for your instance. This step shows how to set up your queues, create a routing profile, and then assign your user account to the profile.
-
On the navigation menu, go to Routing, Queues.

-
Choose Add queue.

-
Complete the Add queue page, as shown in the following image, to add a queue named PasswordReset. When done, choose Save.

The following image shows the Settings section of the Add queue page. Add your default caller ID name and outbound caller ID number.

For the purposes of this tutorial, leave the following empty: Outbound whisper flow, Quick connect, and Maximum contact in queue.
-
Add a queue named NetworkIssue. Complete the Add queue page like you did for the PasswordReset queue.
When done, you'll have three queues.

-
On the navigation menu, go to Users, Routing Profiles.

-
Choose Add routing profile.

-
Assign a name to the new profile (for example, Test routing profile). Enter a description, select Voice, Chat, and set Maximum chats to 1.

-
In the Queues section, use the drop-down arrow to search for the queues you just created. Choose NetworkIssue, select Voice and Chat. Choose Add Queue.

-
Add the PasswordReset queue. Select Voice and Chat, and then choose Save.
-
Under Default outbound queue, use the drop-down arrow to choose BasicQueue.

-
When done, scroll to the top of the page, and choose Save to save the profile.
-
On the navigation menu, go to Users, User management.

-
On the User management page, select your login name.
-
On the Edit page, in the Settings section, in the Routing profile dropdown menu, choose the routing profile you created, for example, Test routing profile. Choose Save.

Routing is all set up and ready to go.
Step 4: Create a contact flow
Although Amazon Connect comes with a set of built-in flows, you can create your own flows to determine how a customer experiences your contact center. The flows contain the prompts that customers hear or see, and they transfer them to the right queue or agent, among other things.
In this step, create a flow that's specific to the IT Help Desk experience that you're creating.
-
On the Amazon Connect navigation menu, go to Routing, Flows.

-
Choose Create flow.

-
The flow designer opens. Enter a name for the flow, such as Test flow.

-
Use the search box to search for the following block, and drag them onto the grid: Set logging behavior, Set voice, and Play prompt.

-
Use your mouse to drag an arrow from the Entry block to the Set logging behavior block.

-
Connect the remaining blocks, as shown in the following image.

-
Choose the Play prompt title to open its properties page.

-
Configure the Play prompt block, as shown in the following image, and then choose Save. Choose Text-to-speech or chat text, choose Set manually, enter Welcome to the IT Help desk.

-
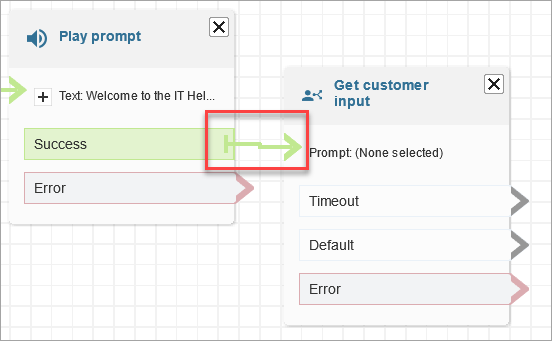
Add a Get customer input block and connect to the Play prompt block.
-
Choose the title of the Get customer input block to open the properties page.

-
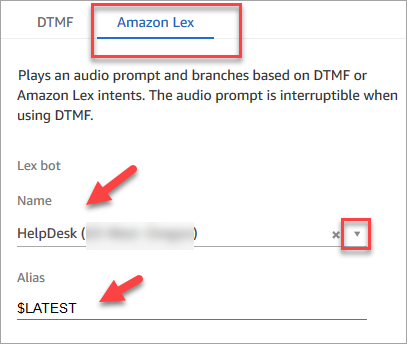
Configure the Get customer input block, as shown in the following images. Choose Text-to-speech or chat text, Set manually, and enter How can I help in the text box. Set the Interpret as dropdown box to Text.

The following image shows the Amazon Lex tab. Choose the name of your Amazon Lex bot from the dropdown list. For Alias enter $LATEST.
-
While still in the Get customer input block, choose Add an intent.

-
Enter the names of the intents that you created in the Amazon Lex bot, such as PasswordReset and NetworkIssue. They are case sensitive!

-
Choose Save.
-
Add a Play prompt block and connect it to the PasswordReset branch.
-
Choose the Play prompt title to open its properties page. Configure the Play prompt block with the message We're putting you in a queue to help you with password reset. Choose Save.
-
Add a second Play prompt block and connect it to the NetworkIssue branch.
-
Choose the Play prompt title to open its properties page. Configure the Play prompt block with the message We're putting you in a queue to help you with your network issues. Choose Save.
-
Add a Disconnect / hang up block to the grid. Connect the Default and Error branches to it.
-
Add a Set working queue block to the grid. Connect the Play prompt block for PasswordReset.

-
Choose the Set working queue title to open its properties page. Configure the Set working queue block by using the drop-down arrow to choose the PasswordReset queue. Choose Save

-
Add a Set working queue block for NetworkIssue, and configure it with the NetworkIssue queue.

-
Drag two Transfer to queue blocks (from the Terminate/Transfer group) onto the grid.
-
Connect each of the Set working queue blocks to a Transfer to queue block.
-
Drag another Disconnect/hang up block onto the grid. Connect all of the remaining Error and At capacity branches to it.
-
The completed flow looks similar to the following image.

-
Choose Save, and then choose Publish.

Tip
Any blocks that aren't connected or configured correctly generate an error. If this happens, double-check that all branches are connected.
-
When the flow publishes, it displays the message that it saved successfully.

If the flow doesn't save, double-check that all the branches are connected to blocks. That's the most common reason flows don't publish.
Step 5: Assign the contact
flow to the phone number
-
On the navigation menu, go to Channels, Phone Numbers.
-
On the Manage Phone numbers page, choose your phone number.

-
Use the drop-down box to choose the flow you just created, and then choose Save.

Everything is all set up! Now you're ready to test your IT Help Desk. Continue on to Step 6: Test a custom voice and chat experience.
Step 6: Test a custom voice and chat
experience
You're ready to try out the Amazon Lex bot, routing, and flow. The first step is to tell Amazon Connect which flow you want to test.
-
On the navigation menu, go to the Dashboard and choose Test chat.
-
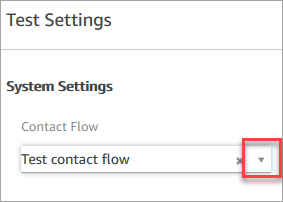
Choose Test Settings.

-
Use the drop-down box to choose the flow you created, for example, Test flow. Choose Apply.
Test a custom chat experience
-
If needed, choose the chat bubble to start a chat.

-
Amazon Connect automatically detects a contact and runs the flow that you created. It displays messages from the flow.

-
Enter that you need help resetting a password. Then accept the incoming chat. The following image shows you what the chat and agent interfaces look like when you're trying them.

-
In the customer pane on the right, choose End chat to close the chat window.
-
In the test CCP, choose Close contact to end the After Contact Work (ACW).
Test a custom voice experience
-
If the test chat window is still open, choose End chat to close it. Then you can try the voice experience.
-
Call your phone number.
-
When prompted, say I'm having trouble accessing the internet. You should hear the message that you're being transferred to the NetworkIssue queue.
Tip
After you're transferred, you'll hear this message:
Thank you for calling. Your call is very important to us and will be answered in the order it was received.
This message is generated by a default flow named Default customer queue.
-
Switch to the test CCP and accept the incoming call.
-
After you accept the call, but before you're connected to the customer, you'll hear an inbound whisper stating what queue the contact is in, for example, NetworkIssue. This helps you know what the customer is calling about.
The inbound whisper is generated by a default flow named Default agent whisper.
-
When done, end the call.
-
In the CCP, choose Clear contact to end After Contact Work (ACW).
Congratulations! You built and tested an omnichannel IT Help Desk that leverages Amazon Lex and offers customers both chat and voice.
Tip
If you don't want to keep the phone number that you claimed for testing, you can release it back to inventory. For instructions, see Release a phone number from Amazon Connect back to inventory.